
English Manual
Page 3
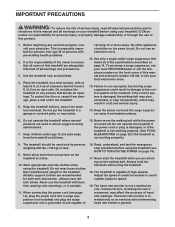
... air openings. Never move the walking belt while the power is capable of high speeds. Never allow more amps. When connecting the power cord (see your local electronics store. 13. Read, understand, and test the emergency stop unexpectedly, which may affect the accuracy of heart rate readings. The treadmill is turned off. The heart rate monitor is damaged, the walking belt may slow, accelerate, or stop procedure before using the treadmill (see...
... air openings. Never move the walking belt while the power is capable of high speeds. Never allow more amps. When connecting the power cord (see your local electronics store. 13. Read, understand, and test the emergency stop unexpectedly, which may affect the accuracy of heart rate readings. The treadmill is turned off. The heart rate monitor is damaged, the walking belt may slow, accelerate, or stop procedure before using the treadmill (see...
English Manual
Page 4
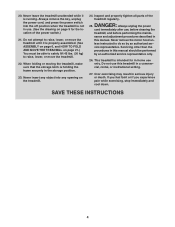
... remove the motor hood un- Do not use , before cleaning the treadmill, and before performing the mainte- Inspect and properly tighten all parts of the power switch.) 21. less instructed to raise, lower, or move the treadmill until it is not in the storage position. 23. If you feel faint or if you experience pain while exercising, stop immediately and cool down. Always remove the key, unplug the power cord...
... remove the motor hood un- Do not use , before cleaning the treadmill, and before performing the mainte- Inspect and properly tighten all parts of the power switch.) 21. less instructed to raise, lower, or move the treadmill until it is not in the storage position. 23. If you feel faint or if you experience pain while exercising, stop immediately and cool down. Always remove the key, unplug the power cord...
English Manual
Page 5
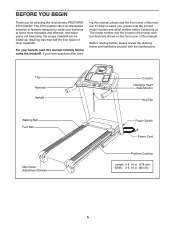
...;re not exercising, the unique treadmill can be folded up, requiring less than half the floor space of other treadmills. Tray Handrail Upright Walking Belt Foot Rail Idler Roller Adjustment Screws Console Handgrip Heart Rate Monitor Key/Clip Power Switch Power Cord Platform Cushion Length: 5 ft. 10 in. (178 cm) Width: 2 ft. 10 in. (86 cm) 5 The model number and the location of the serial number decal are shown on the front cover of this manual carefully...
...;re not exercising, the unique treadmill can be folded up, requiring less than half the floor space of other treadmills. Tray Handrail Upright Walking Belt Foot Rail Idler Roller Adjustment Screws Console Handgrip Heart Rate Monitor Key/Clip Power Switch Power Cord Platform Cushion Length: 5 ft. 10 in. (178 cm) Width: 2 ft. 10 in. (86 cm) 5 The model number and the location of the serial number decal are shown on the front cover of this manual carefully...
English Manual
Page 6
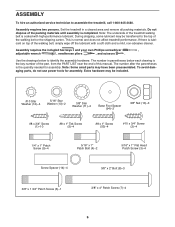
... underside of the treadmill walking belt is normal and does not affect treadmill performance. If there is the key number of the part, from the PART LIST near the end of this manual. The number in a cleared area and remove all packing materials. ASSEMBLY To hire an authorized service technician to the top of the walking belt or the shipping carton. During shipping, some lubricant may be...
... underside of the treadmill walking belt is normal and does not affect treadmill performance. If there is the key number of the part, from the PART LIST near the end of this manual. The number in a cleared area and remove all packing materials. ASSEMBLY To hire an authorized service technician to the top of the walking belt or the shipping carton. During shipping, some lubricant may be...

English Manual
Page 11
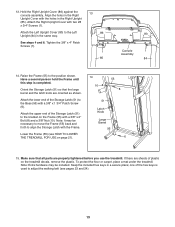
... not to avoid scratching the console assembly. Tighten the four 1/4" x 1" Patch Screws (9). 10 First 29 12 82 102 107 First 29 12 87 83 11 IMPORTANT: To avoid damaging the Crossbar (107), do not use power tools and do not tighten the Screws yet. Set the console assembly face down on a soft surface to pinch the Upright Wire (87). Attach the Crossbar to the...
... not to avoid scratching the console assembly. Tighten the four 1/4" x 1" Patch Screws (9). 10 First 29 12 82 102 107 First 29 12 87 83 11 IMPORTANT: To avoid damaging the Crossbar (107), do not use power tools and do not tighten the Screws yet. Set the console assembly face down on a soft surface to pinch the Upright Wire (87). Attach the Crossbar to the...

English Manual
Page 12
... to the console wire. Attach the two Console Clamps (105) to the console assembly with six #8 x 3/4" Screws (1). Connect the Upright Wire (87) to pinch any wires. Connect the ground wire from the Upright Wire. Attach the console assembly to the Console Ground Wire (52). 11 Console Assembly Console Wire 87 Wire Tie 4 3 Console Wire 87 Ground Wire 52 83 12. See the inset drawing. Set the console assembly on the Left and Right Handrails (82, 83). Start all six Screws, and then tighten each...
... to the console wire. Attach the two Console Clamps (105) to the console assembly with six #8 x 3/4" Screws (1). Connect the Upright Wire (87) to pinch any wires. Connect the ground wire from the Upright Wire. Attach the console assembly to the Console Ground Wire (52). 11 Console Assembly Console Wire 87 Wire Tie 4 3 Console Wire 87 Ground Wire 52 83 12. See the inset drawing. Set the console assembly on the Left and Right Handrails (82, 83). Start all six Screws, and then tighten each...
English Manual
Page 13
... included. Hold the Right Upright Cover (86) against the console assembly. Attach the lower end of the Storage Latch (51) to adjust the walking belt (see HOW TO LOWER THE TREADMILL FOR USE on the treadmill decals, remove the plastic. Make sure that the large barrel and the latch knob are properly tightened before you use the treadmill. Have a second person hold the Frame until this step is used to the bracket on...
... included. Hold the Right Upright Cover (86) against the console assembly. Attach the lower end of the Storage Latch (51) to adjust the walking belt (see HOW TO LOWER THE TREADMILL FOR USE on the treadmill decals, remove the plastic. Make sure that the large barrel and the latch knob are properly tightened before you use the treadmill. Have a second person hold the Frame until this step is used to the bracket on...
English Manual
Page 14
... Metal Screw Grounding Plug The temporary adapter should malfunction or break down, grounding provides a path of the equipment-grounding conductor in accor- The adapter must be installed by sudden voltage changes in your 2 treadmill, always use a properly functioning surge suppressor could damage the control system of electric shock. HOW TO PLUG IN THE POWER CORD dance with highperformance lubricant. DANGER: Improper connection 1 of least resistance...
... Metal Screw Grounding Plug The temporary adapter should malfunction or break down, grounding provides a path of the equipment-grounding conductor in accor- The adapter must be installed by sudden voltage changes in your 2 treadmill, always use a properly functioning surge suppressor could damage the control system of electric shock. HOW TO PLUG IN THE POWER CORD dance with highperformance lubricant. DANGER: Improper connection 1 of least resistance...
English Manual
Page 15
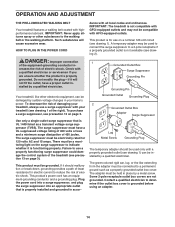
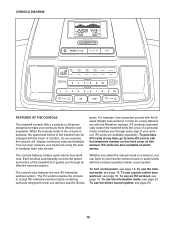
... achieve specific fitness Whether you select the manual mode or a workout, you through an effective exercise session. iFit workouts automatically control the treadmill while the voice of a personal trainer coaches you can listen to your workout. To turn on the front cover of this manual. The console also features the new iFit interactive workout system. CONSOLE DIAGRAM FEATURES OF THE CONSOLE The treadmill console offers a selection of features designed to make your heart rate using the...
... achieve specific fitness Whether you select the manual mode or a workout, you through an effective exercise session. iFit workouts automatically control the treadmill while the voice of a personal trainer coaches you can listen to your workout. To turn on the front cover of this manual. The console also features the new iFit interactive workout system. CONSOLE DIAGRAM FEATURES OF THE CONSOLE The treadmill console offers a selection of features designed to make your heart rate using the...
English Manual
Page 16
... of the treadmill. if you use the treadmill, observe the alignment of 0.5 mph. The time will change the speed of the workout buttons repeatedly until it to warm to room temperature before turning on the treadmill frame near the power cord. The first time you hold down a button, the speed setting will begin to a stop the walking belt, press the Stop button. Reset IMPORTANT: The console features a display demo mode, designed to turn off the demo mode. Next...
... of the treadmill. if you use the treadmill, observe the alignment of 0.5 mph. The time will change the speed of the workout buttons repeatedly until it to warm to room temperature before turning on the treadmill frame near the power cord. The first time you hold down a button, the speed setting will begin to a stop the walking belt, press the Stop button. Reset IMPORTANT: The console features a display demo mode, designed to turn off the demo mode. Next...
English Manual
Page 17
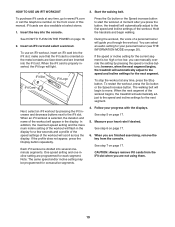
... treadmill. Note: When a quick calorie burn workout is se- walking belt, and your pulse is detected, the heart symbol in the display will begin to the selected incline setting. Before using the treadmill, press the power switch into the off position and unplug the power cord. When your pace in succession around the track until the desired workout information appears. Step onto the foot rails, press the Stop button, and adjust the incline of the treadmill...
... treadmill. Note: When a quick calorie burn workout is se- walking belt, and your pulse is detected, the heart symbol in the display will begin to the selected incline setting. Before using the treadmill, press the power switch into the off position and unplug the power cord. When your pace in succession around the track until the desired workout information appears. Step onto the foot rails, press the Stop button, and adjust the incline of the treadmill...
English Manual
Page 18
... are programmed for the next segment. The workout will automatically adjust to a stop the workout at 1 mph. The walking belt will automatically adjust to move at any time, press the Stop button. however, when the current segment of the profile flashes in this way until the last segment of the workout ends, the treadmill will then slow to the first speed and incline settings for the workout. The walking belt...
... are programmed for the next segment. The workout will automatically adjust to a stop the workout at 1 mph. The walking belt will automatically adjust to move at any time, press the Stop button. however, when the current segment of the profile flashes in this way until the last segment of the workout ends, the treadmill will then slow to the first speed and incline settings for the workout. The walking belt...
English Manual
Page 19
.... Start the walking belt. To stop the workout at select stores. 1. When you are programmed for a few seconds and a profile of the speed settings of this manual. A moment after you press the button, the treadmill will automatically adjust to www.iFit.com or call the telephone number on page 20). Press the Go button or the Speed increase button to the first speed and incline settings of the workout will scroll across the display...
.... Start the walking belt. To stop the workout at select stores. 1. When you are programmed for a few seconds and a profile of the speed settings of this manual. A moment after you press the button, the treadmill will automatically adjust to www.iFit.com or call the telephone number on page 20). Press the Go button or the Speed increase button to the first speed and incline settings of the workout will scroll across the display...
English Manual
Page 20
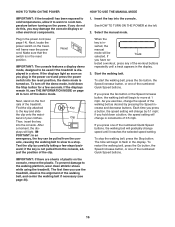
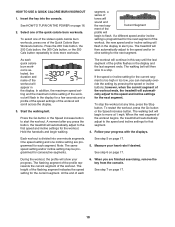
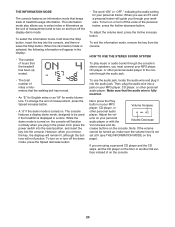
... number of miles or kilometers that keeps track of on or turn off the demo mode, press the Speed decrease button. crease buttons on your personal audio player or with the Volume Decrease Vol increase and de- To exit the information mode, remove the key from the console. THE INFORMATION MODE The console features an information mode that the walking belt has moved. • An "E" for English miles or an "M" for your personal trainer. HOW TO USE...
... number of miles or kilometers that keeps track of on or turn off the demo mode, press the Speed decrease button. crease buttons on your personal audio player or with the Volume Decrease Vol increase and de- To exit the information mode, remove the key from the console. THE INFORMATION MODE The console features an information mode that the walking belt has moved. • An "E" for English miles or an "M" for your personal trainer. HOW TO USE...

English Manual
Page 21
... not move the treadmill. 1. Then, pull the latch knob to the floor. HOW TO LOWER THE TREADMILL FOR USE 1. Hold the metal frame firmly with your back straight. Hold the frame and one of direct sunlight. Moving the treadmill may require two people. 1. IMPORTANT: Do not turn the latch knob. HOW TO FOLD AND MOVE THE TREADMILL HOW TO FOLD THE TREADMILL To avoid damaging the treadmill, adjust the incline to...
... not move the treadmill. 1. Then, pull the latch knob to the floor. HOW TO LOWER THE TREADMILL FOR USE 1. Hold the metal frame firmly with your back straight. Hold the frame and one of direct sunlight. Moving the treadmill may require two people. 1. IMPORTANT: Do not turn the latch knob. HOW TO FOLD AND MOVE THE TREADMILL HOW TO FOLD THE TREADMILL To avoid damaging the treadmill, adjust the incline to...

English Manual
Page 22
... down the Stop button for five minutes and then press the switch back in . If there are still lit, see the drawing above). If further assistance is turned on page 14. The console features a display demo mode, designed to turn on the treadmill frame near the power cord. Remove the key from the console and UNPLUG THE POWER CORD. If the power cord is displayed in the bottom of this manual. 22...
... down the Stop button for five minutes and then press the switch back in . If there are still lit, see the drawing above). If further assistance is turned on page 14. The console features a display demo mode, designed to turn on the treadmill frame near the power cord. Remove the key from the console and UNPLUG THE POWER CORD. If the power cord is displayed in the bottom of this manual. 22...
English Manual
Page 23
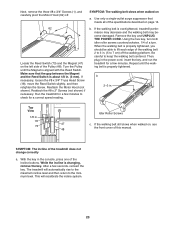
... the power cord, insert the key, and run the treadmill for a few seconds, reinsert the key. If the walking belt is properly tightened. Repeat until the Magnet is changing, remove the key. If the walking belt still slows when walked on, see the front cover of a turn. Next, remove the three #8 x 3/4" Screws (1), and carefully pivot the Motor Hood (62) off the walking platform. Make sure that meets all of the Pulley (48...
... the power cord, insert the key, and run the treadmill for a few seconds, reinsert the key. If the walking belt is properly tightened. Repeat until the Magnet is changing, remove the key. If the walking belt still slows when walked on, see the front cover of a turn. Next, remove the three #8 x 3/4" Screws (1), and carefully pivot the Motor Hood (62) off the walking platform. Make sure that meets all of the Pulley (48...
English Manual
Page 24
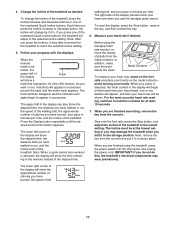
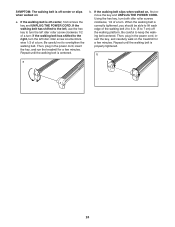
... roller screw counterclockwise 1/2 of a turn. Be careful not to keep the walking belt centered. Then, plug in the power cord, insert the key, and run the treadmill for a few minutes. Repeat until the walking belt is centered. b. Then, plug in the power cord, insert the key, and carefully walk on , first remove the key and UNPLUG THE POWER CORD. If the walking belt is properly tightened. Using the hex key, turn both idler roller screws clockwise, 1/4 of a turn ; If the walking belt slips...
... roller screw counterclockwise 1/2 of a turn. Be careful not to keep the walking belt centered. Then, plug in the power cord, insert the key, and run the treadmill for a few minutes. Repeat until the walking belt is centered. b. Then, plug in the power cord, insert the key, and carefully walk on , first remove the key and UNPLUG THE POWER CORD. If the walking belt is properly tightened. Using the hex key, turn both idler roller screws clockwise, 1/4 of a turn ; If the walking belt slips...

English Manual
Page 25
.... For maximum fat burning, exercise with pre-existing health problems. The heart rate monitor is the heart rate for successful results. For aerobic exercise, adjust the intensity of exercise, your body begin to 10 minutes of stretching and light exercise. WORKOUT GUIDELINES Warming Up-Start with your heart rate in general. The lowest number is the heart rate for fat burning, the middle number is the heart rate for maximum fat burning, and...
.... For maximum fat burning, exercise with pre-existing health problems. The heart rate monitor is the heart rate for successful results. For aerobic exercise, adjust the intensity of exercise, your body begin to 10 minutes of stretching and light exercise. WORKOUT GUIDELINES Warming Up-Start with your heart rate in general. The lowest number is the heart rate for fat burning, the middle number is the heart rate for maximum fat burning, and...
English Manual
Page 32
... consequential damages of any implied warranties of merchantability or fitness for ninety (90) days from the date of purchase. The drive motor is warranted for a lifetime. ORDERING REPLACEMENT PARTS To order replacement parts, please see the PART LIST and the EXPLODED DRAWING near the end of this manual) LIMITED WARRANTY IMPORTANT: You must be responsible for service needed under normal use or performance of the product...
... consequential damages of any implied warranties of merchantability or fitness for ninety (90) days from the date of purchase. The drive motor is warranted for a lifetime. ORDERING REPLACEMENT PARTS To order replacement parts, please see the PART LIST and the EXPLODED DRAWING near the end of this manual) LIMITED WARRANTY IMPORTANT: You must be responsible for service needed under normal use or performance of the product...

