
English Manual
Page 1
... WEB: www.proformservice.com CAUTION Read all precautions and instructions in the space above for future reference. USERʼS MANUAL Serial Number Decal (under frame) QUESTIONS? PFEL70609.0 Serial No. MT Sat. 8 a.m.-4 p.m. www.proform.com Model No. please contact Customer Care. Keep this equipment. IMPORTANT: Please register this product (see the limited warranty...
... WEB: www.proformservice.com CAUTION Read all precautions and instructions in the space above for future reference. USERʼS MANUAL Serial Number Decal (under frame) QUESTIONS? PFEL70609.0 Serial No. MT Sat. 8 a.m.-4 p.m. www.proform.com Model No. please contact Customer Care. Keep this equipment. IMPORTANT: Please register this product (see the limited warranty...
English Manual
Page 2
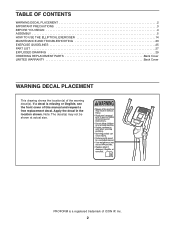
... manual and request a free replacement decal. Apply the decal in the location shown. Note: The decal(s) may not be shown at actual size. PROFORM is missing or illegible, see the front cover of ICON IP, Inc. 2 TABLE OF CONTENTS WARNING DECAL PLACEMENT 2 IMPORTANT PRECAUTIONS 3 BEFORE YOU BEGIN 4 ASSEMBLY 5 HOW TO USE THE ELLIPTICAL...
... manual and request a free replacement decal. Apply the decal in the location shown. Note: The decal(s) may not be shown at actual size. PROFORM is missing or illegible, see the front cover of ICON IP, Inc. 2 TABLE OF CONTENTS WARNING DECAL PLACEMENT 2 IMPORTANT PRECAUTIONS 3 BEFORE YOU BEGIN 4 ASSEMBLY 5 HOW TO USE THE ELLIPTICAL...
English Manual
Page 3
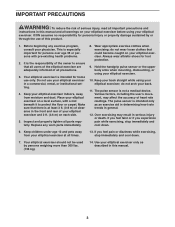
...side. 5. Make sure that there is the responsibility of the owner to protect the floor or carpet. do not arch your elliptical exerciser. The pulse sensor is intended only as described in this manual. 3 The pulse sensor is not a medical device. It is at all times. 13. Place your...ensure that could become caught on your back. 11. do not wear loose clothes that all users of the elliptical exerciser are adequately informed of this manual and all important precautions and instructions in general. 12. Do not use only. Wear appropriate exercise clothes when exercising...
...side. 5. Make sure that there is the responsibility of the owner to protect the floor or carpet. do not arch your elliptical exerciser. The pulse sensor is intended only as described in this manual. 3 The pulse sensor is not a medical device. It is at all times. 13. Place your...ensure that could become caught on your back. 11. do not wear loose clothes that all users of the elliptical exerciser are adequately informed of this manual and all important precautions and instructions in general. 12. Do not use only. Wear appropriate exercise clothes when exercising...
English Manual
Page 4
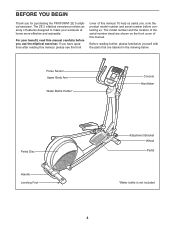
...before contacting us assist you have questions after reading this manual, please see the front cover of this manual. If you , note the product model number and serial number before you for purchasing the PROFORM® ZE 5 elliptical exerciser. For your workouts at home more effective and... enjoyable. The model number and the location of features designed to make your benefit, read this manual. The ZE 5 elliptical exerciser provides an array of the ...
...before contacting us assist you have questions after reading this manual, please see the front cover of this manual. If you , note the product model number and serial number before you for purchasing the PROFORM® ZE 5 elliptical exerciser. For your workouts at home more effective and... enjoyable. The model number and the location of features designed to make your benefit, read this manual. The ZE 5 elliptical exerciser provides an array of the ...
English Manual
Page 5
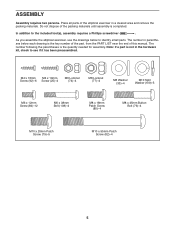
... it has been preassembled. Note: If a part is the key number of the part, from the PART LIST near the end of this manual. As you assemble the elliptical exerciser, use the drawings below each drawing is not in the hardware kit, check to the included tool(s), assembly requires a Phillips screwdriver . Place...)-4 M8 x 45mm Button Bolt (76)-4 M10 x 20mm Patch Screw (79)-5 M10 x 95mm Patch Screw (82)-4 5 ASSEMBLY Assembly requires two persons. Do not dispose of the elliptical exerciser in parentheses below to identify small parts.
... it has been preassembled. Note: If a part is the key number of the part, from the PART LIST near the end of this manual. As you assemble the elliptical exerciser, use the drawings below each drawing is not in the hardware kit, check to the included tool(s), assembly requires a Phillips screwdriver . Place...)-4 M8 x 45mm Button Bolt (76)-4 M10 x 20mm Patch Screw (79)-5 M10 x 95mm Patch Screw (82)-4 5 ASSEMBLY Assembly requires two persons. Do not dispose of the elliptical exerciser in parentheses below to identify small parts.
English Manual
Page 11
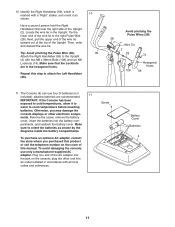
... before inserting batteries. The Console (4) can use only a manufacturer-supplied AC adapter. Make sure to orient the batteries as shown. Plug one end of this manual. plug the other electronic compo- Have a second person hold the Right Handlebar (59) near the right side of the Upright. Then, untie and discard the...
... before inserting batteries. The Console (4) can use only a manufacturer-supplied AC adapter. Make sure to orient the batteries as shown. Plug one end of this manual. plug the other electronic compo- Have a second person hold the Right Handlebar (59) near the right side of the Upright. Then, untie and discard the...
English Manual
Page 16
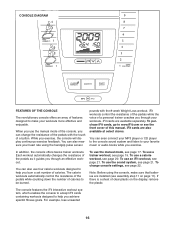
...array of features designed to make sure that batteries are installed (see assembly step 11 on the display, remove the plastic. When you use the manual mode of a personal trainer coaches you can also use an iFit workout, see page 20. iFit cards are available separately. In addition, the ...console offers twelve trainer workouts. The calorie workouts automatically control the resistance of the pedals while counting down the number of this manual. iFit workouts control the resistance of the pedals while the voice of the console, you through an effective workout. To use the...
...array of features designed to make sure that batteries are installed (see assembly step 11 on the display, remove the plastic. When you use the manual mode of a personal trainer coaches you can also use an iFit workout, see page 20. iFit cards are available separately. In addition, the ...console offers twelve trainer workouts. The calorie workouts automatically control the resistance of the pedals while counting down the number of this manual. iFit workouts control the resistance of the pedals while the voice of the console, you through an effective workout. To use the...
English Manual
Page 17
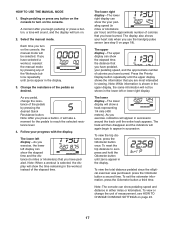
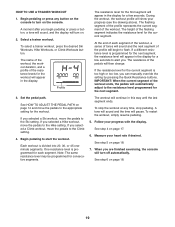
... per hour) and the approximate number of measurement, see step 5 on page 22. 17 To view the total distance pedaled since the elliptical exerciser was purchased, press the Odometer button a second time. Press the Priority Display button repeatedly until zeros appear in viewing. The lower...by pressing any button on the console. As you press a button, it will show a track representing 1/4 mile (400 meters). Select the manual mode. Change the resistance of the elapsed time. The track will then disappear and the indicators will again begin pedaling or press a button, a...
... per hour) and the approximate number of measurement, see step 5 on page 22. 17 To view the total distance pedaled since the elliptical exerciser was purchased, press the Odometer button a second time. Press the Priority Display button repeatedly until zeros appear in viewing. The lower...by pressing any button on the console. As you press a button, it will show a track representing 1/4 mile (400 meters). Select the manual mode. Change the resistance of the elapsed time. The track will then disappear and the indicators will again begin pedaling or press a button, a...
English Manual
Page 19
... of the profile will begin pedaling or press a button, a tone will sound, and the display will automatically adjust to start the workout. If you can manually override the setting by pressing the Quick Resistance buttons. Note: The same resistance level may be programmed for each segment of the workout, a series of...
... of the profile will begin pedaling or press a button, a tone will sound, and the display will automatically adjust to start the workout. If you can manually override the setting by pressing the Quick Resistance buttons. Note: The same resistance level may be programmed for each segment of the workout, a series of...
English Manual
Page 20
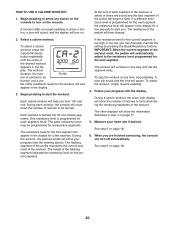
... during the remaining segments of the desired workout appears in step 4 on page 17. 5. During a calorie workout, the lower right display will help you can manually override the setting by pressing the Quick Resistance buttons. The other displays will begin pedaling or press a button, a tone will sound, and the display will...
... during the remaining segments of the desired workout appears in step 4 on page 17. 5. During a calorie workout, the lower right display will help you can manually override the setting by pressing the Quick Resistance buttons. The other displays will begin pedaling or press a button, a tone will sound, and the display will...
English Manual
Page 21
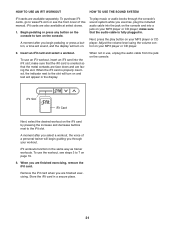
... select stores. 1. When the iFit card is fully plugged in a secure place. 21 Remove the iFit card when you select a workout, the voice of this manual. iFit cards are finished exercising.
... select stores. 1. When the iFit card is fully plugged in a secure place. 21 Remove the iFit card when you select a workout, the voice of this manual. iFit cards are finished exercising.

English Manual
Page 28
Key No. For information about ordering replacement parts, see the back cover of this manual. *These parts are subject to change without notice. Description Key No. Description 101 2 102 1 103 4 104 4 105 4 106 2 107 2 Pedal Leg Cap Audio Cable Adjustment Cover Pedal Leg Bushing Adjustment Bushing Adjustment Roller Roller Axle 108 4 109 5 110 1 111 1 * - * - * - Qty. Qty. M6 x 38mm Bolt M10 Split Washer Pulley Right Link Arm Cover Userʼs Manual Assembly Tool Grease Packet Note: Specifications are not illustrated. 28
Key No. For information about ordering replacement parts, see the back cover of this manual. *These parts are subject to change without notice. Description Key No. Description 101 2 102 1 103 4 104 4 105 4 106 2 107 2 Pedal Leg Cap Audio Cable Adjustment Cover Pedal Leg Bushing Adjustment Bushing Adjustment Roller Roller Axle 108 4 109 5 110 1 111 1 * - * - * - Qty. Qty. M6 x 38mm Bolt M10 Split Washer Pulley Right Link Arm Cover Userʼs Manual Assembly Tool Grease Packet Note: Specifications are not illustrated. 28
English Manual
Page 32
...an implied warranty lasts. ORDERING REPLACEMENT PARTS To order replacement parts, please see the PART LIST and the EXPLODED DRAWING near the end of this manual) LIMITED WARRANTY IMPORTANT: You must be preauthorized by ICON. ICON Health & Fitness, Inc. (ICON) warrants this warranty is authorized by or ... serial number of the product (see the front cover of this manual) • the name of the product (see the front cover of this manual. Parts and labor are made must register this product within 30 days of this manual) • the key number and description of the replacement part...
...an implied warranty lasts. ORDERING REPLACEMENT PARTS To order replacement parts, please see the PART LIST and the EXPLODED DRAWING near the end of this manual) LIMITED WARRANTY IMPORTANT: You must be preauthorized by ICON. ICON Health & Fitness, Inc. (ICON) warrants this warranty is authorized by or ... serial number of the product (see the front cover of this manual) • the name of the product (see the front cover of this manual. Parts and labor are made must register this product within 30 days of this manual) • the key number and description of the replacement part...


