
English Manual
Page 4
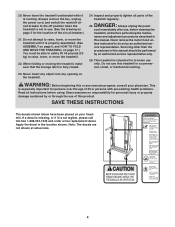
...remove the key, unplug the power cord, and switch the reset/off circuit breaker to raise, lower, or move the treadmill until it is running. Inspect and properly tighten all instructions before performing the mainte- Never insert any object into any exercise program, consult your treadmill. SAVE ... HOW TO FOLD AND MOVE THE TREADMILL on your physician. Always unplug the power cord immediately after use this treadmill in -home use of 35 or persons with pre-existing health problems. Read all parts of the circuit breaker.) 21. This treadmill is not in this or any ...
...remove the key, unplug the power cord, and switch the reset/off circuit breaker to raise, lower, or move the treadmill until it is running. Inspect and properly tighten all instructions before performing the mainte- Never insert any object into any exercise program, consult your treadmill. SAVE ... HOW TO FOLD AND MOVE THE TREADMILL on your physician. Always unplug the power cord immediately after use this treadmill in -home use of 35 or persons with pre-existing health problems. Read all parts of the circuit breaker.) 21. This treadmill is not in this or any ...
English Manual
Page 5
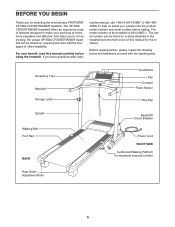
...and effective. Before reading further, please review the drawing below and familiarize yourself with the labeled parts. If you for selecting the revolutionary PROFORM® XP 580s CROSSTRAINER treadmill. The model number of this manual carefully before calling. The serial number can be found on... a decal attached to make your benefit, read - Accessory Tray Handrail Storage Latch Dumbbells Fan Console Pulse Sensor Key/Clip ...
...and effective. Before reading further, please review the drawing below and familiarize yourself with the labeled parts. If you for selecting the revolutionary PROFORM® XP 580s CROSSTRAINER treadmill. The model number of this manual carefully before calling. The serial number can be found on... a decal attached to make your benefit, read - Accessory Tray Handrail Storage Latch Dumbbells Fan Console Pulse Sensor Key/Clip ...
English Manual
Page 6
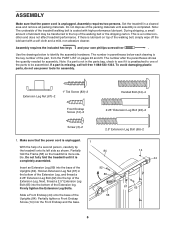
... assembly is lubricant on pages 22 and 23. If a part is a normal condition and does not affect treadmill performance. Hold an Extension Leg Nut (67) in a cleared area and remove all packing materials. Assembly requires the included hex keys and your own phillips screwdriver . Do not dispose of a ...second person, carefully tip the treadmill onto its left side as shown. Make sure that the power cord is more sta- Assembly ...
... assembly is lubricant on pages 22 and 23. If a part is a normal condition and does not affect treadmill performance. Hold an Extension Leg Nut (67) in a cleared area and remove all packing materials. Assembly requires the included hex keys and your own phillips screwdriver . Do not dispose of a ...second person, carefully tip the treadmill onto its left side as shown. Make sure that the power cord is more sta- Assembly ...
English Manual
Page 8
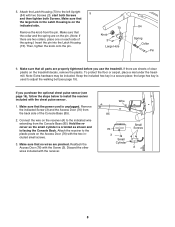
... from the back side of the Console Base (85). 2. Make sure that the large hole in a secure place; If you use the treadmill. Make sure that all parts are two collars, place one on each side of clear plastic on the indicated side. Hold the receiver so the small cylinder is... that no wires are sheets of the spring.) Insert the pin into the Latch Housing (73). Keep the included hex key in the Latch Housing is unplugged. the large hex key is facing the Console Back. Attach the receiver to install the receiver included with two Screws (3); If there are pinched...
... from the back side of the Console Base (85). 2. Make sure that the large hole in a secure place; If you use the treadmill. Make sure that all parts are two collars, place one on each side of clear plastic on the indicated side. Hold the receiver so the small cylinder is... that no wires are sheets of the spring.) Insert the pin into the Latch Housing (73). Keep the included hex key in the Latch Housing is unplugged. the large hex key is facing the Console Back. Attach the receiver to install the receiver included with two Screws (3); If there are pinched...
English Manual
Page 16
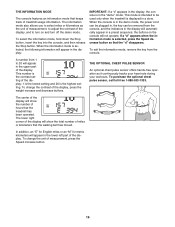
...store. The center of the display. In addition, an "E" for English miles or an "M" for metric kilometers will show the total number of treadmill usage information. The information mode also allows you to be removed from the console, and the indicators in the display will appear in a preset ...operation as the unit of measurement, to turn off the demo mode. To exit the information mode, remove the key from 1 to 20 will automatically appear in the upper part of the display, and to adjust the contrast of the display. THE INFORMATION MODE The console features an information...
...store. The center of the display. In addition, an "E" for English miles or an "M" for metric kilometers will show the total number of treadmill usage information. The information mode also allows you to be removed from the console, and the indicators in the display will appear in a preset ...operation as the unit of measurement, to turn off the demo mode. To exit the information mode, remove the key from 1 to 20 will automatically appear in the upper part of the display, and to adjust the contrast of the display. THE INFORMATION MODE The console features an information...
English Manual
Page 20
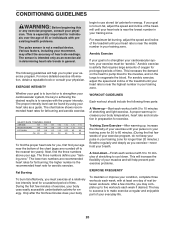
... for you must be found by using your training zone. To find the proper heart rate for individuals over the age of the treadmill until your heart rate is to 10 minutes of stretching and light exercise. the higher number is to success is the recommended heart ... increases your movement, may complete up , increase the intensity of your exercise until your training zone for fat burning; The key to make exercise a regular and enjoyable part of heart rate readings. Various factors, including your body temperature, heart rate and circulation in your goal is near the bottom...
... for you must be found by using your training zone. To find the proper heart rate for individuals over the age of the treadmill until your heart rate is to 10 minutes of stretching and light exercise. the higher number is to success is the recommended heart ... increases your movement, may complete up , increase the intensity of your exercise until your training zone for fat burning; The key to make exercise a regular and enjoyable part of heart rate readings. Various factors, including your body temperature, heart rate and circulation in your goal is near the bottom...
English Manual
Page 22
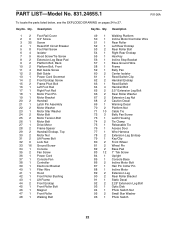
... 49 1 Walking Platform 50 1 Incline Motor/Controller Wire 51 1 Rear Roller 52 1 Left Rear Endcap 53 2 Rear Roller Bolt 54 1 Right Rear Endcap 55 1 Hex Key 56 1 Incline Stop Bracket 57 1 Base Ground Wire 58 1 Frame 59 1 Belly Pan 60 2 Center Isolator 61 1 Reed Switch Clip 62 2 Handrail Endcap 63 1... 91 1 Static Decal 92 2 2.25" Extension Leg Bolt 93 1 Optic Disk 94 1 Photo Switch Nut 95 2 Small Star Washer 96 1 Photo Switch 22 Qty. Key No. Description Key No. PART LIST-Model No. 831.24655.1 R1106A To locate the parts listed below, see the EXPLODED DRAWING on pages 24 to 27.
... 49 1 Walking Platform 50 1 Incline Motor/Controller Wire 51 1 Rear Roller 52 1 Left Rear Endcap 53 2 Rear Roller Bolt 54 1 Right Rear Endcap 55 1 Hex Key 56 1 Incline Stop Bracket 57 1 Base Ground Wire 58 1 Frame 59 1 Belly Pan 60 2 Center Isolator 61 1 Reed Switch Clip 62 2 Handrail Endcap 63 1... 91 1 Static Decal 92 2 2.25" Extension Leg Bolt 93 1 Optic Disk 94 1 Photo Switch Nut 95 2 Small Star Washer 96 1 Photo Switch 22 Qty. Key No. Description Key No. PART LIST-Model No. 831.24655.1 R1106A To locate the parts listed below, see the EXPLODED DRAWING on pages 24 to 27.
English Manual
Page 23
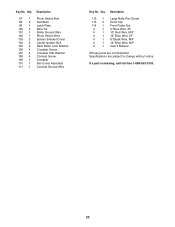
... 113 3 Hood Clip 114 1 Front Roller Nut # 1 4" Blue Wire, 2F # 1 10" Red Wire, M/F # 1 12" Blue Wire, 2F # 1 8" Black Wire, M/F # 1 12" Blue Wire, M/F # 1 User's Manual #These parts are not illustrated Specifications are subject to change without notice. Description 97 1 Photo Switch Bolt 98 2 Dumbbell 99 1 Latch Plate 100 3 Wire Tie 101 1 Roller... 105 2 Rear Roller Lock Washer 106 4 Crossbar Screw 107 4 Crossbar Star Washer 108 4 Console Screw 109 1 Crossbar 110 1 Fan Cover Assembly 111 1 Console Ground Wire Key No. Qty. Qty. If a part is missing, call toll-free 1-888-533-1333. 23...
... 113 3 Hood Clip 114 1 Front Roller Nut # 1 4" Blue Wire, 2F # 1 10" Red Wire, M/F # 1 12" Blue Wire, 2F # 1 8" Black Wire, M/F # 1 12" Blue Wire, M/F # 1 User's Manual #These parts are not illustrated Specifications are subject to change without notice. Description 97 1 Photo Switch Bolt 98 2 Dumbbell 99 1 Latch Plate 100 3 Wire Tie 101 1 Roller... 105 2 Rear Roller Lock Washer 106 4 Crossbar Screw 107 4 Crossbar Star Washer 108 4 Console Screw 109 1 Crossbar 110 1 Fan Cover Assembly 111 1 Console Ground Wire Key No. Qty. Qty. If a part is missing, call toll-free 1-888-533-1333. 23...

