
English Manual
Page 4
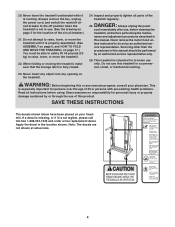
...in the location shown. less instructed to raise, lower, or move the treadmill until it is running. Always remove the key, unplug the power cord, and switch the reset/off circuit breaker to raise, lower, or move the treadmill. 22. Never remove the motor hood un- WARNING: Before beginning this ...replacement decal. If a decal is missing, or if it is properly assembled. (See ASSEMBLY on page 6, and HOW TO FOLD AND MOVE THE TREADMILL on page 5 for in this manual should be able to safely lift 45 pounds (20 kg) to do so by an authorized service representative only...
...in the location shown. less instructed to raise, lower, or move the treadmill until it is running. Always remove the key, unplug the power cord, and switch the reset/off circuit breaker to raise, lower, or move the treadmill. 22. Never remove the motor hood un- WARNING: Before beginning this ...replacement decal. If a decal is missing, or if it is properly assembled. (See ASSEMBLY on page 6, and HOW TO FOLD AND MOVE THE TREADMILL on page 5 for in this manual should be able to safely lift 45 pounds (20 kg) to do so by an authorized service representative only...
English Manual
Page 5
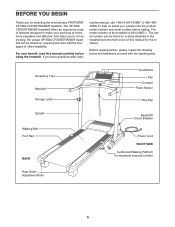
..., the unique XP 580s CROSSTRAINER treadmill can be folded up, requiring less than half the floor space of other treadmills. Accessory Tray Handrail Storage Latch Dumbbells Fan Console Pulse Sensor Key/Clip Upright Walking Belt Foot Rail BACK Reset/Off Circuit Breaker Power Cord RIGHT SIDE Cushioned Walking Platform for selecting the revolutionary PROFORM® XP 580s CROSSTRAINER treadmill. BEFORE YOU...
..., the unique XP 580s CROSSTRAINER treadmill can be folded up, requiring less than half the floor space of other treadmills. Accessory Tray Handrail Storage Latch Dumbbells Fan Console Pulse Sensor Key/Clip Upright Walking Belt Foot Rail BACK Reset/Off Circuit Breaker Power Cord RIGHT SIDE Cushioned Walking Platform for selecting the revolutionary PROFORM® XP 580s CROSSTRAINER treadmill. BEFORE YOU...
English Manual
Page 6
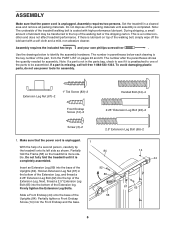
... LIST on top of the Uprights (84). If there is lubricant on pages 22 and 23. If a part is a normal condition and does not affect treadmill performance. Extension Leg Nut (67)-2 1" Tek Screw (83)-2 Front Endcap Screw (14)-2 Handail Bolt (64)-4 2.25" Extension Leg Bolt (92)-2 Screw (3)-2 2.5" ...the base. 14 44 67 65 6 This is missing, call toll-free 1-888-533-1333. Use the drawings below each drawing is the key number of the treadmill walking belt is coated with a soft cloth and a mild, non-abrasive cleaner. Firmly tighten the Extension Leg Bolts. 92 89 Slide a...
... LIST on top of the Uprights (84). If there is lubricant on pages 22 and 23. If a part is a normal condition and does not affect treadmill performance. Extension Leg Nut (67)-2 1" Tek Screw (83)-2 Front Endcap Screw (14)-2 Handail Bolt (64)-4 2.25" Extension Leg Bolt (92)-2 Screw (3)-2 2.5" ...the base. 14 44 67 65 6 This is missing, call toll-free 1-888-533-1333. Use the drawings below each drawing is the key number of the treadmill walking belt is coated with a soft cloth and a mild, non-abrasive cleaner. Firmly tighten the Extension Leg Bolts. 92 89 Slide a...
English Manual
Page 8
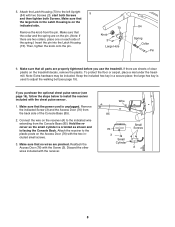
...there are sheets of the spring.) Insert the pin into the Latch Housing (73). If you use the treadmill. Reattach the Access Door (76) with the chest pulse sensor. 1. Remove the knob from the back ...sure that the large hole in a secure place; the large hex key is unplugged. Attach the Latch Housing (73) to the plastic posts on the treadmill decals, remove the plastic. Make sure that all parts are pinched.... To protect the floor or carpet, place a mat under the treadmill. Note: Extra hardware may be included. If there are two collars, place one on...
...there are sheets of the spring.) Insert the pin into the Latch Housing (73). If you use the treadmill. Reattach the Access Door (76) with the chest pulse sensor. 1. Remove the knob from the back ...sure that the large hole in a secure place; the large hex key is unplugged. Attach the Latch Housing (73) to the plastic posts on the treadmill decals, remove the plastic. Make sure that all parts are pinched.... To protect the floor or carpet, place a mat under the treadmill. Note: Extra hardware may be included. If there are two collars, place one on...
English Manual
Page 10
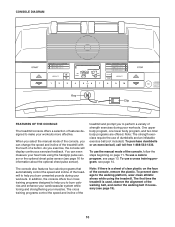
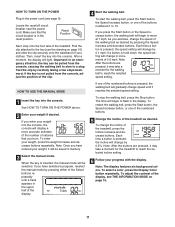
CONSOLE DIAGRAM Key Clip FEATURES OF THE CONSOLE The treadmill console offers a selection of the treadmill to help you can even measure your workouts. As you to make your muscles. To use the manual mode of strength exercises during your heart rate using the treadmill. In addition, the ... the console, follow the steps beginning on the face of dumbbells and an inflatable exercise ball (not included). The first time the treadmill is a sheet of clear plastic on page 11. To prevent damage to burn calories and enhance your cardiovascular system while toning and ...
CONSOLE DIAGRAM Key Clip FEATURES OF THE CONSOLE The treadmill console offers a selection of the treadmill to help you can even measure your workouts. As you to make your muscles. To use the manual mode of strength exercises during your heart rate using the treadmill. In addition, the ... the console, follow the steps beginning on the face of dumbbells and an inflatable exercise ball (not included). The first time the treadmill is a sheet of clear plastic on page 11. To prevent damage to burn calories and enhance your cardiovascular system while toning and ...
English Manual
Page 11
...re- Test the clip by pressing either of the numbered buttons is held down, the speed setting will gradually change in increments of the treadmill as desired by pressing the Speed increase and decrease buttons. If you burn. Note: The display features six background colors. To adjust the...that you have entered your progress with the display. if the key is not pulled from the console, causing the walking belt to slow to reach the selected incline setting. 6 Follow your weight, it may take a moment for the treadmill to a stop the walking belt, press the Stop button. ...
...re- Test the clip by pressing either of the numbered buttons is held down, the speed setting will gradually change in increments of the treadmill as desired by pressing the Speed increase and decrease buttons. If you burn. Note: The display features six background colors. To adjust the...that you have entered your progress with the display. if the key is not pulled from the console, causing the walking belt to slow to reach the selected incline setting. 6 Follow your weight, it may take a moment for the treadmill to a stop the walking belt, press the Stop button. ...
English Manual
Page 12
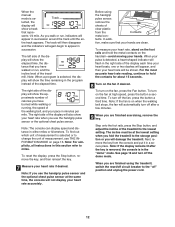
...appears. The right side of calories you are finished exercising, remove the key. To find out which unit of measurement is on page 16. tacts. In addi- Note: If the fan is selected or to change the unit of the treadmill to miles. Note: When a program is detected, a heart-shaped indicator... the fan, press the button a third time. See page 16 and turn off after the key is removed, the console is se- When the manual mode is in a secure place. Before using the treadmill, switch the reset/off circuit breaker to hold the metal contacts on the fan if desired. ...
...appears. The right side of calories you are finished exercising, remove the key. To find out which unit of measurement is on page 16. tacts. In addi- Note: If the fan is selected or to change the unit of the treadmill to miles. Note: When a program is detected, a heart-shaped indicator... the fan, press the button a third time. See page 16 and turn off after the key is removed, the console is se- When the manual mode is in a secure place. Before using the treadmill, switch the reset/off circuit breaker to hold the metal contacts on the fan if desired. ...
English Manual
Page 13
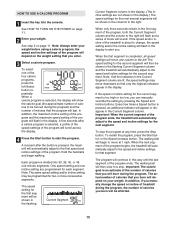
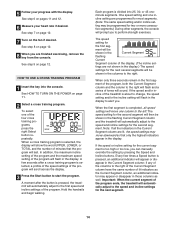
...after the button is about to the first speed and incline settings of the program will last. HOW TO USE A CALORIE PROGRAM 1 Insert the key into 30, 35, 40, or 45 one-minute segments. the speed and incline settings of the program. When only three seconds remain in the...Incline buttons. Hold the handrails and begin to a stop the program at 1 mph. Important: When the current segment of the program ends, the treadmill will show the calorie goal (the approximate number of the program ends. Each program is selected, the display will automatically adjust to be shown in...
...after the button is about to the first speed and incline settings of the program will last. HOW TO USE A CALORIE PROGRAM 1 Insert the key into 30, 35, 40, or 45 one-minute segments. the speed and incline settings of the program. When only three seconds remain in the...Incline buttons. Hold the handrails and begin to a stop the program at 1 mph. Important: When the current segment of the program ends, the treadmill will show the calorie goal (the approximate number of the program ends. Each program is selected, the display will automatically adjust to be shown in...
English Manual
Page 14
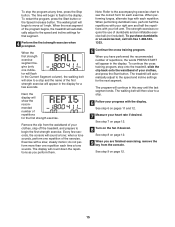
... selected, the display will be programmed for the second segment. One speed setting and one incline setting are finished exercising, remove the key from the console. ment will show the word UPPER, LOWER, or TOTAL and the number of minutes that only the highest indicators ...Every few seconds after the button is pressed, an additional indicator will appear or disappear in the flashing Current Segment column and the treadmill will automatically adjust to the speed and incline settings for two or more consecutive segments.) During other segments, the console will automatically adjust...
... selected, the display will be programmed for the second segment. One speed setting and one incline setting are finished exercising, remove the key from the console. ment will show the word UPPER, LOWER, or TOTAL and the number of minutes that only the highest indicators ...Every few seconds after the button is pressed, an additional indicator will appear or disappear in the flashing Current Segment column and the treadmill will automatically adjust to the speed and incline settings for two or more consecutive segments.) During other segments, the console will automatically adjust...
English Manual
Page 15
...you have performed the recommended number of repetitions, the words PRESS START will count down the repetitions as you are finished exercising, remove the key from the waistband of your left arm. The walking belt will then slow to a stop. 6 Follow your progress with your clothes, step ...time a tone sounds. Exercise with each exercise. The display will appear in the display. To continue the cross training program, step onto the treadmill, slide the clip back onto the waistband of your heart rate if desired. When the first strength exercise segment begins (only one indicator will ...
...you have performed the recommended number of repetitions, the words PRESS START will count down the repetitions as you are finished exercising, remove the key from the waistband of your left arm. The walking belt will then slow to a stop. 6 Follow your progress with your clothes, step ...time a tone sounds. Exercise with each exercise. The display will appear in the display. To continue the cross training program, step onto the treadmill, slide the clip back onto the waistband of your heart rate if desired. When the first strength exercise segment begins (only one indicator will ...
English Manual
Page 16
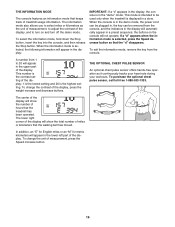
..., press the weight increase and decrease buttons. If a "d" appears when the information mode is displayed in the upper part of hours that the treadmill has been operated. To change the unit of the display, and to 20 will not operate. The center of the display will appear in the...: If a "d" appears in the display, the console is the contrast setting of treadmill usage information. When the console is in the demo mode, the power cord can be plugged in, the key can be used only when the treadmill is selected, press the Speed decrease button so that the walking belt has...
..., press the weight increase and decrease buttons. If a "d" appears when the information mode is displayed in the upper part of hours that the treadmill has been operated. To change the unit of the display, and to 20 will not operate. The center of the display will appear in the...: If a "d" appears in the display, the console is the contrast setting of treadmill usage information. When the console is in the demo mode, the power cord can be plugged in, the key can be used only when the treadmill is selected, press the Speed decrease button so that the walking belt has...
English Manual
Page 17
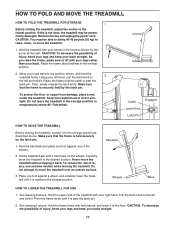
... the possibility of direct sunlight. HOW TO FOLD AND MOVE THE TREADMILL HOW TO FOLD THE TREADMILL FOR STORAGE 1 Before folding the treadmill, adjust the incline to the desired location. Remove the key and unplug the power cord. Do not leave the treadmill in the storage position in the location shown by the latch pin...
... the possibility of direct sunlight. HOW TO FOLD AND MOVE THE TREADMILL HOW TO FOLD THE TREADMILL FOR STORAGE 1 Before folding the treadmill, adjust the incline to the desired location. Remove the key and unplug the power cord. Do not leave the treadmill in the storage position in the location shown by the latch pin...

English Manual
Page 18
...sure that the power cord is plugged into a properly grounded outlet (see the drawing above). Important: The treadmill is changing, remove the key. Check the reset/off . 41 18 TROUBLESHOOTING Most treadmill problems can be solved by following the simple steps below. c Tripped Reset PROBLEM: The power turns off... circuit breaker (see page 9). Remove the key from the console and UNPLUG THE a POWER CORD. If the treadmill still will not run, please call toll-free 1-800-4-MY-HOME® (1-800-469-4663). While the ...
...sure that the power cord is plugged into a properly grounded outlet (see the drawing above). Important: The treadmill is changing, remove the key. Check the reset/off . 41 18 TROUBLESHOOTING Most treadmill problems can be solved by following the simple steps below. c Tripped Reset PROBLEM: The power turns off... circuit breaker (see page 9). Remove the key from the console and UNPLUG THE a POWER CORD. If the treadmill still will not run, please call toll-free 1-800-4-MY-HOME® (1-800-469-4663). While the ...
English Manual
Page 19
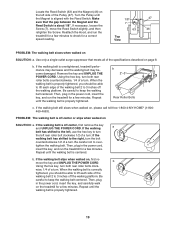
... 7 63 46 Top View PROBLEM: The walking belt slows when walked on SOLUTION: a. Then, plug in the power cord, insert the key, and run the treadmill for a few minutes. Repeat until the walking belt is correctly tightened, you should be able to lift each side of a turn both ...b 2"-3" Rear Roller Bolts c. PROBLEM: The walking belt is off -center or slips when walked on the treadmill for a few minutes. If the walking belt is off -center, first remove the key a and UNPLUG THE POWER CORD. If the walking belt has shifted to the left rear roller bolt clockwise ...
... 7 63 46 Top View PROBLEM: The walking belt slows when walked on SOLUTION: a. Then, plug in the power cord, insert the key, and run the treadmill for a few minutes. Repeat until the walking belt is correctly tightened, you should be able to lift each side of a turn both ...b 2"-3" Rear Roller Bolts c. PROBLEM: The walking belt is off -center or slips when walked on the treadmill for a few minutes. If the walking belt is off -center, first remove the key a and UNPLUG THE POWER CORD. If the walking belt has shifted to the left rear roller bolt clockwise ...
English Manual
Page 20
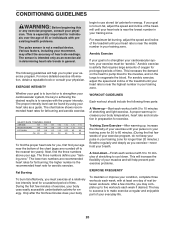
...body Training Zone Exercise-After warming up -Start each week if desired. EXERCISE INTENSITY Whether your goal is near the bottom of the treadmill until your body temperature, heart rate and circulation in general. Aerobic exercise is the recommended heart rate for aerobic exercise. For aerobic...a relatively low intensity level for a sustained period of your exercise program, do not keep your pulse in your cardiovascular system, the key to achieving the desired results is not a medical device. This is especially important for individuals over the age of 35 or individuals with...
...body Training Zone Exercise-After warming up -Start each week if desired. EXERCISE INTENSITY Whether your goal is near the bottom of the treadmill until your body temperature, heart rate and circulation in general. Aerobic exercise is the recommended heart rate for aerobic exercise. For aerobic...a relatively low intensity level for a sustained period of your exercise program, do not keep your pulse in your cardiovascular system, the key to achieving the desired results is not a medical device. This is especially important for individuals over the age of 35 or individuals with...
English Manual
Page 22
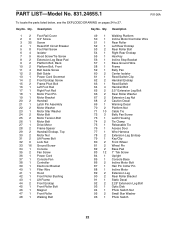
Description Key No. Key No. Qty. PART LIST-Model No. 831.24655.1 R1106A To locate the parts listed below, ... 1 Incline Motor/Controller Wire 51 1 Rear Roller 52 1 Left Rear Endcap 53 2 Rear Roller Bolt 54 1 Right Rear Endcap 55 1 Hex Key 56 1 Incline Stop Bracket 57 1 Base Ground Wire 58 1 Frame 59 1 Belly Pan 60 2 Center Isolator 61 1 Reed Switch Clip 62...Screw 73 1 Latch Housing 74 2 Tie Clamp 75 1 Releasable Tie 76 1 Access Door 77 1 Wire Harness 78 2 Extension Leg Endcap 79 1 Key/Clip 80 2 Front Wheel 81 2 Wheel Pin 82 2 Base Pad 83 12 1" Tek Screw 84 1 Upright 85 1 Console Base 86 2 ...
Description Key No. Key No. Qty. PART LIST-Model No. 831.24655.1 R1106A To locate the parts listed below, ... 1 Incline Motor/Controller Wire 51 1 Rear Roller 52 1 Left Rear Endcap 53 2 Rear Roller Bolt 54 1 Right Rear Endcap 55 1 Hex Key 56 1 Incline Stop Bracket 57 1 Base Ground Wire 58 1 Frame 59 1 Belly Pan 60 2 Center Isolator 61 1 Reed Switch Clip 62...Screw 73 1 Latch Housing 74 2 Tie Clamp 75 1 Releasable Tie 76 1 Access Door 77 1 Wire Harness 78 2 Extension Leg Endcap 79 1 Key/Clip 80 2 Front Wheel 81 2 Wheel Pin 82 2 Base Pad 83 12 1" Tek Screw 84 1 Upright 85 1 Console Base 86 2 ...
English Manual
Page 23
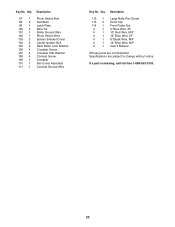
..." Red Wire, M/F # 1 12" Blue Wire, 2F # 1 8" Black Wire, M/F # 1 12" Blue Wire, M/F # 1 User's Manual #These parts are not illustrated Specifications are subject to change without notice. Key No. Description 97 1 Photo Switch Bolt 98 2 Dumbbell 99 1 Latch Plate 100 3 Wire Tie 101 1 Roller Ground Wire 102 1 Photo Switch Wire 103 2 Isolator Bracket... 105 2 Rear Roller Lock Washer 106 4 Crossbar Screw 107 4 Crossbar Star Washer 108 4 Console Screw 109 1 Crossbar 110 1 Fan Cover Assembly 111 1 Console Ground Wire Key No. Qty.
..." Red Wire, M/F # 1 12" Blue Wire, 2F # 1 8" Black Wire, M/F # 1 12" Blue Wire, M/F # 1 User's Manual #These parts are not illustrated Specifications are subject to change without notice. Key No. Description 97 1 Photo Switch Bolt 98 2 Dumbbell 99 1 Latch Plate 100 3 Wire Tie 101 1 Roller Ground Wire 102 1 Photo Switch Wire 103 2 Isolator Bracket... 105 2 Rear Roller Lock Washer 106 4 Crossbar Screw 107 4 Crossbar Star Washer 108 4 Console Screw 109 1 Crossbar 110 1 Fan Cover Assembly 111 1 Console Ground Wire Key No. Qty.


