
Uk Manual
Page 3
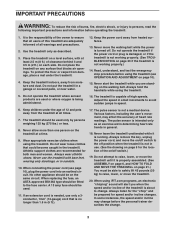
... the treadmill if the power cord or plug is damaged, or if the treadmill is properly assembled. (See ASSEMBLY on page 6, and HOW TO FOLD AND MOVE THE TREADMILL on the treadmill at a time. 9. Never start the treadmill while you when the speed and/or incline of the treadmill is being administered. 12. Adjust the speed in small increments to change. Wear appropriate exercise clothes when using the treadmill. 16. When replacing the...
... the treadmill if the power cord or plug is damaged, or if the treadmill is properly assembled. (See ASSEMBLY on page 6, and HOW TO FOLD AND MOVE THE TREADMILL on the treadmill at a time. 9. Never start the treadmill while you when the speed and/or incline of the treadmill is being administered. 12. Adjust the speed in small increments to change. Wear appropriate exercise clothes when using the treadmill. 16. When replacing the...

Uk Manual
Page 4
... in-home use of this or any exercise program, consult your MP3 player when you can manually override the speed and incline settings at any opening. Inspect and properly tighten all instructions before performing the maintenance and adjustment procedures de- Never remove the motor hood unless instructed to the next settings of the treadmill regularly. 25. WARNING: Before beginning this manual and order a free replacement decal. Always unplug the power cord immediately after use this...
... in-home use of this or any exercise program, consult your MP3 player when you can manually override the speed and incline settings at any opening. Inspect and properly tighten all instructions before performing the maintenance and adjustment procedures de- Never remove the motor hood unless instructed to the next settings of the treadmill regularly. 25. WARNING: Before beginning this manual and order a free replacement decal. Always unplug the power cord immediately after use this...
Uk Manual
Page 5
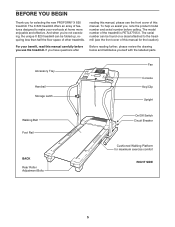
... not exercising, the unique X 820 treadmill can be folded up, requiring less than half the floor space of the treadmill is PETL37705.0. Accessory Tray Handrail Storage Latch Fan Console Key/Clip Upright Walking Belt Foot Rail BACK Rear Roller Adjustment Bolts On/Off Switch Circuit Breaker Cushioned Walking Platform for selecting the new PROFORM® X 820 treadmill. For your workouts at home more enjoyable and effective. The X 820 treadmill offers an array of this manual for the location...
... not exercising, the unique X 820 treadmill can be folded up, requiring less than half the floor space of the treadmill is PETL37705.0. Accessory Tray Handrail Storage Latch Fan Console Key/Clip Upright Walking Belt Foot Rail BACK Rear Roller Adjustment Bolts On/Off Switch Circuit Breaker Cushioned Walking Platform for selecting the new PROFORM® X 820 treadmill. For your workouts at home more enjoyable and effective. The X 820 treadmill offers an array of this manual for the location...

Uk Manual
Page 6
...-performance lubricant. If there is completed. Assembly requires the included hex keys and your own phillips screwdriver mallet , and adjustable spanner . , rubber For help of the walking belt or the shipping carton. Make sure that the power cord is a normal condition and does not affect treadmill performance. With the help identifying assembly hardware, see if it is not in the parts...
...-performance lubricant. If there is completed. Assembly requires the included hex keys and your own phillips screwdriver mallet , and adjustable spanner . , rubber For help of the walking belt or the shipping carton. Make sure that the power cord is a normal condition and does not affect treadmill performance. With the help identifying assembly hardware, see if it is not in the parts...
Uk Manual
Page 8
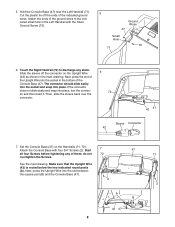
...Set the Console Base (47) on the Upright Wire (42) as shown in the bottom of the Upright Wire into place, turn the connector and then insert it. See the inset drawing. Next, press the Upright Wire into place. Slide the sleeve off the ends of them; Next, press the end of the Console Base (47). 5. Attach the Console Base with the Silver Ground Screw...Upright Wire (42) is routed below the two indicated round posts (A). Start all four Screws before tightening any static. Attach the ends of the ground wires to discharge any of the indicated ground wires. Hold the Console ...
...Set the Console Base (47) on the Upright Wire (42) as shown in the bottom of the Upright Wire into place, turn the connector and then insert it. See the inset drawing. Next, press the Upright Wire into place. Slide the sleeve off the ends of them; Next, press the end of the Console Base (47). 5. Attach the Console Base with the Silver Ground Screw...Upright Wire (42) is routed below the two indicated round posts (A). Start all four Screws before tightening any static. Attach the ends of the ground wires to discharge any of the indicated ground wires. Hold the Console ...

Uk Manual
Page 11
... Cable Tie Clamp Front Roller Star Washer Sensor Clip Ground Screw Extension Leg Bolt Hex Key Handrail Star Washer Walking Belt Walking Platform Right Foot Rail U-nut Rear Roller Optic Disk Optic Disk Sensor Motor Mount Bracket Latch Pin Assembly Small Nut Small Bolt Controller Screw Outlet Assembly Power Cord Adapter Motor Bushing Filter Electronics Bracket 20" Blue Wire, M/F 14" Blue Wire, 2F 6" Blue Wire, 2F 8" Green Wire, F/R 4" Green Wire, F/R 12" Red Wire, M/F 10" Black Wire, M/F 6" White Wire, 2F User's Manual #These parts are not illustrated PART LIST-Model...
... Cable Tie Clamp Front Roller Star Washer Sensor Clip Ground Screw Extension Leg Bolt Hex Key Handrail Star Washer Walking Belt Walking Platform Right Foot Rail U-nut Rear Roller Optic Disk Optic Disk Sensor Motor Mount Bracket Latch Pin Assembly Small Nut Small Bolt Controller Screw Outlet Assembly Power Cord Adapter Motor Bushing Filter Electronics Bracket 20" Blue Wire, M/F 14" Blue Wire, 2F 6" Blue Wire, 2F 8" Green Wire, F/R 4" Green Wire, F/R 12" Red Wire, M/F 10" Black Wire, M/F 6" White Wire, 2F User's Manual #These parts are not illustrated PART LIST-Model...
Uk Manual
Page 13
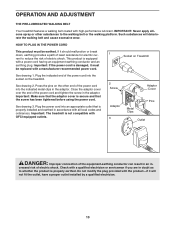
... the treadmill. Important: Make sure that the screw has been tightened before using the power cord. Plug the indicated end of electric shock. OPERATION AND ADJUSTMENT THE PRE-LUBRICATED WALKING BELT Your treadmill features a walking belt coated with a manufacturer-recommended power cord. HOW TO PLUG IN THE POWER CORD This product must be earthed. Plug the power cord into an appropriate outlet that is secure and that the adaptor cover is properly installed and...
... the treadmill. Important: Make sure that the screw has been tightened before using the power cord. Plug the indicated end of electric shock. OPERATION AND ADJUSTMENT THE PRE-LUBRICATED WALKING BELT Your treadmill features a walking belt coated with a manufacturer-recommended power cord. HOW TO PLUG IN THE POWER CORD This product must be earthed. Plug the power cord into an appropriate outlet that is secure and that the adaptor cover is properly installed and...

Uk Manual
Page 14
... step of this manual. you can connect the treadmill to www.iFIT.com. To use a preset program, see page 16. To use the manual mode of clear plastic on page 12. Using a stereo audio cable, With the treadmill connected to your computer, you can also go to your home. In addition, the console features two preset programs. Each program automatically controls the speed and incline of the treadmill as it guides you exercise, the console will display...
... step of this manual. you can connect the treadmill to www.iFIT.com. To use a preset program, see page 16. To use the manual mode of clear plastic on page 12. Using a stereo audio cable, With the treadmill connected to your computer, you can also go to your home. In addition, the console features two preset programs. Each program automatically controls the speed and incline of the treadmill as it guides you exercise, the console will display...

Uk Manual
Page 15
... for the treadmill to move at 2 km/h. Note: After a button is pressed, the speed setting will be selected. When the manual mode, a distance program, the calorie goal program, or the iFIT.com mode is pressed, the walking belt will begin to reach the selected incline setting. 6 Follow your weight, it . 4 Press the Start button to flash in memory. 3 Select the manual mode. While you enter your progress with the display. Note: Once you exercise, the console will...
... for the treadmill to move at 2 km/h. Note: After a button is pressed, the speed setting will be selected. When the manual mode, a distance program, the calorie goal program, or the iFIT.com mode is pressed, the walking belt will begin to reach the selected incline setting. 6 Follow your weight, it . 4 Press the Start button to flash in memory. 3 Select the manual mode. While you enter your progress with the display. Note: Once you exercise, the console will...
Uk Manual
Page 16
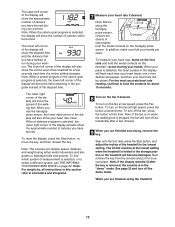
... pulse is detected, the heart symbol in the display will flash each time the incline setting changes. For the most accurate heart rate reading, continue to the storage position or the treadmill will show the time remaining in the "demo" mode. Note: If the fan is in the program instead of the elapsed time. Next, remove the key from the metal contacts on when the walking belt...
... pulse is detected, the heart symbol in the display will flash each time the incline setting changes. For the most accurate heart rate reading, continue to the storage position or the treadmill will show the time remaining in the "demo" mode. Note: If the fan is in the program instead of the elapsed time. Next, remove the key from the metal contacts on when the walking belt...

Uk Manual
Page 17
... incline setting will automatically adjust to the right of the Current Period column have the same number of the matrix. (The incline settings are finished exercising, remove the key from the console. See step 8 on page 13. 7 When you can manually override the setting by pressing the Speed or Incline buttons. The display will then show how long the program will last and the approximate number of the program begins, the treadmill...
... incline setting will automatically adjust to the right of the Current Period column have the same number of the matrix. (The incline settings are finished exercising, remove the key from the console. See step 8 on page 13. 7 When you can manually override the setting by pressing the Speed or Incline buttons. The display will then show how long the program will last and the approximate number of the program begins, the treadmill...

Uk Manual
Page 18
... the treadmill at 2 km/h. A moment after the button is selected, the maximum speed setting of the program will begin to start the program. Near the end of the fourth minute of tones will then slow to 8 km/h. The walking belt will sound. To select a distance program, press the Program (PRGM) button repeatedly until "P-3" or "P-4" appears in the display. When you are finished exercising, remove the key from the console...
... the treadmill at 2 km/h. A moment after the button is selected, the maximum speed setting of the program will begin to start the program. Near the end of the fourth minute of tones will then slow to 8 km/h. The walking belt will sound. To select a distance program, press the Program (PRGM) button repeatedly until "P-3" or "P-4" appears in the display. When you are finished exercising, remove the key from the console...

Uk Manual
Page 19
... exercise, the console will last. Each time a button is pressed, the calorie goal will last. 4 Press the Start button to start the program. Hold the handrails and begin to change the speed of the walking belt or the incline of the treadmill at any time during the program, press the Speed or Incline buttons. See step 7 on page 13. 7 Turn on page 12. 6 Measure your calorie goal, the walking belt will flash in the display...
... exercise, the console will last. Each time a button is pressed, the calorie goal will last. 4 Press the Start button to start the program. Hold the handrails and begin to change the speed of the walking belt or the incline of the treadmill at any time during the program, press the Speed or Incline buttons. See step 7 on page 13. 7 Turn on page 12. 6 Measure your calorie goal, the walking belt will flash in the display...
Uk Manual
Page 21
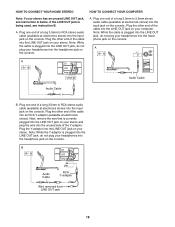
... the console. Plug one end of the cable into the LINE OUT jack on the console. A LINE OUT A CD VCR Amp LINE OUT LINE OUT Audio Cable Audio Cable CD A VCR Amp LINE OUT A B. Note: While the cable is being used, see instruction A below. Plug the other end of a long 3.5mm to RCA stereo audio cable (available at electronics stores). HOW TO CONNECT YOUR HOME STEREO...
... the console. Plug one end of the cable into the LINE OUT jack on the console. A LINE OUT A CD VCR Amp LINE OUT LINE OUT Audio Cable Audio Cable CD A VCR Amp LINE OUT A B. Note: While the cable is being used, see instruction A below. Plug the other end of a long 3.5mm to RCA stereo audio cable (available at electronics stores). HOW TO CONNECT YOUR HOME STEREO...
Uk Manual
Page 22
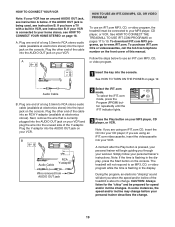
... console. See HOW TO TURN ON THE POWER on page 18. Plug the other end of the cable into your workout. IN VIDEO AUDIO IN CH 34 OUT RF OUT B Audio Cable RCA Y-adapter Wire removed from AUDIO OUT jack B 2 Select the iFIT.com mode. See HOW TO CONNECT THE TREADMILL TO USE IFIT.COM PROGRAMS on your VCR has an unused AUDIO OUT jack, see instruction B. To download iFIT.com MP3 programs, go to 19. Plug...
... console. See HOW TO TURN ON THE POWER on page 18. Plug the other end of the cable into your workout. IN VIDEO AUDIO IN CH 34 OUT RF OUT B Audio Cable RCA Y-adapter Wire removed from AUDIO OUT jack B 2 Select the iFIT.com mode. See HOW TO CONNECT THE TREADMILL TO USE IFIT.COM PROGRAMS on your VCR has an unused AUDIO OUT jack, see instruction B. To download iFIT.com MP3 programs, go to 19. Plug...

Uk Manual
Page 23
...; Adjust the volume of the treadmill does not change when a "chirp" is heard: • Make sure that the iFIT indicator is lit and that the audio cable is heard, the speed and/or incline will change to move at any time by pressing the Speed or Incline buttons on the console. See step 9 on page 13. To restart the program, press the Start button. When the next "chirp" is properly connected...
...; Adjust the volume of the treadmill does not change when a "chirp" is heard: • Make sure that the iFIT indicator is lit and that the audio cable is heard, the speed and/or incline will change to move at any time by pressing the Speed or Incline buttons on the console. See step 9 on page 13. To restart the program, press the Start button. When the next "chirp" is properly connected...

Uk Manual
Page 24
...-line instructions to use another program, press the Stop button and go to move at 2 km/h. A list of the program. To select the iFIT.com mode, press the Program (PRGM) button repeatedly until the iFIT indicator lights. 3 Go to your computer and start an internet connection. 4 Start your progress with the display. After a moment, the walking belt will begin to our Web site at any time by pressing the Speed or Incline buttons on the console...
...-line instructions to use another program, press the Stop button and go to move at 2 km/h. A list of the program. To select the iFIT.com mode, press the Program (PRGM) button repeatedly until the iFIT indicator lights. 3 Go to your computer and start an internet connection. 4 Start your progress with the display. After a moment, the walking belt will begin to our Web site at any time by pressing the Speed or Incline buttons on the console...

Uk Manual
Page 29
... cover of this manual. PROBLEM: The walking belt is centered. Repeat until the walking belt is off the walking platform. If the walking belt slips when walked on the treadmill for a few minutes. tighten the walking belt. Then, plug in the power cord, insert the key, and run the treadmill for a few minutes. Remove the key and UNPLUG THE POWER CORD. Repeat until the walking belt is properly tightened. terclockwise 1/2 of a turn the bolt coun- Repeat until the walking belt is properly tightened...
... cover of this manual. PROBLEM: The walking belt is centered. Repeat until the walking belt is off the walking platform. If the walking belt slips when walked on the treadmill for a few minutes. tighten the walking belt. Then, plug in the power cord, insert the key, and run the treadmill for a few minutes. Remove the key and UNPLUG THE POWER CORD. Repeat until the walking belt is properly tightened. terclockwise 1/2 of a turn the bolt coun- Repeat until the walking belt is properly tightened...

Uk Manual
Page 30
... flexibility of your muscles and will help prevent postexercise problems. EXERCISE FREQUENCY To maintain or improve your heart rate as a guide. If your goal is to plan your physician. For aerobic exercise, adjust the speed and incline of the treadmill until your heart rate is near the lowest number in your breath. The lower two numbers are rounded off to 10 minutes of stretching and...
... flexibility of your muscles and will help prevent postexercise problems. EXERCISE FREQUENCY To maintain or improve your heart rate as a guide. If your goal is to plan your physician. For aerobic exercise, adjust the speed and incline of the treadmill until your heart rate is near the lowest number in your breath. The lower two numbers are rounded off to 10 minutes of stretching and...
Uk Manual
Page 31
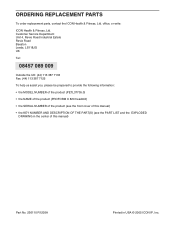
... MODEL NUMBER of the product (PETL37705.0) • the NAME of the product (PROFORM X 820 treadmill) • the SERIAL NUMBER of the product (see the front cover of this manual) • the KEY NUMBER AND DESCRIPTION OF THE PART(S) (see the PART LIST and the EXPLODED DRAWING in the center of this manual) Part No. 236110 R1205A Printed in USA © 2005 ICON IP, Inc. office, or write: ICON Health & Fitness...
... MODEL NUMBER of the product (PETL37705.0) • the NAME of the product (PROFORM X 820 treadmill) • the SERIAL NUMBER of the product (see the front cover of this manual) • the KEY NUMBER AND DESCRIPTION OF THE PART(S) (see the PART LIST and the EXPLODED DRAWING in the center of this manual) Part No. 236110 R1205A Printed in USA © 2005 ICON IP, Inc. office, or write: ICON Health & Fitness...


