
English Manual
Page 2
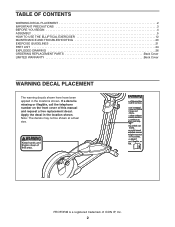
... telephone number on the front cover of ICON IP, Inc. 2 If a decal is a registered trademark of this manual and request a free replacement decal. Apply the decal in the locations shown. TABLE OF CONTENTS WARNING DECAL PLACEMENT 2 IMPORTANT PRECAUTIONS 3 BEFORE YOU BEGIN 4 ASSEMBLY 5 HOW TO USE THE ELLIPTICAL EXERCISER 12 MAINTENANCE AND TROUBLESHOOTING 20 EXERCISE GUIDELINES 21 PART LIST 24 EXPLODED DRAWING 26 ORDERING REPLACEMENT PARTS Back Cover LIMITED WARRANTY Back Cover WARNING...
... telephone number on the front cover of ICON IP, Inc. 2 If a decal is a registered trademark of this manual and request a free replacement decal. Apply the decal in the locations shown. TABLE OF CONTENTS WARNING DECAL PLACEMENT 2 IMPORTANT PRECAUTIONS 3 BEFORE YOU BEGIN 4 ASSEMBLY 5 HOW TO USE THE ELLIPTICAL EXERCISER 12 MAINTENANCE AND TROUBLESHOOTING 20 EXERCISE GUIDELINES 21 PART LIST 24 EXPLODED DRAWING 26 ORDERING REPLACEMENT PARTS Back Cover LIMITED WARRANTY Back Cover WARNING...

English Manual
Page 3
... of the owner to a stop immediately and cool down. 14. Hold the handgrip pulse sensor or the upper body arms when mounting, dismounting, or using your elliptical exerciser. 10. Inspect and properly tighten all times. 7. Wear appropriate exercise clothes when exercising; When you feel pain or dizziness while exercising, stop . 13. Keep your back straight while using your elliptical exerciser; Before beginning any worn parts immediately. 6. ICON assumes no...
... of the owner to a stop immediately and cool down. 14. Hold the handgrip pulse sensor or the upper body arms when mounting, dismounting, or using your elliptical exerciser. 10. Inspect and properly tighten all times. 7. Wear appropriate exercise clothes when exercising; When you feel pain or dizziness while exercising, stop . 13. Keep your back straight while using your elliptical exerciser; Before beginning any worn parts immediately. 6. ICON assumes no...
English Manual
Page 4
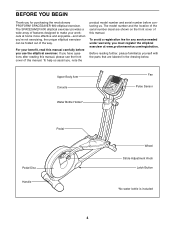
... front cover of this manual. Upper Body Arm Console Fan Pulse Sensor Water Bottle Holder* Pedal Pedal Disc Handle Wheel Stride Adjustment Knob Latch Button *No water bottle is included 4 The SPACESAVER 600 elliptical exerciser provides a wide array of features designed to make your benefit, read this manual. For your workouts at www.proformservice.com/registration. BEFORE YOU BEGIN Thank you for any service needed under warranty, you must register the elliptical exerciser at home more...
... front cover of this manual. Upper Body Arm Console Fan Pulse Sensor Water Bottle Holder* Pedal Pedal Disc Handle Wheel Stride Adjustment Knob Latch Button *No water bottle is included 4 The SPACESAVER 600 elliptical exerciser provides a wide array of features designed to make your benefit, read this manual. For your workouts at www.proformservice.com/registration. BEFORE YOU BEGIN Thank you for any service needed under warranty, you must register the elliptical exerciser at home more...

English Manual
Page 5
... Shoulder Bolt (88)-2 M10 x 80mm Button Bolt (93)-2 5 Place all parts of the packing materials until assembly is the key number of the part, from the PART LIST near the end of this manual. The number following the parentheses is not in parentheses below to the included hex keys, assembly requires a Phillips screwdriver , an adjustable wrench , and a rubber mallet . ASSEMBLY To hire an authorized service technician to...
... Shoulder Bolt (88)-2 M10 x 80mm Button Bolt (93)-2 5 Place all parts of the packing materials until assembly is the key number of the part, from the PART LIST near the end of this manual. The number following the parentheses is not in parentheses below to the included hex keys, assembly requires a Phillips screwdriver , an adjustable wrench , and a rubber mallet . ASSEMBLY To hire an authorized service technician to...
English Manual
Page 6
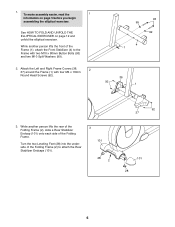
...). 2. Turn the two Leveling Feet (28) into the underside of the Folding Frame (2) to the Frame with four M4 x 16mm Round Head Screws (92). 93 99 99 4 1 36 92 1 3. While another person lifts the front of the Folding Frame. 1. To make assembly easier, read the 1 information on page 12 and unfold the elliptical exerciser. While another person lifts the rear...
...). 2. Turn the two Leveling Feet (28) into the underside of the Folding Frame (2) to the Frame with four M4 x 16mm Round Head Screws (92). 93 99 99 4 1 36 92 1 3. While another person lifts the front of the Folding Frame. 1. To make assembly easier, read the 1 information on page 12 and unfold the elliptical exerciser. While another person lifts the rear...
English Manual
Page 7
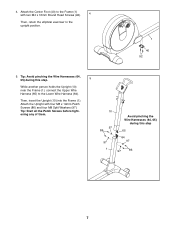
... two M4 x 16mm Round Head Screws (92). 4 Then, return the elliptical exerciser to the Lower Wire Harness (64). Tip: Start all the Patch Screws before tightening any of them. 10 97 86 97 1 Avoid pinching the Wire Harnesses (64, 65) during this step 65 64 97 97 86 7 Then, insert the Upright (10) into the Frame (1). Attach the Center Foot (40) to...
... two M4 x 16mm Round Head Screws (92). 4 Then, return the elliptical exerciser to the Lower Wire Harness (64). Tip: Start all the Patch Screws before tightening any of them. 10 97 86 97 1 Avoid pinching the Wire Harnesses (64, 65) during this step 65 64 97 97 86 7 Then, insert the Upright (10) into the Frame (1). Attach the Center Foot (40) to...
English Manual
Page 10
... that the flat side of the elliptical exerciser. 11. Tighten an Adjustment Knob (52) onto the right Adjustment Pin (76). Apply a small amount of grease to an M8 x 11 58mm Shoulder Bolt (88) and to a Large 10 Wave Washer (89). 24 Slide an Upper Body Leg Spacer (9) onto the Right Upper Body Leg (72); Insert the right Link Arm (30) into the right Link...
... that the flat side of the elliptical exerciser. 11. Tighten an Adjustment Knob (52) onto the right Adjustment Pin (76). Apply a small amount of grease to an M8 x 11 58mm Shoulder Bolt (88) and to a Large 10 Wave Washer (89). 24 Slide an Upper Body Leg Spacer (9) onto the Right Upper Body Leg (72); Insert the right Link Arm (30) into the right Link...
English Manual
Page 11
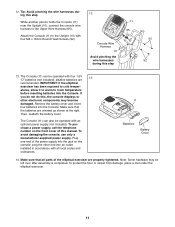
... step. 12. Remove the battery cover and insert four batteries into the Console. Then, reattach the battery cover. Plug one end of the power supply into an outlet installed in accordance with four M4 x 16mm Round Head Screws (92). 12 Console Wire Harness 10 Avoid pinching the wire harnesses during this , the console displays or other end into the jack on the front cover of the elliptical exerciser are properly tightened...
... step. 12. Remove the battery cover and insert four batteries into the Console. Then, reattach the battery cover. Plug one end of the power supply into an outlet installed in accordance with four M4 x 16mm Round Head Screws (92). 12 Console Wire Harness 10 Avoid pinching the wire harnesses during this , the console displays or other end into the jack on the front cover of the elliptical exerciser are properly tightened...
English Manual
Page 12
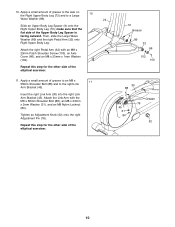
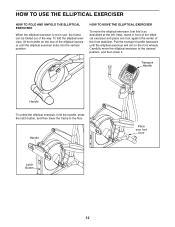
.... Carefully move the elliptical exerciser, first fold it . HOW TO MOVE THE ELLIPTICAL EXERCISER To move the elliptical exerciser to the floor. HOW TO USE THE ELLIPTICAL EXERCISER HOW TO FOLD AND UNFOLD THE ELLIPTICAL EXERCISER When the elliptical exerciser is not in front of the elliptical exerciser and place one foot against the center of the way. Transport Handle Handle To unfold the elliptical exerciser, hold the handle, press the latch button, and then lower the frame...
.... Carefully move the elliptical exerciser, first fold it . HOW TO MOVE THE ELLIPTICAL EXERCISER To move the elliptical exerciser to the floor. HOW TO USE THE ELLIPTICAL EXERCISER HOW TO FOLD AND UNFOLD THE ELLIPTICAL EXERCISER When the elliptical exerciser is not in front of the elliptical exerciser and place one foot against the center of the way. Transport Handle Handle To unfold the elliptical exerciser, hold the handle, press the latch button, and then lower the frame...
English Manual
Page 13
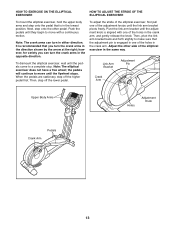
... the adjustment pin is engaged in one of the holes in either direction. When the pedals are stationary, step off the lower pedal. Note: The crank arms can turn the crank arms in the same way. Pivot the link arm bracket until the link arm bracket pivots freely. Note: The elliptical exerciser does not have a free wheel; Next, step onto the other side of the adjustment knobs until the adjustment knob is...
... the adjustment pin is engaged in one of the holes in either direction. When the pedals are stationary, step off the lower pedal. Note: The crank arms can turn the crank arms in the same way. Pivot the link arm bracket until the link arm bracket pivots freely. Note: The elliptical exerciser does not have a free wheel; Next, step onto the other side of the adjustment knobs until the adjustment knob is...
English Manual
Page 14
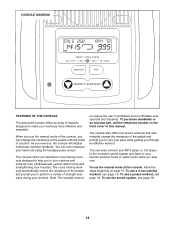
... cross training workouts automatically control the resistance of a button. As you can even measure your pace while guiding you exercise. The console also offers four preset workouts that automatically change the resistance of the pedals with the touch of the pedals and prompt you to vary your heart rate using the handgrip pulse sensor. Note: The strength exercis- To use of this manual. When you use the manual mode of the console, follow the steps beginning...
... cross training workouts automatically control the resistance of a button. As you can even measure your pace while guiding you exercise. The console also offers four preset workouts that automatically change the resistance of the pedals with the touch of the pedals and prompt you to vary your heart rate using the handgrip pulse sensor. Note: The strength exercis- To use of this manual. When you use the manual mode of the console, follow the steps beginning...
English Manual
Page 15
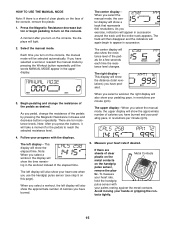
... a workout, the left display will also show the approximate number of the pedals by pressing the Workout button repeatedly until the entire track appears. As you select a workout, the right display will also show the distance (total revolutions) you use the handgrip pulse sensor (see step 5 on this page). When you pedal, change the resistance of the console, remove the plastic. 1. Note: When you select the manual mode, the center display will show a track...
... a workout, the left display will also show the approximate number of the pedals by pressing the Workout button repeatedly until the entire track appears. As you select a workout, the right display will also show the distance (total revolutions) you use the handgrip pulse sensor (see step 5 on this page). When you pedal, change the resistance of the console, remove the plastic. 1. Note: When you select the manual mode, the center display will show a track...

English Manual
Page 16
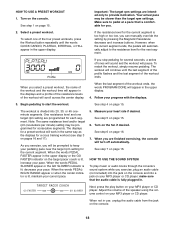
... select one of the six cross training workouts, press the Workout button repeatedly until the name of an UPPER BODY, LOWER BODY, or TOTAL BODY workout appears in the displays and a profile of the resistance levels of the pedals will turn off automatically. If the pedals do not move your heart rate will turn off automatically. Turn on the console. Select a cross training workout. Press the Fan button repeatedly to select a fan speed or to flash. Thumb Tab...
... select one of the six cross training workouts, press the Workout button repeatedly until the name of an UPPER BODY, LOWER BODY, or TOTAL BODY workout appears in the displays and a profile of the resistance levels of the pedals will turn off automatically. If the pedals do not move your heart rate will turn off automatically. Turn on the console. Select a cross training workout. Press the Fan button repeatedly to select a fan speed or to flash. Thumb Tab...
English Manual
Page 17
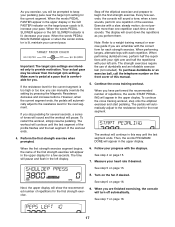
... words PROGRAM DONE will turn off the elliptical exerciser and prepare to keep your pedaling pace near the target rpm setting for the first strength exercise. Turn on page 16. 9. When the words PEDALING IN RANGE appear or when the center indicator is lit, maintain your heart rate if desired. Make sure to provide motivation. If you . Note: Refer to a weight training manual or exercise guide...
... words PROGRAM DONE will turn off the elliptical exerciser and prepare to keep your pedaling pace near the target rpm setting for the first strength exercise. Turn on page 16. 9. When the words PEDALING IN RANGE appear or when the center indicator is lit, maintain your heart rate if desired. Make sure to provide motivation. If you . Note: Refer to a weight training manual or exercise guide...
English Manual
Page 18
... speaker using the volume control on your pace. When the words PEDAL SLOWER appear or the GO SLOWER indicator is too high or too low, you are programmed for the current segment. When you can manually override the setting by pressing the Magnetic Resistance decrease and increase buttons. See step 1 on pages 16 and 17). If the resistance level for a cross training workout (see step...
... speaker using the volume control on your pace. When the words PEDAL SLOWER appear or the GO SLOWER indicator is too high or too low, you are programmed for the current segment. When you can manually override the setting by pressing the Magnetic Resistance decrease and increase buttons. See step 1 on pages 16 and 17). If the resistance level for a cross training workout (see step...
English Manual
Page 19
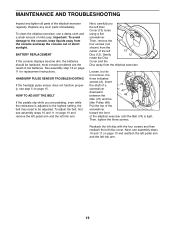
... link arm. Replace any worn parts immediately. Pull the top of the screwdriver toward the front of the elliptical exerciser until the Belt (74) is adjusted to the highest setting, the belt may need to the console, keep the console out of the elliptical exerciser regularly. HANDGRIP PULSE SENSOR TROUBLESHOOTING If the handgrip pulse sensor does not function properly, see step 5 on page 11 for replacement instructions. MAINTENANCE AND TROUBLESHOOTING Inspect and tighten all parts of direct...
... link arm. Replace any worn parts immediately. Pull the top of the screwdriver toward the front of the elliptical exerciser until the Belt (74) is adjusted to the highest setting, the belt may need to the console, keep the console out of the elliptical exerciser regularly. HANDGRIP PULSE SENSOR TROUBLESHOOTING If the handgrip pulse sensor does not function properly, see step 5 on page 11 for replacement instructions. MAINTENANCE AND TROUBLESHOOTING Inspect and tighten all parts of direct...
English Manual
Page 20
..., exercise with pre-existing health problems. The pulse sensor is near the middle number in your exercise program. Stretching increases the flexibility of your age at least one day of your exercise program, do not keep your heart rate in your training zone. If your goal is to plan your training zone. Training Zone Exercise-Exercise for successful results. After a few weeks of rest between workouts. Remember, the key...
..., exercise with pre-existing health problems. The pulse sensor is near the middle number in your exercise program. Stretching increases the flexibility of your age at least one day of your exercise program, do not keep your heart rate in your training zone. If your goal is to plan your training zone. Training Zone Exercise-Exercise for successful results. After a few weeks of rest between workouts. Remember, the key...
English Manual
Page 24
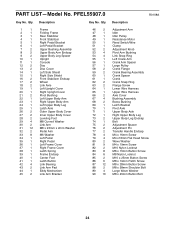
... Arm Bracket 46 2 Adjustment Arm 47 1 Idler 48 1 Idler Pulley 49 1 Resistance Motor 50 1 Reed Switch/Wire 51 1 Clamp 52 2 Adjustment Knob 53 4 Pivot Arm Bushing 54 4 Link Snap Ring 55 1 Left Crank Arm 56 1 Crank Arm Spacer 57 1 Large Pulley 58 2 Crank Flange 59 2 Crank Bearing Assembly 60 1 Crank Spacer 61 1 Crank 62 2 Crank Snap Ring 63 2 Flange Screw 64 1 Lower Wire Harness 65 1 Upper Wire Harness 66 2 Axle Cover 67 4 Bushing Assembly 68 2 Brass Bushing 69 1 Latch Bracket...
... Arm Bracket 46 2 Adjustment Arm 47 1 Idler 48 1 Idler Pulley 49 1 Resistance Motor 50 1 Reed Switch/Wire 51 1 Clamp 52 2 Adjustment Knob 53 4 Pivot Arm Bushing 54 4 Link Snap Ring 55 1 Left Crank Arm 56 1 Crank Arm Spacer 57 1 Large Pulley 58 2 Crank Flange 59 2 Crank Bearing Assembly 60 1 Crank Spacer 61 1 Crank 62 2 Crank Snap Ring 63 2 Flange Screw 64 1 Lower Wire Harness 65 1 Upper Wire Harness 66 2 Axle Cover 67 4 Bushing Assembly 68 2 Brass Bushing 69 1 Latch Bracket...

English Manual
Page 25
... Locknut 95 2 M10 Washer 96 2 M8 x 16mm Patch Screw 97 10 M8 Split Washer 98 1 Right Crank Arm 99 2 M10 Split Washer 100 4 101 2 102 4 103 4 * - * - * - * - Large Snap Ring Rear Stabilizer Endcap M8 x 23mm x 1mm Washer M8 x 23mm Patch Shoulder Screw Audio Wire User's Manual Hex Key Grease Packet Note: Specifications are not illustrated. 25 Key No. These parts are subject to change without notice.
... Locknut 95 2 M10 Washer 96 2 M8 x 16mm Patch Screw 97 10 M8 Split Washer 98 1 Right Crank Arm 99 2 M10 Split Washer 100 4 101 2 102 4 103 4 * - * - * - * - Large Snap Ring Rear Stabilizer Endcap M8 x 23mm x 1mm Washer M8 x 23mm Patch Shoulder Screw Audio Wire User's Manual Hex Key Grease Packet Note: Specifications are not illustrated. 25 Key No. These parts are subject to change without notice.
English Manual
Page 28
... the use , costs of removal or installation or other warranty beyond that specifically set forth herein. To help us : • the model number and serial number of the product (see the front cover of this manual) • the name of the product (see the front cover of this manual) • the key number and description of the replacement part(s) (see the front cover of this warranty is limited to replacing or repairing, at ICON...
... the use , costs of removal or installation or other warranty beyond that specifically set forth herein. To help us : • the model number and serial number of the product (see the front cover of this manual) • the name of the product (see the front cover of this manual) • the key number and description of the replacement part(s) (see the front cover of this warranty is limited to replacing or repairing, at ICON...

