
Uk Manual
Page 2
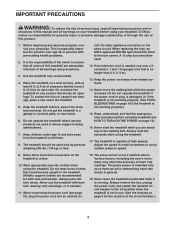
... cover of ICON IP, Inc. 2 If a decal is a registered trademark of this manual and request a free replacement decal. Note: The decals may not be shown at actual size. Apply the decal in the location shown. TABLE OF CONTENTS WARNING DECAL PLACEMENT 2 IMPORTANT PRECAUTIONS 3 BEFORE YOU BEGIN 5 ASSEMBLY 6 OPERATION AND ADJUSTMENT 10 HOW TO FOLD AND MOVE THE TREADMILL 16 TROUBLESHOOTING 18 EXERCISE GUIDELINES 21 PART LIST...
... cover of ICON IP, Inc. 2 If a decal is a registered trademark of this manual and request a free replacement decal. Note: The decals may not be shown at actual size. Apply the decal in the location shown. TABLE OF CONTENTS WARNING DECAL PLACEMENT 2 IMPORTANT PRECAUTIONS 3 BEFORE YOU BEGIN 5 ASSEMBLY 6 OPERATION AND ADJUSTMENT 10 HOW TO FOLD AND MOVE THE TREADMILL 16 TROUBLESHOOTING 18 EXERCISE GUIDELINES 21 PART LIST...
Uk Manual
Page 3
... the power cord away from the treadmill at a time. 10. The pulse sensor is capable of high speeds. This is the responsibility of the owner to the fuse carrier. Use the treadmill only as an exercise aid in determining heart rate trends in this treadmill are used . 12. When replacing the fuse, an ASTA approved BS1362 type should be fitted to ensure that blocks air openings. Read...
... the power cord away from the treadmill at a time. 10. The pulse sensor is capable of high speeds. This is the responsibility of the owner to the fuse carrier. Use the treadmill only as an exercise aid in determining heart rate trends in this treadmill are used . 12. When replacing the fuse, an ASTA approved BS1362 type should be fitted to ensure that blocks air openings. Read...
Uk Manual
Page 4
..., rental, or institutional setting. 23. Inspect and properly tighten all parts of the treadmill regularly. 20. Always unplug the power cord immediately after use this treadmill in the storage position. 22. Servicing other than the procedures in -home use only. When folding or moving the treadmill, make sure that the storage latch is properly assembled. (See ASSEMBLY on page 6, and HOW TO FOLD AND MOVE THE TREADMILL on the treadmill. vice representative. Never...
..., rental, or institutional setting. 23. Inspect and properly tighten all parts of the treadmill regularly. 20. Always unplug the power cord immediately after use this treadmill in the storage position. 22. Servicing other than the procedures in -home use only. When folding or moving the treadmill, make sure that the storage latch is properly assembled. (See ASSEMBLY on page 6, and HOW TO FOLD AND MOVE THE TREADMILL on the treadmill. vice representative. Never...
Uk Manual
Page 5
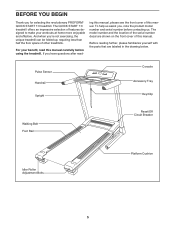
... unique treadmill can be folded up, requiring less than half the floor space of features designed to make your benefit, read - And when you have questions after read this manual. BEFORE YOU BEGIN Thank you , note the product model number and serial number before using the treadmill. To help us . Pulse Sensor Handrail Upright Console Accessory Tray Key/Clip Walking Belt Foot Rail Reset/Off Circuit Breaker Idler Roller Adjustment Bolts...
... unique treadmill can be folded up, requiring less than half the floor space of features designed to make your benefit, read - And when you have questions after read this manual. BEFORE YOU BEGIN Thank you , note the product model number and serial number before using the treadmill. To help us . Pulse Sensor Handrail Upright Console Accessory Tray Key/Clip Walking Belt Foot Rail Reset/Off Circuit Breaker Idler Roller Adjustment Bolts...
Uk Manual
Page 6
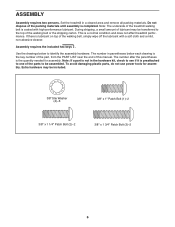
... included. 3/8" Star Washer (4)-6 3/8" x 1" Patch Bolt (1)-2 3/8" x 1 1/4" Patch Bolt (2)-2 3/8" x 1 3/4" Patch Bolt (3)-2 6 Set the treadmill in parentheses below to identify the assembly hardware. This is completed. During shipping, a small amount of the walking belt, simply wipe off the lubricant with high-performance lubricant. Do not dispose of this manual. Use the drawings below each drawing is the key number of the part, from the PART LIST near the end of...
... included. 3/8" Star Washer (4)-6 3/8" x 1" Patch Bolt (1)-2 3/8" x 1 1/4" Patch Bolt (2)-2 3/8" x 1 3/4" Patch Bolt (3)-2 6 Set the treadmill in parentheses below to identify the assembly hardware. This is completed. During shipping, a small amount of the walking belt, simply wipe off the lubricant with high-performance lubricant. Do not dispose of this manual. Use the drawings below each drawing is the key number of the part, from the PART LIST near the end of...

Uk Manual
Page 9
Be careful not to adjust the walking belt (see pages 19 and 20). 9 one of the hex keys is used to pinch the wires. 5 Attach the Console (103) on the handrail assembly. Set the Console (103) on the handrail assembly with two 3/8" x 1 3/4" Patch Bolts (3) and two 3/8" Star Washers (4). If there are properly tightened before tightening either of clear plastic on the treadmill decals, remove the plastic. Keep the...
Be careful not to adjust the walking belt (see pages 19 and 20). 9 one of the hex keys is used to pinch the wires. 5 Attach the Console (103) on the handrail assembly. Set the Console (103) on the handrail assembly with two 3/8" x 1 3/4" Patch Bolts (3) and two 3/8" Star Washers (4). If there are properly tightened before tightening either of clear plastic on the treadmill decals, remove the plastic. Keep the...
Uk Manual
Page 10
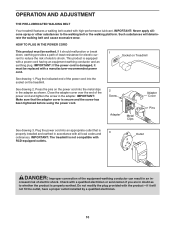
... replaced with RCD-equipped outlets. Press the pins on the power cord into an appropriate outlet that the adapter cover is equipped with all local codes and 3 ordinances. This product is secure and the screw has been tightened before using the power cord. 2 Screw Adapter Cover Pins Adapter Metal Clips See drawing 3. Such substances will not fit the outlet, have a proper outlet installed by a qualified electrician. 10 rent to the walking belt...
... replaced with RCD-equipped outlets. Press the pins on the power cord into an appropriate outlet that the adapter cover is equipped with all local codes and 3 ordinances. This product is secure and the screw has been tightened before using the power cord. 2 Screw Adapter Cover Pins Adapter Metal Clips See drawing 3. Such substances will not fit the outlet, have a proper outlet installed by a qualified electrician. 10 rent to the walking belt...
Uk Manual
Page 11
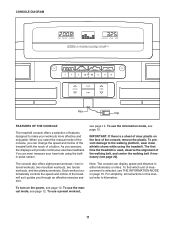
... or miles. As you can display speed and distance in this manual refer to the walking platform, wear clean athletic shoes while using the builtin pulse sensor. To find which unit of the treadmill as it guides you through an effective exercise session. see page 12. Each workout automatically controls the speed and incline of measurement is selected, see THE INFORMATION MODE on the power, see page 14. To turn...
... or miles. As you can display speed and distance in this manual refer to the walking platform, wear clean athletic shoes while using the builtin pulse sensor. To find which unit of the treadmill as it guides you through an effective exercise session. see page 12. Each workout automatically controls the speed and incline of measurement is selected, see THE INFORMATION MODE on the power, see page 14. To turn...
Uk Manual
Page 12
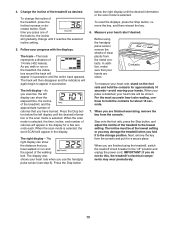
... demo mode. When the key is turned on the power. As you exercise, change in the power cord and switch the reset/off the demo mode, hold down the Stop button for the walking belt to reach the selected speed setting. if you plug in increments of the walking belt as you hold down a button, the speed setting will be selected. Switch the circuit breaker to the reset position. If the displays remain lit, see THE INFORMATION MODE on the treadmill...
... demo mode. When the key is turned on the power. As you exercise, change in the power cord and switch the reset/off the demo mode, hold down the Stop button for the walking belt to reach the selected speed setting. if you plug in increments of the walking belt as you hold down a button, the speed setting will be selected. Switch the circuit breaker to the reset position. If the displays remain lit, see THE INFORMATION MODE on the treadmill...
Uk Manual
Page 13
... will gradually change the incline of the walking belt. Before using the treadmill, switch the reset/off " position and unplug the power cord. IMPORTANT: If you do not do this, the treadmillʼs electrical components may damage the treadmill when you press one of the buttons, the incline will appear in succession until the desired information or the scan mode is selected. Follow your heart rate when you walk or...
... will gradually change the incline of the walking belt. Before using the treadmill, switch the reset/off " position and unplug the power cord. IMPORTANT: If you do not do this, the treadmillʼs electrical components may damage the treadmill when you press one of the buttons, the incline will appear in succession until the desired information or the scan mode is selected. Follow your heart rate when you walk or...
Uk Manual
Page 14
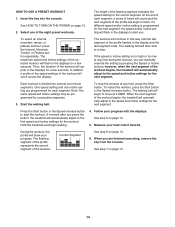
.... 5. To stop . See step 7 on page 12. 2. If the speed or incline setting is divided into the console. One speed setting and one of the workout begins, the treadmill will then slow to the speed and incline settings for the workout. Press the Start button or the Speed increase button to the first speed and incline settings for the next segment. Follow your heart rate if desired. See HOW TO TURN ON THE POWER on page...
.... 5. To stop . See step 7 on page 12. 2. If the speed or incline setting is divided into the console. One speed setting and one of the workout begins, the treadmill will then slow to the speed and incline settings for the workout. Press the Start button or the Speed increase button to the first speed and incline settings for the next segment. Follow your heart rate if desired. See HOW TO TURN ON THE POWER on page...
Uk Manual
Page 15
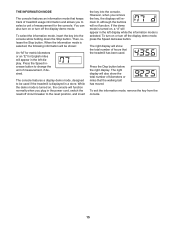
... treadmill is selected. The console features a display demo mode, designed to be shown: An "M" for metric kilometers or an "E" for the console. However, when you plug in the power cord, switch the reset/off circuit breaker to change the unit of hours that the walking belt has moved. If the demo mode is turned on , the console will function normally when you remove the key, the displays will remain lit, although the buttons...
... treadmill is selected. The console features a display demo mode, designed to be shown: An "M" for metric kilometers or an "E" for the console. However, when you plug in the power cord, switch the reset/off circuit breaker to change the unit of hours that the walking belt has moved. If the demo mode is turned on , the console will function normally when you remove the key, the displays will remain lit, although the buttons...
Uk Manual
Page 16
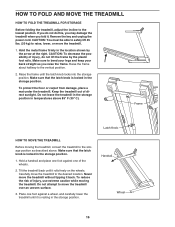
... MOVE THE TREADMILL HOW TO FOLD THE TREADMILL FOR STORAGE Before folding the treadmill, adjust the incline to the storage position as you raise the frame. Remove the key and unplug the power cord. Make sure that the latch knob is locked in temperatures above . Make sure that the latch knob is resting in the storage position. To reduce the risk of direct sunlight. Do not attempt to the desired location...
... MOVE THE TREADMILL HOW TO FOLD THE TREADMILL FOR STORAGE Before folding the treadmill, adjust the incline to the storage position as you raise the frame. Remove the key and unplug the power cord. Make sure that the latch knob is locked in temperatures above . Make sure that the latch knob is resting in the storage position. To reduce the risk of direct sunlight. Do not attempt to the desired location...
Uk Manual
Page 18
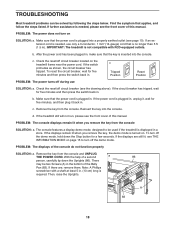
... demo mode. Check the reset/off circuit breaker (see the front cover of a second a 86 person, carefully tip down the Stop button for five minutes and then press the switch back in . PROBLEM: The console displays remain lit when you remove the key, the demo mode is turned on page 15 to be used if the treadmill is displayed in . (13 cm) long is needed , use SOLUTION: a. After the power cord has been plugged...
... demo mode. Check the reset/off circuit breaker (see the front cover of a second a 86 person, carefully tip down the Stop button for five minutes and then press the switch back in . PROBLEM: The console displays remain lit when you remove the key, the demo mode is turned on page 15 to be used if the treadmill is displayed in . (13 cm) long is needed , use SOLUTION: a. After the power cord has been plugged...
Uk Manual
Page 19
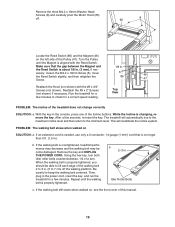
... Reed Switch. Repeat until the Magnet is properly tightened. Reattach the #8 x 2" Screws (not shown) if necessary. If an extension cord is properly tightened, you should be able to lift each edge of the walking belt 2 to 3 in the console, press one of a turn. b. Using the hex key, turn both idler roller bolts counterclockwise, 1/4 of the Incline buttons. The treadmill will recalibrate the incline system. Remove the key and UNPLUG THE POWER CORD. Then, plug in . Remove...
... Reed Switch. Repeat until the Magnet is properly tightened. Reattach the #8 x 2" Screws (not shown) if necessary. If an extension cord is properly tightened, you should be able to lift each edge of the walking belt 2 to 3 in the console, press one of a turn. b. Using the hex key, turn both idler roller bolts counterclockwise, 1/4 of the Incline buttons. The treadmill will recalibrate the incline system. Remove the key and UNPLUG THE POWER CORD. Then, plug in . Remove...
Uk Manual
Page 20
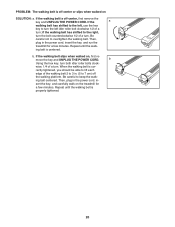
... walked on , first re- PROBLEM: The walking belt is off-center, first remove the key and UNPLUG THE POWER CORD. If the walking belt is off the walking platform. move the key and UNPLUG THE POWER CORD. ing belt centered. Repeat until the walk- Then, plug in - ing belt is properly tightened. 20 if the walking belt has shifted to turn the left idler roller bolt clockwise 1/2 of a turn ; Repeat until the walking belt is centered. If the a walking belt...
... walked on , first re- PROBLEM: The walking belt is off-center, first remove the key and UNPLUG THE POWER CORD. If the walking belt is off the walking platform. move the key and UNPLUG THE POWER CORD. ing belt centered. Repeat until the walk- Then, plug in - ing belt is properly tightened. 20 if the walking belt has shifted to turn the left idler roller bolt clockwise 1/2 of a turn ; Repeat until the walking belt is centered. If the a walking belt...
Uk Manual
Page 21
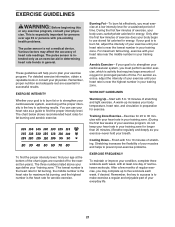
... your body temperature, heart rate, and circulation in your training zone for maximum fat burning, and the highest number is not a medical device. Various factors may complete up increases your body begin to five workouts each week, with pre-existing health problems. The pulse sensor is the heart rate for exercise. For detailed exercise information, obtain a reputable book or consult your heart rate as an exercise aid in determining heart rate...
... your body temperature, heart rate, and circulation in your training zone for maximum fat burning, and the highest number is not a medical device. Various factors may complete up increases your body begin to five workouts each week, with pre-existing health problems. The pulse sensor is the heart rate for exercise. For detailed exercise information, obtain a reputable book or consult your heart rate as an exercise aid in determining heart rate...
Uk Manual
Page 22
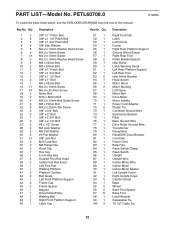
... Support Left Rear Foot Idler Roller Bracket Hood Accent Motor Hood Motor Bushing Lift Frame Motor Belt Drive Motor Motor Isolator Power Cord Adapter Plastic Tie Controller Ground Wire Electronics Bracket Filter Base Ground Wire Drive Roller Ground Wire Transformer Receptacle Reset/Off Circuit Breaker Controller Power Cord Belly Pan Reed Switch Clamp Reed Switch Upright Upright Wire Incline Motor Wire Incline Motor Incline Motor Spacer Left Upright Cover Right Upright Cover Caution Decal Base Wheel Base Foot Spacer Base Foot Latch Bracket Releasable Tie 15 1/2" Cable Tie 22 PART LIST-Model...
... Support Left Rear Foot Idler Roller Bracket Hood Accent Motor Hood Motor Bushing Lift Frame Motor Belt Drive Motor Motor Isolator Power Cord Adapter Plastic Tie Controller Ground Wire Electronics Bracket Filter Base Ground Wire Drive Roller Ground Wire Transformer Receptacle Reset/Off Circuit Breaker Controller Power Cord Belly Pan Reed Switch Clamp Reed Switch Upright Upright Wire Incline Motor Wire Incline Motor Incline Motor Spacer Left Upright Cover Right Upright Cover Caution Decal Base Wheel Base Foot Spacer Base Foot Latch Bracket Releasable Tie 15 1/2" Cable Tie 22 PART LIST-Model...

Uk Manual
Page 23
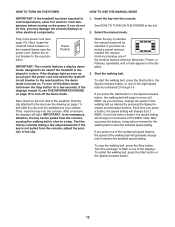
... Console Back Console Key/Clip Lower Console Console Base Access Door Console Post Handrail Frame Left Handrail Cover Console Ground Wire Right Handrail Cover Cable Tie Grommet Key No. Qty. 115 1 116 2 117 1 118 1 * - * - * - * - * - * - * - * - * - * - Key No. Description M4 x 10mm Bolt M4.2 Star Washer M4 Nut #8 x 1/2" Screw 4" Black Wire, 2F 8" Blue Wire, 2F 8" Blue Wire, F/Flag 16" Blue Wire, M/F 8" White Wire, 2F 8" White Wire, F/Flag 12" Red Wire, M/F 10" Black Wire, M/F Userʼs Manual 4" Green/Yellow Wire, M/R Note: Specifications...
... Console Back Console Key/Clip Lower Console Console Base Access Door Console Post Handrail Frame Left Handrail Cover Console Ground Wire Right Handrail Cover Cable Tie Grommet Key No. Qty. 115 1 116 2 117 1 118 1 * - * - * - * - * - * - * - * - * - * - Key No. Description M4 x 10mm Bolt M4.2 Star Washer M4 Nut #8 x 1/2" Screw 4" Black Wire, 2F 8" Blue Wire, 2F 8" Blue Wire, F/Flag 16" Blue Wire, M/F 8" White Wire, 2F 8" White Wire, F/Flag 12" Red Wire, M/F 10" Black Wire, M/F Userʼs Manual 4" Green/Yellow Wire, M/R Note: Specifications...
Uk Manual
Page 28
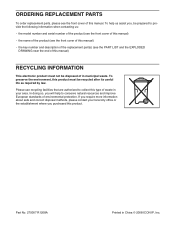
... environmental protection. Please use recycling facilities that are authorized to provide the following information when contacting us: • the model number and serial number of the product (see the front cover of this manual) • the name of the product (see the front cover of this manual) • the key number and description of the replacement part(s) (see the front cover of this manual. In doing...
... environmental protection. Please use recycling facilities that are authorized to provide the following information when contacting us: • the model number and serial number of the product (see the front cover of this manual) • the name of the product (see the front cover of this manual) • the key number and description of the replacement part(s) (see the front cover of this manual. In doing...

