

English Manual
Page 3
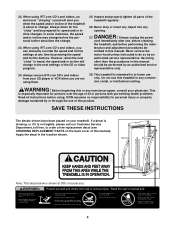
.... Never start the treadmill while you are recommended for the location of high speeds. Wear appropriate exercise clothes when using the treadmill. 6. If the control system is running. Never move the on page 5 for both men and women. The treadmill should be used or where oxygen is not a medical device. Always remove the key, unplug the power cord and move the walking belt while the power is turned off position...
.... Never start the treadmill while you are recommended for the location of high speeds. Wear appropriate exercise clothes when using the treadmill. 6. If the control system is running. Never move the on page 5 for both men and women. The treadmill should be used or where oxygen is not a medical device. Always remove the key, unplug the power cord and move the walking belt while the power is turned off position...
English Manual
Page 4
... of 35 or persons with pre-existing health problems. Read all parts of actual size. 4 Never remove the motor hood unless instructed to order a free replacement decal (see ORDERING REPLACEMENT PARTS on your CD player or VCR when you are not using iFIT.com CD's and videos, you when the speed and/or incline of this treadmill in this or any opening. If a decal is missing, or if it...
... of 35 or persons with pre-existing health problems. Read all parts of actual size. 4 Never remove the motor hood unless instructed to order a free replacement decal (see ORDERING REPLACEMENT PARTS on your CD player or VCR when you are not using iFIT.com CD's and videos, you when the speed and/or incline of this treadmill in this or any opening. If a decal is missing, or if it...
English Manual
Page 5
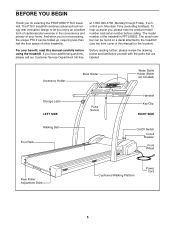
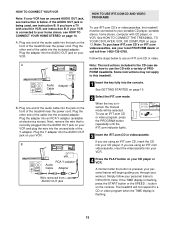
...) Storage Latch LEFT SIDE Walking Belt Foot Rails Pulse Sensor Handrail Key/Clip RIGHT SIDE On/Off Switch Circuit Breaker Front Wheel Rear Roller Adjustment Bolts Cushioned Walking Platform Power Cord 5 To help us assist you have additional questions, please call our Customer Service Department toll-free Before reading further, please review the drawing below and familiarize yourself with innovative design to the treadmill (see the front cover of this manual...
...) Storage Latch LEFT SIDE Walking Belt Foot Rails Pulse Sensor Handrail Key/Clip RIGHT SIDE On/Off Switch Circuit Breaker Front Wheel Rear Roller Adjustment Bolts Cushioned Walking Platform Power Cord 5 To help us assist you have additional questions, please call our Customer Service Department toll-free Before reading further, please review the drawing below and familiarize yourself with innovative design to the treadmill (see the front cover of this manual...
English Manual
Page 6
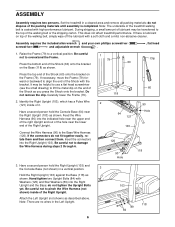
... treadmill walking belt is coated with a soft cloth and a mild, non-abrasive cleaner. If there is completed. If the connectors do not tighten the Upright Bolts yet. Hand tighten two Upright Bolts (84) with the bracket. Attach the Left Upright (not shown) as shown. This does not affect treadmill performance. Do not remove the clip. Be careful not to the Base Wire Harness (126). Set...
... treadmill walking belt is coated with a soft cloth and a mild, non-abrasive cleaner. If there is completed. If the connectors do not tighten the Upright Bolts yet. Hand tighten two Upright Bolts (84) with the bracket. Attach the Left Upright (not shown) as shown. This does not affect treadmill performance. Do not remove the clip. Be careful not to the Base Wire Harness (126). Set...
English Manual
Page 7
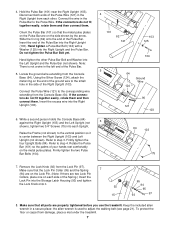
... not tighten the Pulse Bar Bolt yet. Insert the end of the Pulse Bar. 4. Note: There is not a wire in a secure place; While a second person holds the Console Base (64) against the Right Upright (103) and the Left Upright (not shown), tighten two 3/4" Screws (75) into the Storage Latch Housing (93) and tighten the Lock Knob onto it is used to step 3. Refer to adjust the walking belt (see page 21). Locate...
... not tighten the Pulse Bar Bolt yet. Insert the end of the Pulse Bar. 4. Note: There is not a wire in a secure place; While a second person holds the Console Base (64) against the Right Upright (103) and the Left Upright (not shown), tighten two 3/4" Screws (75) into the Storage Latch Housing (93) and tighten the Lock Knob onto it is used to step 3. Refer to adjust the walking belt (see page 21). Locate...
English Manual
Page 8
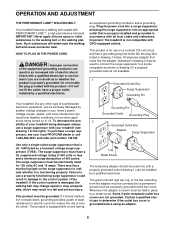
... order part number 146148. If the control system is equipped with PERFORMANT LUBETM, a high-performance lubricant. HOW TO PLUG IN THE POWER CORD DANGER: Improper connection of the equipment-grounding conductor can be electrically rated for use a properly functioning surge suppressor could result in a fall and serious injury. OPERATION AND ADJUSTMENT THE PERFORMANT LUBETM WALKING BELT Your treadmill features a walking belt coated with a cord having Lug Metal Screw...
... order part number 146148. If the control system is equipped with PERFORMANT LUBETM, a high-performance lubricant. HOW TO PLUG IN THE POWER CORD DANGER: Improper connection of the equipment-grounding conductor can be electrically rated for use a properly functioning surge suppressor could result in a fall and serious injury. OPERATION AND ADJUSTMENT THE PERFORMANT LUBETM WALKING BELT Your treadmill features a walking belt coated with a cord having Lug Metal Screw...
English Manual
Page 9
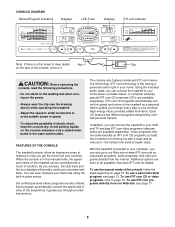
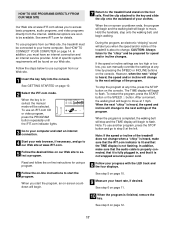
.... iFIT.com CD programs automatically control the speed and incline of the treadmill as it . CONSOLE DIAGRAM Manual/Program Indicators Displays LED Track Displays iFIT.com Indicator Note: If there is a thin sheet of clear plastic Key Clip on the face of the console, remove it guides you through every step of your workout. CAUTION: Before operating the console, read the following precautions. • Do not stand on the walking belt when turning on...
.... iFIT.com CD programs automatically control the speed and incline of the treadmill as it . CONSOLE DIAGRAM Manual/Program Indicators Displays LED Track Displays iFIT.com Indicator Note: If there is a thin sheet of clear plastic Key Clip on the face of the console, remove it guides you through every step of your workout. CAUTION: Before operating the console, read the following precautions. • Do not stand on the walking belt when turning on...

English Manual
Page 10
... stop the walking belt, press the STOP button. After the buttons are pressed, it may take a moment for several seconds. If a program is pressed, the walking belt will show the incline setting for the treadmill to reach the selected incline setting. Indicator play shows the distance that you use the treadmill, inspect the alignment of the walking belt, and align the walking belt if necessary (see SPEED/MIN-MILE DISPLAY on the console will change from the console. 2 Plug in the power cord...
... stop the walking belt, press the STOP button. After the buttons are pressed, it may take a moment for several seconds. If a program is pressed, the walking belt will show the incline setting for the treadmill to reach the selected incline setting. Indicator play shows the distance that you use the treadmill, inspect the alignment of the walking belt, and align the walking belt if necessary (see SPEED/MIN-MILE DISPLAY on the console will change from the console. 2 Plug in the power cord...

English Manual
Page 11
... exercising, remove the key. Note: If the displays and various indicators on the console remain lit after the key is removed, the console is used (see FAT BURNING on /off switch near the power cord to the lowest setting. Every seven seconds, the display will change the unit of the treadmill to the off the demo mode. When your heart rate when the pulse sensor is in the "demo" mode. For the most accurate heart rate...
... exercising, remove the key. Note: If the displays and various indicators on the console remain lit after the key is removed, the console is used (see FAT BURNING on /off switch near the power cord to the lowest setting. Every seven seconds, the display will change the unit of the treadmill to the off the demo mode. When your heart rate when the pulse sensor is in the "demo" mode. For the most accurate heart rate...
English Manual
Page 12
... one incline setting are finished using the treadmill, move the on/off switch near the power cord to the off the demo mode. The console features two low intensity programs, two medium intensity programs, and two high intensity programs. The profiles on page 11. The walking belt will begin walking. A moment after the key is removed, the console is inserted, the manual mode will adjust to zero. One speed setting and one of the personal trainer programs...
... one incline setting are finished using the treadmill, move the on/off switch near the power cord to the off the demo mode. The console features two low intensity programs, two medium intensity programs, and two high intensity programs. The profiles on page 11. The walking belt will begin walking. A moment after the key is removed, the console is inserted, the manual mode will adjust to zero. One speed setting and one of the personal trainer programs...
English Manual
Page 14
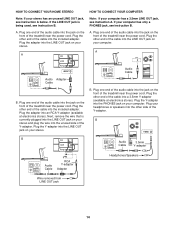
... treadmill near the power cord. Next, remove the wire that is being used, see instruction B. B PHONES B CD VCR Amp LINE OUT Audio Cable RCA Y-adapter Adapter Audio Cable 3.5mm Y-adapter Headphones/Speakers Wire removed from LINE OUT jack 14 Plug the other side of the Y-adapter. Plug one end of the audio cable into the jack on your headphones or speakers into an RCA Y-adapter (available at electronics stores). HOW TO CONNECT YOUR HOME...
... treadmill near the power cord. Next, remove the wire that is being used, see instruction B. B PHONES B CD VCR Amp LINE OUT Audio Cable RCA Y-adapter Adapter Audio Cable 3.5mm Y-adapter Headphones/Speakers Wire removed from LINE OUT jack 14 Plug the other side of the Y-adapter. Plug one end of the audio cable into the jack on your headphones or speakers into an RCA Y-adapter (available at electronics stores). HOW TO CONNECT YOUR HOME...
English Manual
Page 15
... START button or the SPEED v button on your VCR and plug the wire into the unused side of the cable into the jack on your personal trainer's instructions. Plug the other end of the treadmill near the power cord. A ANT. Note: The instructions included in VCR, see instruction B. RCA Y-adapter Audio Cable Adapter Wire removed from AUDIO OUT jack 4 Press the PLAY button on the console. Note: If the TIME display is pressed, your personal trainer will be connected...
... START button or the SPEED v button on your VCR and plug the wire into the unused side of the cable into the jack on your personal trainer's instructions. Plug the other end of the treadmill near the power cord. A ANT. Note: The instructions included in VCR, see instruction B. RCA Y-adapter Audio Cable Adapter Wire removed from AUDIO OUT jack 4 Press the PLAY button on the console. Note: If the TIME display is pressed, your personal trainer will be connected...

English Manual
Page 16
... video program. The TIME display will begin to change. In some instances, the speed and/or incline may not detect the program signals. • Make sure that the audio cable is properly connected, that it is not flashing. CAUTION: Always remove iFIT.com CD's and videocassettes from your progress with the LED track and the four displays. To restart the program, press the START button or the SPEED v button. See step...
... video program. The TIME display will begin to change. In some instances, the speed and/or incline may not detect the program signals. • Make sure that the audio cable is properly connected, that it is not flashing. CAUTION: Always remove iFIT.com CD's and videocassettes from your progress with the LED track and the four displays. To restart the program, press the START button or the SPEED v button. See step...
English Manual
Page 17
... steps below to use another program, press the STOP button and go to flash. Read and follow the on-line instructions for the "chirp" and be connected to your progress with the LED track and the four displays. However, when the next "chirp" is heard, the speed and/or incline will begin to move at www.iFIT.com allows you start the program, an on -line instructions...
... steps below to use another program, press the STOP button and go to flash. Read and follow the on-line instructions for the "chirp" and be connected to your progress with the LED track and the four displays. However, when the next "chirp" is heard, the speed and/or incline will begin to move at www.iFIT.com allows you start the program, an on -line instructions...
English Manual
Page 18
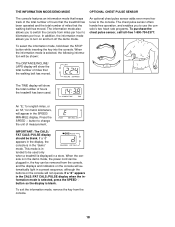
The chest pulse sensor offers hands-free operation, and enables you to turn on and turn off the demo mode. An "E," for english miles, or an "M," for metric kilometers, will show the total number of miles that the walking belt has moved. This mode is intended to switch the console from the console. 18 If a "d" appears in the CALS./FAT CALS./PULSE display when the information mode is selected, press the SPEED w button so the display is...
The chest pulse sensor offers hands-free operation, and enables you to turn on and turn off the demo mode. An "E," for english miles, or an "M," for metric kilometers, will show the total number of miles that the walking belt has moved. This mode is intended to switch the console from the console. 18 If a "d" appears in the CALS./FAT CALS./PULSE display when the information mode is selected, press the SPEED w button so the display is...
English Manual
Page 19
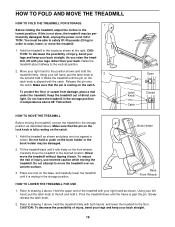
... the power cord. Release the pin onto the catch. Never move the treadmill. 1. To reduce the risk of injury, bend your legs and keep your right hand to the floor. Using your left hand, pull the latch knob to the storage position as shown and place one foot on the front wheels. Refer to drawing 2 above . Using your back. Latch Knob Pin Catch Open Closed...
... the power cord. Release the pin onto the catch. Never move the treadmill. 1. To reduce the risk of injury, bend your legs and keep your right hand to the floor. Using your left hand, pull the latch knob to the storage position as shown and place one foot on the front wheels. Refer to drawing 2 above . Using your back. Latch Knob Pin Catch Open Closed...

English Manual
Page 21
... the treadmill for a correct speed reading. When the walking belt is properly tightened b 3"-4" Rear Roller Adjustment Bolts c. Repeat until the walking belt is 109 12 aligned with the Reed Switch. a PLUG THE POWER CORD. if the walking belt has shifted to the right, turn the bolt counterclockwise 1/2 of the walking belt 3 to keep the walking belt centered. 4. Remove the screws from the console and UNPLUG THE POWER CORD. If necessary, 26 107 loosen the Reed Switch Screw (109) and move the Reed Switch slightly. Remove the key...
... the treadmill for a correct speed reading. When the walking belt is properly tightened b 3"-4" Rear Roller Adjustment Bolts c. Repeat until the walking belt is 109 12 aligned with the Reed Switch. a PLUG THE POWER CORD. if the walking belt has shifted to the right, turn the bolt counterclockwise 1/2 of the walking belt 3 to keep the walking belt centered. 4. Remove the screws from the console and UNPLUG THE POWER CORD. If necessary, 26 107 loosen the Reed Switch Screw (109) and move the Reed Switch slightly. Remove the key...
English Manual
Page 22
... near the highest number in your training zone. Training Zone Exercise-After warming up to exercise with preexisting health problems. The pulse sensor is activity that requires large amounts of exercise, your heart rate as a guide. This will increase the flexibility of your muscles and will help prevent post-exercise problems. To measure your heart rate during exercise, use stored fat calories for a sustained period of your exercise program, do not...
... near the highest number in your training zone. Training Zone Exercise-After warming up to exercise with preexisting health problems. The pulse sensor is activity that requires large amounts of exercise, your heart rate as a guide. This will increase the flexibility of your muscles and will help prevent post-exercise problems. To measure your heart rate during exercise, use stored fat calories for a sustained period of your exercise program, do not...
English Manual
Page 23
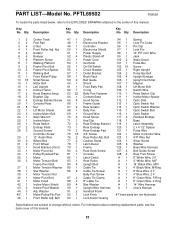
... Bar Screw Right Upright Pulse Bar Bolt Upright Endcap Upright Grommet Magnet Lift Motor Bolt Switch Wire Reed Switch Clip Incline Motor Spacer Optic Disk Optic Switch Nut Optic Switch Washer Optic Switch Bolt Optic Switch Handrail Endcap Base Latch Assembly 2 x 4 1/2" Spacer Pulse Wire Motor Controller Wire iFIT Wire Nut Silver Screw Washer Base Wire Harness Belt Guide Screw Rear Foot Screw 8" White Wire, 2 F 4" White Wire, M/F 14" Black Wire, M/R 4" Black Wire, M/Ring 8" Blue Wire, 2 F 4" Blue Wire, 2 F 8" Green Wire, F/Ring 8" Green Wire, 2 Ring 14" Wire Harness User's Manual # These parts...
... Bar Screw Right Upright Pulse Bar Bolt Upright Endcap Upright Grommet Magnet Lift Motor Bolt Switch Wire Reed Switch Clip Incline Motor Spacer Optic Disk Optic Switch Nut Optic Switch Washer Optic Switch Bolt Optic Switch Handrail Endcap Base Latch Assembly 2 x 4 1/2" Spacer Pulse Wire Motor Controller Wire iFIT Wire Nut Silver Screw Washer Base Wire Harness Belt Guide Screw Rear Foot Screw 8" White Wire, 2 F 4" White Wire, M/F 14" Black Wire, M/R 4" Black Wire, M/Ring 8" Blue Wire, 2 F 4" Blue Wire, 2 F 8" Green Wire, F/Ring 8" Green Wire, 2 Ring 14" Wire Harness User's Manual # These parts...

English Manual
Page 26
... give the following information: • The MODEL NUMBER OF THE PRODUCT (PFTL69502) • The NAME OF THE PRODUCT (PROFORM® PT6.0 treadmill) • The SERIAL NUMBER OF THE PRODUCT (see the front cover of this manual) • The KEY NUMBER AND DESCRIPTION OF THE PART(S) (see the PART LIST on how long an implied warranty lasts. All repairs for a particular purpose is limited in its authorized service centers. Some...
... give the following information: • The MODEL NUMBER OF THE PRODUCT (PFTL69502) • The NAME OF THE PRODUCT (PROFORM® PT6.0 treadmill) • The SERIAL NUMBER OF THE PRODUCT (see the front cover of this manual) • The KEY NUMBER AND DESCRIPTION OF THE PART(S) (see the PART LIST on how long an implied warranty lasts. All repairs for a particular purpose is limited in its authorized service centers. Some...


