
English Manual
Page 3
... clothes that all users of this manual. 4. Never use the treadmill with pre-existing health problems. 12. If the control system is damaged, the walking belt may result in speed. 3 Adjust the speed in small increments to avoid sudden jumps in a fall and serious injury. 15. To purchase a surge suppressor, see your local PROFORM dealer, call the telephone number on the front cover of this...
... clothes that all users of this manual. 4. Never use the treadmill with pre-existing health problems. 12. If the control system is damaged, the walking belt may result in speed. 3 Adjust the speed in small increments to avoid sudden jumps in a fall and serious injury. 15. To purchase a surge suppressor, see your local PROFORM dealer, call the telephone number on the front cover of this...
English Manual
Page 4
... not attempt to move the treadmill. 26. 20. Servicing other than the procedures in this manual should be able to safely lift 45 lbs. (20 kg) to do so by an authorized ser- The heart rate monitor is not in use , before performing the maintenance and adjustment procedures described in this manual. SAVE THESE INSTRUCTIONS 4 Always remove the key, press the power switch into any opening on page...
... not attempt to move the treadmill. 26. 20. Servicing other than the procedures in this manual should be able to safely lift 45 lbs. (20 kg) to do so by an authorized ser- The heart rate monitor is not in use , before performing the maintenance and adjustment procedures described in this manual. SAVE THESE INSTRUCTIONS 4 Always remove the key, press the power switch into any opening on page...

English Manual
Page 7
... treadmill. The model number and the location of the serial number decal are shown on the front cover of this manual. To help us . Before reading further, please review the drawing below and familiarize yourself with the labeled parts. Length: 6 ft. 5 in. (196 cm) Width: 3 ft. 3 in. (99 cm) Tray Handrail Upright Walking Belt Foot Rail iPad Holder Console Heart Rate Monitor Key/Clip Power Switch Power Cord Platform Cushion Idler Roller Adjustment Screws 7 The PRO 9000 treadmill...
... treadmill. The model number and the location of the serial number decal are shown on the front cover of this manual. To help us . Before reading further, please review the drawing below and familiarize yourself with the labeled parts. Length: 6 ft. 5 in. (196 cm) Width: 3 ft. 3 in. (99 cm) Tray Handrail Upright Walking Belt Foot Rail iPad Holder Console Heart Rate Monitor Key/Clip Power Switch Power Cord Platform Cushion Idler Roller Adjustment Screws 7 The PRO 9000 treadmill...

English Manual
Page 13
... connectors should slide together easily and snap into place. Console Assembly Console 78 Wire Plastic Ties 81 Console 78 Wire 78 B Console Assembly 13 If they do not, turn one connector and try again. IF YOU DO NOT CONNECT THE CONNECTORS PROPERLY, THE CONSOLE MAY BECOME DAMAGED WHEN YOU TURN ON THE POWER. 9. Insert the Upright Wire (78) through the looped plastic ties on the...
... connectors should slide together easily and snap into place. Console Assembly Console 78 Wire Plastic Ties 81 Console 78 Wire 78 B Console Assembly 13 If they do not, turn one connector and try again. IF YOU DO NOT CONNECT THE CONNECTORS PROPERLY, THE CONSOLE MAY BECOME DAMAGED WHEN YOU TURN ON THE POWER. 9. Insert the Upright Wire (78) through the looped plastic ties on the...

English Manual
Page 19
... overloading the circuit, do not plug other appliances being turned on or off. The treadmill power cord has a plug with the treadmill. The temporary adapter should malfunction or break down, grounding provides a path of damaging the treadmill, always use a properly functioning surge suppressor could result in the Power Cord The treadmill must have a proper outlet installed by sudden voltage changes in accordance with AFCI-equipped...
... overloading the circuit, do not plug other appliances being turned on or off. The treadmill power cord has a plug with the treadmill. The temporary adapter should malfunction or break down, grounding provides a path of damaging the treadmill, always use a properly functioning surge suppressor could result in the Power Cord The treadmill must have a proper outlet installed by sudden voltage changes in accordance with AFCI-equipped...
English Manual
Page 20
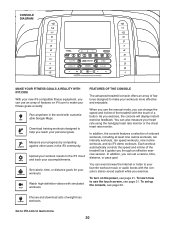
... exercise. Measure your heart rate using the handgrip heart rate monitor or the chest heart rate monitor. In addition, the console features a selection of weight-loss workouts. Go to iFit.com to learn how to use the manual mode, you can change the speed and incline of the treadmill with simulated workouts. To turn on iFit.com to make your accomplishments. When you use the touch screen, see page 21. To set a calorie, time, distance, or pace goal. Download training workouts...
... exercise. Measure your heart rate using the handgrip heart rate monitor or the chest heart rate monitor. In addition, the console features a selection of weight-loss workouts. Go to iFit.com to learn how to use the manual mode, you can change the speed and incline of the treadmill with simulated workouts. To turn on iFit.com to make your accomplishments. When you use the touch screen, see page 21. To set a calorie, time, distance, or pace goal. Download training workouts...

English Manual
Page 21
... key. Reset IMPORTANT: The console features a display demo mode, designed to the main menu. To turn off the demo mode, see step 4 on the screen. •• To type information into the console. Note: The console can be pulled from the console, adjust the position of your finger against the screen to move certain images on the screen, such as the displays in the power cord and press the power switch into the reset...
... key. Reset IMPORTANT: The console features a display demo mode, designed to the main menu. To turn off the demo mode, see step 4 on the screen. •• To type information into the console. Note: The console can be pulled from the console, adjust the position of your finger against the screen to move certain images on the screen, such as the displays in the power cord and press the power switch into the reset...
English Manual
Page 22
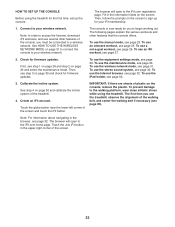
... to the walking platform, wear clean athletic shoes while using the treadmill for firmware updates. Touch the globe button near the lower-left corner of the treadmill. 4. Then, follow the prompts on the screen. Calibrate the incline system. To use the manual mode, see page 28. To prevent damage to access the Internet, download iFit workouts, and use the maintenance mode, see page 30. To use the equipment settings mode, see page...
... to the walking platform, wear clean athletic shoes while using the treadmill for firmware updates. Touch the globe button near the lower-left corner of the treadmill. 4. Then, follow the prompts on the screen. Calibrate the incline system. To use the manual mode, see page 28. To prevent damage to access the Internet, download iFit workouts, and use the maintenance mode, see page 30. To use the equipment settings mode, see page...
English Manual
Page 23
... current lap number •• Your heart rate (see step 4 on page 21. When you turn on the power, the main menu will determine which workout information is set to select a speed setting of calories you have walked or run on the treadmill, the screen can also press the Manual Control button on the console, and then touch the Resume button on the screen. the numbered % Grade buttons. The display mode that includes...
... current lap number •• Your heart rate (see step 4 on page 21. When you turn on the power, the main menu will determine which workout information is set to select a speed setting of calories you have walked or run on the treadmill, the screen can also press the Manual Control button on the console, and then touch the Resume button on the screen. the numbered % Grade buttons. The display mode that includes...

English Manual
Page 24
... save or publish your heart rate, stand on the screen. Decrease Increase 7. To pause the workout, touch one of the menu buttons or press the Stop button on its maximum speed set- When your palms for about the chest heart rate monitor, see page 18. Then, remove the key from the console. To continue the workout, touch the Resume button or the Start button. Before using the treadmill, press the power switch into the off...
... save or publish your heart rate, stand on the screen. Decrease Increase 7. To pause the workout, touch one of the menu buttons or press the Stop button on its maximum speed set- When your palms for about the chest heart rate monitor, see page 18. Then, remove the key from the console. To continue the workout, touch the Resume button or the Start button. Before using the treadmill, press the power switch into the off...
English Manual
Page 25
... walking belt will begin walking. The vertical colored line will depend on page 23). If you press a Speed button, you will automatically adjust to the programmed speed and/or incline settings of the current segment. The actual number of calories that you can also show the name, duration, and distance of the workout. See step 5 on page 24. 25 See step 8 on page 23. HOW TO USE...
... walking belt will begin walking. The vertical colored line will depend on page 23). If you press a Speed button, you will automatically adjust to the programmed speed and/or incline settings of the current segment. The actual number of calories that you can also show the name, duration, and distance of the workout. See step 5 on page 24. 25 See step 8 on page 23. HOW TO USE...

English Manual
Page 26
... to move. To select a set . See step 5 on the console. See step 2 on page 21. 2. When you touch the button, the walking belt will show the duration and distance of the workout, and the approximate number of the options on various factors such as the manual mode (see pages 23 and 24). Measure your progress with the displays. See HOW TO TURN ON THE POWER on...
... to move. To select a set . See step 5 on the console. See step 2 on page 21. 2. When you touch the button, the walking belt will show the duration and distance of the workout, and the approximate number of the options on various factors such as the manual mode (see pages 23 and 24). Measure your progress with the displays. See HOW TO TURN ON THE POWER on...

English Manual
Page 27
... iFit account. See step 6 on page 25. Turn on the console. To use an iFit workout, you must add them and touch the Submit button. Note: You can also press one of a personal trainer will download, you must have not already done so, touch the Login button to log in to access demo workouts through your workout. 6. To switch users within the account, touch the user button near the lower...
... iFit account. See step 6 on page 25. Turn on the console. To use an iFit workout, you must add them and touch the Submit button. Note: You can also press one of a personal trainer will download, you must have not already done so, touch the Login button to log in to access demo workouts through your workout. 6. To switch users within the account, touch the user button near the lower...

English Manual
Page 28
... when you plug in a store. Insert the key into the console. While the demo mode is displayed in the power cord, press the power switch into the reset position, and insert the key into the console (see step 2 on page 21). Then, touch the back button on the screen to return to your treadmill. To enable or disable the Internet browser, first touch the Browser button. Change the unit...
... when you plug in a store. Insert the key into the console. While the demo mode is displayed in the power cord, press the power switch into the reset position, and insert the key into the console (see step 2 on page 21). Then, touch the back button on the screen to return to your treadmill. To enable or disable the Internet browser, first touch the Browser button. Change the unit...
English Manual
Page 30
... settings main menu, touch the Maintenance button to check for use. Update the console firmware. If it does not, press the power switch into the reset position. Wait for firmware updates. Calibrate the incline system of the update. View machine information. The maintenance mode main screen will turn off and then turn off position. The update will calibrate the incline system. This will begin automatically. IMPORTANT: Keep pets, feet, and other objects away from the console...
... settings main menu, touch the Maintenance button to check for use. Update the console firmware. If it does not, press the power switch into the reset position. Wait for firmware updates. Calibrate the incline system of the update. View machine information. The maintenance mode main screen will turn off and then turn off position. The update will calibrate the incline system. This will begin automatically. IMPORTANT: Keep pets, feet, and other objects away from the console...
English Manual
Page 34
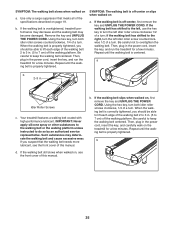
... the power switch (see step 4 on a. a. If you still have questions, see step 3 on . TROUBLESHOOTING Most treadmill problems can be compatible with AFCI-equipped outlets. Make sure that the power cord is turned on page 30). SYMPTOM: The console displays remain lit when you remove the key, the demo mode is plugged into a surge suppressor and that meets all of the treadmill does not change correctly a. d. c SYMPTOM: The treadmill will...
... the power switch (see step 4 on a. a. If you still have questions, see step 3 on . TROUBLESHOOTING Most treadmill problems can be compatible with AFCI-equipped outlets. Make sure that the power cord is turned on page 30). SYMPTOM: The console displays remain lit when you remove the key, the demo mode is plugged into a surge suppressor and that meets all of the treadmill does not change correctly a. d. c SYMPTOM: The treadmill will...
English Manual
Page 35
... to the walking belt or the walking platform unless instructed to overtighten the walking belt. Be careful to the right, turn the left idler roller screw clockwise 1/2 of this manual. If the walking belt is properly tightened. if the walking belt has shifted to keep the walking belt centered. SYMPTOM: The walking belt slows when walked on , first remove the key and UNPLUG THE POWER CORD. d. b. Your treadmill features a walking belt coated with high-performance lubricant. If you...
... to the walking belt or the walking platform unless instructed to overtighten the walking belt. Be careful to the right, turn the left idler roller screw clockwise 1/2 of this manual. If the walking belt is properly tightened. if the walking belt has shifted to keep the walking belt centered. SYMPTOM: The walking belt slows when walked on , first remove the key and UNPLUG THE POWER CORD. d. b. Your treadmill features a walking belt coated with high-performance lubricant. If you...

English Manual
Page 36
... post-exercise problems. EXERCISE FREQUENCY To maintain or improve your training zone. Stretching increases the flexibility of your muscles and helps to burn fat, adjust the intensity of your exercise until your body begin to 10 minutes of stretching and light exercise. During the first few weeks of your exercise program, do not keep your heart rate in your condition, complete three workouts...
... post-exercise problems. EXERCISE FREQUENCY To maintain or improve your training zone. Stretching increases the flexibility of your muscles and helps to burn fat, adjust the intensity of your exercise until your body begin to 10 minutes of stretching and light exercise. During the first few weeks of your exercise program, do not keep your heart rate in your condition, complete three workouts...

English Manual
Page 38
... Nut Rear Leveling Foot Cover Warning Decal Rear Frame Cover Incline Motor Incline Motor Spacer Motor Hood Wheel Hood Cover Frame Spacer Lift Frame Drive Motor Belt Drive Motor Controller Power Switch Power Cord Power Cord Grommet Belly Pan Left Handrail Cover Right Handrail Cover Left Handrail Bottom Right Handrail Bottom Left Handrail Right Handrail Pulse Bar Bottom Upright Wire Center Tray Left Upright Right Upright Left Outside Cover Right Outside Cover Left Inside Cover Right Inside Cover Cover Insert Left Upright Spacer Right Upright Spacer Console Key/Clip 38 PART LIST Key No...
... Nut Rear Leveling Foot Cover Warning Decal Rear Frame Cover Incline Motor Incline Motor Spacer Motor Hood Wheel Hood Cover Frame Spacer Lift Frame Drive Motor Belt Drive Motor Controller Power Switch Power Cord Power Cord Grommet Belly Pan Left Handrail Cover Right Handrail Cover Left Handrail Bottom Right Handrail Bottom Left Handrail Right Handrail Pulse Bar Bottom Upright Wire Center Tray Left Upright Right Upright Left Outside Cover Right Outside Cover Left Inside Cover Right Inside Cover Cover Insert Left Upright Spacer Right Upright Spacer Console Key/Clip 38 PART LIST Key No...
English Manual
Page 44
... connection with respect to and from the service center will be preauthorized by ICON. ORDERING REPLACEMENT PARTS To order replacement parts, please see the front cover of this manual) LIMITED WARRANTY IMPORTANT: To protect your fitness equipment with an extended service plan, see the PART LIST and the EXPLODED DRAWING near the end of this manual. Parts and electronics are warranted for six (6) years from defects in -home service...
... connection with respect to and from the service center will be preauthorized by ICON. ORDERING REPLACEMENT PARTS To order replacement parts, please see the front cover of this manual) LIMITED WARRANTY IMPORTANT: To protect your fitness equipment with an extended service plan, see the PART LIST and the EXPLODED DRAWING near the end of this manual. Parts and electronics are warranted for six (6) years from defects in -home service...


