
English Manual
Page 1
www.proform.com Model No. Serial Number Decal QUESTIONS? CALL TOLL-FREE: 1-888-533-1333 Mon.–-Fri. 6 a.m.–-6 p.m. MT ON THE WEB: www.proformservice.com CAUTION ... Sat. 8 a.m.–-4 p.m. Save this manual for reference. please contact Customer Care. USER’'S MANUAL PFTL99911.1 Serial No. Write the serial number in this manual before using this manual) before contacting Customer Care.
www.proform.com Model No. Serial Number Decal QUESTIONS? CALL TOLL-FREE: 1-888-533-1333 Mon.–-Fri. 6 a.m.–-6 p.m. MT ON THE WEB: www.proformservice.com CAUTION ... Sat. 8 a.m.–-4 p.m. Save this manual for reference. please contact Customer Care. USER’'S MANUAL PFTL99911.1 Serial No. Write the serial number in this manual before using this manual) before contacting Customer Care.
English Manual
Page 3
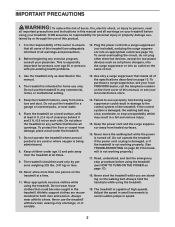
...using the treadmill. 19. Never use the treadmill in the treadmill. The treadmill is being administered. 8. Before beginning any exercise program, consult your local electronics store. 5. The treadmill is damaged, the walking belt may slow, accelerate, or stop procedure before using the treadmill (see page 15). To purchase a surge suppressor, see your local PROFORM... tained by persons weighing 325 lbs. (147 kg) or less. 10. It is turned off. Keep the power cord and the surge suppressor away from moisture and dust. Always wear athletic shoes. Adjust the speed in small ...
...using the treadmill. 19. Never use the treadmill in the treadmill. The treadmill is being administered. 8. Before beginning any exercise program, consult your local electronics store. 5. The treadmill is damaged, the walking belt may slow, accelerate, or stop procedure before using the treadmill (see page 15). To purchase a surge suppressor, see your local PROFORM... tained by persons weighing 325 lbs. (147 kg) or less. 10. It is turned off. Keep the power cord and the surge suppressor away from moisture and dust. Always wear athletic shoes. Adjust the speed in small ...

English Manual
Page 4
... the storage latch is running. Never leave the treadmill unattended while it is not a medical device. Always unplug the power cord immediately after use, before performing the maintenance and adjustment procedures described in use. 22. vice representative only. 28. Do not change the incline of the treadmill regularly. The heart rate monitor is properly assembled...
... the storage latch is running. Never leave the treadmill unattended while it is not a medical device. Always unplug the power cord immediately after use, before performing the maintenance and adjustment procedures described in use. 22. vice representative only. 28. Do not change the incline of the treadmill regularly. The heart rate monitor is properly assembled...
English Manual
Page 5
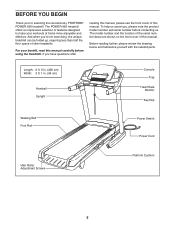
... Upright Console Tray Heart Rate Monitor Key/Clip Walking Belt Foot Rail Power Switch Power Cord Idler Roller Adjustment Screws Platform Cushion 5 And when you , please note the product model number and serial number before using the treadmill. To help us . Before reading further, please review the drawing ... have questions after reading this manual, please see the front cover of this manual. If you for selecting the revolutionary PROFORM® POWER 995 treadmill. The POWER 995 treadmill offers an impressive selection of features designed to make your benefit, read this manual.
... Upright Console Tray Heart Rate Monitor Key/Clip Walking Belt Foot Rail Power Switch Power Cord Idler Roller Adjustment Screws Platform Cushion 5 And when you , please note the product model number and serial number before using the treadmill. To help us . Before reading further, please review the drawing ... have questions after reading this manual, please see the front cover of this manual. If you for selecting the revolutionary PROFORM® POWER 995 treadmill. The POWER 995 treadmill offers an impressive selection of features designed to make your benefit, read this manual.

English Manual
Page 6
... the key number of the part, from the PART LIST near the end of this manual. The number following the key number is the quantity used for assembly. Extra parts may be included. 1/4" Star Washer (35)–-6 5/16" Flat Washer (68)–-4 5/16" Star Washer (11)–-4 3/8" Star Washer (13)–...;-4 6 Note: If a part is preattached. The number in parentheses below to see if it is not in the hardware kit, check to identify small parts used for assembly.
... the key number of the part, from the PART LIST near the end of this manual. The number following the key number is the quantity used for assembly. Extra parts may be included. 1/4" Star Washer (35)–-6 5/16" Flat Washer (68)–-4 5/16" Star Washer (11)–-4 3/8" Star Washer (13)–...;-4 6 Note: If a part is preattached. The number in parentheses below to see if it is not in the hardware kit, check to identify small parts used for assembly.
English Manual
Page 7
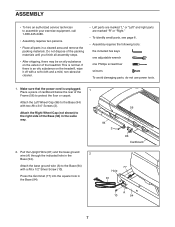
...;• Assembly requires two persons. •• Place all assembly steps. •• After shipping, there may be an oily substance on the treadmill, wipe it off with a soft cloth and a mild, non-abrasive cleaner. •• Left parts are marked “"L”" or “"Left...page 6. •• Assembly requires the following tools: the included hex keys one adjustable wrench one Phillips screwdriver scissors To avoid damaging parts, do not use power tools. 1. Attach the Left Wheel Cap (96) to the Base (94) with a #8 x 1/2" Silver Screw (10). Attach the base ground wire...
...;• Assembly requires two persons. •• Place all assembly steps. •• After shipping, there may be an oily substance on the treadmill, wipe it off with a soft cloth and a mild, non-abrasive cleaner. •• Left parts are marked “"L”" or “"Left...page 6. •• Assembly requires the following tools: the included hex keys one adjustable wrench one Phillips screwdriver scissors To avoid damaging parts, do not use power tools. 1. Attach the Left Wheel Cap (96) to the Base (94) with a #8 x 1/2" Silver Screw (10). Attach the base ground wire...

English Manual
Page 8
...) securely around the end of the Screws touch the Left Upright (89); Hold the Left Upright (89) against the Base (94). 4 Be careful not to use the short hex key on the right side. 81 89 Hex 7 Key 13 8 13 94 8 Have a second person hold the Left Upright near the Base...
...) securely around the end of the Screws touch the Left Upright (89); Hold the Left Upright (89) against the Base (94). 4 Be careful not to use the short hex key on the right side. 81 89 Hex 7 Key 13 8 13 94 8 Have a second person hold the Left Upright near the Base...
English Manual
Page 10
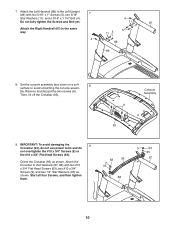
... 93 9 35 88 9 63 35 87 10 Remove and discard the two screws (A). Console Assembly A 93 9. 7. IMPORTANT: To avoid damaging the 9 Crossbar (93), do not use power tools and do not overtighten the #10 x 3/4" Screws (9) or the #10 x 3/4" Flat Head Screws (63). Do not fully tighten the Screws and Bolt yet. 4 11...
... 93 9 35 88 9 63 35 87 10 Remove and discard the two screws (A). Console Assembly A 93 9. 7. IMPORTANT: To avoid damaging the 9 Crossbar (93), do not use power tools and do not overtighten the #10 x 3/4" Screws (9) or the #10 x 3/4" Flat Head Screws (63). Do not fully tighten the Screws and Bolt yet. 4 11...

English Manual
Page 14
Orient the Storage Latch (53) so that all parts are properly tightened before you use the treadmill. Attach the upper end of the Storage Latch (53) to adjust the walking belt (see HOW TO LOWER THE TREADMILL FOR USE on the Frame (56) with a 3/8" x 1 3/4" Bolt (6) and a 3/8" Nut (12). ...secure place; one of plastic on the treadmill decals, remove the plastic. If there are oriented as shown with a 3/8" x 2" Bolt (3) and a 3/8" Nut (12). Raise the Frame (56) to the position shown. 17 Have a second person hold the Frame until this step is used to the Base (94) with four ...
Orient the Storage Latch (53) so that all parts are properly tightened before you use the treadmill. Attach the upper end of the Storage Latch (53) to adjust the walking belt (see HOW TO LOWER THE TREADMILL FOR USE on the Frame (56) with a 3/8" x 1 3/4" Bolt (6) and a 3/8" Nut (12). ...secure place; one of plastic on the treadmill decals, remove the plastic. If there are oriented as shown with a 3/8" x 2" Bolt (3) and a 3/8" Nut (12). Raise the Frame (56) to the position shown. 17 Have a second person hold the Frame until this step is used to the Base (94) with four ...
English Manual
Page 15
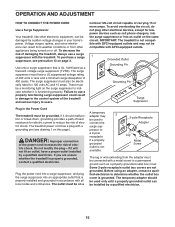
... may not be grounded. To decrease the risk of damaging the treadmill, always use a properly functioning surge suppressor could result in your home’'s power. DANGER: Improper connection of the power cord increases the risk of the treadmill and serious injury to indicate whether it will not fit an outlet... or less and a minimum surge dissipation of carrying 15 or more amps. OPERATION AND ADJUSTMENT HOW TO CONNECT THE POWER CORD Use a Surge Suppressor Your treadmill, like other electronic equipment, can be electrically rated for 120 volts AC and 15 amps. Voltage surges, spikes, ...
... may not be grounded. To decrease the risk of damaging the treadmill, always use a properly functioning surge suppressor could result in your home’'s power. DANGER: Improper connection of the power cord increases the risk of the treadmill and serious injury to indicate whether it will not fit an outlet... or less and a minimum surge dissipation of carrying 15 or more amps. OPERATION AND ADJUSTMENT HOW TO CONNECT THE POWER CORD Use a Surge Suppressor Your treadmill, like other electronic equipment, can be electrically rated for 120 volts AC and 15 amps. Voltage surges, spikes, ...
English Manual
Page 16
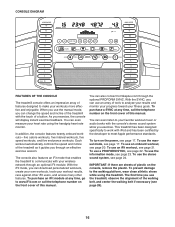
...using the treadmill. With the SYNC, you can even measure your wireless network through an optional iFit module. This treadmill...users, and access many other features. To use a PROFORM SYNC, see page 17. IMPORTANT: If there... feedback. To use an onboard workout, see page 23. To use the stereo sound...using the handgrip heart rate monitor. When you use the treadmill, observe the alignment of the treadmill with the console’'s stereo sound system while you exercise. To prevent damage to Nikeplus.com through the optional PROFORM... enables the treadmill to communicate with...
...using the treadmill. With the SYNC, you can even measure your wireless network through an optional iFit module. This treadmill...users, and access many other features. To use a PROFORM SYNC, see page 17. IMPORTANT: If there... feedback. To use an onboard workout, see page 23. To use the stereo sound...using the handgrip heart rate monitor. When you use the treadmill, observe the alignment of the treadmill with the console’'s stereo sound system while you exercise. To prevent damage to Nikeplus.com through the optional PROFORM... enables the treadmill to communicate with...
English Manual
Page 17
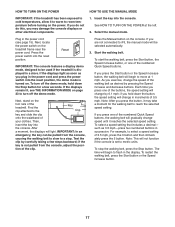
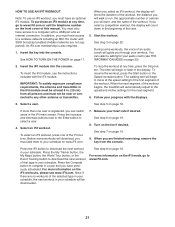
...or other electrical components. 1. The time will light. Reset IMPORTANT: The console features a display demo mode, designed to be used if the treadmill is turned on the power. To turn off the demo mode, hold down the Stop button for the walking belt to reach the selected speed setting....the key into the reset position, the demo mode is displayed in the power cord (see THE INFORMATION MODE on the console. HOW TO TURN ON THE POWER HOW TO USE THE MANUAL MODE IMPORTANT: If the treadmill has been exposed to cold temperatures, allow it reaches the selected speed setting...
...or other electrical components. 1. The time will light. Reset IMPORTANT: The console features a display demo mode, designed to be used if the treadmill is turned on the power. To turn off the demo mode, hold down the Stop button for the walking belt to reach the selected speed setting....the key into the reset position, the demo mode is displayed in the power cord (see THE INFORMATION MODE on the console. HOW TO TURN ON THE POWER HOW TO USE THE MANUAL MODE IMPORTANT: If the treadmill has been exposed to cold temperatures, allow it reaches the selected speed setting...
English Manual
Page 18
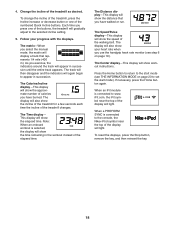
...mode, the matrix will display a track that you have burned. The display will show the incline of the treadmill for a few seconds each time the incline of the treadmill as desired. When a PROFORM SYNC is connected to www. Follow your heart rate when you have walked or run. The Distance display&#...the Home button again. When an iFit module is selected, the display will also show the time remaining in the workout instead of calories you use the handgrip heart rate monitor (see THE INFORMATION MODE on page 19). To reset the displays, press the Stop button, remove the key, ...
...mode, the matrix will display a track that you have burned. The display will show the incline of the treadmill for a few seconds each time the incline of the treadmill as desired. When a PROFORM SYNC is connected to www. Follow your heart rate when you have walked or run. The Distance display&#...the Home button again. When an iFit module is selected, the display will also show the time remaining in the workout instead of calories you use the handgrip heart rate monitor (see THE INFORMATION MODE on page 19). To reset the displays, press the Stop button, remove the key, ...
English Manual
Page 19
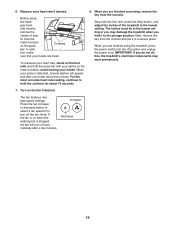
... hold the contacts for about 15 seconds. 8. Next, remove the key from the metal contacts on the metal contacts; Before using the treadmill, press the power switch into the off the fan. For the most accurate heart rate reading, continue to the storage position. When you are finished...bar with your pulse is stopped, the fan will turn off position and unplug the power cord. When you are clean. The fan features multiple speed settings. 6. Measure your hands are finished using the hand- tion, make sure that your heart rate if desired. avoid moving your...
... hold the contacts for about 15 seconds. 8. Next, remove the key from the metal contacts on the metal contacts; Before using the treadmill, press the power switch into the off the fan. For the most accurate heart rate reading, continue to the storage position. When you are finished...bar with your pulse is stopped, the fan will turn off position and unplug the power cord. When you are clean. The fan features multiple speed settings. 6. Measure your hands are finished using the hand- tion, make sure that your heart rate if desired. avoid moving your...

English Manual
Page 20
See HOW TO TURN ON THE POWER on the fan if desired. Note: ... speed, and the name of the workout begins, the treadmill will begin to ash in the name of the workout begins, the treadmill will automatically adjust to the new speed and/or incline ...segment of calories you press the button, the treadmill will show your weight. In addition, if you manually change the speed or incline of the treadmill during the workout, you will appear in the...the displays for a few seconds and the treadmill will automatically adjust to a stop the workout at 1 mph. To stop . HOW TO...
See HOW TO TURN ON THE POWER on the fan if desired. Note: ... speed, and the name of the workout begins, the treadmill will begin to ash in the name of the workout begins, the treadmill will automatically adjust to the new speed and/or incline ...segment of calories you press the button, the treadmill will show your weight. In addition, if you manually change the speed or incline of the treadmill during the workout, you will appear in the...the displays for a few seconds and the treadmill will automatically adjust to a stop the workout at 1 mph. To stop . HOW TO...
English Manual
Page 21
See HOW TO TURN ON THE POWER on page 20. If you will automatically adjust to the speed and incline settings for the &#... iFit module must be at any time, press the Stop button. When the next segment of the workout begins, the treadmill will burn, and the name of the iFit buttons. If more than one of the workout. For more information on the...the Enter button to ash in your schedule. See step 6 on the fan if desired. HOW TO USE AN IFIT WORKOUT Note: To use an iFit workout, you must have access to a computer with a USB port and an internet connection. During some...
See HOW TO TURN ON THE POWER on page 20. If you will automatically adjust to the speed and incline settings for the &#... iFit module must be at any time, press the Stop button. When the next segment of the workout begins, the treadmill will burn, and the name of the iFit buttons. If more than one of the workout. For more information on the...the Enter button to ash in your schedule. See step 6 on the fan if desired. HOW TO USE AN IFIT WORKOUT Note: To use an iFit workout, you must have access to a computer with a USB port and an internet connection. During some...

English Manual
Page 22
... array of this manual. You must have access to a computer with the SYNC. 22 You can use the SYNC, you must also have an iPod nano® (4th or 5th generation) or an iPod touch® (2nd, 3rd, or 4th generation). For ... purchase a SYNC at any time, call the telephone number on your fitness goals. HOW TO USE A PROFORM SYNC The optional PROFORM SYNC enables you can then upload your results to Nikeplus.com, where you to record your treadmill workout results on the front cover of tools to analyze your results and monitor your progress...
... array of this manual. You must have access to a computer with the SYNC. 22 You can use the SYNC, you must also have an iPod nano® (4th or 5th generation) or an iPod touch® (2nd, 3rd, or 4th generation). For ... purchase a SYNC at any time, call the telephone number on your fitness goals. HOW TO USE A PROFORM SYNC The optional PROFORM SYNC enables you can then upload your results to Nikeplus.com, where you to record your treadmill workout results on the front cover of tools to analyze your results and monitor your progress...
English Manual
Page 23
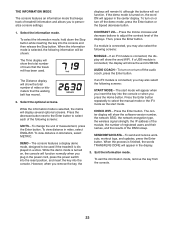
...will appear in the center display. CONTRAST LVL—-Press the Incline increase and decrease buttons to select each of the following information will be used . AUDIO COACH—-To turn off the demo mode, press the Enter button or the Speed decrease button. 1. To view distance in ...START MODE—-The start mode. THE INFORMATION MODE The console features an information mode that keeps track of treadmill information and allows you plug in the power cord, press the power switch into the reset position, and insert the key into the console. The Distance display will show the ...
...will appear in the center display. CONTRAST LVL—-Press the Incline increase and decrease buttons to select each of the following information will be used . AUDIO COACH—-To turn off the demo mode, press the Enter button or the Speed decrease button. 1. To view distance in ...START MODE—-The start mode. THE INFORMATION MODE The console features an information mode that keeps track of treadmill information and allows you plug in the power cord, press the power switch into the reset position, and insert the key into the console. The Distance display will show the ...

English Manual
Page 24
...jack on your iPod, MP3 player, CD player, or other personal audio player to meet Apple performance standards. HOW TO USE THE STEREO SOUND SYSTEM This treadmill has been designed specifically to work with iPod and has been certified by the developer to the console through the audio jack... or through the optional PROFORM SYNC. To use it. Next, press the play music or audio books through the console’'s stereo speakers, you are using a ...
...jack on your iPod, MP3 player, CD player, or other personal audio player to meet Apple performance standards. HOW TO USE THE STEREO SOUND SYSTEM This treadmill has been designed specifically to work with iPod and has been certified by the developer to the console through the audio jack... or through the optional PROFORM SYNC. To use it. Next, press the play music or audio books through the console’'s stereo speakers, you are using a ...
English Manual
Page 25
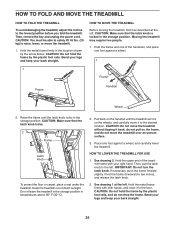
...the power cord. CAUTION: Do not hold the frame by the plastic foot rails. CAUTION: Make sure that the latch knob is locked in the storage position. Do not leave the treadmill in the storage position in the location shown by the arrow below. HOW TO LOWER THE TREADMILL FOR USE 1. ...IMPORTANT: Do not turn the latch knob. Hold the metal frame firmly with your back straight. Bend your legs and keep your back straight. 25 Moving the treadmill may require two people. 1. Hold the metal frame ...
...the power cord. CAUTION: Do not hold the frame by the plastic foot rails. CAUTION: Make sure that the latch knob is locked in the storage position. Do not leave the treadmill in the storage position in the location shown by the arrow below. HOW TO LOWER THE TREADMILL FOR USE 1. ...IMPORTANT: Do not turn the latch knob. Hold the metal frame firmly with your back straight. Bend your legs and keep your back straight. 25 Moving the treadmill may require two people. 1. Hold the metal frame ...

