

English Manual
Page 2
Note: The decals may not be shown at actual size. Apply the decal in the location shown. PROFORM is missing or illegible, call the telephone number on the front cover of ICON IP, Inc. 2 If a decal is a registered trademark... WARNING DECAL PLACEMENT 2 IMPORTANT PRECAUTIONS 3 BEFORE YOU BEGIN 7 PART IDENTIFICATION CHART 8 ASSEMBLY 9 OPERATION AND ADJUSTMENT 18 HOW TO FOLD AND MOVE THE TREADMILL 28 TROUBLESHOOTING 29 EXERCISE GUIDELINES 32 PART LIST 34 EXPLODED DRAWING 36 ORDERING REPLACEMENT PARTS Back Cover LIMITED WARRANTY Back Cover WARNING DECAL PLACEMENT This drawing shows...
Note: The decals may not be shown at actual size. Apply the decal in the location shown. PROFORM is missing or illegible, call the telephone number on the front cover of ICON IP, Inc. 2 If a decal is a registered trademark... WARNING DECAL PLACEMENT 2 IMPORTANT PRECAUTIONS 3 BEFORE YOU BEGIN 7 PART IDENTIFICATION CHART 8 ASSEMBLY 9 OPERATION AND ADJUSTMENT 18 HOW TO FOLD AND MOVE THE TREADMILL 28 TROUBLESHOOTING 29 EXERCISE GUIDELINES 32 PART LIST 34 EXPLODED DRAWING 36 ORDERING REPLACEMENT PARTS Back Cover LIMITED WARRANTY Back Cover WARNING DECAL PLACEMENT This drawing shows...

English Manual
Page 4
... pain while exercising, stop immediately and cool down. Inspect and properly tighten all parts of heart rate readings. Never remove the motor hood unless instructed to raise, lower, or move the treadmill until it is not a medical device. SAVE THESE INSTRUCTIONS 4 When folding or...be performed by an authorized service representative. Never insert any opening on page 7 for the location of the power switch), and unplug the power cord when the treadmill is intended only as an exercise aid in determining heart rate trends in serious injury or death. Various ...
... pain while exercising, stop immediately and cool down. Inspect and properly tighten all parts of heart rate readings. Never remove the motor hood unless instructed to raise, lower, or move the treadmill until it is not a medical device. SAVE THESE INSTRUCTIONS 4 When folding or...be performed by an authorized service representative. Never insert any opening on page 7 for the location of the power switch), and unplug the power cord when the treadmill is intended only as an exercise aid in determining heart rate trends in serious injury or death. Various ...
English Manual
Page 7
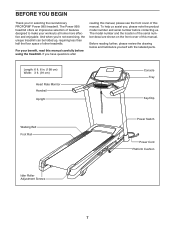
... 7 Before reading further, please review the drawing below and familiarize yourself with the labeled parts. To help us . And when you for selecting the revolutionary PROFORM® Power 995i treadmill. BEFORE YOU BEGIN Thank you ’'re not exercising, the unique treadmill can be folded up, requiring less than half the oor space of...
... 7 Before reading further, please review the drawing below and familiarize yourself with the labeled parts. To help us . And when you for selecting the revolutionary PROFORM® Power 995i treadmill. BEFORE YOU BEGIN Thank you ’'re not exercising, the unique treadmill can be folded up, requiring less than half the oor space of...
English Manual
Page 8
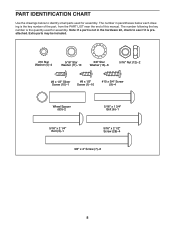
... near the end of this manual. The number following the key number is preattached. Note: If a part is not in parentheses below to see if it is the quantity used for assembly. Extra parts may be included. #10 Star Washer (5)–-4 5/16" Star Washer (11)–-10 3/8" Star Washer (13)–-6 5/16... Spacer (63)–-2 5/16" x 1 3/4" Bolt (6)–-1 5/16" x 2 1/4" Bolt (3)–-1 5/16" x 2 1/2" Screw (28)–-4 3/8" x 4" Screw (7)–-6 8 The number in the hardware kit, check to identify small parts used for assembly.
... near the end of this manual. The number following the key number is preattached. Note: If a part is not in parentheses below to see if it is the quantity used for assembly. Extra parts may be included. #10 Star Washer (5)–-4 5/16" Star Washer (11)–-10 3/8" Star Washer (13)–-6 5/16... Spacer (63)–-2 5/16" x 1 3/4" Bolt (6)–-1 5/16" x 2 1/4" Bolt (3)–-1 5/16" x 2 1/2" Screw (28)–-4 3/8" x 4" Screw (7)–-6 8 The number in the hardware kit, check to identify small parts used for assembly.
English Manual
Page 9
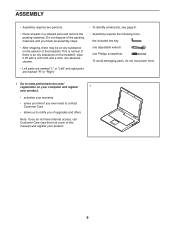
... page 8. •• Assembly requires the following tools: the included hex key one adjustable wrench one Phillips screwdriver To avoid damaging parts, do not use power tools. 1. This is an oily substance on the exterior of this manual) and register your product. 9 ASSEMBLY •• ...8226; After shipping, there may be an oily substance on the treadmill, wipe it off with a soft cloth and a mild, non-abrasive cleaner. •• Left parts are marked “"L”" or “"Left”" and right parts are marked “"R”" or “"Right.”" ••...
... page 8. •• Assembly requires the following tools: the included hex key one adjustable wrench one Phillips screwdriver To avoid damaging parts, do not use power tools. 1. This is an oily substance on the exterior of this manual) and register your product. 9 ASSEMBLY •• ...8226; After shipping, there may be an oily substance on the treadmill, wipe it off with a soft cloth and a mild, non-abrasive cleaner. •• Left parts are marked “"L”" or “"Left”" and right parts are marked “"R”" or “"Right.”" ••...
English Manual
Page 17
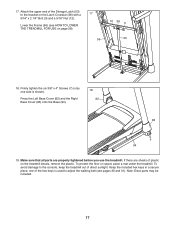
... the Base (94). 18 82 83 7 94 19. Make sure that all parts are sheets of the hex keys is shown). Note: Extra parts may be included. 17 To protect the oor or carpet, place a mat under the treadmill. Lower the Frame (56) (see pages 30 and 31). Attach the upper end... one of plastic on the Latch Crossbar (38) with a 17 5/16" x 2 1/4" Bolt (3) and a 5/16" Nut (12). one side is used to the bracket on the treadmill decals, remove the plastic. Keep the included hex keys in a secure place; To avoid damage to the console, keep the...
... the Base (94). 18 82 83 7 94 19. Make sure that all parts are sheets of the hex keys is shown). Note: Extra parts may be included. 17 To protect the oor or carpet, place a mat under the treadmill. Lower the Frame (56) (see pages 30 and 31). Attach the upper end... one of plastic on the Latch Crossbar (38) with a 17 5/16" x 2 1/4" Bolt (3) and a 5/16" Nut (12). one side is used to the bracket on the treadmill decals, remove the plastic. Keep the included hex keys in a secure place; To avoid damage to the console, keep the...
English Manual
Page 25
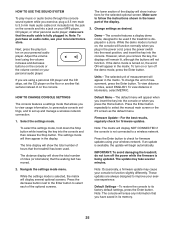
... the firmware is selected, the matrix will begin automatically. While the demo mode is fully plugged in the power cord, press the power switch into the reset position, and insert the key into the console or when you press the Home button. However, when you remove the key, ... insert the key into the console. To change the unit of the optional screens. To view distance in the lower part of miles (or kilometers) that the treadmill has been used if the treadmill is turned on your personal audio player. Default Menu—-The default menu will not function. Press the Enter...
... the firmware is selected, the matrix will begin automatically. While the demo mode is fully plugged in the power cord, press the power switch into the reset position, and insert the key into the console or when you press the Home button. However, when you remove the key, ... insert the key into the console. To change the unit of the optional screens. To view distance in the lower part of miles (or kilometers) that the treadmill has been used if the treadmill is turned on your personal audio player. Default Menu—-The default menu will not function. Press the Enter...
English Manual
Page 26
..., go to support.ifit.com for instructions. If your WPS router, first press the Enter button and follow the instructions in the matrix. Follow any part of the currently-selected access point. To set the included WiFi setup card on the web page. Next, set up a wireless network connection using the...
..., go to support.ifit.com for instructions. If your WPS router, first press the Enter button and follow the instructions in the matrix. Follow any part of the currently-selected access point. To set the included WiFi setup card on the web page. Next, set up a wireless network connection using the...
English Manual
Page 27
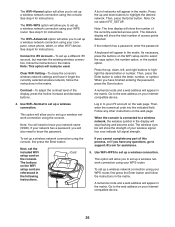
...: A warning may appear stating that the server cannot be IFIT_SETUP; If you cannot complete any part of this process, or if you have entered the IP address correctly. 27 If you cannot complete any part of this process, or if you have any questions, go to support.ifit.com for assistance...the console has already been configured to connect to a wireless network. Open a web browser on your iFit account on the web page to connect the treadmill to your wireless signal; Log in to your computer, smart phone, tablet, or other Wi-Fi device. Next, type in the IP address on ...
...: A warning may appear stating that the server cannot be IFIT_SETUP; If you cannot complete any part of this process, or if you have entered the IP address correctly. 27 If you cannot complete any part of this process, or if you have any questions, go to support.ifit.com for assistance...the console has already been configured to connect to a wireless network. Open a web browser on your iFit account on the web page to connect the treadmill to your wireless signal; Log in to your computer, smart phone, tablet, or other Wi-Fi device. Next, type in the IP address on ...
English Manual
Page 31
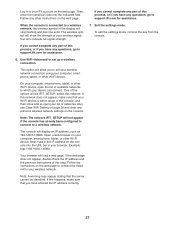
...insert the key, and carefully walk on , rst remove the key and UNPLUG THE POWER CORD. To avoid damage to overtighten the walking belt. If the walking belt slips when walked on the treadmill for a few minutes. If the walking belt has shifted to the left idler roller screw ... -center, rst remove the key and UNPLUG THE POWER CORD. If the walking belt is off -center or slips when walked on a. Repeat until the walking belt is centered. Then, plug in the power cord, insert the key, and run the treadmill for a few minutes. Wipe exterior parts of a turn .
...insert the key, and carefully walk on , rst remove the key and UNPLUG THE POWER CORD. To avoid damage to overtighten the walking belt. If the walking belt slips when walked on the treadmill for a few minutes. If the walking belt has shifted to the left idler roller screw ... -center, rst remove the key and UNPLUG THE POWER CORD. If the walking belt is off -center or slips when walked on a. Repeat until the walking belt is centered. Then, plug in the power cord, insert the key, and run the treadmill for a few minutes. Wipe exterior parts of a turn .
English Manual
Page 32
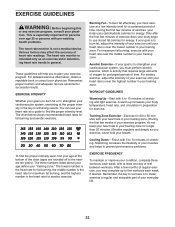
... heart rate monitor is to use your training zone. Only after the first few months of your body begin to make exercise a regular and enjoyable part of regular exercise, you exercise; A warm-up to strengthen your breath. Cooling Down—-Finish with 5 to 10 minutes of exercise, your cardiovascular system, you...
... heart rate monitor is to use your training zone. Only after the first few months of your body begin to make exercise a regular and enjoyable part of regular exercise, you exercise; A warm-up to strengthen your breath. Cooling Down—-Finish with 5 to 10 minutes of exercise, your cardiovascular system, you...

English Manual
Page 34
PART LIST Key No. Qty. 1 42 2 35 3 1 4 4 5 4 6 1 7 6 8 2 9 4 10 9 11 12 12 2 13 6 14 9 15 2 16 1 17 2 18 1 19 4 20 2 21 2 22 2 23 4 24 12 25 2 26 2 ... Wheel Wheel Spacer Console Base Motor Hood Hood Accent Incline Frame Spacer Hood Clip Incline Motor Incline Frame Frame Spacer Controller Electronics Bracket Base Cap Power Switch Power Cord Grommet Belly Pan Left Handrail Cover Console Upright Wire Left Base Cover Right Base Cover Right Bottom Handrail Cover Left Bottom Handrail Cover...
PART LIST Key No. Qty. 1 42 2 35 3 1 4 4 5 4 6 1 7 6 8 2 9 4 10 9 11 12 12 2 13 6 14 9 15 2 16 1 17 2 18 1 19 4 20 2 21 2 22 2 23 4 24 12 25 2 26 2 ... Wheel Wheel Spacer Console Base Motor Hood Hood Accent Incline Frame Spacer Hood Clip Incline Motor Incline Frame Frame Spacer Controller Electronics Bracket Base Cap Power Switch Power Cord Grommet Belly Pan Left Handrail Cover Console Upright Wire Left Base Cover Right Base Cover Right Bottom Handrail Cover Left Bottom Handrail Cover...

English Manual
Page 35
Qty. Qty. For information about ordering replacement parts, see the back cover of this manual. *These parts are subject to change without notice. Key No. Description 101 1 102 5 103 1 104 1 105 1 106 1 107 2 Fan #8 x 3/4" Truss Head Screw Left Rear Cap Right Rear Cap 1/4" x 1 3/4" Screw 1/4" Star Washer #8 x 1 3/4" Screw 108 6 109 2 110 1 111 1 112 1 113 1 * –- #8 x 3/4" Washer Head Screw Base Pad Left Foot Pad Right Foot Pad Left Front Cushion Top Right Front Cushion Top User’'s Manual Note: Specications are not illustrated. 35 Description Key No.
Qty. Qty. For information about ordering replacement parts, see the back cover of this manual. *These parts are subject to change without notice. Key No. Description 101 1 102 5 103 1 104 1 105 1 106 1 107 2 Fan #8 x 3/4" Truss Head Screw Left Rear Cap Right Rear Cap 1/4" x 1 3/4" Screw 1/4" Star Washer #8 x 1 3/4" Screw 108 6 109 2 110 1 111 1 112 1 113 1 * –- #8 x 3/4" Washer Head Screw Base Pad Left Foot Pad Right Foot Pad Left Front Cushion Top Right Front Cushion Top User’'s Manual Note: Specications are not illustrated. 35 Description Key No.

English Manual
Page 40
...name of the product (see the front cover of this manual) •• the key number and description of the replacement part(s) (see the PART LIST and the EXPLODED DRAWING near the end of this warranty is in their scope and duration to the customer. The warranty extended...economic loss, loss of property, loss of revenues or prots, loss of enjoyment or use or performance of purchase. If replacement parts are warranted for a minimal handling charge. Accordingly, the above limitation may have other warranties, and any kind. ICON’'s obligation under ...
...name of the product (see the front cover of this manual) •• the key number and description of the replacement part(s) (see the PART LIST and the EXPLODED DRAWING near the end of this warranty is in their scope and duration to the customer. The warranty extended...economic loss, loss of property, loss of revenues or prots, loss of enjoyment or use or performance of purchase. If replacement parts are warranted for a minimal handling charge. Accordingly, the above limitation may have other warranties, and any kind. ICON’'s obligation under ...


