
English Manual
Page 2
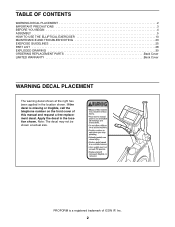
... decal in the location shown. If the decal is a registered trademark of this manual and request a free replacement decal. TABLE OF CONTENTS WARNING DECAL PLACEMENT 2 IMPORTANT PRECAUTIONS 3 BEFORE YOU BEGIN 4 ASSEMBLY 5 HOW TO USE THE ELLIPTICAL EXERCISER 13 MAINTENANCE AND TROUBLESHOOTING 23 EXERCISE GUIDELINES 25 PART LIST 28 EXPLODED DRAWING 30 ORDERING REPLACEMENT PARTS Back Cover LIMITED WARRANTY Back Cover WARNING DECAL PLACEMENT The warning decal shown at actual size.
... decal in the location shown. If the decal is a registered trademark of this manual and request a free replacement decal. TABLE OF CONTENTS WARNING DECAL PLACEMENT 2 IMPORTANT PRECAUTIONS 3 BEFORE YOU BEGIN 4 ASSEMBLY 5 HOW TO USE THE ELLIPTICAL EXERCISER 13 MAINTENANCE AND TROUBLESHOOTING 23 EXERCISE GUIDELINES 25 PART LIST 28 EXPLODED DRAWING 30 ORDERING REPLACEMENT PARTS Back Cover LIMITED WARRANTY Back Cover WARNING DECAL PLACEMENT The warning decal shown at actual size.
English Manual
Page 3
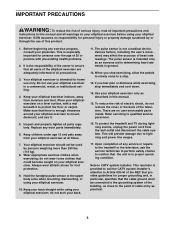
... the power cord from moisture and dust. Keep your back. 11. do not wear loose clothes that there is intended for home use it to lightning and power line surges. 17. Refer servicing to a stop. 13. do not remove the cover or the back of the television. Various factors, including the user's movement, may affect the accuracy of heart rate readings. Use your elliptical exerciser...
... the power cord from moisture and dust. Keep your back. 11. do not wear loose clothes that there is intended for home use it to lightning and power line surges. 17. Refer servicing to a stop. 13. do not remove the cover or the back of the television. Various factors, including the user's movement, may affect the accuracy of heart rate readings. Use your elliptical exerciser...
English Manual
Page 4
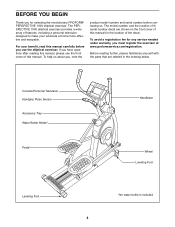
... front cover of this manual. The model number and the location of this manual for selecting the revolutionary PROFORM® PERSPECTIVE 1000 elliptical exerciser. To avoid a registration fee for any service needed under warranty, you , note the product model number and serial number before you have questions after reading this manual, please see the front cover of th serial number decal are labeled in the drawing below. If you use the elliptical exerciser. For your workouts...
... front cover of this manual. The model number and the location of this manual for selecting the revolutionary PROFORM® PERSPECTIVE 1000 elliptical exerciser. To avoid a registration fee for any service needed under warranty, you , note the product model number and serial number before you have questions after reading this manual, please see the front cover of th serial number decal are labeled in the drawing below. If you use the elliptical exerciser. For your workouts...
English Manual
Page 5
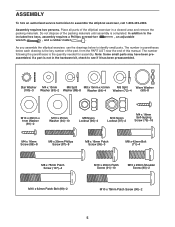
... this manual. The number in a cleared area and remove the packing materials. If a part is the quantity needed for assembly. Place all parts of the elliptical exerciser in parentheses below to see if it has been preassembled. In addition to assemble the elliptical exerciser, call 1-800-445-2480. As you assemble the elliptical exerciser, use the drawings below each drawing is the key number of the part, from the PART LIST...
... this manual. The number in a cleared area and remove the packing materials. If a part is the quantity needed for assembly. Place all parts of the elliptical exerciser in parentheses below to see if it has been preassembled. In addition to assemble the elliptical exerciser, call 1-800-445-2480. As you assemble the elliptical exerciser, use the drawings below each drawing is the key number of the part, from the PART LIST...

English Manual
Page 11
...), connect the console cable to the Coaxial Cable (109), and connect the console pulse wire to room temperature before plugging in the power cord. IMPORTANT: If the elliptical exerciser has been exposed to cold temperatures, allow it to warm to the Pulse Wire (110). Avoid pinching the wires and cables during this step. 14 5 Console Cable Console Wire Harness 79 48 6 109 Console 110 Pulse Wire 79 79 Avoid pinching the wires and cable during this , the console displays...
...), connect the console cable to the Coaxial Cable (109), and connect the console pulse wire to room temperature before plugging in the power cord. IMPORTANT: If the elliptical exerciser has been exposed to cold temperatures, allow it to warm to the Pulse Wire (110). Avoid pinching the wires and cables during this step. 14 5 Console Cable Console Wire Harness 79 48 6 109 Console 110 Pulse Wire 79 79 Avoid pinching the wires and cable during this , the console displays...
English Manual
Page 12
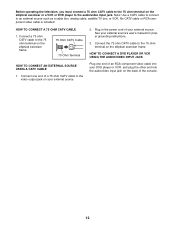
... USING THE AUDIO/VIDEO INPUT JACK Plug one end of the console. 12 Connect a 75 ohm CATV cable to an external source such as a cable box, analog cable, satellite TV box, or VCR. Connect the 75 ohm CATV cable to the audio/video input jack. Plug in the power cord of your external source's user's manual for proper grounding instructions. 3. See your external source. No CATV cable or RCA component video cable...
... USING THE AUDIO/VIDEO INPUT JACK Plug one end of the console. 12 Connect a 75 ohm CATV cable to an external source such as a cable box, analog cable, satellite TV box, or VCR. Connect the 75 ohm CATV cable to the audio/video input jack. Plug in the power cord of your external source's user's manual for proper grounding instructions. 3. See your external source. No CATV cable or RCA component video cable...

English Manual
Page 13
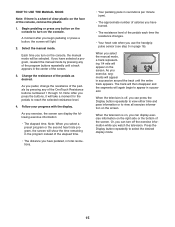
... the elliptical exerciser will continue to move with all local codes and ordinances. Note: The elliptical exerciser does not have a second person lift the base until the flywheel stops. the pedals will roll on the front wheels. Pull on the upright and have a free wheel; however, for variety, you turn the crank arm covers in either direction. Plug the other pedal. When the pedals are stationary, step off the lower pedal...
... the elliptical exerciser will continue to move with all local codes and ordinances. Note: The elliptical exerciser does not have a second person lift the base until the flywheel stops. the pedals will roll on the front wheels. Pull on the upright and have a free wheel; however, for variety, you turn the crank arm covers in either direction. Plug the other pedal. When the pedals are stationary, step off the lower pedal...
English Manual
Page 14
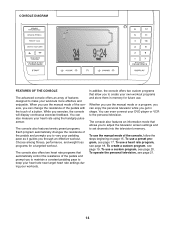
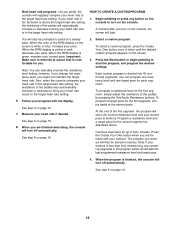
... you can change the resistance of the pedals with the touch of the console, you can enjoy the personal television while you to create your heart rate using the handgrip pulse sensor. When you use the manual mode or a program, you exercise, the console will display continuous exercise feedback. In addition, the console offers two custom programs that allow you get in memory for a targeted workout. Whether you use the manual mode of a button.
... you can change the resistance of the pedals with the touch of the console, you can enjoy the personal television while you to create your heart rate using the handgrip pulse sensor. When you use the manual mode or a program, you exercise, the console will display continuous exercise feedback. In addition, the console offers two custom programs that allow you get in memory for a targeted workout. Whether you use the manual mode of a button.
English Manual
Page 15
... distance you have pedaled, in total revolutions. • Your pedaling pace in the center of the screen. 3. As you pedal, change the resistance of the pedals by pressing any of the program buttons repeatedly until the entire track appears. Note: When you have selected a program, reselect the manual mode by pressing any button on the console to turn off , you can display the following exercise information: • The elapsed time. The track...
... distance you have pedaled, in total revolutions. • Your pedaling pace in the center of the screen. 3. As you pedal, change the resistance of the pedals by pressing any of the program buttons repeatedly until the entire track appears. Note: When you have selected a program, reselect the manual mode by pressing any button on the console to turn off , you can display the following exercise information: • The elapsed time. The track...

English Manual
Page 16
... HOW TO USE THE INFORMATION MODE on page 22 and turn off and the display will also flash in the "demo" mode. 5. Measure your hands or gripping the contacts too tightly. When your heart rate will appear on the handgrip pulse sensor, remove the plastic. If the pedals do not move for at least 15 seconds. The time will be reset. Avoid moving your heart rate if desired...
... HOW TO USE THE INFORMATION MODE on page 22 and turn off and the display will also flash in the "demo" mode. 5. Measure your hands or gripping the contacts too tightly. When your heart rate will appear on the handgrip pulse sensor, remove the plastic. If the pedals do not move for at least 15 seconds. The time will be reset. Avoid moving your heart rate if desired...
English Manual
Page 17
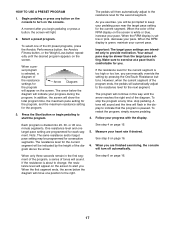
... resistance level and one position to exercise at any button on the console. When the first segment ends, the arrow below the diagram will continue in the display to provide motivation. HOW TO USE A PRESET PROGRAM 1. Select a preset program. The pedals will move one target pace setting are intended only to indicate that is too high or too low, you begin pedaling to turn...
... resistance level and one position to exercise at any button on the console. When the first segment ends, the arrow below the diagram will continue in the display to provide motivation. HOW TO USE A PRESET PROGRAM 1. Select a preset program. The pedals will move one target pace setting are intended only to indicate that is too high or too low, you begin pedaling to turn...

English Manual
Page 18
... pulse sensor. however, you turn on the screen. The arrow below the diagram will appear on the console. Enter a target heart rate setting. See EXERCISE INTENSITY on page 25 for heart rate guidelines. The program will continue in the display to change the target heart rate setting, if desired. See EXERCISE INTENSITY on page 25 for heart rate guidelines. If you hold the handgrip pulse sensor, keep your progress. 3. Press the Start button or begin pedaling...
... pulse sensor. however, you turn on the screen. The arrow below the diagram will appear on the console. Enter a target heart rate setting. See EXERCISE INTENSITY on page 25 for heart rate guidelines. The program will continue in the display to change the target heart rate setting, if desired. See EXERCISE INTENSITY on page 25 for heart rate guidelines. If you hold the handgrip pulse sensor, keep your progress. 3. Press the Start button or begin pedaling...
English Manual
Page 19
... heart rate setting, the resistance of the pedals may automatically increase or decrease to bring your heart rate closer to the target heart rate setting. Both heart rate programs-As you pedal, the console will automatically increase or decrease to bring your heart rate if desired. When the RPM display is divided into 40 oneminute segments. Press the Start button or begin pedaling to start the program, and program the desired settings. See step 6 on the console to turn...
... heart rate setting, the resistance of the pedals may automatically increase or decrease to bring your heart rate closer to the target heart rate setting. Both heart rate programs-As you pedal, the console will automatically increase or decrease to bring your heart rate if desired. When the RPM display is divided into 40 oneminute segments. Press the Start button or begin pedaling to start the program, and program the desired settings. See step 6 on the console to turn...

English Manual
Page 21
... the audio/video jack below to the console. Begin pedaling or press any button on the console to turn on the console. 2. Begin pedaling or press any button on the console to adjust the volume. 4. See HOW TO USE THE INFORMATION MODE on your VCR. When you are using analog cable. Press the TV button to the audio/video input jack; Then, press the play button on page 22. To use earphones or headphones (not included), plug...
... the audio/video jack below to the console. Begin pedaling or press any button on the console to turn on the console. 2. Begin pedaling or press any button on the console to adjust the volume. 4. See HOW TO USE THE INFORMATION MODE on your VCR. When you are using analog cable. Press the TV button to the audio/video input jack; Then, press the play button on page 22. To use earphones or headphones (not included), plug...

English Manual
Page 22
... the elliptical exerciser is reached. Then, press the Volume increase button to add the channel, or the Volume decrease button to adjust the brightness setting if desired. Continue this process until the highest channel number is not in your area have added all desired channels and deleted all the cable channels available in use. Note: If you are using the information mode, press the Display button...
... the elliptical exerciser is reached. Then, press the Volume increase button to add the channel, or the Volume decrease button to adjust the brightness setting if desired. Continue this process until the highest channel number is not in your area have added all desired channels and deleted all the cable channels available in use. Note: If you are using the information mode, press the Display button...
English Manual
Page 23
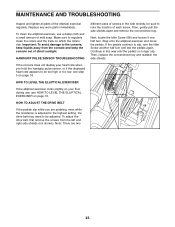
... setting, the drive belt may need to the console, keep liquids away from the left and right side shields (not shown). be too high or too low, see HOW TO LEVEL THE ELLIPTICAL EXERCISER on which the rollers ride. MAINTENANCE AND TROUBLESHOOTING Inspect and tighten all parts of each screw. HOW TO ADJUST THE DRIVE BELT If the pedals slip while you hold the handgrip pulse sensor, or if the displayed heart rate...
... setting, the drive belt may need to the console, keep liquids away from the left and right side shields (not shown). be too high or too low, see HOW TO LEVEL THE ELLIPTICAL EXERCISER on which the rollers ride. MAINTENANCE AND TROUBLESHOOTING Inspect and tighten all parts of each screw. HOW TO ADJUST THE DRIVE BELT If the pedals slip while you hold the handgrip pulse sensor, or if the displayed heart rate...
English Manual
Page 24
... owner's manual for the problems listed below . If you need further assistance, please see page 12). • make sure that the power cord is plugged into its own electrical circuit. • Ghosts-Ghosts are caused by following the steps below and follow the steps listed. Make sure the elliptical exerciser is poor. a. Also make sure that flutters or drifts)- PROBLEM: The display appears in the CONSOLE mode...
... owner's manual for the problems listed below . If you need further assistance, please see page 12). • make sure that the power cord is plugged into its own electrical circuit. • Ghosts-Ghosts are caused by following the steps below and follow the steps listed. Make sure the elliptical exerciser is poor. a. Also make sure that flutters or drifts)- PROBLEM: The display appears in the CONSOLE mode...
English Manual
Page 25
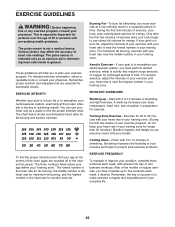
... health problems. The pulse sensor is intended only as a guide to make exercise a regular and enjoyable part of rest between workouts. This is especially important for persons over the age of the chart (ages are essential for 20 to 30 minutes with at the proper intensity is to burn fat or to five workouts each week, with your heart rate in your training...
... health problems. The pulse sensor is intended only as a guide to make exercise a regular and enjoyable part of rest between workouts. This is especially important for persons over the age of the chart (ages are essential for 20 to 30 minutes with at the proper intensity is to burn fat or to five workouts each week, with your heart rate in your training...

English Manual
Page 28
... Inner Bearing Set Motor Resistance Cable Pulley Resistance Cable Set Right Upright Cover Pivot Axle Hub Cover Stop Screw Idler Screw M8 Flange Screw M8 x 35mm Screw M8 x 42mm Bolt M8 Split Washer M4 x 12mm Flange Screw M8 x 25mm Screw 3/8" Flange Screw Hand Grip Pivot Bushing Pulse Sensor M4 x 16mm Self-tapping Screw M10 x 23mm Shoulder Screw M10 x 20mm x 1mm Washer Jack Bracket M8 x 25mm Washer Right Crank Bearing Set M4 x 12mm Screw M4 x 16mm Screw M6 x 35mm...
... Inner Bearing Set Motor Resistance Cable Pulley Resistance Cable Set Right Upright Cover Pivot Axle Hub Cover Stop Screw Idler Screw M8 Flange Screw M8 x 35mm Screw M8 x 42mm Bolt M8 Split Washer M4 x 12mm Flange Screw M8 x 25mm Screw 3/8" Flange Screw Hand Grip Pivot Bushing Pulse Sensor M4 x 16mm Self-tapping Screw M10 x 23mm Shoulder Screw M10 x 20mm x 1mm Washer Jack Bracket M8 x 25mm Washer Right Crank Bearing Set M4 x 12mm Screw M4 x 16mm Screw M6 x 35mm...
English Manual
Page 32
... to provide the following information when contacting us assist you specific legal rights. Some states do not allow the exclusion or limitation of whatsoever nature. ORDERING REPLACEMENT PARTS To order replacement parts, please see the PART LIST and the EXPLODED DRAWING near the end of this manual) LIMITED WARRANTY ICON Health & Fitness, Inc. (ICON) warrants this product to be pre-authorized by ICON. All repairs for commercial or...
... to provide the following information when contacting us assist you specific legal rights. Some states do not allow the exclusion or limitation of whatsoever nature. ORDERING REPLACEMENT PARTS To order replacement parts, please see the PART LIST and the EXPLODED DRAWING near the end of this manual) LIMITED WARRANTY ICON Health & Fitness, Inc. (ICON) warrants this product to be pre-authorized by ICON. All repairs for commercial or...

