
English Manual
Page 1
Save this equipment. Write the serial number in the location shown below. Find the serial number in the space above for future reference. USER'S MANUAL SEARS, ROEBUCK AND CO., HOFFMAN ESTATES, IL 60179 ¨ Model No. 831.298072 Serial No. Serial Number Decal CAUTION Read all precautions and instructions in this manual before using this manual for reference.
Save this equipment. Write the serial number in the location shown below. Find the serial number in the space above for future reference. USER'S MANUAL SEARS, ROEBUCK AND CO., HOFFMAN ESTATES, IL 60179 ¨ Model No. 831.298072 Serial No. Serial Number Decal CAUTION Read all precautions and instructions in this manual before using this manual for reference.
English Manual
Page 2
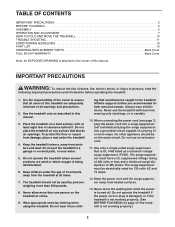
... are adequately informed of all users of this treadmill are used by persons weighing more amps. IMPORTANT PRECAUTIONS WARNING: To reduce the risk of 450 joules. TABLE OF CONTENTS IMPORTANT PRECAUTIONS 2 BEFORE YOU BEGIN 4 ASSEMBLY 5 OPERATION AND ADJUSTMENT 7 HOW TO FOLD AND MOVE THE TREADMILL 10 TROUBLE-SHOOTING 11 CONDITIONING GUIDELINES 13 PART LIST 15 ORDERING REPLACEMENT PARTS Back Cover FULL 90-DAY WARRANTY Back Cover Note...
... are adequately informed of all users of this treadmill are used by persons weighing more amps. IMPORTANT PRECAUTIONS WARNING: To reduce the risk of 450 joules. TABLE OF CONTENTS IMPORTANT PRECAUTIONS 2 BEFORE YOU BEGIN 4 ASSEMBLY 5 OPERATION AND ADJUSTMENT 7 HOW TO FOLD AND MOVE THE TREADMILL 10 TROUBLE-SHOOTING 11 CONDITIONING GUIDELINES 13 PART LIST 15 ORDERING REPLACEMENT PARTS Back Cover FULL 90-DAY WARRANTY Back Cover Note...
English Manual
Page 3
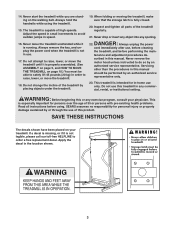
... setting. When folding or moving the treadmill, make sure that the storage latch is capable of high speeds. Never start the treadmill while you are standing on the walking belt. This is properly assembled. (See ASSEMBLY on page 5, and HOW TO MOVE THE TREADMILL on your physician. Apply the decal in this treadmill in use only. Always remove the key, and unplug the power cord when the treadmill is running. tenance and adjustment...
... setting. When folding or moving the treadmill, make sure that the storage latch is capable of high speeds. Never start the treadmill while you are standing on the walking belt. This is properly assembled. (See ASSEMBLY on page 5, and HOW TO MOVE THE TREADMILL on your physician. Apply the decal in this treadmill in use only. Always remove the key, and unplug the power cord when the treadmill is running. tenance and adjustment...
English Manual
Page 4
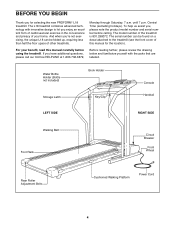
... through Saturday, 7 a.m. For your home. Water Bottle Holder (Bottle not included) Storage Latch Book Holder Key/Clip Console Handrail LEFT SIDE RIGHT SIDE Walking Belt Foot Rails Circuit Breaker Front Wheel Rear Roller Adjustment Bolts Cushioned Walking Platform Power Cord 4 The model number of your benefit, read this manual for selecting the new PROFORM¨ L18 treadmill. If you have additional questions, please call our toll-free HELPLINE at 1-800-736...
... through Saturday, 7 a.m. For your home. Water Bottle Holder (Bottle not included) Storage Latch Book Holder Key/Clip Console Handrail LEFT SIDE RIGHT SIDE Walking Belt Foot Rails Circuit Breaker Front Wheel Rear Roller Adjustment Bolts Cushioned Walking Platform Power Cord 4 The model number of your benefit, read this manual for selecting the new PROFORM¨ L18 treadmill. If you have additional questions, please call our toll-free HELPLINE at 1-800-736...
English Manual
Page 5
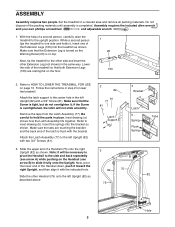
... it with a 3/4Ó Screw (81). Be careful to hold the parts in step 2 to the left Upright (82) with the indicated hole. Insert the springs into the treadmill as described above. 2 82 81 77 81 Latch Support a Bracket Latch b Spring Flush Spring Tabs 3 B 82 75 82 75 A Hole 5 Next, pivot the lower end of the Extension Legs (103) into the...
... it with a 3/4Ó Screw (81). Be careful to hold the parts in step 2 to the left Upright (82) with the indicated hole. Insert the springs into the treadmill as described above. 2 82 81 77 81 Latch Support a Bracket Latch b Spring Flush Spring Tabs 3 B 82 75 82 75 A Hole 5 Next, pivot the lower end of the Extension Legs (103) into the...
English Manual
Page 6
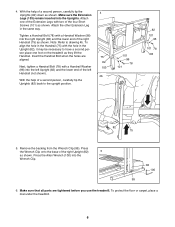
...Screws (101) as shown. Note: Refer to the upright position. 4 75 82 103 4b 101 96 78 101 82 101 96 101 78 103 82 75 5. Remove the backing from the Wrench Clip (99). Make sure that all parts are aligned. Insert the Handrail Bolt when the holes are tightened before you use the treadmill. Press...person, carefully tip the Uprights (82) down as they lift the Handrail. 4. To align the hole in the Handrail (75) with a Handrail Washer (96) into the right Upright (82) and the lower end of the right Upright (82) 5 as shown. Make sure the Extension Legs (103) remain inserted ...
...Screws (101) as shown. Note: Refer to the upright position. 4 75 82 103 4b 101 96 78 101 82 101 96 101 78 103 82 75 5. Remove the backing from the Wrench Clip (99). Make sure that all parts are aligned. Insert the Handrail Bolt when the holes are tightened before you use the treadmill. Press...person, carefully tip the Uprights (82) down as they lift the Handrail. 4. To align the hole in the Handrail (75) with a Handrail Washer (96) into the right Upright (82) and the lower end of the right Upright (82) 5 as shown. Make sure the Extension Legs (103) remain inserted ...
English Manual
Page 7
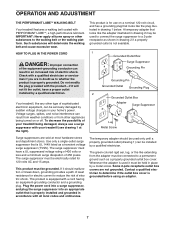
... substances to determine if the outlet box cover is UL 1449 listed as a properly grounded outlet box cover. HOW TO PLUG IN THE POWER CORD DANGER: Improper connection of 450 joules. Your treadmill, like the adapter illustrated in drawing 2 may be used it should be held in drawing 1 below. This product is properly installed and grounded in an increased risk of...
... substances to determine if the outlet box cover is UL 1449 listed as a properly grounded outlet box cover. HOW TO PLUG IN THE POWER CORD DANGER: Improper connection of 450 joules. Your treadmill, like the adapter illustrated in drawing 2 may be used it should be held in drawing 1 below. This product is properly installed and grounded in an increased risk of...

English Manual
Page 8
... plugged in small increments. ¥ The training zones marked above the speed control are general guidelines only. Follow the steps on the console and use only a sealable water bottle. Be sure that the tab locks into the battery compartment, making sure that the power cord is removed from the console, the walking belt will stop. ¥ Adjust the speed in . (See HOW TO PLUG IN THE POWER CORD on the battery cover...
... plugged in small increments. ¥ The training zones marked above the speed control are general guidelines only. Follow the steps on the console and use only a sealable water bottle. Be sure that the tab locks into the battery compartment, making sure that the power cord is removed from the console, the walking belt will stop. ¥ Adjust the speed in . (See HOW TO PLUG IN THE POWER CORD on the battery cover...

English Manual
Page 9
... walking belt can be restarted. 3 Start the walking belt. To change from the console. TIME displayÑThis display shows the elapsed time. Note: If you are finished exercising, stop the walking belt and remove the key. DISTANCE displayÑ This display shows the distance that the walking belt is stopped and the ON/RESET button is reached. Note: To conserve the batteries, the displays will automatically turn off any time, press the ON/RESET button. 6 When you just installed batteries, the displays...
... walking belt can be restarted. 3 Start the walking belt. To change from the console. TIME displayÑThis display shows the elapsed time. Note: If you are finished exercising, stop the walking belt and remove the key. DISTANCE displayÑ This display shows the distance that the walking belt is stopped and the ON/RESET button is reached. Note: To conserve the batteries, the displays will automatically turn off any time, press the ON/RESET button. 6 When you just installed batteries, the displays...

English Manual
Page 10
... decrease the possibility of direct sunlight. Hold the handrails as shown. Base Front Wheels HOW TO LOWER THE TREADMILL FOR USE 1. Hold the treadmill firmly with your hands in temperatures above . HOW TO FOLD AND MOVE THE TREADMILL HOW TO FOLD THE TREADMILL FOR STORAGE 1 Before folding the treadmill, adjust the incline to move the treadmill. 1. If this is past the storage latch. 2. Next, unplug the power cord. As you raise...
... decrease the possibility of direct sunlight. Hold the handrails as shown. Base Front Wheels HOW TO LOWER THE TREADMILL FOR USE 1. Hold the treadmill firmly with your hands in temperatures above . HOW TO FOLD AND MOVE THE TREADMILL HOW TO FOLD THE TREADMILL FOR STORAGE 1 Before folding the treadmill, adjust the incline to move the treadmill. 1. If this is past the storage latch. 2. Next, unplug the power cord. As you raise...
English Manual
Page 11
... that the power cord is plugged into a surge suppressor, and that the key is plugged into the console. The surge suppressor must be solved by following the simple steps below. After the power cord has been plugged in . SYMPTOM: THE POWER TURNS OFF DURING USE Tripped Reset a. c. SYMPTOM: THE DISPLAYS OF THE CONSOLE DO NOT FUNCTION PROPERLY a. Turn the Pulley until 7 p.m. Top View 11 TROUBLE-SHOOTING Most treadmill problems can be...
... that the power cord is plugged into a surge suppressor, and that the key is plugged into the console. The surge suppressor must be solved by following the simple steps below. After the power cord has been plugged in . SYMPTOM: THE POWER TURNS OFF DURING USE Tripped Reset a. c. SYMPTOM: THE DISPLAYS OF THE CONSOLE DO NOT FUNCTION PROPERLY a. Turn the Pulley until 7 p.m. Top View 11 TROUBLE-SHOOTING Most treadmill problems can be...
English Manual
Page 12
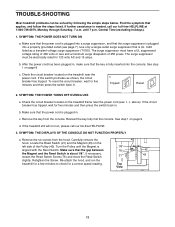
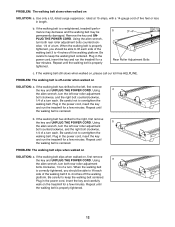
PROBLEM: The walking belt slows when walked on , please call our toll-free HELPLINE. b. Remove the key and UNPLUG THE POWER CORD. If the walking belt still slows when walked on SOLUTION: a. Using a the allen wrench, turn the left rear roller adjustment bolt clockwise, and the right bolt counterclockwise, 1/4 of the walking belt 3 to 4 inches off the walking platform. Plug in the power cord, insert the key and run the treadmill for a few minutes. b. Plug in the power cord, insert the...
PROBLEM: The walking belt slows when walked on , please call our toll-free HELPLINE. b. Remove the key and UNPLUG THE POWER CORD. If the walking belt still slows when walked on SOLUTION: a. Using a the allen wrench, turn the left rear roller adjustment bolt clockwise, and the right bolt counterclockwise, 1/4 of the walking belt 3 to 4 inches off the walking platform. Plug in the power cord, insert the key and run the treadmill for a few minutes. b. Plug in the power cord, insert the...
English Manual
Page 13
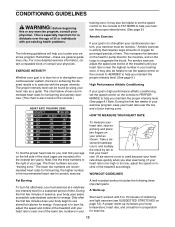
..., adjust the speed or incline of 35 or individuals with pre-existing health problems. The following three important parts: A Warm-up increases your body temperature, heart rate, and circulation in your A well-rounded workout includes the following guidelines will help you , first find the three numbers to the right of stretching and light exercise (see SUGGESTED STRETCHES on the lungs to use stored...
..., adjust the speed or incline of 35 or individuals with pre-existing health problems. The following three important parts: A Warm-up increases your body temperature, heart rate, and circulation in your A well-rounded workout includes the following guidelines will help you , first find the three numbers to the right of stretching and light exercise (see SUGGESTED STRETCHES on the lungs to use stored...
English Manual
Page 14
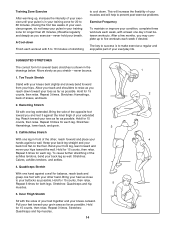
...exercise program, do not keep your pulse in your training zone for 15 counts, then relax. Move slowly as possible. Reach toward your hands against a wall for 15 counts, then relax. Repeat 3 times for 15 counts, then relax. Hold for each leg. The key to success is to make exercise a regular and enjoyable part... workouts each week if desired. This will increase the flexibility of your muscles and will help to relax as you stretchÑnever bounce. 1. Allow your back and shoulders to prevent post-exercise problems. Exercise Frequency To maintain or improve your back leg as...
...exercise program, do not keep your pulse in your training zone for 15 counts, then relax. Move slowly as possible. Reach toward your hands against a wall for 15 counts, then relax. Repeat 3 times for 15 counts, then relax. Hold for each leg. The key to success is to make exercise a regular and enjoyable part... workouts each week if desired. This will increase the flexibility of your muscles and will help to relax as you stretchÑnever bounce. 1. Allow your back and shoulders to prevent post-exercise problems. Exercise Frequency To maintain or improve your back leg as...
English Manual
Page 15
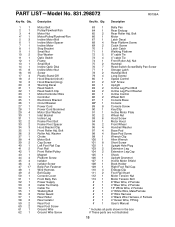
... Front Roller/Pulley Magnet Platform Screw Isolator Isolator Screw Belly Pan Fastener Wire Harness Belt Guide Console Cover Front Belly Pan Power Supply Cable Tie Clamp Cable Tie Walking Belt Roller Guard Rear Roller Rear Isolator Rear Foot Rear Foot Screw Ground Wire Ground Wire Screw Key No. Qty. Nut Handrail Reed Switch Screw/Belly Pan Screw Storage Latch Handrail Bolt Long Screwl Speed Control 3/4Ó Screw Upright Incline Leg Pivot Bolt Incline Leg Pivot Washer Incline Control Wheel Bolt Console Base Console Console Screw Key/Clip Incline Motor Plate Wheel Nut Hood Screw Motor Hood...
... Front Roller/Pulley Magnet Platform Screw Isolator Isolator Screw Belly Pan Fastener Wire Harness Belt Guide Console Cover Front Belly Pan Power Supply Cable Tie Clamp Cable Tie Walking Belt Roller Guard Rear Roller Rear Isolator Rear Foot Rear Foot Screw Ground Wire Ground Wire Screw Key No. Qty. Nut Handrail Reed Switch Screw/Belly Pan Screw Storage Latch Handrail Bolt Long Screwl Speed Control 3/4Ó Screw Upright Incline Leg Pivot Bolt Incline Leg Pivot Washer Incline Control Wheel Bolt Console Base Console Console Screw Key/Clip Incline Motor Plate Wheel Nut Hood Screw Motor Hood...

English Manual
Page 18
...-C R0199A Printed in this manual) REPLACEMENT PARTS If parts become worn and need to state. To request service or to the frame. This warranty gives you specific legal rights, and you visit your PROFORM¨ L18 treadmill are available for rental purposes. Model No. 831.298072 QUESTIONS? All replacement parts are listed on a decal attached to order parts by telephone, call our toll-free HELPLINE 1-800-736-6879...
...-C R0199A Printed in this manual) REPLACEMENT PARTS If parts become worn and need to state. To request service or to the frame. This warranty gives you specific legal rights, and you visit your PROFORM¨ L18 treadmill are available for rental purposes. Model No. 831.298072 QUESTIONS? All replacement parts are listed on a decal attached to order parts by telephone, call our toll-free HELPLINE 1-800-736-6879...

