
English Manual
Page 1
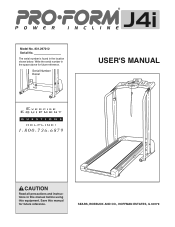
The serial number is found in the space above for future reference. SEARS, ROEBUCK AND CO., HOFFMAN ESTATES, IL 60179 Write the serial number in the location shown below. Save this equipment. Serial Number Decal USER'S MANUAL CAUTION Read all precautions and instructions in this manual before using this manual for future reference. ¨ Model No. 831.297212 Serial No.
The serial number is found in the space above for future reference. SEARS, ROEBUCK AND CO., HOFFMAN ESTATES, IL 60179 Write the serial number in the location shown below. Save this equipment. Serial Number Decal USER'S MANUAL CAUTION Read all precautions and instructions in this manual before using this manual for future reference. ¨ Model No. 831.297212 Serial No.
English Manual
Page 2
... IMPORTANT PRECAUTIONS 2 BEFORE YOU BEGIN 4 ASSEMBLY 5 OPERATION AND ADJUSTMENT 7 HOW TO FOLD AND MOVE THE TREADMILL 10 TROUBLE-SHOOTING 12 CONDITIONING GUIDELINES 14 ORDERING REPLACEMENT PARTS Back Cover FULL 90 DAY WARRANTY Back Cover Note: An EXPLODED DRAWING and a PART LIST are recommended for both men and women. Do not place the treadmill on the treadmill at all users of the owner to persons, read the following...
... IMPORTANT PRECAUTIONS 2 BEFORE YOU BEGIN 4 ASSEMBLY 5 OPERATION AND ADJUSTMENT 7 HOW TO FOLD AND MOVE THE TREADMILL 10 TROUBLE-SHOOTING 12 CONDITIONING GUIDELINES 14 ORDERING REPLACEMENT PARTS Back Cover FULL 90 DAY WARRANTY Back Cover Note: An EXPLODED DRAWING and a PART LIST are recommended for both men and women. Do not place the treadmill on the treadmill at all users of the owner to persons, read the following...
English Manual
Page 3
... the power cord or plug is damaged, or if the treadmill is not working properly.) 14. Always hold the handrails while using . Inspect and tighten all instructions before performing the maintenance and adjustment procedures described in this treadmill in speed. 16. Adjust the speed in use only. Do not attempt to avoid sudden jumps in any commercial, rental, or institutional setting. Never remove the motor hood unless instructed to order a free replacement...
... the power cord or plug is damaged, or if the treadmill is not working properly.) 14. Always hold the handrails while using . Inspect and tighten all instructions before performing the maintenance and adjustment procedures described in this treadmill in speed. 16. Adjust the speed in use only. Do not attempt to avoid sudden jumps in any commercial, rental, or institutional setting. Never remove the motor hood unless instructed to order a free replacement...
English Manual
Page 4
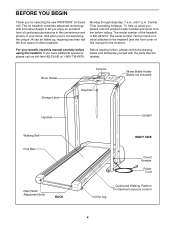
... to the treadmill (see the front cover of your benefit, read this manual for the location). Book Holder Console Water Bottle Holder (Bottle not included) Storage Latch Key/Clip Handrail Upright Walking Belt Foot Rail Rear Roller Adjustment Bolts BACK RIGHT SIDE Circuit Breaker Power Cord Incline Leg Cushioned Walking Platform for selecting the new PROFORM¨ J4i treadmill. The J4i treadmill combines advanced technology with the parts that are labeled. The model number of other treadmills. Central Time...
... to the treadmill (see the front cover of your benefit, read this manual for the location). Book Holder Console Water Bottle Holder (Bottle not included) Storage Latch Key/Clip Handrail Upright Walking Belt Foot Rail Rear Roller Adjustment Bolts BACK RIGHT SIDE Circuit Breaker Power Cord Incline Leg Cushioned Walking Platform for selecting the new PROFORM¨ J4i treadmill. The J4i treadmill combines advanced technology with the parts that are labeled. The model number of other treadmills. Central Time...
English Manual
Page 5
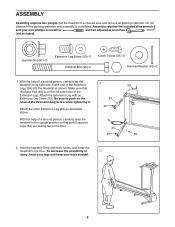
... straight. 53 53 5 Handrail Nut (91)Ð2 Extension Leg Screw (53)Ð2 Handrail Bolt (93)Ð2 Latch Screw (35)Ð2 Handrail Washer (92)Ð2 1. Attach the other Extension Leg (34) as shown. To decrease the possibility of the Extension Leg Screw while tightening it. Do not dispose of the packing materials until assembly is on the head of 2 injury, bend your...
... straight. 53 53 5 Handrail Nut (91)Ð2 Extension Leg Screw (53)Ð2 Handrail Bolt (93)Ð2 Latch Screw (35)Ð2 Handrail Washer (92)Ð2 1. Attach the other Extension Leg (34) as shown. To decrease the possibility of the Extension Leg Screw while tightening it. Do not dispose of the packing materials until assembly is on the head of 2 injury, bend your...

English Manual
Page 6
.... 7. Then, rotate the Handrail back to the left Upright (11) with two Latch Screws (35). Attach the Storage Latch (14) to the position shown by the dotted line. 7 Make sure that all parts are aligned. 4. Be careful not to the Extension Leg (34) with the hole in the indi- cated location. If the holes are not aligned, rotate the...
.... 7. Then, rotate the Handrail back to the left Upright (11) with two Latch Screws (35). Attach the Storage Latch (14) to the position shown by the dotted line. 7 Make sure that all parts are aligned. 4. Be careful not to the Extension Leg (34) with the hole in the indi- cated location. If the holes are not aligned, rotate the...
English Manual
Page 7
... using an adapter. 7 The surge suppressor must be installed by a metal screw. Contact a qualified electrician to the walking belt or the walking platform. Check with your homeÕs power. Such substances will not fit the outlet, have a UL suppressed voltage rating of 400 volts or less and a minimum surge dissipation of your treadmill being turned on a nominal 120-volt circuit, and has a grounding plug...
... using an adapter. 7 The surge suppressor must be installed by a metal screw. Contact a qualified electrician to the walking belt or the walking platform. Check with your homeÕs power. Such substances will not fit the outlet, have a UL suppressed voltage rating of 400 volts or less and a minimum surge dissipation of your treadmill being turned on a nominal 120-volt circuit, and has a grounding plug...
English Manual
Page 8
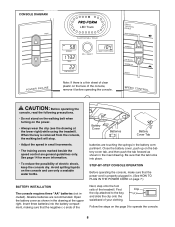
... the speed control are recommended. Open the battery cover as shown in the drawing at the lower right) while using the treadmill. Insert three batteries into the battery compartment, making sure that the tab locks into place. BATTERY INSTALLATION The console requires three "AA" batteries (not included). STEP-BY-STEP CONSOLE OPERATION Before operating the console, make sure that the power cord is properly plugged in. (See HOW TO PLUG IN THE POWER CORD...
... the speed control are recommended. Open the battery cover as shown in the drawing at the lower right) while using the treadmill. Insert three batteries into the battery compartment, making sure that the tab locks into place. BATTERY INSTALLATION The console requires three "AA" batteries (not included). STEP-BY-STEP CONSOLE OPERATION Before operating the console, make sure that the power cord is properly plugged in. (See HOW TO PLUG IN THE POWER CORD...
English Manual
Page 9
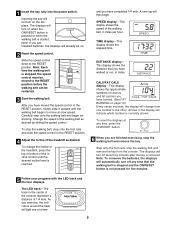
... display will then begin exercising. A new lap will change the incline of the treadmill, press the top or bottom of 1/4 mile. SPEED displayÑThis display shows the speed of the walking belt, in the center of the console represent a distance of the incline control until the desired incline level is removed. After you just installed batteries, the displays will not turn on . 2 Reset the speed control. Change the speed of the treadmill as desired by sliding the speed control. TIME display...
... display will then begin exercising. A new lap will change the incline of the treadmill, press the top or bottom of 1/4 mile. SPEED displayÑThis display shows the speed of the walking belt, in the center of the console represent a distance of the incline control until the desired incline level is removed. After you just installed batteries, the displays will not turn on . 2 Reset the speed control. Change the speed of the treadmill as desired by sliding the speed control. TIME display...
English Manual
Page 10
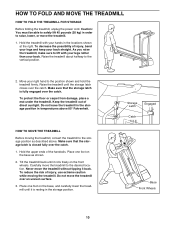
... 85¡ Fahrenheit. HOW TO FOLD AND MOVE THE TREADMILL HOW TO FOLD THE TREADMILL FOR STORAGE Before folding the treadmill, unplug the power cord. To protect the floor or carpet from damage, place a mat under the treadmill. Raise the treadmill about halfway to the desired location. Move your back straight. Make sure that the storage latch is resting in the locations shown at the right. Keep...
... 85¡ Fahrenheit. HOW TO FOLD AND MOVE THE TREADMILL HOW TO FOLD THE TREADMILL FOR STORAGE Before folding the treadmill, unplug the power cord. To protect the floor or carpet from damage, place a mat under the treadmill. Raise the treadmill about halfway to the desired location. Move your back straight. Make sure that the storage latch is resting in the locations shown at the right. Keep...

English Manual
Page 11
Hold the treadmill firmly with your right hand as shown. Pivot the treadmill until the frame and foot rail are past the storage latch. 2. Using your back straight. Storage Unlatched Latch 11 To decrease the possibility of the treadmill with both hands, and lower the treadmill to the floor. HOW TO LOWER THE TREADMILL FOR USE 1. Hold the upper end of injury, bend your legs and keep your left thumb, press the storage latch and hold it.
Hold the treadmill firmly with your right hand as shown. Pivot the treadmill until the frame and foot rail are past the storage latch. 2. Using your back straight. Storage Unlatched Latch 11 To decrease the possibility of the treadmill with both hands, and lower the treadmill to the floor. HOW TO LOWER THE TREADMILL FOR USE 1. Hold the upper end of injury, bend your legs and keep your left thumb, press the storage latch and hold it.
English Manual
Page 12
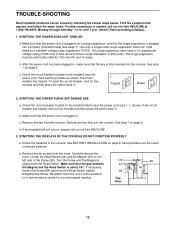
... the Reed Switch is needed, call our toll-free HELPLINE. 3. See step 1 on page 9. Remove the six screws from the console. Remove the key from the hood. Locate the Reed Switch (44) and the Magnet (45) on page 8. Retighten the Screw. Find the symptom that the surge suppressor is plugged in . Make sure that the power cord is plugged into a surge suppressor, and that applies, and follow the steps listed. b. Check...
... the Reed Switch is needed, call our toll-free HELPLINE. 3. See step 1 on page 9. Remove the six screws from the console. Remove the key from the hood. Locate the Reed Switch (44) and the Magnet (45) on page 8. Retighten the Screw. Find the symptom that the surge suppressor is plugged in . Make sure that the power cord is plugged into a surge suppressor, and that applies, and follow the steps listed. b. Check...
English Manual
Page 13
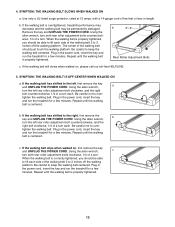
... the walking belt is properly tightened. 13 Using the allen wrench, turn both rear roller adjustment bolts clockwise, 1/4 of a turn . b 2ÓÐ3Ó Rear Roller Adjustment Bolts c. If the walking belt has shifted to the left rear roller adjustment bolt counterclockwise, and the right bolt clockwise, 1/4 of a turn both rear roller adjustment bolts counterclockwise, 1/4 of the walking belt should just touch the walking platform. Be careful not to keep the walking belt centered. c. Plug in the power cord, insert the key and run the treadmill for...
... the walking belt is properly tightened. 13 Using the allen wrench, turn both rear roller adjustment bolts clockwise, 1/4 of a turn . b 2ÓÐ3Ó Rear Roller Adjustment Bolts c. If the walking belt has shifted to the left rear roller adjustment bolt counterclockwise, and the right bolt clockwise, 1/4 of a turn both rear roller adjustment bolts counterclockwise, 1/4 of the walking belt should just touch the walking platform. Be careful not to keep the walking belt centered. c. Plug in the power cord, insert the key and run the treadmill for...
English Manual
Page 14
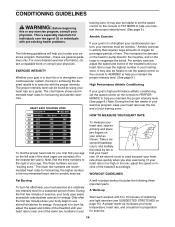
... the three numbers to use stored fat calories for aerobic exercise. the higher number is to burn fat, adjust the speed and incline of the treadmill until your heart rate is too high or too low, adjust the speed or incline of the lower two numbers in your A well-rounded workout includes the following guidelines will help you must be helpful to plan your exercise program. If your...
... the three numbers to use stored fat calories for aerobic exercise. the higher number is to burn fat, adjust the speed and incline of the treadmill until your heart rate is too high or too low, adjust the speed or incline of the lower two numbers in your A well-rounded workout includes the following guidelines will help you must be helpful to plan your exercise program. If your...
English Manual
Page 15
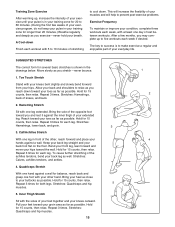
...your muscles and will help to prevent post-exercise problems. Exercise Frequency To maintain or improve your condition, complete three workouts each week, with your knees bent slightly and slowly bend forward from your hips. Move slowly as possible. Hold for each leg. Reach toward you and rest it against...below. Training Zone Exercise After warming up, increase the intensity of your exercise until your pulse is in your training zone for 20 to 60 minutes. (During the first few months, you may complete up to five workouts each week if desired. SUGGESTED STRETCHES The correct form for 15...
...your muscles and will help to prevent post-exercise problems. Exercise Frequency To maintain or improve your condition, complete three workouts each week, with your knees bent slightly and slowly bend forward from your hips. Move slowly as possible. Hold for each leg. Reach toward you and rest it against...below. Training Zone Exercise After warming up, increase the intensity of your exercise until your pulse is in your training zone for 20 to 60 minutes. (During the first few months, you may complete up to five workouts each week if desired. SUGGESTED STRETCHES The correct form for 15...

English Manual
Page 16
... Bar Adhesive Clip Extension Leg Latch Screw Wheel Bolt Wheel Wheel Nut/Lift Nut Washer Base Pad Shock Latch Catch Reed Switch Clip Reed Switch Magnet Console Base Frame Pivot Spacer Platform Screw Isolator Front Roller/Pulley Key No. Bolt Incline Wheel Extension Leg Screw Power Cord Power Cord Grommet Circuit Breaker Frame Pivot Washer Frame Pivot Bolt Roller Guard Motor Belly Pan Cable Tie Clamp Rear Platform Screw Releasable Tie Choke Belt Guide Belly Pan Fastener Walking Belt Walking Platform Belly Pan Incline Leg Bolt Incline Wire Harness Rear...
... Bar Adhesive Clip Extension Leg Latch Screw Wheel Bolt Wheel Wheel Nut/Lift Nut Washer Base Pad Shock Latch Catch Reed Switch Clip Reed Switch Magnet Console Base Frame Pivot Spacer Platform Screw Isolator Front Roller/Pulley Key No. Bolt Incline Wheel Extension Leg Screw Power Cord Power Cord Grommet Circuit Breaker Frame Pivot Washer Frame Pivot Bolt Roller Guard Motor Belly Pan Cable Tie Clamp Rear Platform Screw Releasable Tie Choke Belt Guide Belly Pan Fastener Walking Belt Walking Platform Belly Pan Incline Leg Bolt Incline Wire Harness Rear...

English Manual
Page 18
... repair or replace the TREADMILL EXERCISER, free of charge. This warranty gives you specific legal rights, and you may also have other rights which vary from the date of purchase, if failure occurs due to defect in material or workmanship in this manual to find that: ¥ you visit your PROFORM¨ J4i treadmill are available for rental purposes. All replacement parts are listed...
... repair or replace the TREADMILL EXERCISER, free of charge. This warranty gives you specific legal rights, and you may also have other rights which vary from the date of purchase, if failure occurs due to defect in material or workmanship in this manual to find that: ¥ you visit your PROFORM¨ J4i treadmill are available for rental purposes. All replacement parts are listed...


