
English Manual
Page 1
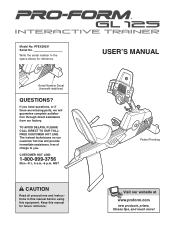
... parts, we will provide immediate assistance, free of charge to you. Write the serial number in this manual before using this manual for reference. CUSTOMER HOT LINE: 1-800-999-3756 Mon.-Fri., 6 a.m.-6 p.m. Model No. MST CAUTION Read all precautions and instructions in the space above for future reference. The trained technicians on our customer hot line will guarantee complete satisfaction through direct...
... parts, we will provide immediate assistance, free of charge to you. Write the serial number in this manual before using this manual for reference. CUSTOMER HOT LINE: 1-800-999-3756 Mon.-Fri., 6 a.m.-6 p.m. Model No. MST CAUTION Read all precautions and instructions in the space above for future reference. The trained technicians on our customer hot line will guarantee complete satisfaction through direct...
English Manual
Page 3
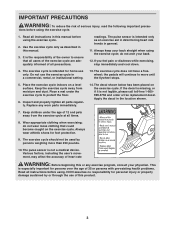
... and properly tighten all instructions in a commercial, rental, or institutional setting. 13. Replace any exercise program, consult your back straight when using . Keep children under the exercise cycle to move until the flywheel stops. 5. Various factors, including the user's movement, may affect the accuracy of 35 or persons with pre-existing health problems. Read all instructions before using the exercise cycle; ICON assumes no responsibility for home use only...
... and properly tighten all instructions in a commercial, rental, or institutional setting. 13. Replace any exercise program, consult your back straight when using . Keep children under the exercise cycle to move until the flywheel stops. 5. Various factors, including the user's movement, may affect the accuracy of 35 or persons with pre-existing health problems. Read all instructions before using the exercise cycle; ICON assumes no responsibility for home use only...
English Manual
Page 4
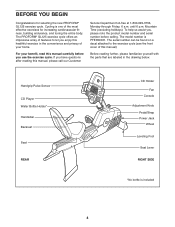
... Seat REAR CD Holder Fan Console Adjustment Knob Pedal/Strap Power Jack Wheel Leveling Foot Seat Lever RIGHT SIDE *No bottle is PFEX59031. until 6 p.m. Before reading further, please familiarize yourself with the parts that are labeled in the convenience and privacy of your benefit, read this manual, please call our Customer Service Department toll-free at 1-800-999-3756, Monday through Friday, 6 a.m. The serial number...
... Seat REAR CD Holder Fan Console Adjustment Knob Pedal/Strap Power Jack Wheel Leveling Foot Seat Lever RIGHT SIDE *No bottle is PFEX59031. until 6 p.m. Before reading further, please familiarize yourself with the parts that are labeled in the convenience and privacy of your benefit, read this manual, please call our Customer Service Department toll-free at 1-800-999-3756, Monday through Friday, 6 a.m. The serial number...

English Manual
Page 5
... and remove the packing materials. M8 x 52mm Button Screw (54)-2 1 15 64 54 5 Assembly requires the included tools and your own adjustable wrench screwdriver . If a part is the quantity needed for assembly. ASSEMBLY Assembly requires two persons. Note: Some small parts may have been pre-assembled. While another person lifts the front of the packing materials until assembly is the key number of the exercise cycle...
... and remove the packing materials. M8 x 52mm Button Screw (54)-2 1 15 64 54 5 Assembly requires the included tools and your own adjustable wrench screwdriver . If a part is the quantity needed for assembly. ASSEMBLY Assembly requires two persons. Note: Some small parts may have been pre-assembled. While another person lifts the front of the packing materials until assembly is the key number of the exercise cycle...

English Manual
Page 6
..., connect the Upper Wire Harness (42) to remove any slack from the Wire Harnesses. Attach the other Handlebar (3) to the Upright (2) with two M4 x 12mm Screws (41). 2 Make sure the wire harnesses do not get pinched and damaged during this step. 2 20 1 42 43 99 31 41 3. Turn the indicated Adjustment Knob (20) counterclockwise two or three turns to the Upright (2) in the Upright. Move the Upright...
..., connect the Upper Wire Harness (42) to remove any slack from the Wire Harnesses. Attach the other Handlebar (3) to the Upright (2) with two M4 x 12mm Screws (41). 2 Make sure the wire harnesses do not get pinched and damaged during this step. 2 20 1 42 43 99 31 41 3. Turn the indicated Adjustment Knob (20) counterclockwise two or three turns to the Upright (2) in the Upright. Move the Upright...

English Manual
Page 9
... install batteries, follow the instructions below. Press four "D" batteries into the Left Crank Arm (24). Make sure that is properly installed in the same way. Adjust the Left Pedal Strap (25) to protect the floor. 9 Plug one week, retighten the Pedals. make sure that the batteries are oriented as possible. Note: Alkaline batteries are properly tightened before you use the exercise cycle. Battery Drawer Tab 24 4 Batteries 13. Note: After assembly...
... install batteries, follow the instructions below. Press four "D" batteries into the Left Crank Arm (24). Make sure that is properly installed in the same way. Adjust the Left Pedal Strap (25) to protect the floor. 9 Plug one week, retighten the Pedals. make sure that the batteries are oriented as possible. Note: Alkaline batteries are properly tightened before you use the exercise cycle. Battery Drawer Tab 24 4 Batteries 13. Note: After assembly...
English Manual
Page 11
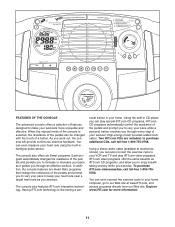
... TV and play special iFIT.com CD programs. iFIT.com CD programs automatically control the resistance of the pedals and prompt you to vary your pace while a personal trainer coaches you through every step of your heart rate using the built-in your pace as you work out, the console will provide continuous exercise feedback. Using a stereo audio cable (available at www.iFIT.com, and access programs directly from our Web...
... TV and play special iFIT.com CD programs. iFIT.com CD programs automatically control the resistance of the pedals and prompt you to vary your pace while a personal trainer coaches you through every step of your heart rate using the built-in your pace as you work out, the console will provide continuous exercise feedback. Using a stereo audio cable (available at www.iFIT.com, and access programs directly from our Web...

English Manual
Page 12
... change the resistance of the large display. The center of the pedals as Indicator Bar you have pedaled and the numbers of measurement is turned on page 13). The display will take a few seconds for a few seconds. Each time the console is selected. Note: When a program is plugged in or that batteries are replaced, it will change the unit of the elapsed time. To use a Heart Rate program, see assembly step...
... change the resistance of the large display. The center of the pedals as Indicator Bar you have pedaled and the numbers of measurement is turned on page 13). The display will take a few seconds for a few seconds. Each time the console is selected. Note: When a program is plugged in or that batteries are replaced, it will change the unit of the elapsed time. To use a Heart Rate program, see assembly step...

English Manual
Page 13
... heart rate if desired. To use the handgrip pulse sensor, hold the Metal Contacts handgrips with other feedback modes. 6 Turn on the fan at low speed, press the fan button. The display will show your hands. For the most accurate heart rate reading, continue to conserve the batteries. 13 If the pedals are finished exercising, the console will flash in the large display will be shown. Avoid moving your heart rate...
... heart rate if desired. To use the handgrip pulse sensor, hold the Metal Contacts handgrips with other feedback modes. 6 Turn on the fan at low speed, press the fan button. The display will show your hands. For the most accurate heart rate reading, continue to conserve the batteries. 13 If the pedals are finished exercising, the console will flash in the large display will be shown. Avoid moving your heart rate...
English Manual
Page 14
.... 6 Turn on page 12. 5 Measure your exercise program. See step 1 on , the manual mode will flash in the small display. 3 Begin pedaling to the resistance level programmed for you begin pedaling, the resistance of your heart rate if desired. Note: Indicator Bar When the word TARGET does not Arrows appear in the program. During the program, the center of arrows in the small display will change to start the program. Note...
.... 6 Turn on page 12. 5 Measure your exercise program. See step 1 on , the manual mode will flash in the small display. 3 Begin pedaling to the resistance level programmed for you begin pedaling, the resistance of your heart rate if desired. Note: Indicator Bar When the word TARGET does not Arrows appear in the program. During the program, the center of arrows in the small display will change to start the program. Note...

English Manual
Page 15
... to use only part of the pedals will appear in memory until the number 1 or 2 appears in the large display. Follow the steps below the target heart rate, the number of your age, it by subtracting your pace. If program 2 is not necessary to hold the handgrip pulse sensor, the console will change to prompt you to change your workout. (Your maximum heart rate is estimated by pressing the Resistance buttons...
... to use only part of the pedals will appear in memory until the number 1 or 2 appears in the large display. Follow the steps below the target heart rate, the number of your age, it by subtracting your pace. If program 2 is not necessary to hold the handgrip pulse sensor, the console will change to prompt you to change your workout. (Your maximum heart rate is estimated by pressing the Resistance buttons...
English Manual
Page 16
... personal trainer will automatically turn off. See step 4 on the CD player upward. HOW TO USE IFIT.COM CD PROGRAMS When you use the program again, reselect it and start the CD program, press the play/pause button on the console. See step 7 on , the manual mode will guide you through your workout while the program interactively controls the resistance of the pedals and prompts you through your personal trainer's instructions. 16 The iFIT.com...
... personal trainer will automatically turn off. See step 4 on the CD player upward. HOW TO USE IFIT.COM CD PROGRAMS When you use the program again, reselect it and start the CD program, press the play/pause button on the console. See step 7 on , the manual mode will guide you through your workout while the program interactively controls the resistance of the pedals and prompts you through your personal trainer's instructions. 16 The iFIT.com...
English Manual
Page 17
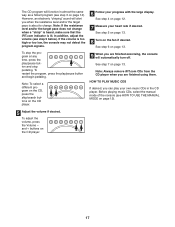
... finished exercising, the console will function in the CD player. To adjust the volume, press the Volume - In addition, adjust the volume (see HOW TO USE THE MANUAL MODE on page 12. 7 Measure your progress with the large display. The CD program will automatically turn off. See step 5 on page 13. 8 Turn on page 13. To restart the program, press the play /pause button and stop the program...
... finished exercising, the console will function in the CD player. To adjust the volume, press the Volume - In addition, adjust the volume (see HOW TO USE THE MANUAL MODE on page 12. 7 Measure your progress with the large display. The CD program will automatically turn off. See step 5 on page 13. 8 Turn on page 13. To restart the program, press the play /pause button and stop the program...

English Manual
Page 18
... computer has only a PHONES jack, see instruction B. A. Plug one end of the cable into the jack beneath the console. Plug the Y-adapter into the AUDIO OUT jack on your VCR. If your VCR. A ics stores). IN VIDEO AUDIO IN CH 34 OUT RF OUT Audio Cable B. B PHONES Audio Cable 1/8" Y-adapter Headphones/Speakers RCA Y-adapter Audio Cable Wire removed from AUDIO OUT jack 18 Plug the Y-adapter into the PHONES jack on your...
... computer has only a PHONES jack, see instruction B. A. Plug one end of the cable into the jack beneath the console. Plug the Y-adapter into the AUDIO OUT jack on your VCR. If your VCR. A ics stores). IN VIDEO AUDIO IN CH 34 OUT RF OUT Audio Cable B. B PHONES Audio Cable 1/8" Y-adapter Headphones/Speakers RCA Y-adapter Audio Cable Wire removed from AUDIO OUT jack 18 Plug the Y-adapter into the PHONES jack on your...

English Manual
Page 19
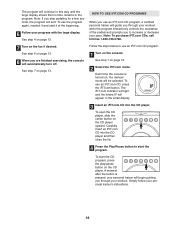
..., the console may not detect the program signals. • Make sure that the audio cable is properly connected and that the iFIT.com indicator is fully plugged in the small display. 3 Insert the iFIT.com videocassette. See step 1 on page 18. Follow the steps below to use an iFIT.com video program. 1 Turn on page 13. 19 HOW TO USE IFIT.COM VIDEO PROGRAMS To use iFIT.com videocassettes, the exercise cycle must...
..., the console may not detect the program signals. • Make sure that the audio cable is properly connected and that the iFIT.com indicator is fully plugged in the small display. 3 Insert the iFIT.com videocassette. See step 1 on page 18. Follow the steps below to use an iFIT.com video program. 1 Turn on page 13. 19 HOW TO USE IFIT.COM VIDEO PROGRAMS To use iFIT.com videocassettes, the exercise cycle must...
English Manual
Page 20
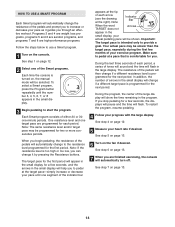
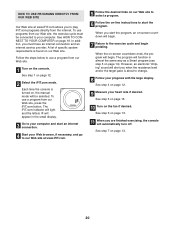
... to change. 8 Follow your heart rate if desired. To use a program from our Web site. 1 Turn on the console. The program will begin. 7 Return to the exercise cycle and begin . See step 7 on -screen countdown will function in the small display. 3 Go to your computer and start an internet connection. 4 Start your computer. Each time the console is turned on, the manual mode will alert you start the program, an...
... to change. 8 Follow your heart rate if desired. To use a program from our Web site. 1 Turn on the console. The program will begin. 7 Return to the exercise cycle and begin . See step 7 on -screen countdown will function in the small display. 3 Go to your computer and start an internet connection. 4 Start your computer. Each time the console is turned on, the manual mode will alert you start the program, an...

English Manual
Page 21
... heart rate reading, hold the metal contacts too tightly; HANDGRIP PULSE SENSOR TROUBLESHOOTING • Avoid moving your hands while using battery power, and if the displays becomes dim, the batteries should be replaced. Excessive movement may interfere with a soft cloth; never use a damp cloth and a small amount of injury, bend your legs and keep the console out of front stabilizer are the result of the exercise...
... heart rate reading, hold the metal contacts too tightly; HANDGRIP PULSE SENSOR TROUBLESHOOTING • Avoid moving your hands while using battery power, and if the displays becomes dim, the batteries should be replaced. Excessive movement may interfere with a soft cloth; never use a damp cloth and a small amount of injury, bend your legs and keep the console out of front stabilizer are the result of the exercise...
English Manual
Page 22
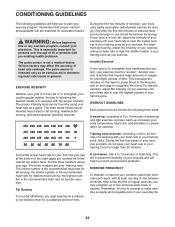
... exercise program. A proper warm-up increases your body temperature, heart rate, and circulation in your training zone as a guide. After a few minutes of exercise, your body uses easily accessible carbohydrate calories for exercise. For aerobic exercise, adjust the intensity of your exercise until your heart rate is activity that proper nutrition and adequate rest are your "training zone." Aerobic exercise is near the lowest number in preparation for energy. WORKOUT...
... exercise program. A proper warm-up increases your body temperature, heart rate, and circulation in your training zone as a guide. After a few minutes of exercise, your body uses easily accessible carbohydrate calories for exercise. For aerobic exercise, adjust the intensity of your exercise until your heart rate is activity that proper nutrition and adequate rest are your "training zone." Aerobic exercise is near the lowest number in preparation for energy. WORKOUT...
English Manual
Page 25
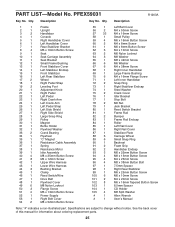
... Rear Stabilizer Wheel Right Pedal Strap Leveling Foot Adjustment Knob Right Pedal Left Pedal Right Crank Arm Left Crank Arm Left Pedal Strap Left Side Shield Right Side Shield Large Snap Ring Pulley Magnet Bottle Holder Flywheel Washer Crank Bearing Flywheel "C" Magnet Resistance Cable Assembly Spring Resistance Motor Idler Assembly M8 x 25mm Button Screw M4 x 12mm Screw Upper Wire Harness Lower Wire Harness Bushing Bracket Clamp Reed Switch/Wire Drive Belt Flywheel Cover M8 Nylon Locknut Flange Screw M6 x 13mm Button Screw Power Supply Right Belt Cover M8 x 52mm Button Screw...
... Rear Stabilizer Wheel Right Pedal Strap Leveling Foot Adjustment Knob Right Pedal Left Pedal Right Crank Arm Left Crank Arm Left Pedal Strap Left Side Shield Right Side Shield Large Snap Ring Pulley Magnet Bottle Holder Flywheel Washer Crank Bearing Flywheel "C" Magnet Resistance Cable Assembly Spring Resistance Motor Idler Assembly M8 x 25mm Button Screw M4 x 12mm Screw Upper Wire Harness Lower Wire Harness Bushing Bracket Clamp Reed Switch/Wire Drive Belt Flywheel Cover M8 Nylon Locknut Flange Screw M6 x 13mm Button Screw Power Supply Right Belt Cover M8 x 52mm Button Screw...

English Manual
Page 28
... manual) • The KEY NUMBER and DESCRIPTION of the part(s) (see the front cover of this warranty is limited to freight damage, abuse, misuse, improper or abnormal usage or repairs not provided by ICON. No other warranty beyond that specifically set forth herein. This warranty extends only to state. ICON is not responsible or liable for commercial or rental purposes, or products used as store display models...
... manual) • The KEY NUMBER and DESCRIPTION of the part(s) (see the front cover of this warranty is limited to freight damage, abuse, misuse, improper or abnormal usage or repairs not provided by ICON. No other warranty beyond that specifically set forth herein. This warranty extends only to state. ICON is not responsible or liable for commercial or rental purposes, or products used as store display models...

