

English Manual
Page 3
... remove the key, unplug the power cord, and move the treadmill. 19. Do not place the treadmill on page 5 for both men and women. When folding or moving the treadmill, make sure that the storage latch is intended only as described in sandals. 9. If the control system is administered. 12. Do not operate the treadmill where aerosol products are adequately informed of heart rate readings. Wear appropriate exercise...
... remove the key, unplug the power cord, and move the treadmill. 19. Do not place the treadmill on page 5 for both men and women. When folding or moving the treadmill, make sure that the storage latch is intended only as described in sandals. 9. If the control system is administered. 12. Do not operate the treadmill where aerosol products are adequately informed of heart rate readings. Wear appropriate exercise...
English Manual
Page 4
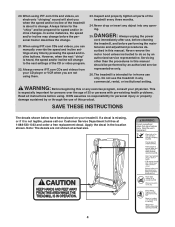
... in-home use , before cleaning the treadmill, and before performing the main- Always remove iFIT.com CDs and videos from your CD player or VCR when you are not shown at actual size. 4 Inspect and properly tighten all instructions before the personal trainer describes the change to the next settings of the treadmill is about to do so by pressing the speed and incline buttons. tenance and adjustment...
... in-home use , before cleaning the treadmill, and before performing the main- Always remove iFIT.com CDs and videos from your CD player or VCR when you are not shown at actual size. 4 Inspect and properly tighten all instructions before the personal trainer describes the change to the next settings of the treadmill is about to do so by pressing the speed and incline buttons. tenance and adjustment...

English Manual
Page 5
The model number is DTL52942. until 6 p.m. The serial number can be found on a decal attached to help us assist you, please note the product model number and serial number before using the treadmill. For your home. Book Holder Accessory Tray Handrail Handgrip Pulse Sensor Fan Console Key/Clip Walking Belt Foot Rail Reset/Off Circuit Breaker Power Cord BACK Rear Roller Adjustment Bolts RIGHT SIDE 5 To help you 're not exercising, the unique PROFORM CS9e treadmill can be folded up, requiring...
The model number is DTL52942. until 6 p.m. The serial number can be found on a decal attached to help us assist you, please note the product model number and serial number before using the treadmill. For your home. Book Holder Accessory Tray Handrail Handgrip Pulse Sensor Fan Console Key/Clip Walking Belt Foot Rail Reset/Off Circuit Breaker Power Cord BACK Rear Roller Adjustment Bolts RIGHT SIDE 5 To help you 're not exercising, the unique PROFORM CS9e treadmill can be folded up, requiring...
English Manual
Page 7
... WHEN THE POWER IS TURNED ON. Console Assembly 83 Right Handrail Set the console assembly on the console assembly. Thread two 1/4" x 1" Bolts (71) with 1/4" Star Washers (92) into the right Upright and the lower end of the upper end as described above. Next, hold the console assembly near the right Upright (109), and insert the Wire Harness (83) into the right handrail. Tighten two 5/16" x 1" Bolts (122) into...
... WHEN THE POWER IS TURNED ON. Console Assembly 83 Right Handrail Set the console assembly on the console assembly. Thread two 1/4" x 1" Bolts (71) with 1/4" Star Washers (92) into the right Upright and the lower end of the upper end as described above. Next, hold the console assembly near the right Upright (109), and insert the Wire Harness (83) into the right handrail. Tighten two 5/16" x 1" Bolts (122) into...

English Manual
Page 10
..., the walking belt may change speed or stop unexpectedly, which may be used it must be installed by sudden voltage changes in your treadmill being turned on the surge suppressor to indicate whether it is properly installed and grounded in accordance with a qualified electrician or serviceman if you are not grounded. Grounding Pin Grounded Outlet Grounding Plug Grounded Outlet Box Adapter Surge Suppressor Use only...
..., the walking belt may change speed or stop unexpectedly, which may be used it must be installed by sudden voltage changes in your treadmill being turned on the surge suppressor to indicate whether it is properly installed and grounded in accordance with a qualified electrician or serviceman if you are not grounded. Grounding Pin Grounded Outlet Grounding Plug Grounded Outlet Box Adapter Surge Suppressor Use only...

English Manual
Page 11
... a personal trainer in your workouts. iFIT.com CD and video programs automatically control the speed and incline of the treadmill as it guides you through an effective workout. To purchase iFIT.com CDs or videocassettes, call tollfree 1-888-533-1333. Additional options are also offered. To use the manual mode of your heart rate using the handgrip pulse sensor or the optional chest pulse sensor (see page 23). To use iFIT.com programs directly from your home. High...
... a personal trainer in your workouts. iFIT.com CD and video programs automatically control the speed and incline of the treadmill as it guides you through an effective workout. To purchase iFIT.com CDs or videocassettes, call tollfree 1-888-533-1333. Additional options are also offered. To use the manual mode of your heart rate using the handgrip pulse sensor or the optional chest pulse sensor (see page 23). To use iFIT.com programs directly from your home. High...

English Manual
Page 12
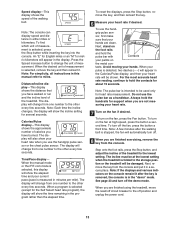
... reset position. See HOW TO TURN ON THE POWER above. 2 Select the manual mode. Hold the handrails and begin to reach the selected incline setting. 5 Follow your progress with the matrix, the training zone bar, and the displays. Each time a button is ideal for the treadmill to flash. To stop the walking belt, press the Stop button. Each time a button is pressed, the incline will display a 1/4-mile track. As you exercise, change the speed setting quickly, press the Quick Start buttons...
... reset position. See HOW TO TURN ON THE POWER above. 2 Select the manual mode. Hold the handrails and begin to reach the selected incline setting. 5 Follow your progress with the matrix, the training zone bar, and the displays. Each time a button is ideal for the treadmill to flash. To stop the walking belt, press the Stop button. Each time a button is pressed, the incline will display a 1/4-mile track. As you exercise, change the speed setting quickly, press the Quick Start buttons...
English Manual
Page 13
... fan, press the Fan button. Calories/Pulse display-This display shows the approximate number of measurement is measured in the program rather than the elapsed time. The display will change from the console and put it . To use the pulse bar as a handlebar. grip pulse sen- sor, first make sure that you have walked or run and the incline level of the treadmill. To turn off the demo mode. See...
... fan, press the Fan button. Calories/Pulse display-This display shows the approximate number of measurement is measured in the program rather than the elapsed time. The display will change from the console and put it . To use the pulse bar as a handlebar. grip pulse sen- sor, first make sure that you have walked or run and the incline level of the treadmill. To turn off the demo mode. See...

English Manual
Page 15
... are finished exercising, remove the key from the console and put it in the "demo" mode. See step 7 on the fan if desired. See page 23 and turn off position and unplug the power cord. 15 The walking belt will begin to move the reset/off circuit breaker to the speed and incline settings for the next segment. 4 Follow your heart rate if desired. The Time/Pace display will begin...
... are finished exercising, remove the key from the console and put it in the "demo" mode. See step 7 on the fan if desired. See page 23 and turn off position and unplug the power cord. 15 The walking belt will begin to move the reset/off circuit breaker to the speed and incline settings for the next segment. 4 Follow your heart rate if desired. The Time/Pace display will begin...

English Manual
Page 16
... Calories/ Pulse display. After you are taking medication regularly, consult your exercise heart rate. 1 Put on page 12. 3 Select a heart rate program. You must wear the optional chest pulse sensor (see page 23) to use the heart rate programs. If you select. See the instructions included with the chest pulse sensor. 2 Insert the key fully into the console. The diagrams beside the heart rate program indicators show a moving graphic that represents your estimated maximum heart rate is selected...
... Calories/ Pulse display. After you are taking medication regularly, consult your exercise heart rate. 1 Put on page 12. 3 Select a heart rate program. You must wear the optional chest pulse sensor (see page 23) to use the heart rate programs. If you select. See the instructions included with the chest pulse sensor. 2 Insert the key fully into the console. The diagrams beside the heart rate program indicators show a moving graphic that represents your estimated maximum heart rate is selected...

English Manual
Page 17
... maximum speed setting of the program (see the instructions included with the displays. The walking belt will flash. If this occurs, see step 5 on the fan if desired. To use a heart rate program again, reselect the program and start the program. Heart rate programs cannot be stopped temporarily and then restarted. If your progress with the optional chest pulse sensor. See step 7 on page 13. 10 When you can adjust the setting with the Speed or Incline buttons...
... maximum speed setting of the program (see the instructions included with the displays. The walking belt will flash. If this occurs, see step 5 on the fan if desired. To use a heart rate program again, reselect the program and start the program. Heart rate programs cannot be stopped temporarily and then restarted. If your progress with the optional chest pulse sensor. See step 7 on page 13. 10 When you can adjust the setting with the Speed or Incline buttons...
English Manual
Page 20
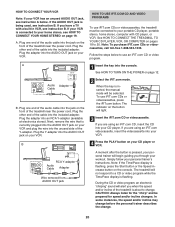
... the console. Plug the adapter into the included adapter. Note: If the Time/Pace display is being used, see instruction B. If the AUDIO OUT jack is flashing, press the Start button or the Speed increase button on the front of the treadmill near the power cord. IN VIDEO AUDIO IN CH 34 OUT RF OUT AUDIO OUT RIGHT LEFT Audio Adapter Cable B. Plug the Y-adapter into the jack on page 19. See HOW TO TURN...
... the console. Plug the adapter into the included adapter. Note: If the Time/Pace display is being used, see instruction B. If the AUDIO OUT jack is flashing, press the Start button or the Speed increase button on the front of the treadmill near the power cord. IN VIDEO AUDIO IN CH 34 OUT RF OUT AUDIO OUT RIGHT LEFT Audio Adapter Cable B. Plug the Y-adapter into the jack on page 19. See HOW TO TURN...

English Manual
Page 21
... exercising, remove the key from the console. See step 6 on page 13. 7 Turn on page 15. After a moment, the walking belt will change to move at any time, press the Stop button on the console. • Adjust the volume of the CD or video program. However, when the next "chirp" is flashing, press the Start button or the Speed increase button on the console. See step 5 on the console. 5 Follow your heart rate if desired. CAUTION: Always remove iFIT...
... exercising, remove the key from the console. See step 6 on page 13. 7 Turn on page 15. After a moment, the walking belt will change to move at any time, press the Stop button on the console. • Adjust the volume of the CD or video program. However, when the next "chirp" is flashing, press the Start button or the Speed increase button on the console. See step 5 on the console. 5 Follow your heart rate if desired. CAUTION: Always remove iFIT...

English Manual
Page 22
... by pressing the Speed or Incline buttons on our Web site to the next settings of the treadmill does not change to select a program. HOW TO USE PROGRAMS DIRECTLY FROM OUR WEB SITE To use programs from our Web site, the treadmill must have an internet connection and an internet service provider. A list of your progress with the matrix, the training zone bar, and the displays. The indicator on the console...
... by pressing the Speed or Incline buttons on our Web site to the next settings of the treadmill does not change to select a program. HOW TO USE PROGRAMS DIRECTLY FROM OUR WEB SITE To use programs from our Web site, the treadmill must have an internet connection and an internet service provider. A list of your progress with the matrix, the training zone bar, and the displays. The indicator on the console...
English Manual
Page 23
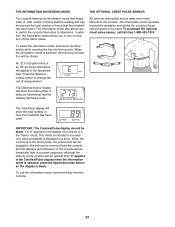
... miles to the console. The chest pulse sensor provides hands-free operation and allows the console's heart rate programs to turn off the demo mode. The Time/Pace display will show the total number of miles (or kilometers) that the walking belt has moved. If a "d" appears in the Calories/Pulse display when the information mode is selected, press the Speed decrease button so the display is in the display, the console is blank. Press the Speed increase button to be used only when a treadmill...
... miles to the console. The chest pulse sensor provides hands-free operation and allows the console's heart rate programs to turn off the demo mode. The Time/Pace display will show the total number of miles (or kilometers) that the walking belt has moved. If a "d" appears in the Calories/Pulse display when the information mode is selected, press the Speed decrease button so the display is in the display, the console is blank. Press the Speed increase button to be used only when a treadmill...

English Manual
Page 27
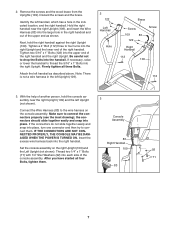
.... Turn the Pulley until the walking belt is properly tightened, you should be able to 4 inches off the walking platform. If necessary, loosen the Screw (25) and move the Reed Switch slightly. Reattach the Hood. Make sure the Screws are return to 4 inches off the walking platform. Plug in the power cord, insert the key, and run the treadmill for a few minutes. ing belt 3 to the correct holes (see step...
.... Turn the Pulley until the walking belt is properly tightened, you should be able to 4 inches off the walking platform. If necessary, loosen the Screw (25) and move the Reed Switch slightly. Reattach the Hood. Make sure the Screws are return to 4 inches off the walking platform. Plug in the power cord, insert the key, and run the treadmill for a few minutes. ing belt 3 to the correct holes (see step...
English Manual
Page 28
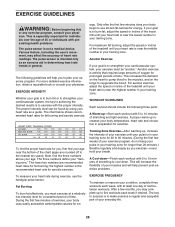
... the treadmill until your heart rate is near the lowest number in your cardiovascular system, the key to burn fat, adjust the speed or incline of time. To find the proper heart rate for prolonged periods of your muscles and will help prevent post-exercise problems. To measure your heart rate is especially important for exercise. Training Zone Exercise-After warming up -Start each week, with preexisting health problems. The pulse sensor...
... the treadmill until your heart rate is near the lowest number in your cardiovascular system, the key to burn fat, adjust the speed or incline of time. To find the proper heart rate for prolonged periods of your muscles and will help prevent post-exercise problems. To measure your heart rate is especially important for exercise. Training Zone Exercise-After warming up -Start each week, with preexisting health problems. The pulse sensor...
English Manual
Page 30
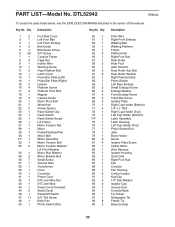
...3/4" Screw Console Frame Cage Nut Incline Wire Warning Decal Rear Platform Bolt Latch Cover Pulse Bar Plate (Left) Pulse Bar Plate (Right) Isolator Platform Screw Platform Pivot Bolt Magnet Caution Decal Motor Pivot Bolt Wheel Nut Frame Spacer Reed Switch Clip Reed Switch Reed Switch Screw Lift Frame Motor Tension Nut Motor Pulley/Flywheel/Fan Motor Belt Motor Assembly Motor Tension Bolt Motor Tension Washer/ Lift Pivot Washer Motor Star Washer Motor Bracket Bolt Small Screw Ground Wire Transformer Hood Controller Power Cord iFIT.com Wire Nut iFIT.com Wire Power Cord Grommet Static Decal Reset...
...3/4" Screw Console Frame Cage Nut Incline Wire Warning Decal Rear Platform Bolt Latch Cover Pulse Bar Plate (Left) Pulse Bar Plate (Right) Isolator Platform Screw Platform Pivot Bolt Magnet Caution Decal Motor Pivot Bolt Wheel Nut Frame Spacer Reed Switch Clip Reed Switch Reed Switch Screw Lift Frame Motor Tension Nut Motor Pulley/Flywheel/Fan Motor Belt Motor Assembly Motor Tension Bolt Motor Tension Washer/ Lift Pivot Washer Motor Star Washer Motor Bracket Bolt Small Screw Ground Wire Transformer Hood Controller Power Cord iFIT.com Wire Nut iFIT.com Wire Power Cord Grommet Static Decal Reset...
English Manual
Page 31
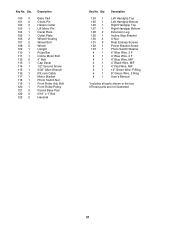
... Bolt Wheel Upright Pulse Bar Incline Motor Bolt 4" Bolt Cap Decal 1/2" Ground Screw 5/32" Allen Wrench iFit.com Cable Motor Bracket Photo Switch Nut Front Roller Adj. Description 124 1 125 1 126 1 127 1 128 2 129 1 130 4 131 8 132 1 133 1 # 1 # 1 # 1 # 1 # 1 # 1 # 1 # 1 Left Handgrip Top Left Handgrip Bottom Right Handgrip Top Right Handgrip Bottom Extension Leg Incline Stop Bracket U-Nut Rear Endcap Screws Power Bracket Screw Photo Switch Washer 6" Blue Wire, 2 F 4" Blue Wire, 2 F 4" Blue Wire, M/F 4" Black Wire, M/F 4" Red Wire, M/F 12" Green Wire...
... Bolt Wheel Upright Pulse Bar Incline Motor Bolt 4" Bolt Cap Decal 1/2" Ground Screw 5/32" Allen Wrench iFit.com Cable Motor Bracket Photo Switch Nut Front Roller Adj. Description 124 1 125 1 126 1 127 1 128 2 129 1 130 4 131 8 132 1 133 1 # 1 # 1 # 1 # 1 # 1 # 1 # 1 # 1 Left Handgrip Top Left Handgrip Bottom Right Handgrip Top Right Handgrip Bottom Extension Leg Incline Stop Bracket U-Nut Rear Endcap Screws Power Bracket Screw Photo Switch Washer 6" Blue Wire, 2 F 4" Blue Wire, 2 F 4" Blue Wire, M/F 4" Black Wire, M/F 4" Red Wire, M/F 12" Green Wire...

English Manual
Page 34
... manual) • The KEY NUMBER and DESCRIPTION of removal or installation or other rights which warranty claims are made must be free from defects in lieu of any implied warranties of merchantability or fitness for which vary from the date of whatsoever nature. HOW TO ORDER REPLACEMENT PARTS To order replacement parts, call our Customer Service Department toll-free at ICON's option, the product through Friday, 6 a.m. ICON HEALTH & FITNESS...
... manual) • The KEY NUMBER and DESCRIPTION of removal or installation or other rights which warranty claims are made must be free from defects in lieu of any implied warranties of merchantability or fitness for which vary from the date of whatsoever nature. HOW TO ORDER REPLACEMENT PARTS To order replacement parts, call our Customer Service Department toll-free at ICON's option, the product through Friday, 6 a.m. ICON HEALTH & FITNESS...

