

English Manual
Page 1
HOFFMAN ESTATES, IL 60179 CAUTION Read all precautions and instructions in this manual before using this manual for future reference. Visit our website at www.proform.com new products, prizes, fitness tips, and much more! Save this equipment. Model No. 831.293230 Serial No. Serial Number Decal USER'S MANUAL SEARS, ROEBUCK AND CO.
HOFFMAN ESTATES, IL 60179 CAUTION Read all precautions and instructions in this manual before using this manual for future reference. Visit our website at www.proform.com new products, prizes, fitness tips, and much more! Save this equipment. Model No. 831.293230 Serial No. Serial Number Decal USER'S MANUAL SEARS, ROEBUCK AND CO.
English Manual
Page 2
... PRECAUTIONS 2 BEFORE YOU BEGIN 4 ASSEMBLY 5 OPERATION AND ADJUSTMENT 8 HOW TO FOLD AND MOVE THE TREADMILL 11 TROUBLESHOOTING 13 CONDITIONING GUIDELINES 15 ORDERING REPLACEMENT PARTS Back Cover FULL 90 DAY WARRANTY Back Cover Note: An EXPLODED DRAWING and a PART LIST are attached in a garage or covered patio, or near water. 5. It is being administered. 9. To purchase a surge suppressor, see page 8), plug the power cord into a surge suppressor (not included...
... PRECAUTIONS 2 BEFORE YOU BEGIN 4 ASSEMBLY 5 OPERATION AND ADJUSTMENT 8 HOW TO FOLD AND MOVE THE TREADMILL 11 TROUBLESHOOTING 13 CONDITIONING GUIDELINES 15 ORDERING REPLACEMENT PARTS Back Cover FULL 90 DAY WARRANTY Back Cover Note: An EXPLODED DRAWING and a PART LIST are attached in a garage or covered patio, or near water. 5. It is being administered. 9. To purchase a surge suppressor, see page 8), plug the power cord into a surge suppressor (not included...
English Manual
Page 3
.... 21. Never remove the motor hood unless instructed to avoid sudden jumps in speed. 17. vice representative only. 23. This treadmill is running. Never start the treadmill while you are not shown at actual size. 3 Adjust the speed in this product. Inspect and properly tighten all instructions before performing the maintenance and adjustment procedures de- Never insert any object into any exercise program, consult your treadmill. Servicing other than...
.... 21. Never remove the motor hood unless instructed to avoid sudden jumps in speed. 17. vice representative only. 23. This treadmill is running. Never start the treadmill while you are not shown at actual size. 3 Adjust the speed in this product. Inspect and properly tighten all instructions before performing the maintenance and adjustment procedures de- Never insert any object into any exercise program, consult your treadmill. Servicing other than...
English Manual
Page 4
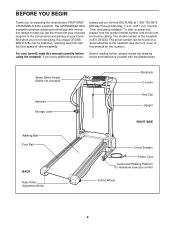
... with innovative design to the treadmill (see the front cover of the treadmill is 831.293230. For your home. please call our toll-free HELPLINE at 1-800-736-6879, Monday through Saturday, 7 a.m. Water Bottle Holder (Bottle not included) Handrail Storage Latch Walking Belt Foot Rail BACK Rear Roller Adjustment Bolts Bookrack Console Key/Clip Upright RIGHT SIDE Circuit Breaker Power Cord Cushioned Walking Platform for selecting the revolutionary PROFORM® CROSSWALK 325x treadmill.
... with innovative design to the treadmill (see the front cover of the treadmill is 831.293230. For your home. please call our toll-free HELPLINE at 1-800-736-6879, Monday through Saturday, 7 a.m. Water Bottle Holder (Bottle not included) Handrail Storage Latch Walking Belt Foot Rail BACK Rear Roller Adjustment Bolts Bookrack Console Key/Clip Upright RIGHT SIDE Circuit Breaker Power Cord Cushioned Walking Platform for selecting the revolutionary PROFORM® CROSSWALK 325x treadmill.
English Manual
Page 5
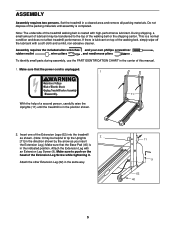
... you insert the Extension Leg.) Make sure that the power cord is completed. Make sure to the top of a second person, carefully raise the Uprights (11) until assembly is unplugged. 1 11 With the help of the walking belt or the shipping carton. To identify small parts during assembly, use the PART IDENTIFICATION CHART in the center of the treadmill walking belt is a normal condition and...
... you insert the Extension Leg.) Make sure that the power cord is completed. Make sure to the top of a second person, carefully raise the Uprights (11) until assembly is unplugged. 1 11 With the help of the walking belt or the shipping carton. To identify small parts during assembly, use the PART IDENTIFICATION CHART in the center of the treadmill walking belt is a normal condition and...

English Manual
Page 6
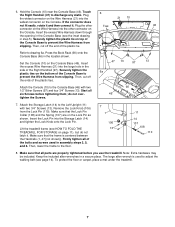
... four 3/4" Screws (13) (only two Screws are shown). Attach the end of the ground wire to the small hole in the 4 side of the Console Base (46). Attach the Console Base with three 1" Bolts (8) and two Washers (39) as shown. Insert the Wire Harness (21...Wire Harness (21) through the opening beside the Console Cover (96). Do not tighten the Bolts yet. Note: There is resting against the right Upright. Make sure that the Console Cover is securely attached to the Console Base. 13 Refer to pull the Wire Harness out of the large hole.) Press a Handrail Cap (41) onto the lower...
... four 3/4" Screws (13) (only two Screws are shown). Attach the end of the ground wire to the small hole in the 4 side of the Console Base (46). Attach the Console Base with three 1" Bolts (8) and two Washers (39) as shown. Insert the Wire Harness (21...Wire Harness (21) through the opening beside the Console Cover (96). Do not tighten the Bolts yet. Note: There is resting against the right Upright. Make sure that the Console Cover is securely attached to the Console Base. 13 Refer to pull the Wire Harness out of the large hole.) Press a Handrail Cap (41) onto the lower...
English Manual
Page 7
..., lower the frame to drawing 6a. Keep the included allen wrenches in the location shown. Insert 47 13 97 13 the excess Wire Harness (21) into the Storage Latch (14) and tighten the Lock Knob onto the Lock Pin. Then, cut off the ends of the Console Base to discharge any static. Firmly tighten all six Screws before you use the treadmill. Set the Console...
..., lower the frame to drawing 6a. Keep the included allen wrenches in the location shown. Insert 47 13 97 13 the excess Wire Harness (21) into the Storage Latch (14) and tighten the Lock Knob onto the Lock Pin. Then, cut off the ends of the Console Base to discharge any static. Firmly tighten all six Screws before you use the treadmill. Set the Console...
English Manual
Page 8
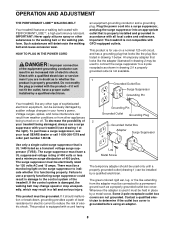
... order part number 146148. There must be grounded. This product is equipped with PERFORMANT LUBETM, a high-performance lubricant. OPERATION AND ADJUSTMENT THE PERFORMANT LUBETM WALKING BELT Your treadmill features a walking belt coated with a cord having Lug Metal Screw The temporary adapter should malfunction or break down, grounding provides a path of least resistance for electric current to reduce the risk of 2 your treadmill being turned on...
... order part number 146148. There must be grounded. This product is equipped with PERFORMANT LUBETM, a high-performance lubricant. OPERATION AND ADJUSTMENT THE PERFORMANT LUBETM WALKING BELT Your treadmill features a walking belt coated with a cord having Lug Metal Screw The temporary adapter should malfunction or break down, grounding provides a path of least resistance for electric current to reduce the risk of 2 your treadmill being turned on...

English Manual
Page 9
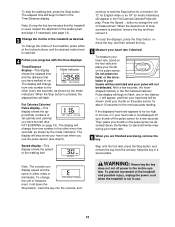
... the walking belt when turning on the console and place only a sealed water bottle in (see SPEED DISPLAY on the foot rails of the treadmill. For simplicity, all instructions in either miles or kilometers (see page 8). If the key is properly plugged in the water bottle holder. As you exercise, change by carefully taking a few seconds after the button is pressed, the speed setting will light. 2 Press the Start button...
... the walking belt when turning on the console and place only a sealed water bottle in (see SPEED DISPLAY on the foot rails of the treadmill. For simplicity, all instructions in either miles or kilometers (see page 8). If the key is properly plugged in the water bottle holder. As you exercise, change by carefully taking a few seconds after the button is pressed, the speed setting will light. 2 Press the Start button...
English Manual
Page 10
... injury, unplug the power cord when the treadmill is used, inspect the alignment of the walking belt, and align it . To change the unit of the treadmill as shown by the mode indicators. Press the Speed v button to the incline system. After a few seconds, as described above. Hold your thumb on the pulse sensor. Keep the key in the Time/Distance display. Speed display-This display shows the speed of measurement is...
... injury, unplug the power cord when the treadmill is used, inspect the alignment of the walking belt, and align it . To change the unit of the treadmill as shown by the mode indicators. Press the Speed v button to the incline system. After a few seconds, as described above. Hold your thumb on the pulse sensor. Keep the key in the Time/Distance display. Speed display-This display shows the speed of measurement is...
English Manual
Page 11
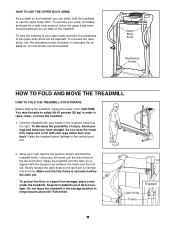
.... Upper Body Arms Resistance Knobs HOW TO FOLD AND MOVE THE TREADMILL HOW TO FOLD THE TREADMILL FOR STORAGE Before folding the treadmill, unplug the power cord. Hold the treadmill with your legs rather than your back. To decrease the possibility of direct sunlight. Using your left and hold it. Raise the treadmill until the latch pin is securely held by the latch pin. To vary the intensity of your upper body exercise, the resistance of...
.... Upper Body Arms Resistance Knobs HOW TO FOLD AND MOVE THE TREADMILL HOW TO FOLD THE TREADMILL FOR STORAGE Before folding the treadmill, unplug the power cord. Hold the treadmill with your legs rather than your back. To decrease the possibility of direct sunlight. Using your left and hold it. Raise the treadmill until the latch pin is securely held by the latch pin. To vary the intensity of your upper body exercise, the resistance of...

English Manual
Page 12
... decrease the possibility of injury, use extreme caution while moving the treadmill, convert the treadmill to the desired location. HOW TO LOWER THE TREADMILL FOR USE 1. Tilt the treadmill back until the frame is resting in the storage position. Do not drop the treadmill frame to the floor. Using your back straight. Make sure that the frame is securely held by the latch pin. 1.
... decrease the possibility of injury, use extreme caution while moving the treadmill, convert the treadmill to the desired location. HOW TO LOWER THE TREADMILL FOR USE 1. Tilt the treadmill back until the frame is resting in the storage position. Do not drop the treadmill frame to the floor. Using your back straight. Make sure that the frame is securely held by the latch pin. 1.
English Manual
Page 13
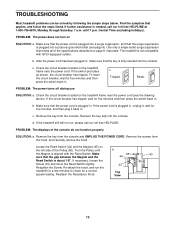
... reset the circuit breaker, wait for five minutes, and then plug it , wait for five minutes and then press the switch back in. Check the circuit breaker located on the treadmill frame near the power cord. b. If necessary, loosen the Screw (33) and move the Reed Switch slightly. Reattach the Resistance Knob. TROUBLESHOOTING Most treadmill problems can be solved by following the simple steps below. PROBLEM: The power does not turn...
... reset the circuit breaker, wait for five minutes, and then plug it , wait for five minutes and then press the switch back in. Check the circuit breaker located on the treadmill frame near the power cord. b. If necessary, loosen the Screw (33) and move the Reed Switch slightly. Reattach the Resistance Knob. TROUBLESHOOTING Most treadmill problems can be solved by following the simple steps below. PROBLEM: The power does not turn...
English Manual
Page 14
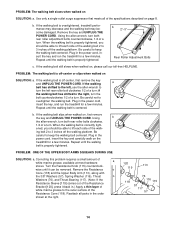
... be removed. Using b the allen wrench, turn . When the walking belt is centered. Repeat until the walking belt is properly tightened. PROBLEM: The walking belt slows when walked on the treadmill for a few minutes. b. Plug in the power cord, insert the key, and run the treadmill for a few minutes. Plug in .) Apply a thin layer of white marine grease to the outer surface of a turn both rear roller adjustment bolts counterclockwise, 1/4 of the Resistance Cone (118). Turn the Resistance Knob...
... be removed. Using b the allen wrench, turn . When the walking belt is centered. Repeat until the walking belt is properly tightened. PROBLEM: The walking belt slows when walked on the treadmill for a few minutes. b. Plug in the power cord, insert the key, and run the treadmill for a few minutes. Plug in .) Apply a thin layer of white marine grease to the outer surface of a turn both rear roller adjustment bolts counterclockwise, 1/4 of the Resistance Cone (118). Turn the Resistance Knob...
English Manual
Page 15
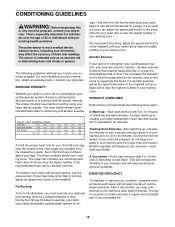
... or any exercise program, consult your body begin to use the pulse sensor. Only after the first few weeks of exercise, your training zone. For aerobic exercise, adjust the speed and incline of the treadmill until your pulse is near the middle number in preparation for fat burning; During the first few months, you to 10 minutes of the chart (ages are recommended heart rates for exercise. The key to...
... or any exercise program, consult your body begin to use the pulse sensor. Only after the first few weeks of exercise, your training zone. For aerobic exercise, adjust the speed and incline of the treadmill until your pulse is near the middle number in preparation for fat burning; During the first few months, you to 10 minutes of the chart (ages are recommended heart rates for exercise. The key to...
English Manual
Page 16
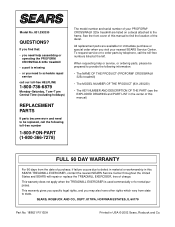
... manual to find that: • you need to state. This warranty gives you specific legal rights, and you visit your PROFORM® CROSSWALK 325x treadmill are available for rental purposes. All replacement parts are listed on a decal attached to provide the following toll-free number 1-800-FON-PART (1-800-366-7278) The model number and serial number of your nearest SEARS Service Center. See the front cover of this SEARS TREADMILL EXERCISER, contact the nearest SEARS Service...
... manual to find that: • you need to state. This warranty gives you specific legal rights, and you visit your PROFORM® CROSSWALK 325x treadmill are available for rental purposes. All replacement parts are listed on a decal attached to provide the following toll-free number 1-800-FON-PART (1-800-366-7278) The model number and serial number of your nearest SEARS Service Center. See the front cover of this SEARS TREADMILL EXERCISER, contact the nearest SEARS Service...
English Manual
Page 17
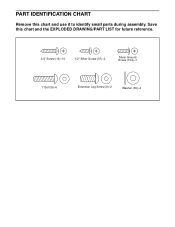
PART IDENTIFICATION CHART Remove this chart and the EXPLODED DRAWING/PART LIST for future reference. 3/4" Screw (13)-10 1/2" Silver Screw (97)-2 Silver Ground Screw (104)-1 1" Bolt (8)-6 Extension Leg Screw (9)-2 Washer (39)-4 Save this chart and use it to identify small parts during assembly.
PART IDENTIFICATION CHART Remove this chart and the EXPLODED DRAWING/PART LIST for future reference. 3/4" Screw (13)-10 1/2" Silver Screw (97)-2 Silver Ground Screw (104)-1 1" Bolt (8)-6 Extension Leg Screw (9)-2 Washer (39)-4 Save this chart and use it to identify small parts during assembly.
English Manual
Page 18
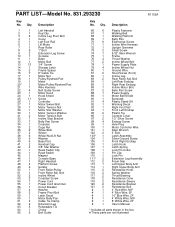
... Washer Reed Switch Clip Reed Switch Magnet Console Base Right Handrail Platform Screw Isolator Front Roller/Pulley Front Roller Adj. Bolt Left Rear Endcap Right Rear Endcap Incline Motor Bolt Belly Pan Screw Power Supply Motor Belt Shield Bookrack Plastic Stand-Off Warning Decal Right Foot Rail Front Left Endcap Plastic Tie Console Cover 1/2" Silver Screw Endcap Screw Hole Plug Motor Controller Wire Allen Wrench 3" Bolt Latch Assembly Silver Ground Screw Front Right Endcap Latch Knob Latch Spring Lock Pin Collar Pin Clip Lock Pin Extension Leg Assembly Foam...
... Washer Reed Switch Clip Reed Switch Magnet Console Base Right Handrail Platform Screw Isolator Front Roller/Pulley Front Roller Adj. Bolt Left Rear Endcap Right Rear Endcap Incline Motor Bolt Belly Pan Screw Power Supply Motor Belt Shield Bookrack Plastic Stand-Off Warning Decal Right Foot Rail Front Left Endcap Plastic Tie Console Cover 1/2" Silver Screw Endcap Screw Hole Plug Motor Controller Wire Allen Wrench 3" Bolt Latch Assembly Silver Ground Screw Front Right Endcap Latch Knob Latch Spring Lock Pin Collar Pin Clip Lock Pin Extension Leg Assembly Foam...
English Manual
Page 19
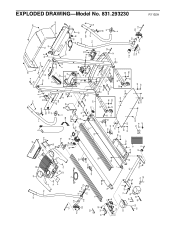
... 40 102 36 40 39 33 25 35 58 41 57 9 8 115 57 117 116 76 57 118 119 42 120 121 R1102A EXPLODED DRAWING-Model No. 831.293230
... 40 102 36 40 39 33 25 35 58 41 57 9 8 115 57 117 116 76 57 118 119 42 120 121 R1102A EXPLODED DRAWING-Model No. 831.293230

