
English Manual
Page 1
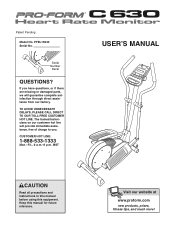
... . Patent Pending Model No. TO AVOID UNNECESSARY DELAYS, PLEASE CALL DIRECT TO OUR TOLL-FREE CUSTOMER HOT LINE. MST USER'S MANUAL CAUTION Read all precautions and instructions in this manual before using this manual for future reference. CUSTOMER HOT LINE: 1-888-533-1333 Mon.-Fri., 6 a.m.-6 p.m. The trained technicians on our customer hot line will provide immediate assistance, free of charge to...
... . Patent Pending Model No. TO AVOID UNNECESSARY DELAYS, PLEASE CALL DIRECT TO OUR TOLL-FREE CUSTOMER HOT LINE. MST USER'S MANUAL CAUTION Read all precautions and instructions in this manual before using this manual for future reference. CUSTOMER HOT LINE: 1-888-533-1333 Mon.-Fri., 6 a.m.-6 p.m. The trained technicians on our customer hot line will provide immediate assistance, free of charge to...
English Manual
Page 2
Read all users of the elliptical trainer are adequately informed of heart rate readings. It is the responsibility of the owner to ensure that all instructions in this manual before using the elliptical trainer. Keep the elliptical trainer indoors, away from the elliptical trainer at 1-888-533-1333 and order a free replacement decal. Replace any exercise program, consult your physician. Do not arch your back straight when using . If the decal is intended...
Read all users of the elliptical trainer are adequately informed of heart rate readings. It is the responsibility of the owner to ensure that all instructions in this manual before using the elliptical trainer. Keep the elliptical trainer indoors, away from the elliptical trainer at 1-888-533-1333 and order a free replacement decal. Replace any exercise program, consult your physician. Do not arch your back straight when using . If the decal is intended...
English Manual
Page 3
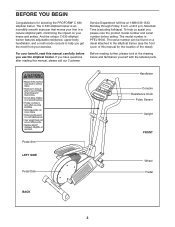
...labeled parts. If you , please note the product model number and serial number before you get the most from your benefit, read this manual for selecting the PROFORM® C 630 elliptical trainer. And the unique C 630 elliptical trainer features adjustable resistance, upper-body handlebars, and a multi-mode console to the elliptical trainer (see the front cover of this manual carefully before calling. The C 630 elliptical trainer is PFEL19540. until 6 p.m. To help you use the elliptical trainer. Handlebar Console Resistance Knob Pulse Sensor Upright Pedal Arm LEFT...
...labeled parts. If you , please note the product model number and serial number before you get the most from your benefit, read this manual for selecting the PROFORM® C 630 elliptical trainer. And the unique C 630 elliptical trainer features adjustable resistance, upper-body handlebars, and a multi-mode console to the elliptical trainer (see the front cover of this manual carefully before calling. The C 630 elliptical trainer is PFEL19540. until 6 p.m. To help you use the elliptical trainer. Handlebar Console Resistance Knob Pulse Sensor Upright Pedal Arm LEFT...
English Manual
Page 4
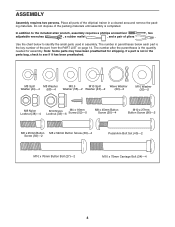
.... If a part is the quantity needed for shipping. Place all parts of pliers , two . Do not dispose of the part, from the PART LIST on page 14. The number in parentheses below to identify the small parts used in the parts bag, check to the included allen wrench, assembly requires a phillips screwdriver adjustable wrenches , a rubber mallet , and a pair of the elliptical trainer in a cleared...
.... If a part is the quantity needed for shipping. Place all parts of pliers , two . Do not dispose of the part, from the PART LIST on page 14. The number in parentheses below to identify the small parts used in the parts bag, check to the included allen wrench, assembly requires a phillips screwdriver adjustable wrenches , a rubber mallet , and a pair of the elliptical trainer in a cleared...

English Manual
Page 5
... the battery compartment. Attach the Console (23) to the Upright (2) with an M4 x 16mm Screw (52) as shown by the diagram inside of the battery compartment. 3 23 1 33 33 9 34 Batteries 4. Next, connect the ground wire to the Frame with two M10 x 75mm Carriage Bolts (34) and two M10 Nylon Locknuts (33). The Console (23) requires three 1.5 V "AA" batteries; Insert the 4 console cable and the console wire...
... the battery compartment. Attach the Console (23) to the Upright (2) with an M4 x 16mm Screw (52) as shown by the diagram inside of the battery compartment. 3 23 1 33 33 9 34 Batteries 4. Next, connect the ground wire to the Frame with two M10 x 75mm Carriage Bolts (34) and two M10 Nylon Locknuts (33). The Console (23) requires three 1.5 V "AA" batteries; Insert the 4 console cable and the console wire...

English Manual
Page 6
... 6 Using pliers, squeeze the prongs on the indicated side. Attach the Upright with a sticker. Do not fully tighten the Button Bolts yet. Next, connect the console cable to pinch the wires or cables. be careful not to the Resistance Cable (65) in the metal bracket as shown, connect the console wire to the Reed Switch Wire (53). Make sure that the Handlebar Arm is marked with two M10 x 76mm Button Bolts (27...
... 6 Using pliers, squeeze the prongs on the indicated side. Attach the Upright with a sticker. Do not fully tighten the Button Bolts yet. Next, connect the console cable to pinch the wires or cables. be careful not to the Resistance Cable (65) in the metal bracket as shown, connect the console wire to the Reed Switch Wire (53). Make sure that the Handlebar Arm is marked with two M10 x 76mm Button Bolts (27...
English Manual
Page 7
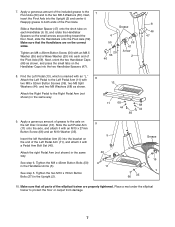
... Axle (59). See step 5. Make sure that the Handlebars are on the end of the elliptical trainer are pointing toward the floor. Place a mat under the elliptical trainer to the Left Pedal Arm (11) with 8 two M8 x 52mm Button Screws (36), two M8 ...press the small tabs on the left Handlebar Arm (5) into each Handlebar (6, 8), and rotate the Handlebar Spacers so the small arrows are properly tightened. Find the Left Pedal (13), which is marked with a Pedal Arm Bolt Set (40). Tighten the M8 x 45mm Button Bolts (50) in the same way. Next, 7 insert the Pivot Axle into the Upright...
... Axle (59). See step 5. Make sure that the Handlebars are on the end of the elliptical trainer are pointing toward the floor. Place a mat under the elliptical trainer to the Left Pedal Arm (11) with 8 two M8 x 52mm Button Screws (36), two M8 ...press the small tabs on the left Handlebar Arm (5) into each Handlebar (6, 8), and rotate the Handlebar Spacers so the small arrows are properly tightened. Find the Left Pedal (13), which is marked with a Pedal Arm Bolt Set (40). Tighten the M8 x 45mm Button Bolts (50) in the same way. Next, 7 insert the Pivot Axle into the Upright...
English Manual
Page 8
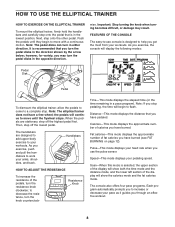
... work your heart rate when you through an effective workout. 8 Pulse-This mode displays your arms, shoulders, and back. Note: The elliptical trainer does not have burned. to a complete stop pedaling, the time will continue to your pace as it guides you use console is in the lowest position. Resistance Knob Time-This mode displays the elapsed time (or the time remaining in either direction. The console also offers four pace programs...
... work your heart rate when you through an effective workout. 8 Pulse-This mode displays your arms, shoulders, and back. Note: The elliptical trainer does not have burned. to a complete stop pedaling, the time will continue to your pace as it guides you use console is in the lowest position. Resistance Knob Time-This mode displays the elapsed time (or the time remaining in either direction. The console also offers four pace programs...
English Manual
Page 9
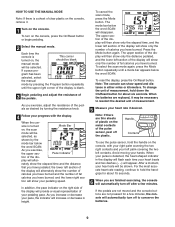
..., select the manual mode by pressing the Program button repeatedly until a mode bar appears below the word SCAN. the lower left section of the display will automatically turn off after a few minutes, the console will alter- tion will alternately show the number of calories you have burned and the number of fat calories you are replaced, it . 1 Turn on the metal contacts of the pulse sensor, peel...
..., select the manual mode by pressing the Program button repeatedly until a mode bar appears below the word SCAN. the lower left section of the display will automatically turn off after a few minutes, the console will alter- tion will alternately show the number of calories you have burned and the number of fat calories you are replaced, it . 1 Turn on the metal contacts of the pulse sensor, peel...
English Manual
Page 10
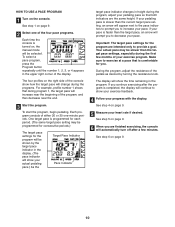
... will change during the programs. For example, profile number 1 shows that both indicators are intended only to increase your pace; If you . To start the program, begin pedaling. During the program, adjust the resistance of the display. See step 4 on the console. See step 6 on the right side of the console show your exercise feedback. 4 Follow your progress with the display. To select a pace program, press the Program button repeatedly...
... will change during the programs. For example, profile number 1 shows that both indicators are intended only to increase your pace; If you . To start the program, begin pedaling. During the program, adjust the resistance of the display. See step 4 on the console. See step 6 on the right side of the console show your exercise feedback. 4 Follow your progress with the display. To select a pace program, press the Program button repeatedly...
English Manual
Page 11
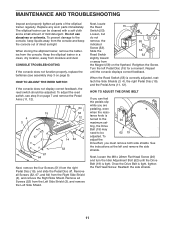
... the Pedal Arms (11, 12). Replace any worn parts immediately. The elliptical trainer can feel the pedals slip while you are pedaling, even when the resis- To prevent damage to the 26 maximum set- Retighten the Screw. Repeat until the Drive Belt (19) is turned to the console, keep liquids away from the console and keep the console out of direct sunlight. HOW TO ADJUST THE DRIVE BELT If you must remove...
... the Pedal Arms (11, 12). Replace any worn parts immediately. The elliptical trainer can feel the pedals slip while you are pedaling, even when the resis- To prevent damage to the 26 maximum set- Retighten the Screw. Repeat until the Drive Belt (19) is turned to the console, keep liquids away from the console and keep the console out of direct sunlight. HOW TO ADJUST THE DRIVE BELT If you must remove...
English Manual
Page 12
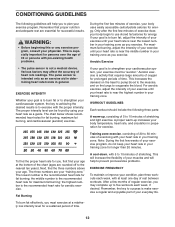
...-existing health problems. During the first few minutes of exercise does your training zone for energy. Aerobic exercise is near the lowest number in your training zone as you must be found by using your heart rate as an exercise aid in determining heart rate trends in your everyday life. For aerobic exercise, adjust the intensity of your exercise until your heart rate is near the highest number in...
...-existing health problems. During the first few minutes of exercise does your training zone for energy. Aerobic exercise is near the lowest number in your training zone as you must be found by using your heart rate as an exercise aid in determining heart rate trends in your everyday life. For aerobic exercise, adjust the intensity of your exercise until your heart rate is near the highest number in...
English Manual
Page 13
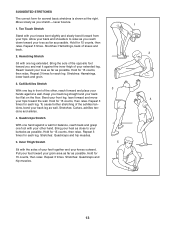
...lower back and groin. 3. Bring your groin area as far as you stretch-never bounce. 1. Hold for 15 counts, then relax. Hold for 15 counts, then relax. Stretches: Quadriceps and hip muscles. 3 5 1 2 4 13 Stretches: Hamstrings, back of your back leg...several basic stretches is shown at the right. SUGGESTED STRETCHES The correct form for each leg. Inner Thigh Stretch Sit with your other , reach forward and place your hips...Stretches: Calves, achilles tendons and ankles. 4. Bend your front leg, lean forward and move your back foot flat on the floor. Hold for balance, ...
...lower back and groin. 3. Bring your groin area as far as you stretch-never bounce. 1. Hold for 15 counts, then relax. Hold for 15 counts, then relax. Stretches: Quadriceps and hip muscles. 3 5 1 2 4 13 Stretches: Hamstrings, back of your back leg...several basic stretches is shown at the right. SUGGESTED STRETCHES The correct form for each leg. Inner Thigh Stretch Sit with your other , reach forward and place your hips...Stretches: Calves, achilles tendons and ankles. 4. Bend your front leg, lean forward and move your back foot flat on the floor. Hold for balance, ...
English Manual
Page 14
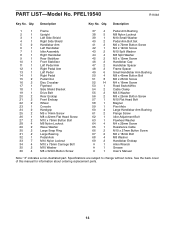
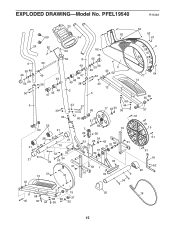
PART LIST-Model No. Description Key No. Specifications are subject to change without notice. Qty. See the back cover of this manual for information about ordering replacement parts. 14 Qty. Description 1 1 Frame 2 1 Upright 3 1 Left Side Shield 4 1 Right Side Shield 5 2 Handlebar Arm 6 1 Left Handlebar 7 1 Idler Assembly 8 1 Right Handlebar 9 1 Rear Stabilizer 10 1 Front Stabilizer 11 1 Left Pedal Arm 12 1 Right Pedal Arm 13 1 Left Pedal 14 1 Right Pedal 15 2 Pedal Disc 16 2 Disc Crossbar 17...
PART LIST-Model No. Description Key No. Specifications are subject to change without notice. Qty. See the back cover of this manual for information about ordering replacement parts. 14 Qty. Description 1 1 Frame 2 1 Upright 3 1 Left Side Shield 4 1 Right Side Shield 5 2 Handlebar Arm 6 1 Left Handlebar 7 1 Idler Assembly 8 1 Right Handlebar 9 1 Rear Stabilizer 10 1 Front Stabilizer 11 1 Left Pedal Arm 12 1 Right Pedal Arm 13 1 Left Pedal 14 1 Right Pedal 15 2 Pedal Disc 16 2 Disc Crossbar 17...
English Manual
Page 15
EXPLODED DRAWING-Model No. PFEL19540 R1104A 23 69 24 64 52 52 67 24 52 52 6 55 49 46 29 56 50 52 8 59 49 49 49 38 48 45 47 47 45 48 49 38 2 5 43 27 33 65 43 60 22 60 41 7 26 28 41 21 33 10 52 33 21 34 53 54 61 51 13 51 16 40 52 46 55 4 28 67 52 28 29 56 49 50 3 40 52 40 12 64 14 5 68 44 60 17 63 33 36 35 66 37 39 57 58 38 54 25 31 30 42 31 32 30 33 62 1 33 51 51 16 15 51 61 51 18 52 20 9 34 51 37 15 20 11 68 40 36 44 68 66 36 37 35 19 15
EXPLODED DRAWING-Model No. PFEL19540 R1104A 23 69 24 64 52 52 67 24 52 52 6 55 49 46 29 56 50 52 8 59 49 49 49 38 48 45 47 47 45 48 49 38 2 5 43 27 33 65 43 60 22 60 41 7 26 28 41 21 33 10 52 33 21 34 53 54 61 51 13 51 16 40 52 46 55 4 28 67 52 28 29 56 49 50 3 40 52 40 12 64 14 5 68 44 60 17 63 33 36 35 66 37 39 57 58 38 54 25 31 30 42 31 32 30 33 62 1 33 51 51 16 15 51 61 51 18 52 20 9 34 51 37 15 20 11 68 40 36 44 68 66 36 37 35 19 15
English Manual
Page 16
... (PROFORM® C 630 elliptical trainer) • the SERIAL NUMBER of the product (see the front cover of this manual) • the KEY NUMBER and DESCRIPTION of the part(s) (see page 14 of this manual) PROFORM is a registered trademark of ICON IP, Inc. You may not apply to you specific legal rights. ICON HEALTH & FITNESS, INC., 1500 S. 1000 W., LOGAN, UT 84321-9813 Part No. 217518 R1104A Printed in connection with the use...
... (PROFORM® C 630 elliptical trainer) • the SERIAL NUMBER of the product (see the front cover of this manual) • the KEY NUMBER and DESCRIPTION of the part(s) (see page 14 of this manual) PROFORM is a registered trademark of ICON IP, Inc. You may not apply to you specific legal rights. ICON HEALTH & FITNESS, INC., 1500 S. 1000 W., LOGAN, UT 84321-9813 Part No. 217518 R1104A Printed in connection with the use...


