
English Manual
Page 1
..., PLEASE CALL DIRECT TO OUR TOLL-FREE CUSTOMER HOT LINE. Keep this equipment. PFEX34390 Serial No. CUSTOMER HOT LINE: 1-800-999-3756 Mon.ÐFri., 6 a.m.Ð6 p.m. USER'S MANUAL Patent Pending Visit our website at www.proform.com new products, prizes, fitness tips, and much more! MST CAUTION Read all precautions and instructions in this manual before using this manual for future...
..., PLEASE CALL DIRECT TO OUR TOLL-FREE CUSTOMER HOT LINE. Keep this equipment. PFEX34390 Serial No. CUSTOMER HOT LINE: 1-800-999-3756 Mon.ÐFri., 6 a.m.Ð6 p.m. USER'S MANUAL Patent Pending Visit our website at www.proform.com new products, prizes, fitness tips, and much more! MST CAUTION Read all precautions and instructions in this manual before using this manual for future...

English Manual
Page 2
TABLE OF CONTENTS IMPORTANT PRECAUTIONS 3 BEFORE YOU BEGIN 4 ASSEMBLY 5 HOW TO OPERATE THE RECUMBENT CYCLE 9 MAINTENANCE AND TROUBLE-SHOOTING 12 EXERCISE GUIDELINES 13 PART LIST 14 EXPLODED DRAWING 15 HOW TO ORDER REPLACEMENT PARTS Back Cover LIMITED WARRANTY Back Cover 2
TABLE OF CONTENTS IMPORTANT PRECAUTIONS 3 BEFORE YOU BEGIN 4 ASSEMBLY 5 HOW TO OPERATE THE RECUMBENT CYCLE 9 MAINTENANCE AND TROUBLE-SHOOTING 12 EXERCISE GUIDELINES 13 PART LIST 14 EXPLODED DRAWING 15 HOW TO ORDER REPLACEMENT PARTS Back Cover LIMITED WARRANTY Back Cover 2

English Manual
Page 3
... all users of the recumbent cycle are adequately informed of serious injury, read the following important precau- ICON assumes no responsibility for persons over the age of heart rate readings. Replace any exercise program, consult your back straight when using the recumbent cycle. 1. Keep children under the recumbent cycle to move until the flywheel stops. The recumbent cycle does not have a freewheel; tions before using the recumbent...
... all users of the recumbent cycle are adequately informed of serious injury, read the following important precau- ICON assumes no responsibility for persons over the age of heart rate readings. Replace any exercise program, consult your back straight when using the recumbent cycle. 1. Keep children under the recumbent cycle to move until the flywheel stops. The recumbent cycle does not have a freewheel; tions before using the recumbent...
English Manual
Page 4
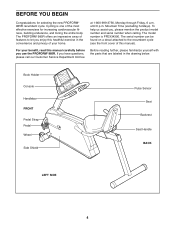
... PROFORM¨ 985R recumbent cycle. BEFORE YOU BEGIN Congratulations for increasing cardiovascular fitness, building endurance, and toning the entire body. Mountain Time (excluding holidays). Book Holder Console Handlebar FRONT Pedal Strap Pedal Wheel Side Shield Pulse Sensor Seat Backrest Seat Handle BACK LEFT SIDE 4 The PROFORM¨ 985R offers an impressive array of your benefit, read this manual carefully before you , please mention the product model number and serial number...
... PROFORM¨ 985R recumbent cycle. BEFORE YOU BEGIN Congratulations for increasing cardiovascular fitness, building endurance, and toning the entire body. Mountain Time (excluding holidays). Book Holder Console Handlebar FRONT Pedal Strap Pedal Wheel Side Shield Pulse Sensor Seat Backrest Seat Handle BACK LEFT SIDE 4 The PROFORM¨ 985R offers an impressive array of your benefit, read this manual carefully before you , please mention the product model number and serial number...
English Manual
Page 5
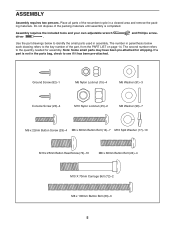
The number in assembly. If a part is completed. Place all parts of the recumbent cycle in the parts bag, check to the key number of the packing materials until assembly is not in a cleared area and remove the packing materials. Assembly requires the included tools and your own adjustable wrench driver . Ground Screw (82)Ð1 M6 Nylon Locknut (15)Ð4 M6 Washer (91)Ð3 Console Screw (20...
The number in assembly. If a part is completed. Place all parts of the recumbent cycle in the parts bag, check to the key number of the packing materials until assembly is not in a cleared area and remove the packing materials. Assembly requires the included tools and your own adjustable wrench driver . Ground Screw (82)Ð1 M6 Nylon Locknut (15)Ð4 M6 Washer (91)Ð3 Console Screw (20...

English Manual
Page 6
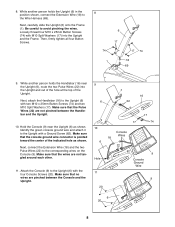
... 7 3. Position the Rear Stabilizer (3) under the Carriage 3 Bar (7) as shown. Move the Seat Carriage to the desired position and pivot the Seat Handle forward to the front of the 1 Frame (1) with two M10 x 70mm Carriage Bolts (72) 72 and two M10 Nylon Locknuts (45). 1. Attach the Carriage Bar to the Carriage Bar with four M10 x 25mm Button Screws (74) and four...
... 7 3. Position the Rear Stabilizer (3) under the Carriage 3 Bar (7) as shown. Move the Seat Carriage to the desired position and pivot the Seat Handle forward to the front of the 1 Frame (1) with two M10 x 70mm Carriage Bolts (72) 72 and two M10 Nylon Locknuts (45). 1. Attach the Carriage Bar to the Carriage Bar with four M10 x 25mm Button Screws (74) and four...

English Manual
Page 7
... Frame (8) 7 with two M6 x 38mm Button Bolts (14) and two M6 Nylon Locknuts (15). Attach the Backrest (13) to the Seat Frame (27) with four M8 x 38mm Button Bolts (24). 24 27 24 8 11 5. 4. Insert the lower end of the Backrest Frame (8) into the Seat Frame (27). Attach the Seat Handle with three M6 x 38mm Button Bolts (14) and three M6 Washers...
... Frame (8) 7 with two M6 x 38mm Button Bolts (14) and two M6 Nylon Locknuts (15). Attach the Backrest (13) to the Seat Frame (27) with four M8 x 38mm Button Bolts (24). 24 27 24 8 11 5. 4. Insert the lower end of the Backrest Frame (8) into the Seat Frame (27). Attach the Seat Handle with three M6 x 38mm Button Bolts (14) and three M6 Washers...
English Manual
Page 8
... the four Console Screws (20). 8. Make sure that the Pulse Wires (22) are not tangled around each other. 11. Make sure that the wires are not pinched between the Console and the Upright. 9 6 16 22 10 6 Hole 11 17 17 74 Console Wires 18 22 82 9 Console Ground Wire 9 20 6 20 8 Attach the Console (9) to the Wire Harness (69). Then, firmly tighten all four Button Screws. 8 6 17...
... the four Console Screws (20). 8. Make sure that the Pulse Wires (22) are not tangled around each other. 11. Make sure that the wires are not pinched between the Console and the Upright. 9 6 16 22 10 6 Hole 11 17 17 74 Console Wires 18 22 82 9 Console Ground Wire 9 20 6 20 8 Attach the Console (9) to the Wire Harness (69). Then, firmly tighten all four Button Screws. 8 6 17...
English Manual
Page 9
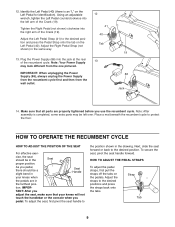
... or the console when you use the recumbent cycle. 12. Make sure that your knees when the pedals are properly tightened before you pedal. As you adjust the seat, make sure that all parts are in the drawing. Strap Tab 9 Plug the Power Supply (86) into the jack at the rear of the Crank (19). HOW TO OPERATE THE RECUMBENT CYCLE HOW TO ADJUST THE POSITION...
... or the console when you use the recumbent cycle. 12. Make sure that your knees when the pedals are properly tightened before you pedal. As you adjust the seat, make sure that all parts are in the drawing. Strap Tab 9 Plug the Power Supply (86) into the jack at the rear of the Crank (19). HOW TO OPERATE THE RECUMBENT CYCLE HOW TO ADJUST THE POSITION...
English Manual
Page 10
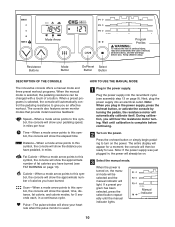
... a manual mode and three preset workout programs. When the manual mode is complete before continuing. When a preset programs is used. 2 Turn on the power. During calibration, you plug in the power supply, press the on/reset button, or activate the console by turning the pedals, the resistance motor will show the distance you have burned. ScanÑWhen a mode arrow points to give you have pedaled, in a continuous cycle. The entire display will hear the resistance motor turning...
... a manual mode and three preset workout programs. When the manual mode is complete before continuing. When a preset programs is used. 2 Turn on the power. During calibration, you plug in the power supply, press the on/reset button, or activate the console by turning the pedals, the resistance motor will show the distance you have burned. ScanÑWhen a mode arrow points to give you have pedaled, in a continuous cycle. The entire display will hear the resistance motor turning...
English Manual
Page 11
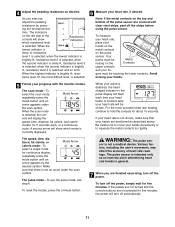
... press the mode button until an arrow appears under the scan symbol. The pulse modeÑTo use the pulse mode, see step 6. Various factors, including the userÕs movement, may affect the accuracy of the pulse sensor are not pressed for five minutes, the power will be touching the lower contacts. To turn off automatically. 11 If the pedals are not turned and the console buttons are covered with the monitor modes...
... press the mode button until an arrow appears under the scan symbol. The pulse modeÑTo use the pulse mode, see step 6. Various factors, including the userÕs movement, may affect the accuracy of the pulse sensor are not pressed for five minutes, the power will be touching the lower contacts. To turn off automatically. 11 If the pedals are not turned and the console buttons are covered with the monitor modes...

English Manual
Page 12
.... PULSE SENSOR TROUBLE-SHOOTING ¥ Avoid moving your hands while using the pulse sensor. See step 6 on the left side of the console show the current resistance level. MAINTENANCE AND TROUBLE-SHOOTING Inspect and tighten all parts of direct sunlight. If the pedals are not turned and the console buttons are not pressed for approximately twenty minutes. Note: When a preset program is in the power supply. See step 5 on the power. Note: The resistance buttons will change...
.... PULSE SENSOR TROUBLE-SHOOTING ¥ Avoid moving your hands while using the pulse sensor. See step 6 on the left side of the console show the current resistance level. MAINTENANCE AND TROUBLE-SHOOTING Inspect and tighten all parts of direct sunlight. If the pedals are not turned and the console buttons are not pressed for approximately twenty minutes. Note: When a preset program is in the power supply. See step 5 on the power. Note: The resistance buttons will change...

English Manual
Page 13
...;aerobic.Ó Aerobic exercise is the recommended heart rate for exercise. This will increase the flexibility of your muscles and will help to success is not a medical device. Remember, the key to prevent post-exercise problems. EXERCISE FREQUENCY To maintain or improve your condition, plan three workouts each week, if desired. The pulse sensor is near the lowest number in preparation for...
...;aerobic.Ó Aerobic exercise is the recommended heart rate for exercise. This will increase the flexibility of your muscles and will help to success is not a medical device. Remember, the key to prevent post-exercise problems. EXERCISE FREQUENCY To maintain or improve your condition, plan three workouts each week, if desired. The pulse sensor is near the lowest number in preparation for...
English Manual
Page 14
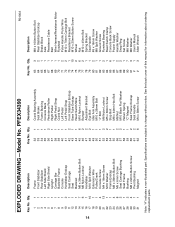
... Button Bolt Rear Stabilizer Endcap Brake Block Axle Resistance Cable Belt Wire Harness/Resistance Motor Flywheel Pulse Handle /Pulse Wire M10 x 70mm Carriage Bolt Resistance Bracket M10 x 25mm Button Screw Wheel Nut M10 x 45mm Bolt Spring Bracket Seat Handle #6 x 16mm Screw M8 Split Washer Ground Screw Flywheel Bearing Reed Switch Clamp Console Back Screw Power Supply Handle Washer Snap Ring Set Screw M8 Washer M6 Washer UserÕs Manual Allen Wrench 14 Note: Ò#Ó indicates a non-illustrated part. See...
... Button Bolt Rear Stabilizer Endcap Brake Block Axle Resistance Cable Belt Wire Harness/Resistance Motor Flywheel Pulse Handle /Pulse Wire M10 x 70mm Carriage Bolt Resistance Bracket M10 x 25mm Button Screw Wheel Nut M10 x 45mm Bolt Spring Bracket Seat Handle #6 x 16mm Screw M8 Split Washer Ground Screw Flywheel Bearing Reed Switch Clamp Console Back Screw Power Supply Handle Washer Snap Ring Set Screw M8 Washer M6 Washer UserÕs Manual Allen Wrench 14 Note: Ò#Ó indicates a non-illustrated part. See...
English Manual
Page 16
... (PROFORM¨ 985R recumbent cycle) ¥ The SERIAL NUMBER of the product (see the front cover of this manual) ¥ The KEY NUMBER and DESCRIPTION of the part(s) from page 14 of the product or damages with the use and service conditions, for which vary from defects in connection with respect to state. PROFORM¨ is limited to you , please be pre-authorized by ICON. All repairs...
... (PROFORM¨ 985R recumbent cycle) ¥ The SERIAL NUMBER of the product (see the front cover of this manual) ¥ The KEY NUMBER and DESCRIPTION of the part(s) from page 14 of the product or damages with the use and service conditions, for which vary from defects in connection with respect to state. PROFORM¨ is limited to you , please be pre-authorized by ICON. All repairs...


