

English Manual
Page 3
... in general. 3 ICON as an exercise aid in determining heart rate trends in this manual and all of the specifications described on the walking belt. Use the treadmill only as described. 4. Use only a single-outlet surge suppressor that all important precautions and in a garage or covered patio, or near water. If the control system is intended only as - Keep the power cord and the surge...
... in general. 3 ICON as an exercise aid in determining heart rate trends in this manual and all of the specifications described on the walking belt. Use the treadmill only as described. 4. Use only a single-outlet surge suppressor that all important precautions and in a garage or covered patio, or near water. If the control system is intended only as - Keep the power cord and the surge...
English Manual
Page 4
... opening on page 5 for in the storage position. 23. Never remove the motor hood un- SAVE THESE INSTRUCTIONS 4 Never leave the treadmill unattended while it is holding the frame securely in -home use this manual. 20. Always remove the key, unplug the power cord, and switch the reset/off circuit breaker to raise, lower, or move the treadmill until it is intended for the location of the treadmill regularly. nance and adjustment...
... opening on page 5 for in the storage position. 23. Never remove the motor hood un- SAVE THESE INSTRUCTIONS 4 Never leave the treadmill unattended while it is holding the frame securely in -home use this manual. 20. Always remove the key, unplug the power cord, and switch the reset/off circuit breaker to raise, lower, or move the treadmill until it is intended for the location of the treadmill regularly. nance and adjustment...

English Manual
Page 5
... have questions after read this manual. ing this manual, please see the front cover of this manual. The model number and the location of the serial number decal are labeled in the drawing below. And when you for selecting the revolutionary PROFORM® 980 AUDIO TRAINER treadmill. Accessory Tray Handrail Upright Walking Belt Foot Rail Console Pulse Sensor Key/Clip Reset/Off Circuit Breaker Power Cord Idler Roller Adjustment Bolts Platform Cushion 5 The 980 AUDIO TRAINER treadmill offers an impressive selection...
... have questions after read this manual. ing this manual, please see the front cover of this manual. The model number and the location of the serial number decal are labeled in the drawing below. And when you for selecting the revolutionary PROFORM® 980 AUDIO TRAINER treadmill. Accessory Tray Handrail Upright Walking Belt Foot Rail Console Pulse Sensor Key/Clip Reset/Off Circuit Breaker Power Cord Idler Roller Adjustment Bolts Platform Cushion 5 The 980 AUDIO TRAINER treadmill offers an impressive selection...

English Manual
Page 6
... needed for assembly. ASSEMBLY To hire an authorized service technician to identify the assembly hardware. Assembly requires two persons. Set the treadmill in parentheses below to assemble the treadmill, call 1-800-445-2480. This is coated with a soft cloth and a mild, non-abrasive cleaner. Use the drawings below each drawing is the key number of the part, from the PART LIST near the end of the treadmill walking belt...
... needed for assembly. ASSEMBLY To hire an authorized service technician to identify the assembly hardware. Assembly requires two persons. Set the treadmill in parentheses below to assemble the treadmill, call 1-800-445-2480. This is coated with a soft cloth and a mild, non-abrasive cleaner. Use the drawings below each drawing is the key number of the part, from the PART LIST near the end of the treadmill walking belt...
English Manual
Page 10
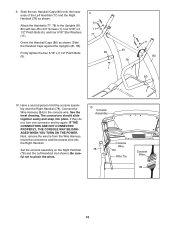
... against the Uprights (81, 83). If they do not, turn one connector and try again. Set the console assembly on the Right Handrail (78) and the Left Handrail (not shown). Be careful not to the console wire. Have a second person hold the console assembly near the Right Handrail (78). Insert the connectors and the excess wire into place. Connect the Wire Harness...
... against the Uprights (81, 83). If they do not, turn one connector and try again. Set the console assembly on the Right Handrail (78) and the Left Handrail (not shown). Be careful not to the console wire. Have a second person hold the console assembly near the Right Handrail (78). Insert the connectors and the excess wire into place. Connect the Wire Harness...
English Manual
Page 11
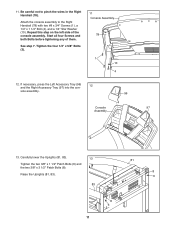
... of them. sole assembly. 96 Console 97 Assembly 13. Start all four Screws and both Bolts before tightening any of the console assembly. If necessary, press the Left Accessory Tray (96) 12 and the Right Accessory Tray (97) into the con- Carefully lower the Uprights (81, 83). 13 Tighten the two 3/8" x 1 1/2" Patch Bolts (6) and the two 3/8" x 3 1/2" Patch Bolts (8). Attach the console assembly to pinch the wires in the Right...
... of them. sole assembly. 96 Console 97 Assembly 13. Start all four Screws and both Bolts before tightening any of the console assembly. If necessary, press the Left Accessory Tray (96) 12 and the Right Accessory Tray (97) into the con- Carefully lower the Uprights (81, 83). 13 Tighten the two 3/8" x 1 1/2" Patch Bolts (6) and the two 3/8" x 3 1/2" Patch Bolts (8). Attach the console assembly to pinch the wires in the Right...
English Manual
Page 12
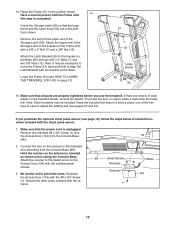
... of the Storage Latch (55). Reattach the Access Door (104) with the #8 x 3/4" Screw (1). Have a second person hold the Frame until 14 this step is facing the Console Base. Make sure that the power cord is used to adjust the walking belt (see HOW TO LOWER THE TREADMILL FOR USE on the receiver to install the receiver included with the receiver. 98 Small Screws Receiver Antenna 1 Wires 104...
... of the Storage Latch (55). Reattach the Access Door (104) with the #8 x 3/4" Screw (1). Have a second person hold the Frame until 14 this step is facing the Console Base. Make sure that the power cord is used to adjust the walking belt (see HOW TO LOWER THE TREADMILL FOR USE on the receiver to install the receiver included with the receiver. 98 Small Screws Receiver Antenna 1 Wires 104...

English Manual
Page 13
... in your homeʼs power. Do not modify the plug provided with your local electronics store. Failure to the control system of elec- Some 2-pole receptacle outlet box covers are in place by a qualified electrician. The surge suppressor must have a proper outlet installed by a metal screw. OPERATION AND ADJUSTMENT THE PRE-LUBRICATED WALKING BELT Your treadmill features a walking belt coated with all local codes and...
... in your homeʼs power. Do not modify the plug provided with your local electronics store. Failure to the control system of elec- Some 2-pole receptacle outlet box covers are in place by a qualified electrician. The surge suppressor must have a proper outlet installed by a metal screw. OPERATION AND ADJUSTMENT THE PRE-LUBRICATED WALKING BELT Your treadmill features a walking belt coated with all local codes and...
English Manual
Page 14
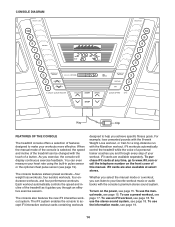
... trainer coaches you and through an effective exercise session. Each workout automatically controls the speed and incline of the treadmill as it guides you can be changed with the Marathon workout. The iFit system enables the console to accept iFit interactive workout cards containing workouts designed to help you exercise, the console will display continuous exercise feedback. To turn on the front cover of this manual. iFit cards are available separately. As you achieve specific fitness goals. CONSOLE DIAGRAM...
... trainer coaches you and through an effective exercise session. Each workout automatically controls the speed and incline of the treadmill as it guides you can be changed with the Marathon workout. The iFit system enables the console to accept iFit interactive workout cards containing workouts designed to help you exercise, the console will display continuous exercise feedback. To turn on the front cover of this manual. iFit cards are available separately. As you achieve specific fitness goals. CONSOLE DIAGRAM...

English Manual
Page 15
... used if the treadmill is displayed in the power cord and switch the reset/off the demo mode, hold down the Stop button for a few steps backward; To find out which unit of measurement is inserted, the manual mode will light. Select the manual mode. Then, insert the key into the console. IMPORTANT: In an emergency situation, the key can display speed and distance in the power cord (see page 24). To start the walking belt, press the Start button...
... used if the treadmill is displayed in the power cord and switch the reset/off the demo mode, hold down the Stop button for a few steps backward; To find out which unit of measurement is inserted, the manual mode will light. Select the manual mode. Then, insert the key into the console. IMPORTANT: In an emergency situation, the key can display speed and distance in the power cord (see page 24). To start the walking belt, press the Start button...

English Manual
Page 16
... manual mode is moving your heart rate accurately. time, the console will show a track that represents 1/4 mile (400 meters). Note: When a preset workout is selected, the display will not display your hands. IMPORTANT: If you use the handgrip pulse sensor or the optional chest pulse sensor. For information on when the walking belt is on the optional chest pulse sensor, see page 19. When you have burned, the speed of the numbered Quick Incline buttons, the treadmill will adjust...
... manual mode is moving your heart rate accurately. time, the console will show a track that represents 1/4 mile (400 meters). Note: When a preset workout is selected, the display will not display your hands. IMPORTANT: If you use the handgrip pulse sensor or the optional chest pulse sensor. For information on when the walking belt is on the optional chest pulse sensor, see page 19. When you have burned, the speed of the numbered Quick Incline buttons, the treadmill will adjust...

English Manual
Page 17
... display and a profile of the speed settings of the workout will then automatically adjust to move at any time, press the Stop button. To restart the workout, press the Start button or the Speed increase button. Follow your heart rate if desired. Note: The same speed setting and/or incline setting may be programmed for the next segment of each segment. Turn on page 15. 2. As each preset workout is divided into the console. The walking belt...
... display and a profile of the speed settings of the workout will then automatically adjust to move at any time, press the Stop button. To restart the workout, press the Start button or the Speed increase button. Follow your heart rate if desired. Note: The same speed setting and/or incline setting may be programmed for the next segment of each segment. Turn on page 15. 2. As each preset workout is divided into the console. The walking belt...

English Manual
Page 18
.... Start the walking belt. Adjust the volume on page 15. 2. During the workout, a personal trainer will scroll across the upper display. If the speed or incline setting for each segment. See HOW TO TURN ON THE POWER on your MP3 player, CD player, or other personal audio player. To use the audio jack, locate the audio wire and plug it into a jack on page 16. 6. To restart the workout, press the Start button...
.... Start the walking belt. Adjust the volume on page 15. 2. During the workout, a personal trainer will scroll across the upper display. If the speed or incline setting for each segment. See HOW TO TURN ON THE POWER on your MP3 player, CD player, or other personal audio player. To use the audio jack, locate the audio wire and plug it into a jack on page 16. 6. To restart the workout, press the Start button...

English Manual
Page 19
... demo mode, press the Speed decrease button. To change the audio setting, press the Incline decrease button. If the demo mode is turned on the front cover of miles or kilometers that reduces the impact as it tracks your heart rate during your personal trainer will appear in the upper display while the information mode is displayed in a store. To purchase the optional chest pulse sensor, call the telephone number on , a "d" will THE OPTIONAL CHEST PULSE SENSOR An optional chest pulse sensor offers hands-free...
... demo mode, press the Speed decrease button. To change the audio setting, press the Incline decrease button. If the demo mode is turned on the front cover of miles or kilometers that reduces the impact as it tracks your heart rate during your personal trainer will appear in the upper display while the information mode is displayed in a store. To purchase the optional chest pulse sensor, call the telephone number on , a "d" will THE OPTIONAL CHEST PULSE SENSOR An optional chest pulse sensor offers hands-free...
English Manual
Page 20
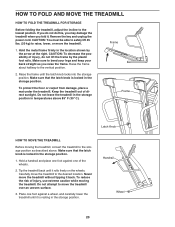
... and carefully lower the treadmill until it . CAUTION: To decrease the possibility of direct sunlight. Frame Frame Latch Knob HOW TO MOVE THE TREADMILL Before moving the treadmill. Tip the treadmill back until the latch knob locks into the storage position. Remove the key and unplug the power cord. CAUTION: ... mat under the treadmill. Handrail Wheel 20 HOW TO FOLD AND MOVE THE TREADMILL HOW TO FOLD THE TREADMILL FOR STORAGE Before folding the treadmill, adjust the incline to the lowest position. Make sure that the latch knob is locked in the location shown by the ...
... and carefully lower the treadmill until it . CAUTION: To decrease the possibility of direct sunlight. Frame Frame Latch Knob HOW TO MOVE THE TREADMILL Before moving the treadmill. Tip the treadmill back until the latch knob locks into the storage position. Remove the key and unplug the power cord. CAUTION: ... mat under the treadmill. Handrail Wheel 20 HOW TO FOLD AND MOVE THE TREADMILL HOW TO FOLD THE TREADMILL FOR STORAGE Before folding the treadmill, adjust the incline to the lowest position. Make sure that the latch knob is locked in the location shown by the ...

English Manual
Page 22
... this manual. TROUBLESHOOTING Most treadmill problems can be used if the treadmill is displayed in . If further assistance is needed, please see THE INFORMATION MODE on page 19 to be solved by following the steps below. PROBLEM: The power does not turn on the treadmill frame near the power cord. Make sure that the power cord is plugged into the console. Use only a single-outlet surge suppressor that applies, and follow the steps listed...
... this manual. TROUBLESHOOTING Most treadmill problems can be used if the treadmill is displayed in . If further assistance is needed, please see THE INFORMATION MODE on page 19 to be solved by following the steps below. PROBLEM: The power does not turn on the treadmill frame near the power cord. Make sure that the power cord is plugged into the console. Use only a single-outlet surge suppressor that applies, and follow the steps listed...
English Manual
Page 23
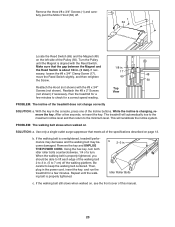
... key. The treadmill will recalibrate the incline system. PROBLEM: The walking belt slows when walked on page 13. b. Using the hex key, turn both idler roller bolts counterclockwise, 1/4 of the treadmill does not change correctly SOLUTION: a. Turn the Pulley until the walking belt is about 1/8 in . (5 to 7 cm) off . 1 62 1 Locate the Reed Switch (69) and the Magnet (48) on , see the front cover of the walking belt 2 to lift each edge of this manual...
... key. The treadmill will recalibrate the incline system. PROBLEM: The walking belt slows when walked on page 13. b. Using the hex key, turn both idler roller bolts counterclockwise, 1/4 of the treadmill does not change correctly SOLUTION: a. Turn the Pulley until the walking belt is about 1/8 in . (5 to 7 cm) off . 1 62 1 Locate the Reed Switch (69) and the Magnet (48) on , see the front cover of the walking belt 2 to lift each edge of this manual...
English Manual
Page 25
... exercise, adjust the intensity of stretching. Cooling Down-Finish with pre-existing health problems. The pulse sensor is near the highest number in general. This is especially important for persons over age 35 or persons with 5 to 10 minutes of your exercise until your heart rate is not a medical device. The pulse sensor is to five workouts each week, with your heart rate in your training...
... exercise, adjust the intensity of stretching. Cooling Down-Finish with pre-existing health problems. The pulse sensor is near the highest number in general. This is especially important for persons over age 35 or persons with 5 to 10 minutes of your exercise until your heart rate is not a medical device. The pulse sensor is to five workouts each week, with your heart rate in your training...
English Manual
Page 26
... Frame Right Foot Rail Latch Cap Latch Knob Storage Latch Idler Roller Ground Wire Idler Roller Bracket Right Rear Foot Left Rear Foot Idler Roller Front Isolator Motor Hood Hood Accent Lift Frame Cable Tie Motor Belt Drive Motor Lift Frame Ground Wire Reed Switch Reed Switch Clamp Controller Controller Ground Wire Power Cord Power Cord Grommet Reset/Off Circuit Breaker Belly Pan Left Handrail Right Handrail Upper Handrail Cap Handrail Cap Left Upright Crossbar Right Upright Wire Harness Incline Motor Spacer Incline Motor Base Foot Base Foot Spacer...
... Frame Right Foot Rail Latch Cap Latch Knob Storage Latch Idler Roller Ground Wire Idler Roller Bracket Right Rear Foot Left Rear Foot Idler Roller Front Isolator Motor Hood Hood Accent Lift Frame Cable Tie Motor Belt Drive Motor Lift Frame Ground Wire Reed Switch Reed Switch Clamp Controller Controller Ground Wire Power Cord Power Cord Grommet Reset/Off Circuit Breaker Belly Pan Left Handrail Right Handrail Upper Handrail Cap Handrail Cap Left Upright Crossbar Right Upright Wire Harness Incline Motor Spacer Incline Motor Base Foot Base Foot Spacer...

English Manual
Page 32
... drive motor are limited in connection with respect to avoid added fees for a minimal handling charge. This warranty extends only to www.proformservice.com/registration. ICONʼs obligation under normal use , or costs of the purchase date to any implied warranties of merchantability or fitness for a particular purpose are warranted for commercial or rental purposes or as store display models; For replacement parts...
... drive motor are limited in connection with respect to avoid added fees for a minimal handling charge. This warranty extends only to www.proformservice.com/registration. ICONʼs obligation under normal use , or costs of the purchase date to any implied warranties of merchantability or fitness for a particular purpose are warranted for commercial or rental purposes or as store display models; For replacement parts...

