
English Manual
Page 2
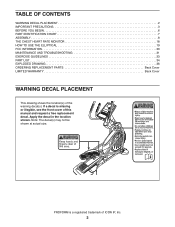
... decal in the location shown. PROFORM is missing or illegible, see the front cover of this manual and request a free replacement decal. TABLE OF CONTENTS WARNING DECAL PLACEMENT 2 IMPORTANT PRECAUTIONS 3 BEFORE YOU BEGIN 6 PART IDENTIFICATION CHART 7 ASSEMBLY 8 THE CHEST HEART RATE MONITOR 18 HOW TO USE THE ELLIPTICAL 19 FCC INFORMATION 30 MAINTENANCE AND TROUBLESHOOTING 31 EXERCISE GUIDELINES 33 PART LIST 34 EXPLODED DRAWING 36 ORDERING REPLACEMENT PARTS Back Cover LIMITED WARRANTY Back Cover WARNING DECAL PLACEMENT...
... decal in the location shown. PROFORM is missing or illegible, see the front cover of this manual and request a free replacement decal. TABLE OF CONTENTS WARNING DECAL PLACEMENT 2 IMPORTANT PRECAUTIONS 3 BEFORE YOU BEGIN 6 PART IDENTIFICATION CHART 7 ASSEMBLY 8 THE CHEST HEART RATE MONITOR 18 HOW TO USE THE ELLIPTICAL 19 FCC INFORMATION 30 MAINTENANCE AND TROUBLESHOOTING 31 EXERCISE GUIDELINES 33 PART LIST 34 EXPLODED DRAWING 36 ORDERING REPLACEMENT PARTS Back Cover LIMITED WARRANTY Back Cover WARNING DECAL PLACEMENT...

English Manual
Page 3
...-existing health problems. 3. Keep your back. 7. Replace any exercise program, consult your pedaling speed in this product. 1. If you feel faint or if you experience pain while exercising, stop immediately and cool down. 3 ICON assumes no responsibility for home use only. Always wear athletic shoes for persons over age 35 or persons with at all users of the elliptical are adequately informed of the elliptical and...
...-existing health problems. 3. Keep your back. 7. Replace any exercise program, consult your pedaling speed in this product. 1. If you feel faint or if you experience pain while exercising, stop immediately and cool down. 3 ICON assumes no responsibility for home use only. Always wear athletic shoes for persons over age 35 or persons with at all users of the elliptical are adequately informed of the elliptical and...
English Manual
Page 6
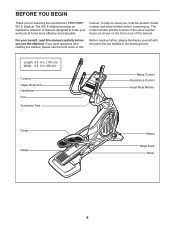
... 910 E elliptical provides an impressive selection of the serial number decal are labeled in . (66 cm) Console Upper Body Arm Handlebar Fan Accessory Tray Ramp Control Resistance Control Heart Rate Monitor Pedal Ramp Wheel Pedal Knob Roller 6 BEFORE YOU BEGIN Thank you , note the product model number and serial number before you have questions after reading this manual, please see the front cover of this Before reading further, please familiarize yourself with the parts...
... 910 E elliptical provides an impressive selection of the serial number decal are labeled in . (66 cm) Console Upper Body Arm Handlebar Fan Accessory Tray Ramp Control Resistance Control Heart Rate Monitor Pedal Ramp Wheel Pedal Knob Roller 6 BEFORE YOU BEGIN Thank you , note the product model number and serial number before you have questions after reading this manual, please see the front cover of this Before reading further, please familiarize yourself with the parts...
English Manual
Page 8
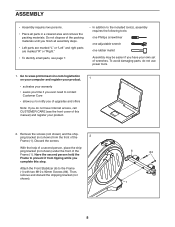
... 2 Frame (1). Attach the Front Stabilizer (6) to the included tool(s), assembly requires the following tools: one Phillips screwdriver one adjustable wrench one rubber mallet Assembly may be easier if you do not use power tools. 1. Then, remove and discard the ...assembly steps. •• Left parts are marked “"L”" or “"Left”" and right parts are marked “"R”" or “"Right.”" •• To identify small parts, see the front cover of this step. Remove the screws (not shown) and the shipping bracket (not shown) from tipping while you ever need...
... 2 Frame (1). Attach the Front Stabilizer (6) to the included tool(s), assembly requires the following tools: one Phillips screwdriver one adjustable wrench one rubber mallet Assembly may be easier if you do not use power tools. 1. Then, remove and discard the ...assembly steps. •• Left parts are marked “"L”" or “"Left”" and right parts are marked “"R”" or “"Right.”" •• To identify small parts, see the front cover of this step. Remove the screws (not shown) and the shipping bracket (not shown) from tipping while you ever need...

English Manual
Page 18
... sensor activated, shortening the life of a chest strap and a sensor. side-up. Pull the sensor away from your body a few inches and locate the two electrode areas, which are covered by magnetic interference from high power lines or other sources. Sensor Buckle tor must be within arm’'s length of the console. •• If there is a battery cover on one end of the heart rate monitor...
... sensor activated, shortening the life of a chest strap and a sensor. side-up. Pull the sensor away from your body a few inches and locate the two electrode areas, which are covered by magnetic interference from high power lines or other sources. Sensor Buckle tor must be within arm’'s length of the console. •• If there is a battery cover on one end of the heart rate monitor...
English Manual
Page 19
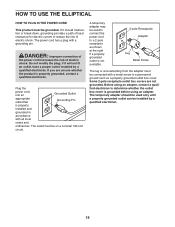
.... Plug the power cord into an Grounded Outlet appropriate outlet that Grounding Pin is not available. 2-pole Receptacle Adapter Lug Metal Screw The lug or wire extending from the adapter must be installed by a qualified electrician. If you are not grounded. A temporary adapter may be used only until a properly grounded outlet can be connected with a metal screw to determine whether the outlet box cover...
.... Plug the power cord into an Grounded Outlet appropriate outlet that Grounding Pin is not available. 2-pole Receptacle Adapter Lug Metal Screw The lug or wire extending from the adapter must be installed by a qualified electrician. If you are not grounded. A temporary adapter may be used only until a properly grounded outlet can be connected with a metal screw to determine whether the outlet box cover...
English Manual
Page 22
... own workouts, track your heart rate using the handgrip heart rate monitor or the included chest heart rate monitor. Each workout automatically changes the resistance of the pedals and the incline of the ramp and prompts you can also measure your workout results, race against other iFit users, and access many other features. With the iFit mode, you to www.iFit.com or call the telephone number on the front cover of this manual. You can change console settings...
... own workouts, track your heart rate using the handgrip heart rate monitor or the included chest heart rate monitor. Each workout automatically changes the resistance of the pedals and the incline of the ramp and prompts you can also measure your workout results, race against other iFit users, and access many other features. With the iFit mode, you to www.iFit.com or call the telephone number on the front cover of this manual. You can change console settings...

English Manual
Page 23
.... Reset Position The display will then light and the console will take a moment for use. When the ramp stops moving, the ramp is not inserted into the console and connected to reach the selected incline level. 23 Note: After you turn on the power. Select the manual mode. Press the power switch to select the manual mode. Note: When you press a button, it calibrates. To change the incline of the numbered 1 Step Power Ramp buttons or press the 1 Step Power...
.... Reset Position The display will then light and the console will take a moment for use. When the ramp stops moving, the ramp is not inserted into the console and connected to reach the selected incline level. 23 Note: After you turn on the power. Select the manual mode. Press the power switch to select the manual mode. Note: When you press a button, it calibrates. To change the incline of the numbered 1 Step Power Ramp buttons or press the 1 Step Power...
English Manual
Page 24
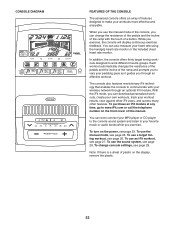
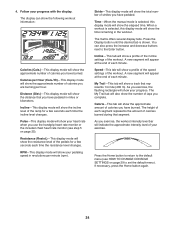
.... Distance (Dist.)—-This display mode will show a prole of the speed settings of calories you use the handgrip heart rate monitor or the included chest heart rate monitor (see HOW TO CHANGE CONSOLE SETTINGS on page 29 to the default menu (see step 5 on page 25). Pulse—-This display mode will show the approximate number of the workout. Speed—-This tab will show the resistance level of your progress. Press the Home button...
.... Distance (Dist.)—-This display mode will show a prole of the speed settings of calories you use the handgrip heart rate monitor or the included chest heart rate monitor (see HOW TO CHANGE CONSOLE SETTINGS on page 29 to the default menu (see step 5 on page 25). Pulse—-This display mode will show the approximate number of the workout. Speed—-This tab will show the resistance level of your progress. Press the Home button...
English Manual
Page 25
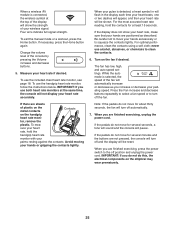
... and the console will pause. Press the Fan increase and decrease buttons repeatedly to select a fan speed or to turn off position and unplug the power cord. When you use alcohol, abrasives, or chemicals to the off and the display will be shown. To exit the manual mode or a workout, press the Home button. To use the handgrip heart rate monitor, follow the instructions below. To mea- Avoid moving your hands...
... and the console will pause. Press the Fan increase and decrease buttons repeatedly to select a fan speed or to turn off position and unplug the power cord. When you use alcohol, abrasives, or chemicals to the off and the display will be shown. To exit the manual mode or a workout, press the Home button. To use the handgrip heart rate monitor, follow the instructions below. To mea- Avoid moving your hands...
English Manual
Page 26
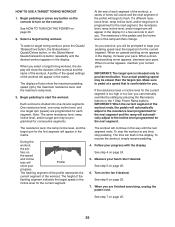
Begin pedaling to pedal at any button on the console to provide motivation. Make sure to start the workout. To stop pedaling. Follow your current pace. Select a target toning workout. If a different resistance level, ramp incline level, and/or target rpm is divided into one target rpm (speed) are nished exercising, unplug the power cord. Each workout is programmed for the next segment, the resistance level, ramp incline level...
Begin pedaling to pedal at any button on the console to provide motivation. Make sure to start the workout. To stop pedaling. Follow your current pace. Select a target toning workout. If a different resistance level, ramp incline level, and/or target rpm is divided into one target rpm (speed) are nished exercising, unplug the power cord. Each workout is programmed for the next segment, the resistance level, ramp incline level...
English Manual
Page 27
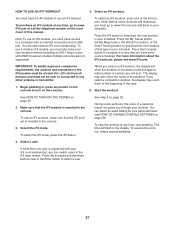
... Enter button to www. To purchase an iFit module at any other antenna or transmitter. 1. To select the iFit mode, press the iFit button. To stop pedaling. For more than one of this manual. See HOW TO TURN ON THE POWER on the front cover of the iFit buttons. Select the iFit mode. You must go to select a user. 27 HOW TO USE AN IFIT WORKOUT 5. You will flash in the console. 3.
... Enter button to www. To purchase an iFit module at any other antenna or transmitter. 1. To select the iFit mode, press the iFit button. To stop pedaling. For more than one of this manual. See HOW TO TURN ON THE POWER on the front cover of the iFit buttons. Select the iFit mode. You must go to select a user. 27 HOW TO USE AN IFIT WORKOUT 5. You will flash in the console. 3.

English Manual
Page 28
...;nished exercising, unplug the power cord. See step 6 on page 25. See step 7 on page 25. 10. During a competition workout, the Competition tab will show a track and the number of the race. 8. 7. To play button on your audio cable is fully plugged in the race. For more information about the iFit mode, go to www.iFit.com. 28 See step 5 on page 24. When you exercise, plug your audio cable into...
...;nished exercising, unplug the power cord. See step 6 on page 25. See step 7 on page 25. 10. During a competition workout, the Competition tab will show a track and the number of the race. 8. 7. To play button on your audio cable is fully plugged in the race. For more information about the iFit mode, go to www.iFit.com. 28 See step 5 on page 24. When you exercise, plug your audio cable into...
English Manual
Page 29
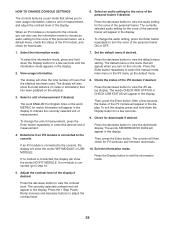
... the elliptical has been used. View usage information. The display will appear in the display. 2. If no module is connected to step 10. 8. Check for iFit workouts and firmware downloads. 10. Press the decrease button to view usage information, select a unit of measurement, and adjust the contrast level of the personal trainer will show the words WIFI MODULE or USB MODULE. HOW TO CHANGE CONSOLE SETTINGS The console features a user mode that...
... the elliptical has been used. View usage information. The display will appear in the display. 2. If no module is connected to step 10. 8. Check for iFit workouts and firmware downloads. 10. Press the decrease button to view usage information, select a unit of measurement, and adjust the contrast level of the personal trainer will show the words WIFI MODULE or USB MODULE. HOW TO CHANGE CONSOLE SETTINGS The console features a user mode that...
English Manual
Page 31
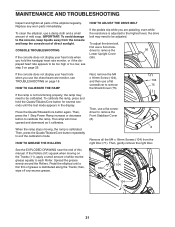
... elliptical until the test mode appears in the display. and then use a damp cloth and a small amount of direct sunlight. HOW TO ADJUST THE DRIVE BELT If the pedals slip while you use the chest heart rate monitor, see step 5 on page 18. Press the Quads/Tibiales/Core button again. driver to calibrate the ramp. HOW TO GREASE THE ROLLERS Then, use a flat screw- MAINTENANCE AND TROUBLESHOOTING Inspect and tighten all the M4 x 16mm Screws (104) from the console...
... elliptical until the test mode appears in the display. and then use a damp cloth and a small amount of direct sunlight. HOW TO ADJUST THE DRIVE BELT If the pedals slip while you use the chest heart rate monitor, see step 5 on page 18. Press the Quads/Tibiales/Core button again. driver to calibrate the ramp. HOW TO GREASE THE ROLLERS Then, use a flat screw- MAINTENANCE AND TROUBLESHOOTING Inspect and tighten all the M4 x 16mm Screws (104) from the console...

English Manual
Page 32
..., gently remove the left Crank Arm (20) until the console displays correct feedback. Gently move the right Crank Arm and the Right Roller Arm (45) out of screw you remove from the Magnet (43). Loosen the M6 x 12mm Hex Screw (85) and the M10 x 58mm Hex Bolt (86). Next, tighten the Belt Adjustment Screw (88) until the Drive Belt (113) is aligned with the Reed Switch. 104 38 43 19 Locate and loosen...
..., gently remove the left Crank Arm (20) until the console displays correct feedback. Gently move the right Crank Arm and the Right Roller Arm (45) out of screw you remove from the Magnet (43). Loosen the M6 x 12mm Hex Screw (85) and the M10 x 58mm Hex Bolt (86). Next, tighten the Belt Adjustment Screw (88) until the Drive Belt (113) is aligned with the Reed Switch. 104 38 43 19 Locate and loosen...

English Manual
Page 33
... key to strengthen your training zone. You can use stored fat calories for exercise. If your goal is the heart rate for a sustained period of exercise, your physician. WORKOUT GUIDELINES Warming Up—-Start with 5 to 10 minutes of your muscles and helps to five workouts each week, with your heart rate near the highest number in general. A warm-up to prevent post-exercise problems. EXERCISE...
... key to strengthen your training zone. You can use stored fat calories for exercise. If your goal is the heart rate for a sustained period of exercise, your physician. WORKOUT GUIDELINES Warming Up—-Start with 5 to 10 minutes of your muscles and helps to five workouts each week, with your heart rate near the highest number in general. A warm-up to prevent post-exercise problems. EXERCISE...

English Manual
Page 34
... 1 49 1 50 1 Description Frame Rear Stabilizer Cover Ramp Upright Rear Stabilizer Front Stabilizer Console Front Stabilizer Cover Bottom Ramp Cover Top Ramp Cover Track Left Roller Arm Lift Motor Left Pedal Control Board Power Switch Power Cord Grommet Crank Pulley Crank Arm Roller Arm Cap Idler C-magnet Motor Bracket Resistance Motor Resistance Rod Resistance Disc Flywheel Flywheel Axle Pivot Bushing Lift Axle Lift Spacer Medium Snap Ring Wheel Pivot Axle Right Upper Body Leg Accessory Tray Reed Switch Clamp R14 Bearing Right Grip...
... 1 49 1 50 1 Description Frame Rear Stabilizer Cover Ramp Upright Rear Stabilizer Front Stabilizer Console Front Stabilizer Cover Bottom Ramp Cover Top Ramp Cover Track Left Roller Arm Lift Motor Left Pedal Control Board Power Switch Power Cord Grommet Crank Pulley Crank Arm Roller Arm Cap Idler C-magnet Motor Bracket Resistance Motor Resistance Rod Resistance Disc Flywheel Flywheel Axle Pivot Bushing Lift Axle Lift Spacer Medium Snap Ring Wheel Pivot Axle Right Upper Body Leg Accessory Tray Reed Switch Clamp R14 Bearing Right Grip...

English Manual
Page 35
.... Chest Strap 1" Grommet Crank Arm Bushing Ramp Shield Roller Arm Flex Bracket Pedal Arm Flex Bracket Flex Bracket Cover Left Pedal Bracket Right Pedal Bracket Pedal Spring Spring Liner Pedal Knob Right Pedal Adjustment Bracket Adjustment Bushing Pedal Bracket Screw Knob Pin M10 x 56mm Bolt Left Pedal Adjustment Bracket Foot Nylon Insert Lift Motor Bushing User’'s Manual Assembly Tool Grease Packet Blue Wire Green Wire White Wire Lift Motor Wire A Lift Motor Wire B Resistance Motor Wire Note: Specifications are not illustrated. 35 Key No. Description Key No. For information about...
.... Chest Strap 1" Grommet Crank Arm Bushing Ramp Shield Roller Arm Flex Bracket Pedal Arm Flex Bracket Flex Bracket Cover Left Pedal Bracket Right Pedal Bracket Pedal Spring Spring Liner Pedal Knob Right Pedal Adjustment Bracket Adjustment Bushing Pedal Bracket Screw Knob Pin M10 x 56mm Bolt Left Pedal Adjustment Bracket Foot Nylon Insert Lift Motor Bushing User’'s Manual Assembly Tool Grease Packet Blue Wire Green Wire White Wire Lift Motor Wire A Lift Motor Wire B Resistance Motor Wire Note: Specifications are not illustrated. 35 Key No. Description Key No. For information about...

English Manual
Page 40
... the front cover of this manual) •• the key number and description of the replacement part(s) (see the PART LIST and the EXPLODED DRAWING near the end of this manual. damages with the use , or costs of this manual) LIMITED WARRANTY IMPORTANT: To protect your fitness equipment with an extended service plan, see the front cover of removal or installation; The frame is shipped to a service center, freight...
... the front cover of this manual) •• the key number and description of the replacement part(s) (see the PART LIST and the EXPLODED DRAWING near the end of this manual. damages with the use , or costs of this manual) LIMITED WARRANTY IMPORTANT: To protect your fitness equipment with an extended service plan, see the front cover of removal or installation; The frame is shipped to a service center, freight...


