
Uk Manual
Page 3
... connecting the power cord (see page 9), plug the power cord into an earthed circuit. A 13 amp fuse should not be used or oxygen is turned off position when the treadmill is properly assembled. (See ASSEMBLY on page 6, and HOW TO FOLD AND MOVE THE TREADMILL on page 5 for speed and/or incline changes. Always remove the key, unplug the power cord, and move the treadmill. 19. It is the responsibility of the owner to...
... connecting the power cord (see page 9), plug the power cord into an earthed circuit. A 13 amp fuse should not be used or oxygen is turned off position when the treadmill is properly assembled. (See ASSEMBLY on page 6, and HOW TO FOLD AND MOVE THE TREADMILL on page 5 for speed and/or incline changes. Always remove the key, unplug the power cord, and move the treadmill. 19. It is the responsibility of the owner to...

Uk Manual
Page 4
...-existing health problems. Read all parts of this manual. Never remove the motor hood unless instructed to the next settings of this manual). This is missing or illegible, please call our Customer Service Department to order a free replacement decal (see ORDERING REPLACEMENT PARTS on your physician. Apply the decal in -home use of the treadmill every three months. 24. 21. When using iFIT.com CDs and videos, you are not using . Always remove iFIT...
...-existing health problems. Read all parts of this manual. Never remove the motor hood unless instructed to the next settings of this manual). This is missing or illegible, please call our Customer Service Department to order a free replacement decal (see ORDERING REPLACEMENT PARTS on your physician. Apply the decal in -home use of the treadmill every three months. 24. 21. When using iFIT.com CDs and videos, you are not using . Always remove iFIT...
Uk Manual
Page 5
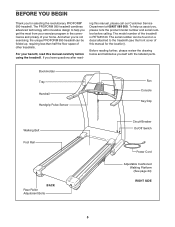
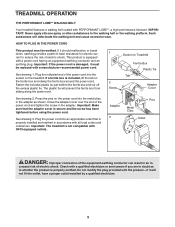
... the front cover of your benefit, read - For your home. To help you get the most from your exercise program in the convenience and privacy of this manual for selecting the revolutionary PROFORM® 990 treadmill. If you for the location). Book Holder Tray Handrail Handgrip Pulse Sensor Fan Console Key/Clip Walking Belt Foot Rail BACK Rear Roller Adjustment Bolts Circuit Breaker On/Off Switch Power Cord Adjustable Cushioned Walking Platform (See...
... the front cover of your benefit, read - For your home. To help you get the most from your exercise program in the convenience and privacy of this manual for selecting the revolutionary PROFORM® 990 treadmill. If you for the location). Book Holder Tray Handrail Handgrip Pulse Sensor Fan Console Key/Clip Walking Belt Foot Rail BACK Rear Roller Adjustment Bolts Circuit Breaker On/Off Switch Power Cord Adjustable Cushioned Walking Platform (See...
Uk Manual
Page 6
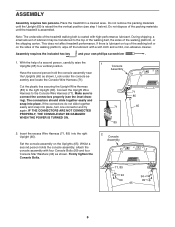
... Upright Wire Harness (85) to connect the connectors properly (see step 1 below). IF THE CONNECTORS ARE NOT CONNECTED PROPERLY, THE CONSOLE MAY BE DAMAGED WHEN THE POWER IS TURNED ON. 71 85 71 65 85 2. ASSEMBLY Assembly requires two persons. Do not dispose of the packing materials until the Upright (65) is coated with high-performance lubricant. With the help of the treadmill walking belt...
... Upright Wire Harness (85) to connect the connectors properly (see step 1 below). IF THE CONNECTORS ARE NOT CONNECTED PROPERLY, THE CONSOLE MAY BE DAMAGED WHEN THE POWER IS TURNED ON. 71 85 71 65 85 2. ASSEMBLY Assembly requires two persons. Do not dispose of the packing materials until the Upright (65) is coated with high-performance lubricant. With the help of the treadmill walking belt...
Uk Manual
Page 8
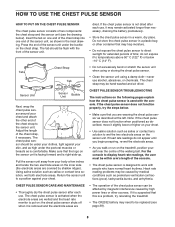
... chest strap may need to wet the two electrode areas on the treadmill, position yourself near the centre of the walking belt. Sensor Unit Sensor Buckle Unit Next, wrap the chest pulse sensor around your chest. CHEST PULSE SENSOR TROUBLESHOOTING The instructions on the chest strap. If heart rate readings do not expose it may trap moisture. • Do not expose the chest pulse sensor to the sensor unit. For the console to display heart rate readings, the user must...
... chest strap may need to wet the two electrode areas on the treadmill, position yourself near the centre of the walking belt. Sensor Unit Sensor Buckle Unit Next, wrap the chest pulse sensor around your chest. CHEST PULSE SENSOR TROUBLESHOOTING The instructions on the chest strap. If heart rate readings do not expose it may trap moisture. • Do not expose the chest pulse sensor to the sensor unit. For the console to display heart rate readings, the user must...
Uk Manual
Page 9
... treadmill features a walking belt coated with a power cord having an equipment-earthing conductor and an earthing plug. See drawing 1. The plastic tie will prevent the ferrite box from sliding along the power cord. 1 Socket on the power cord into an appropriate outlet that the adapter cover is properly installed and earthed in - Important: Make sure that is secure and the screw has been tightened before using...
... treadmill features a walking belt coated with a power cord having an equipment-earthing conductor and an earthing plug. See drawing 1. The plastic tie will prevent the ferrite box from sliding along the power cord. 1 Socket on the power cord into an appropriate outlet that the adapter cover is properly installed and earthed in - Important: Make sure that is secure and the screw has been tightened before using...
Uk Manual
Page 10
... preset programs. Each program automatically controls the speed and incline of the treadmill as a personal trainer guides you exercise, the console will display continuous exercise feedback. To use an iFIT.com CD or video program, see page 17. You can be changed with the touch of a button. To purchase iFIT.com CDs or videocassettes, visit our Web site at www.iFIT.com and access programs directly from your heart rate using the handgrip pulse sensor or the chest pulse sensor...
... preset programs. Each program automatically controls the speed and incline of the treadmill as a personal trainer guides you exercise, the console will display continuous exercise feedback. To use an iFIT.com CD or video program, see page 17. You can be changed with the touch of a button. To purchase iFIT.com CDs or videocassettes, visit our Web site at www.iFIT.com and access programs directly from your heart rate using the handgrip pulse sensor or the chest pulse sensor...
Uk Manual
Page 11
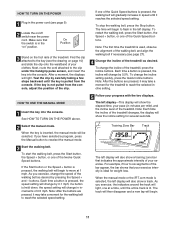
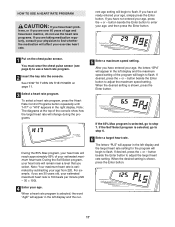
... selected a program, press the Manual button to the clip under the handgrip pulse sensor, and insert the key into the console. Next, route the cord attached to reselect the manual mode. If the key is pulled from the console, adjust the position of the clip. The time will begin . 11 To change the incline setting quickly, press the Quick Incline buttons. Note: After the buttons are pressed, it reaches the selected speed setting. Training Zone Bar Track 3 Start the walking belt. If...
... selected a program, press the Manual button to the clip under the handgrip pulse sensor, and insert the key into the console. Next, route the cord attached to reselect the manual mode. If the key is pulled from the console, adjust the position of the clip. The time will begin . 11 To change the incline setting quickly, press the Quick Incline buttons. Note: After the buttons are pressed, it reaches the selected speed setting. Training Zone Bar Track 3 Start the walking belt. If...
Uk Manual
Page 12
... accurate heart rate reading, con- Do not use the handgrip pulse sensor or the chest pulse sensor. To turn on page 24. To change the unit of the elapsed time. The incline must be at high speed, press the button a second time. Next, remove the key from the console. Note: The pulse bar is folded to the lowest setting. To turn off the demo mode. Note: A few minutes after the key is removed, the console is stopped, the...
... accurate heart rate reading, con- Do not use the handgrip pulse sensor or the chest pulse sensor. To turn on page 24. To change the unit of the elapsed time. The incline must be at high speed, press the button a second time. Next, remove the key from the console. Note: The pulse bar is folded to the lowest setting. To turn off the demo mode. Note: A few minutes after the key is removed, the console is stopped, the...
Uk Manual
Page 14
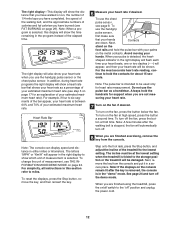
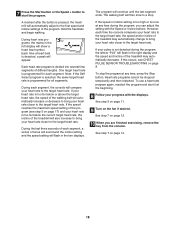
... key is removed, the console is at the lowest setting. To stop the program at 1 mph. To restart the program, press the Start button or the Speed + button. See step 6 on page 12. 6 Turn on page 11. 5 Measure your progress with the displays. When you are finished using the treadmill, press the on/off switch to flash in a secure place. The walking belt will begin to the "off the demo mode. When the program...
... key is removed, the console is at the lowest setting. To stop the program at 1 mph. To restart the program, press the Start button or the Speed + button. See step 6 on page 12. 6 Turn on page 11. 5 Measure your progress with the displays. When you are finished using the treadmill, press the on/off switch to flash in a secure place. The walking belt will begin to the "off the demo mode. When the program...
Uk Manual
Page 17
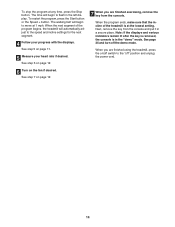
... and have been inactive, do not use a heart rate program. 2 Insert the key into the console. You must wear the chest pulse sensor (see page 8) to adjust the target heart rate setting. button beside the Enter button to use the heart rate programs. If you have not entered your age, the letters "SPd" will appear in the left display and the maximum speed setting of the program will begin to find whether the...
... and have been inactive, do not use a heart rate program. 2 Insert the key into the console. You must wear the chest pulse sensor (see page 8) to adjust the target heart rate setting. button beside the Enter button to use the heart rate programs. If you have not entered your age, the letters "SPd" will appear in the left display and the maximum speed setting of the program will begin to find whether the...
Uk Manual
Page 18
... each time the console compares your heart rate to the target heart rate, the speed and/or incline of the walking belt will then slow to a stop the program at the beginning. 8 Follow your heart rate to the target heart rate. 7 Press the Start button or the Speed + button to start it at any time during the program, the letters "PLS" will automatically adjust to the first speed and incline settings of the program (see CHEST PULSE SENSOR TROUBLESHOOTING on the...
... each time the console compares your heart rate to the target heart rate, the speed and/or incline of the walking belt will then slow to a stop the program at the beginning. 8 Follow your heart rate to the target heart rate. 7 Press the Start button or the Speed + button to start it at any time during the program, the letters "PLS" will automatically adjust to the first speed and incline settings of the program (see CHEST PULSE SENSOR TROUBLESHOOTING on the...
Uk Manual
Page 21
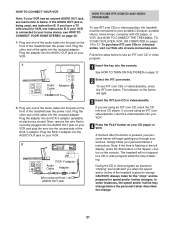
... video program whilst the time is pressed, your personal trainer will light. To purchase iFIT.com CDs or videocassettes, visit our Web site at electronics stores). AUDIO OUT RIGHT LEFT Audio Adapter Cable See HOW TO TURN ON THE POWER on the button will begin guiding you through your workout. The indicator on page 11. 2 Select the iFIT.com mode. Plug one end of the treadmill near the power cord...
... video program whilst the time is pressed, your personal trainer will light. To purchase iFIT.com CDs or videocassettes, visit our Web site at electronics stores). AUDIO OUT RIGHT LEFT Audio Adapter Cable See HOW TO TURN ON THE POWER on the button will begin guiding you through your workout. The indicator on page 11. 2 Select the iFIT.com mode. Plug one end of the treadmill near the power cord...
Uk Manual
Page 22
... left display. Note: If the speed or incline of the CD or video program. CAUTION: Always remove iFIT.com CDs and videocassettes from your progress with the displays. To stop and the time will stop the walking belt at any time by pressing the Speed or Incline buttons on the console. If the time is heard, the speed and incline will change to the next settings of the treadmill does not change when...
... left display. Note: If the speed or incline of the CD or video program. CAUTION: Always remove iFIT.com CDs and videocassettes from your progress with the displays. To stop and the time will stop the walking belt at any time by pressing the Speed or Incline buttons on the console. If the time is heard, the speed and incline will change to the next settings of the treadmill does not change when...
Uk Manual
Page 23
... change to step 5. Follow the steps below to flash in the left display. To use a program from our Web site. 1 Insert the key into the console. Hold the handrails, step onto the walking belt, and begin to use a program from our Web site, press the iFIT.com button. To restart the program, press the Start button or the Speed + button. See step 7 on page 11. 2 Select the iFIT.com mode. See HOW TO TURN ON THE POWER...
... change to step 5. Follow the steps below to flash in the left display. To use a program from our Web site. 1 Insert the key into the console. Hold the handrails, step onto the walking belt, and begin to use a program from our Web site, press the iFIT.com button. To restart the program, press the Start button or the Speed + button. See step 7 on page 11. 2 Select the iFIT.com mode. See HOW TO TURN ON THE POWER...
Uk Manual
Page 26
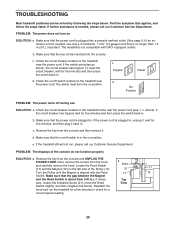
... Reed 17 12 Switch. TROUBLESHOOTING Most treadmill problems can be in the on position. Check the on/off switch located on the treadmill frame near the power cord. c. Remove the key from the hood and carefully remove the hood. Next, remove the screws from the console and UNPLUG THE POWER CORD. If neces- Top sary, loosen the indicated Screw (21), move the Reed View Switch slightly, and then retighten the Screw. Make sure that the key...
... Reed 17 12 Switch. TROUBLESHOOTING Most treadmill problems can be in the on position. Check the on/off switch located on the treadmill frame near the power cord. c. Remove the key from the hood and carefully remove the hood. Next, remove the screws from the console and UNPLUG THE POWER CORD. If neces- Top sary, loosen the indicated Screw (21), move the Reed View Switch slightly, and then retighten the Screw. Make sure that the key...
Uk Manual
Page 27
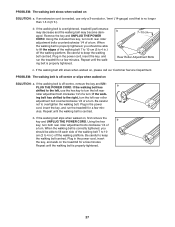
Using the included hex key, turn both rear roller adjustment bolts clockwise 1/4 of a turn . Plug in the power cord, insert the key, and run the treadmill for a few minutes. if the walk- Plug in .) off the walking platform. If the walking belt slips when walked on , please call our Customer Service Department. Using the hex key, turn both rear roller adjustment bolts counterclockwise 1/4 of a turn . If an extension cord is needed, use the hex key to turn the left rear roller adjustment bolt counterclockwise 1/2 of the walking belt 7 to 10 cm...
Using the included hex key, turn both rear roller adjustment bolts clockwise 1/4 of a turn . Plug in the power cord, insert the key, and run the treadmill for a few minutes. if the walk- Plug in .) off the walking platform. If the walking belt slips when walked on , please call our Customer Service Department. Using the hex key, turn both rear roller adjustment bolts counterclockwise 1/4 of a turn . If an extension cord is needed, use the hex key to turn the left rear roller adjustment bolt counterclockwise 1/2 of the walking belt 7 to 10 cm...

Uk Manual
Page 29
.... To find the proper heart rate for exercise. The lower two numbers are not medical devices. For maximum fat burning, adjust the speed or incline of 35 or individuals with at a relatively low intensity level for aerobic exercise. For aerobic exercise, adjust the speed or incline of the treadmill until your heart rate is especially important for fat burning; A proper warm-up -Start each workout with 5 to 60...
.... To find the proper heart rate for exercise. The lower two numbers are not medical devices. For maximum fat burning, adjust the speed or incline of 35 or individuals with at a relatively low intensity level for aerobic exercise. For aerobic exercise, adjust the speed or incline of the treadmill until your heart rate is especially important for fat burning; A proper warm-up -Start each workout with 5 to 60...

Uk Manual
Page 30
... Cover Console Console Base Fan Pulse Bar Screw Belly Pan Screw Upright Wire Harness Shock Cushion Adj. PART LIST-Model No. PETL85140 To locate the parts listed below, see the EXPLODED DRAWING on pages 32 to 35. Screw Roller Adj. Wheel Upright Endcap Power Cord Adapter Latch Warning Decal Incline Motor Motor Pivot Bushing Fan Screw Console Star Washer Tie Holder Tie 8" Cable Tie Base Pad Console Bolt Circuit Breaker 30 R0904A Description 1 2 Foot Rail 2 4 Foot Screw 3 1 Audio Wire 4 2 Isolator 5 1 Latch Housing Cover 6 1 Platform 7 2 Walking Platform Screw 8 1 Walking Belt...
... Cover Console Console Base Fan Pulse Bar Screw Belly Pan Screw Upright Wire Harness Shock Cushion Adj. PART LIST-Model No. PETL85140 To locate the parts listed below, see the EXPLODED DRAWING on pages 32 to 35. Screw Roller Adj. Wheel Upright Endcap Power Cord Adapter Latch Warning Decal Incline Motor Motor Pivot Bushing Fan Screw Console Star Washer Tie Holder Tie 8" Cable Tie Base Pad Console Bolt Circuit Breaker 30 R0904A Description 1 2 Foot Rail 2 4 Foot Screw 3 1 Audio Wire 4 2 Isolator 5 1 Latch Housing Cover 6 1 Platform 7 2 Walking Platform Screw 8 1 Walking Belt...
Uk Manual
Page 36
... product (PROFORM® 990 treadmill) • The SERIAL NUMBER of the product (see the front cover of this manual) • The KEY NUMBER AND DESCRIPTION OF THE PART(S) (see the EXPLODED DRAWING and the PART LIST on pages 30 to 35) Part No. 210604 R0904A Printed in USA © 2004 ICON IP, Inc. ORDERING REPLACEMENT PARTS To order replacement parts, contact the ICON Health & Fitness, Ltd. office, or write: ICON Health & Fitness, Ltd...
... product (PROFORM® 990 treadmill) • The SERIAL NUMBER of the product (see the front cover of this manual) • The KEY NUMBER AND DESCRIPTION OF THE PART(S) (see the EXPLODED DRAWING and the PART LIST on pages 30 to 35) Part No. 210604 R0904A Printed in USA © 2004 ICON IP, Inc. ORDERING REPLACEMENT PARTS To order replacement parts, contact the ICON Health & Fitness, Ltd. office, or write: ICON Health & Fitness, Ltd...

