

User Manual
Page 2
TABLE OF CONTENTS IMPORTANT PRECAUTIONS 3 BEFORE YOU BEGIN 4 ASSEMBLY 5 HOW TO USE THE ELLIPTICAL CROSSTRAINER 10 MAINTENANCE AND TROUBLESHOOTING 20 CONDITIONING GUIDELINES 21 PART LIST 22 EXPLODED DRAWING 23 HOW TO ORDER REPLACEMENT PARTS Back Cover LIMITED WARRANTY Back Cover PROFORM is a registered trademark of ICON Health & Fitness, Inc. 2
TABLE OF CONTENTS IMPORTANT PRECAUTIONS 3 BEFORE YOU BEGIN 4 ASSEMBLY 5 HOW TO USE THE ELLIPTICAL CROSSTRAINER 10 MAINTENANCE AND TROUBLESHOOTING 20 CONDITIONING GUIDELINES 21 PART LIST 22 EXPLODED DRAWING 23 HOW TO ORDER REPLACEMENT PARTS Back Cover LIMITED WARRANTY Back Cover PROFORM is a registered trademark of ICON Health & Fitness, Inc. 2
User Manual
Page 3
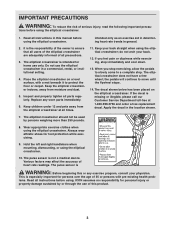
..., with pre-existing health problems. Read all precautions. 3. Always wear athletic shoes for home use the elliptical crosstrainer in this product. 3 The pulse sensor is the responsibility of all instructions before using . tions before using the elliptical crosstrainer. 1. Keep the elliptical crosstrainer indoors, away from the elliptical crosstrainer at 1-800-999-3756 and order a free replacement decal. Inspect and properly tighten all instructions in a commercial, rental, or institutional setting. 4. Apply the decal...
..., with pre-existing health problems. Read all precautions. 3. Always wear athletic shoes for home use the elliptical crosstrainer in this product. 3 The pulse sensor is the responsibility of all instructions before using . tions before using the elliptical crosstrainer. 1. Keep the elliptical crosstrainer indoors, away from the elliptical crosstrainer at 1-800-999-3756 and order a free replacement decal. Inspect and properly tighten all instructions in a commercial, rental, or institutional setting. 4. Apply the decal...
User Manual
Page 4
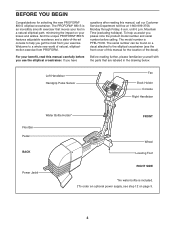
... elliptical path, minimizing the impact on page 9. 4 The PROFORM® 880 S is PFEL71030. To help you , please note the product model number and serial number before you have questions after reading this manual for selecting the new PROFORM® 880 S elliptical crosstrainer. Mountain Time (excluding holidays). And the unique PROFORM® 880 S features adjustable resistance and a state-of-the-art console to the elliptical crosstrainer (see step 12 on your exercise...
... elliptical path, minimizing the impact on page 9. 4 The PROFORM® 880 S is PFEL71030. To help you , please note the product model number and serial number before you have questions after reading this manual for selecting the new PROFORM® 880 S elliptical crosstrainer. Mountain Time (excluding holidays). And the unique PROFORM® 880 S features adjustable resistance and a state-of-the-art console to the elliptical crosstrainer (see step 12 on your exercise...
User Manual
Page 5
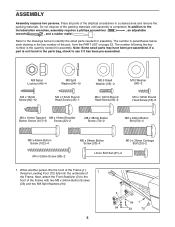
... Button Screws (33) and two M8 Split Washers (94). 5 3 94 1 94 33 72 Next, attach the Front Stabilizer (3) to the drawings below each drawing is the key number of the packing materials until assembly is the quantity needed for assembly. Refer to the front of 1 the Frame. Do not dispose of the part, from the PART LIST on page 22. The number...
... Button Screws (33) and two M8 Split Washers (94). 5 3 94 1 94 33 72 Next, attach the Front Stabilizer (3) to the drawings below each drawing is the key number of the packing materials until assembly is the quantity needed for assembly. Refer to the front of 1 the Frame. Do not dispose of the part, from the PART LIST on page 22. The number...

User Manual
Page 6
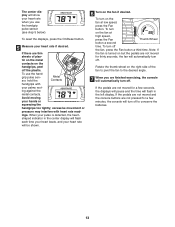
... the Rear Stabilizer (4). 1 Attach the Rear Stabilizer (4) to the Front Stabilizer with two M4 x 52mm Screws (98). 1 14 14 3 98 3. Be careful to avoid disconnecting or pinching the Wire Harnesses. Slide the Stabilizer Cover (31) onto the Frame (1). 2 Next, move and lift each Flex Bar (14) out of a second person, carefully tip the elliptical crosstrainer back to avoid damaging the Wire Harnesses...
... the Rear Stabilizer (4). 1 Attach the Rear Stabilizer (4) to the Front Stabilizer with two M4 x 52mm Screws (98). 1 14 14 3 98 3. Be careful to avoid disconnecting or pinching the Wire Harnesses. Slide the Stabilizer Cover (31) onto the Frame (1). 2 Next, move and lift each Flex Bar (14) out of a second person, carefully tip the elliptical crosstrainer back to avoid damaging the Wire Harnesses...

User Manual
Page 7
... shown, and press the small tabs on the indicated side. See assembly step 5 above. Identify the Left Handlebar (9), which are seated in the left Handlebar Leg (79). Identify the Left and Right Handlebars (9, 10), which is turned so the hexagonal holes are seated in the left Flex Bar (14) with the Union Bolt Set (27). Tighten the two M8 x 43mm Button Bolts (50) in...
... shown, and press the small tabs on the indicated side. See assembly step 5 above. Identify the Left Handlebar (9), which are seated in the left Handlebar Leg (79). Identify the Left and Right Handlebars (9, 10), which is turned so the hexagonal holes are seated in the left Flex Bar (14) with the Union Bolt Set (27). Tighten the two M8 x 43mm Button Bolts (50) in...

User Manual
Page 9
... Screws (66). Note: Some hardware may cause the Console to the Console 11 (5) with all parts of batteries. Plug one end of the power supply into the battery clips; Press four batteries into the jack at the rear of the elliptical crosstrainer (see the inset drawing). Do not over after assembly is properly installed in the same way. 110 109 12. alkaline batteries are properly tightened. tighten the Screws...
... Screws (66). Note: Some hardware may cause the Console to the Console 11 (5) with all parts of batteries. Plug one end of the power supply into the battery clips; Press four batteries into the jack at the rear of the elliptical crosstrainer (see the inset drawing). Do not over after assembly is properly installed in the same way. 110 109 12. alkaline batteries are properly tightened. tighten the Screws...
User Manual
Page 11
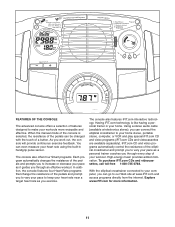
... heart rate using the built-in your home stereo, portable stereo, computer, or VCR and play special iFIT.com CD and video programs (iFIT.com CDs and videocassettes are available separately). With the elliptical crosstrainer connected to your computer, you to increase or decrease your workout. When the manual mode of the console is like having a personal trainer in handgrip pulse sensor. The console also offers four Smart programs. Each program...
... heart rate using the built-in your home stereo, portable stereo, computer, or VCR and play special iFIT.com CD and video programs (iFIT.com CDs and videocassettes are available separately). With the elliptical crosstrainer connected to your computer, you to increase or decrease your workout. When the manual mode of the console is like having a personal trainer in handgrip pulse sensor. The console also offers four Smart programs. Each program...

User Manual
Page 12
... lower section of the left display.) 2 Select the manual mode. Press the Resistance + button to the next every few seconds for Heart Rate program 4), the display will show the distance you pedal, change from our Web site, see page 19. Note: After the buttons are ten resistance levels; To turn on the console, press the On/Reset button or begin pedaling. (The On/Reset button is the most challenging. In addition, an indicator bar will change...
... lower section of the left display.) 2 Select the manual mode. Press the Resistance + button to the next every few seconds for Heart Rate program 4), the display will show the distance you pedal, change from our Web site, see page 19. Note: After the buttons are ten resistance levels; To turn on the console, press the On/Reset button or begin pedaling. (The On/Reset button is the most challenging. In addition, an indicator bar will change...
User Manual
Page 13
... the metal contacts on the fan at low speed, press the Fan button. shaped indicator in the left display. If the pedals are not moved and the console buttons are not pressed for a few minutes, the console will turn off to the desired angle. 7 When you use the handgrip pulse sensor, hold the Metal Contacts handgrips with heart rate read- If there are thin sheets of...
... the metal contacts on the fan at low speed, press the Fan button. shaped indicator in the left display. If the pedals are not moved and the console buttons are not pressed for a few minutes, the console will turn off to the desired angle. 7 When you use the handgrip pulse sensor, hold the Metal Contacts handgrips with heart rate read- If there are thin sheets of...

User Manual
Page 14
...). See step 1 on , the manual mode will be slower than the tar- To select a Smart program, press the Program button repeatedly until one of the Smart programs. Each time the console is intended only to provide a goal. To restart the program, resume pedaling. 4 Follow your exercise program. Important: The target pace is turned on page 12. 2 Select one segment of the indicator bar appears at...
...). See step 1 on , the manual mode will be slower than the tar- To select a Smart program, press the Program button repeatedly until one of the Smart programs. Each time the console is intended only to provide a goal. To restart the program, resume pedaling. 4 Follow your exercise program. Important: The target pace is turned on page 12. 2 Select one segment of the indicator bar appears at...
User Manual
Page 15
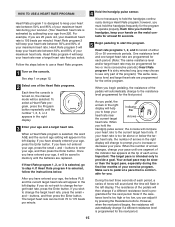
... or too low, you may be selected. See step 1 on , the manual mode will then change if a different resistance level is programmed for the entire program. To select a Heart Rate program, press the Program button repeatedly until the number 1, 2, 3, or 4 appears in the left display. If your age and a target heart rate. Your actual pace may choose to use a Heart Rate program. 1 Turn on the metal contacts for each arrow. During the...
... or too low, you may be selected. See step 1 on , the manual mode will then change if a different resistance level is programmed for the entire program. To select a Heart Rate program, press the Program button repeatedly until the number 1, 2, 3, or 4 appears in the left display. If your age and a target heart rate. Your actual pace may choose to use a Heart Rate program. 1 Turn on the metal contacts for each arrow. During the...
User Manual
Page 16
... OUT PHONES Audio Cable Headphones B. B PHONES PHONES Audio Cable 1/8" Y-adapter Headphones 16 The program will automatically turn off. See step 4 on your home computer. See page 18 for connecting instructions. Note: During Heart Rate programs, an indicator will end. HOW TO CONNECT YOUR CD PLAYER, VCR, OR COMPUTER To use iFIT.com videocassettes, the elliptical crosstrainer must be connected to show your heart rate as a percentage of the Y-adapter. To use iFIT.com programs directly from our...
... OUT PHONES Audio Cable Headphones B. B PHONES PHONES Audio Cable 1/8" Y-adapter Headphones 16 The program will automatically turn off. See step 4 on your home computer. See page 18 for connecting instructions. Note: During Heart Rate programs, an indicator will end. HOW TO CONNECT YOUR CD PLAYER, VCR, OR COMPUTER To use iFIT.com videocassettes, the elliptical crosstrainer must be connected to show your heart rate as a percentage of the Y-adapter. To use iFIT.com programs directly from our...

User Manual
Page 17
... plug the wire into the unused side of the audio cable into the other end of the Y-adapter. HOW TO CONNECT YOUR PORTABLE STEREO HOW TO CONNECT YOUR HOME STEREO Note: If your stereo has an RCA-type AUDIO OUT jack, see instruction A below . If the LINE OUT jack is currently plugged into the adapter. Plug your headphones into the jack beneath the console. Plug...
... plug the wire into the unused side of the audio cable into the other end of the Y-adapter. HOW TO CONNECT YOUR PORTABLE STEREO HOW TO CONNECT YOUR HOME STEREO Note: If your stereo has an RCA-type AUDIO OUT jack, see instruction A below . If the LINE OUT jack is currently plugged into the adapter. Plug your headphones into the jack beneath the console. Plug...

User Manual
Page 18
... beneath the console. IN VIDEO AUDIO IN CH 34 OUT RF OUT Headphones/Speakers RCA Y-adapter Audio Cable Adapter Wire removed from AUDIO OUT jack 18 If your computer has a 1/8" LINE OUT jack, see instruction A. If you have a TV with a built-in VCR, see instruction B. Plug one end of the Y-adapter. IN VIDEO AUDIO IN CH 34 OUT RF OUT AUDIO OUT RIGHT LEFT Adapter B. HOW TO CONNECT YOUR...
... beneath the console. IN VIDEO AUDIO IN CH 34 OUT RF OUT Headphones/Speakers RCA Y-adapter Audio Cable Adapter Wire removed from AUDIO OUT jack 18 If your computer has a 1/8" LINE OUT jack, see instruction A. If you have a TV with a built-in VCR, see instruction B. Plug one end of the Y-adapter. IN VIDEO AUDIO IN CH 34 OUT RF OUT AUDIO OUT RIGHT LEFT Adapter B. HOW TO CONNECT YOUR...

User Manual
Page 19
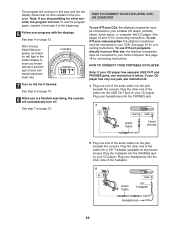
... workout. See step 5 on page 13. 1 Turn on , the manual mode will begin guiding you through your personal trainer's instructions. 8 When you to use an iFIT.com video program. A moment after the play iFIT.com programs directly from our Web site, press the iFIT.com button. To use programs from our Web site. 1 Turn on page 14). A list of your computer. Follow the steps below to play button is turned on the console. Note: If the resistance...
... workout. See step 5 on page 13. 1 Turn on , the manual mode will begin guiding you through your personal trainer's instructions. 8 When you to use an iFIT.com video program. A moment after the play iFIT.com programs directly from our Web site, press the iFIT.com button. To use programs from our Web site. 1 Turn on page 14). A list of your computer. Follow the steps below to play button is turned on the console. Note: If the resistance...

User Manual
Page 20
... tighten all parts of the elliptical crosstrainer, use , Leveling Foot turn off. Never use alcohol, abrasives, or chemicals. 20 3 Go to your computer and start an internet connection. 4 Start your Web browser, if necessary, and go to our Web site at www.iFIT.com. 5 Follow the desired links on our Web site to select a program. 6 Follow the on-line instructions to the size and weight...
... tighten all parts of the elliptical crosstrainer, use , Leveling Foot turn off. Never use alcohol, abrasives, or chemicals. 20 3 Go to your computer and start an internet connection. 4 Start your Web browser, if necessary, and go to our Web site at www.iFIT.com. 5 Follow the desired links on our Web site to select a program. 6 Follow the on-line instructions to the size and weight...
User Manual
Page 21
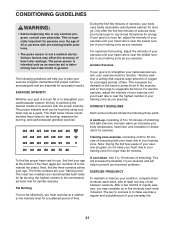
...-existing health problems. • The pulse sensor is to 10 minutes of your training zone. This is especially important for aerobic exercise. Next, find your heart rate as an exercise aid in determining heart rate trends in your everyday life. 21 Various factors may complete up increases your body temperature, heart rate, and circulation in your condition, complete three workouts each week if desired. Training zone exercise...
...-existing health problems. • The pulse sensor is to 10 minutes of your training zone. This is especially important for aerobic exercise. Next, find your heart rate as an exercise aid in determining heart rate trends in your everyday life. 21 Various factors may complete up increases your body temperature, heart rate, and circulation in your condition, complete three workouts each week if desired. Training zone exercise...

User Manual
Page 22
... back cover of this manual for information about ordering replacement parts. 22 PFEL71030 R1203A Key No. Description Key No. Description Key No. Qty. Specifications are subject to change without notice. Description 1 1 Frame 2 1 Upright 3 1 Front Stabilizer 4 1 Rear Stabilizer 5 1 Console 6 1 Left Side Shield 7 1 Right Side Shield 8 1 Rear Left Side Shield 9 1 Left Handlebar 10 1 Right Handlebar 11 2 Foam Grip 12 1 Right Pedal 13 1 Left Pedal 14 2 Flex Bar 15 2 Pedal Knob 16 2 Rear Flex Bracket...
... back cover of this manual for information about ordering replacement parts. 22 PFEL71030 R1203A Key No. Description Key No. Description Key No. Qty. Specifications are subject to change without notice. Description 1 1 Frame 2 1 Upright 3 1 Front Stabilizer 4 1 Rear Stabilizer 5 1 Console 6 1 Left Side Shield 7 1 Right Side Shield 8 1 Rear Left Side Shield 9 1 Left Handlebar 10 1 Right Handlebar 11 2 Foam Grip 12 1 Right Pedal 13 1 Left Pedal 14 2 Flex Bar 15 2 Pedal Knob 16 2 Rear Flex Bracket...
User Manual
Page 24
... © 2003 ICON Health & Fitness, Inc. Accordingly, the above limitation may not apply to give the following information when calling: • The MODEL NUMBER of the product (PFEL71030) • The NAME of the product (PROFORM® 880 S elliptical crosstrainer) • The SERIAL NUMBER of the product (see page 22) LIMITED WARRANTY ICON Health & Fitness, Inc. (ICON), warrants this manual) • The KEY NUMBER and DESCRIPTION of enjoyment or use and service conditions, for commercial...
... © 2003 ICON Health & Fitness, Inc. Accordingly, the above limitation may not apply to give the following information when calling: • The MODEL NUMBER of the product (PFEL71030) • The NAME of the product (PROFORM® 880 S elliptical crosstrainer) • The SERIAL NUMBER of the product (see page 22) LIMITED WARRANTY ICON Health & Fitness, Inc. (ICON), warrants this manual) • The KEY NUMBER and DESCRIPTION of enjoyment or use and service conditions, for commercial...

