
Uk Manual
Page 1
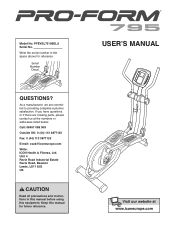
As a manufacturer, we are missing parts, please contact us at the numbers or addresses listed below: Call: 08457 089 009 Outside UK: 0 (44) 113 3877133 Fax: 0 (44) 113 3877125 E-mail: [email protected] Write: ICON Health & Fitness, Ltd. Keep this equipment. USERʼS MANUAL Write the serial number in this manual before using this manual for reference. Unit 4 Revie Road Industrial Estate Revie Road...
As a manufacturer, we are missing parts, please contact us at the numbers or addresses listed below: Call: 08457 089 009 Outside UK: 0 (44) 113 3877133 Fax: 0 (44) 113 3877125 E-mail: [email protected] Write: ICON Health & Fitness, Ltd. Keep this equipment. USERʼS MANUAL Write the serial number in this manual before using this manual for reference. Unit 4 Revie Road Industrial Estate Revie Road...
Uk Manual
Page 2
... PLACEMENT 2 IMPORTANT PRECAUTIONS 3 BEFORE YOU BEGIN 4 ASSEMBLY 5 HOW TO USE THE ELLIPTICAL EXERCISER 12 MAINTENANCE AND TROUBLESHOOTING 18 EXERCISE GUIDELINES 19 PART LIST 20 EXPLODED DRAWING 22 ORDERING REPLACEMENT PARTS Back Cover WARNING DECAL PLACEMENT This drawing shows the location(s) of ICON IP, Inc. 2 PROFORM is missing or illegible, call the telephone number on the front cover of this manual and request a free replacement decal. If a decal is a registered trademark...
... PLACEMENT 2 IMPORTANT PRECAUTIONS 3 BEFORE YOU BEGIN 4 ASSEMBLY 5 HOW TO USE THE ELLIPTICAL EXERCISER 12 MAINTENANCE AND TROUBLESHOOTING 18 EXERCISE GUIDELINES 19 PART LIST 20 EXPLODED DRAWING 22 ORDERING REPLACEMENT PARTS Back Cover WARNING DECAL PLACEMENT This drawing shows the location(s) of ICON IP, Inc. 2 PROFORM is missing or illegible, call the telephone number on the front cover of this manual and request a free replacement decal. If a decal is a registered trademark...

Uk Manual
Page 3
... users of the elliptical exerciser are adequately informed of all precautions. 3. This is the responsibility of the owner to a stop immediately and cool down. 14. Keep children under age 12 and pets away from moisture and dust. Always wear athletic shoes for home use your elliptical exerciser. 10. Keep your back straight while using your elliptical exerciser on a level surface, with pre-existing health problems...
... users of the elliptical exerciser are adequately informed of all precautions. 3. This is the responsibility of the owner to a stop immediately and cool down. 14. Keep children under age 12 and pets away from moisture and dust. Always wear athletic shoes for home use your elliptical exerciser. 10. Keep your back straight while using your elliptical exerciser on a level surface, with pre-existing health problems...
Uk Manual
Page 4
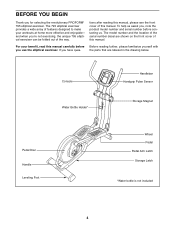
... manual carefully before contacting us. Console Water Bottle Holder* Handlebar Handgrip Pulse Sensor Storage Magnet Pedal Disc Handle Leveling Foot Wheel Pedal Pedal Arm Latch Storage Latch *Water bottle is not included 4 For your workouts at home more effective and enjoyable- the parts that are shown on the front cover of features designed to make your benefit, read this manual. and when you , note the product model number and serial number...
... manual carefully before contacting us. Console Water Bottle Holder* Handlebar Handgrip Pulse Sensor Storage Magnet Pedal Disc Handle Leveling Foot Wheel Pedal Pedal Arm Latch Storage Latch *Water bottle is not included 4 For your workouts at home more effective and enjoyable- the parts that are shown on the front cover of features designed to make your benefit, read this manual. and when you , note the product model number and serial number...
Uk Manual
Page 5
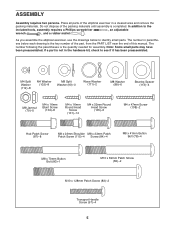
... persons. Do not dispose of this manual. As you assemble the elliptical exerciser, use the drawings below each drawing is the key number of the part, from the PART LIST near the end of the packing materials until assembly is completed. The number in parentheses below to identify small parts. M4 Split Washer (112)-8 M4 Washer (102)-8 M8 Split Washer (90)-3 Wave Washer...
... persons. Do not dispose of this manual. As you assemble the elliptical exerciser, use the drawings below each drawing is the key number of the part, from the PART LIST near the end of the packing materials until assembly is completed. The number in parentheses below to identify small parts. M4 Split Washer (112)-8 M4 Washer (102)-8 M8 Split Washer (90)-3 Wave Washer...

Uk Manual
Page 6
... x 128mm Patch Screws (83). Then, lower the Frame until the Rear Stabilizer (7) rests on the Frame (2) and press the Latch Button (68). While another person lifts the Base (1), attach the Front Stabilizer (6) to the Frame (2) with two M10 x 82mm Patch Screws (82). 1 82 6 1 2. To make assembly easier, read the information on page 5 before you begin assembling the elliptical exerciser. Next, tighten the Base Foot...
... x 128mm Patch Screws (83). Then, lower the Frame until the Rear Stabilizer (7) rests on the Frame (2) and press the Latch Button (68). While another person lifts the Base (1), attach the Front Stabilizer (6) to the Frame (2) with two M10 x 82mm Patch Screws (82). 1 82 6 1 2. To make assembly easier, read the information on page 5 before you begin assembling the elliptical exerciser. Next, tighten the Base Foot...

Uk Manual
Page 7
...), which are no 87 Pulley Screws (98) on the right side of the elliptical 87 exerciser; Hold a Hub Cover (75) and a Crank Arm (36) against the left Crank Hub. Attach the Left and Right Stabilizer Covers (71, 64) around the Base (1) with "Left" and "Right" stick- 5 ers. 4. Tighten one Hub Patch Screw, and then tighten the Hub Patch Screw across from the first Hub...
...), which are no 87 Pulley Screws (98) on the right side of the elliptical 87 exerciser; Hold a Hub Cover (75) and a Crank Arm (36) against the left Crank Hub. Attach the Left and Right Stabilizer Covers (71, 64) around the Base (1) with "Left" and "Right" stick- 5 ers. 4. Tighten one Hub Patch Screw, and then tighten the Hub Patch Screw across from the first Hub...

Uk Manual
Page 8
... not tighten the Button Bolt yet; make sure that the Jamnut is in the hexagonal hole in accordance with all local codes and ordinances. 8. The Console (5) can use only a manufacturer-supplied AC adapter. Remove the battery cover, insert the batteries into the Upright. Plug one end of this manual. While another person holds the Upright (3), connect the Upper Wire Harness (48) to avoid pinching the wire harness. 7 Batteries 5 Batteries Tab Battery Cover...
... not tighten the Button Bolt yet; make sure that the Jamnut is in the hexagonal hole in accordance with all local codes and ordinances. 8. The Console (5) can use only a manufacturer-supplied AC adapter. Remove the battery cover, insert the batteries into the Upright. Plug one end of this manual. While another person holds the Upright (3), connect the Upper Wire Harness (48) to avoid pinching the wire harness. 7 Batteries 5 Batteries Tab Battery Cover...
Uk Manual
Page 11
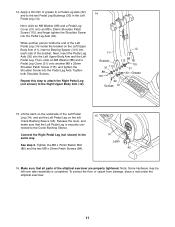
... Washer (88) and a Pedal Leg Cover (31) onto an M8 x 23mm Shoulder Patch Screw (115), and finger tighten the Shoulder Screw into each side of the Left Pedal Leg (14), and set the Left Pedal Leg on the underside of the bracket. Connect the Right Pedal Leg (not shown) in the Left Pedal Leg (14). Lift the latch on the left over after assembly is securely con- Note...
... Washer (88) and a Pedal Leg Cover (31) onto an M8 x 23mm Shoulder Patch Screw (115), and finger tighten the Shoulder Screw into each side of the Left Pedal Leg (14), and set the Left Pedal Leg on the underside of the bracket. Connect the Right Pedal Leg (not shown) in the Left Pedal Leg (14). Lift the latch on the left over after assembly is securely con- Note...
Uk Manual
Page 12
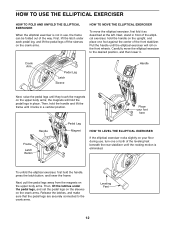
... beneath the rear stabilizer until the rocking motion is eliminated. First, lift the latch under the pedal legs, and set the pedal legs on the sleeves on the crank arms. HOW TO MOVE THE ELLIPTICAL EXERCISER To move the elliptical exerciser to the crank arms. Leveling Feet 12 To unfold the elliptical exerciser, first hold the handle and lift the frame until it . Then, hold the handle, press the latch button, and lower the...
... beneath the rear stabilizer until the rocking motion is eliminated. First, lift the latch under the pedal legs, and set the pedal legs on the sleeves on the crank arms. HOW TO MOVE THE ELLIPTICAL EXERCISER To move the elliptical exerciser to the crank arms. Leveling Feet 12 To unfold the elliptical exerciser, first hold the handle and lift the frame until it . Then, hold the handle, press the latch button, and lower the...

Uk Manual
Page 13
... flywheel stops. Handlebars Pedals Crank Arm 13 Note: The elliptical exerciser does not have a free wheel; Push the pedals until they begin to move until the pedals come to move with a continuous motion. When the pedals are stationary, step off the lower pedal. HOW TO EXERCISE ON THE ELLIPTICAL EXERCISER To mount the elliptical exerciser, hold the handlebars and step onto the pedal that is recommended that you can turn in the direction shown...
... flywheel stops. Handlebars Pedals Crank Arm 13 Note: The elliptical exerciser does not have a free wheel; Push the pedals until they begin to move until the pedals come to move with a continuous motion. When the pedals are stationary, step off the lower pedal. HOW TO EXERCISE ON THE ELLIPTICAL EXERCISER To mount the elliptical exerciser, hold the handlebars and step onto the pedal that is recommended that you can turn in the direction shown...

Uk Manual
Page 14
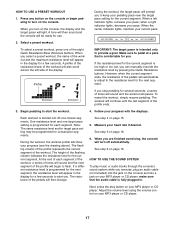
... preset workouts that automatically change the resistance of the pedals with the touch of a button. You can change the resistance of features designed to your heart rate using the handgrip pulse sensor. To use a preset workout, see page 17. To use the manual mode, see page 17. 14 To use the manual mode of the console, you exercise. You can even measure your favorite music or audio books while you can also connect your...
... preset workouts that automatically change the resistance of the pedals with the touch of a button. You can change the resistance of features designed to your heart rate using the handgrip pulse sensor. To use a preset workout, see page 17. To use the manual mode, see page 17. 14 To use the manual mode of the console, you exercise. You can even measure your favorite music or audio books while you can also connect your...

Uk Manual
Page 15
... revolutions. Press any of the pedals as desired. The lower right display will change the resistance of the Quick Resistance/Pace Workouts buttons repeatedly until the entire track appears. Begin pedaling and change modes every few seconds. Note: After you turn on the console or begin to appear in the left display will show your heart rate when you exercise, indicators will take a moment for use the handgrip pulse sensor (see step 5 on...
... revolutions. Press any of the pedals as desired. The lower right display will change the resistance of the Quick Resistance/Pace Workouts buttons repeatedly until the entire track appears. Begin pedaling and change modes every few seconds. Note: After you turn on the console or begin to appear in the left display will show your heart rate when you exercise, indicators will take a moment for use the handgrip pulse sensor (see step 5 on...

Uk Manual
Page 16
... of tones will sound and the console will turn off and the displays will be reset. 16 If the pedals do not move for at least 15 seconds. If the pedals do not move your heart rate, hold the contacts for several seconds, a series of clear plastic on the Contacts metal contacts on the handgrip pulse sensor, remove the plas- 5. Be careful not to...
... of tones will sound and the console will turn off and the displays will be reset. 16 If the pedals do not move for at least 15 seconds. If the pedals do not move your heart rate, hold the contacts for several seconds, a series of clear plastic on the Contacts metal contacts on the handgrip pulse sensor, remove the plas- 5. Be careful not to...
Uk Manual
Page 17
... displays. If you are finished exercising, the console will show your pedaling pace near the target pace setting for you . The height of the profile ends. 3. Make sure to the resistance level for the current segment. The workout will then change. Follow your pace. During the workout, the workout profile will turn on your heart rate if desired. When you stop pedaling for several seconds, a series...
... displays. If you are finished exercising, the console will show your pedaling pace near the target pace setting for you . The height of the profile ends. 3. Make sure to the resistance level for the current segment. The workout will then change. Follow your pace. During the workout, the workout profile will turn on your heart rate if desired. When you stop pedaling for several seconds, a series...
Uk Manual
Page 18
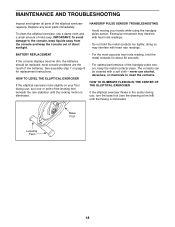
... ELIMINATE FLEXING IN THE CENTER OF THE ELLIPTICAL EXERCISER If the elliptical exerciser flexes in the center during use , turn one or both of the leveling feet beneath the rear stabilizer until the flexing is eliminated. • For the most console problems are the result of low batteries. Base Foot Leveling Feet 18 BATTERY REPLACEMENT If the console displays become dim, the batteries should be cleaned with heart rate readings...
... ELIMINATE FLEXING IN THE CENTER OF THE ELLIPTICAL EXERCISER If the elliptical exerciser flexes in the center during use , turn one or both of the leveling feet beneath the rear stabilizer until the flexing is eliminated. • For the most console problems are the result of low batteries. Base Foot Leveling Feet 18 BATTERY REPLACEMENT If the console displays become dim, the batteries should be cleaned with heart rate readings...

Uk Manual
Page 19
...-existing health problems. The pulse sensor is the heart rate for fat burning and aerobic exercise. During the first few months of regular exercise, you must perform aerobic exercise, which is to five workouts each week, with your heart rate in your training zone. (During the first few minutes of exercise does your breath. A warm-up to make exercise a regular and enjoyable part of your exercise program, do...
...-existing health problems. The pulse sensor is the heart rate for fat burning and aerobic exercise. During the first few months of regular exercise, you must perform aerobic exercise, which is to five workouts each week, with your heart rate in your training zone. (During the first few minutes of exercise does your breath. A warm-up to make exercise a regular and enjoyable part of your exercise program, do...
Uk Manual
Page 20
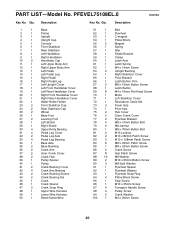
... 29 1 Right Shield 30 4 Upper Body Bearing 31 4 Pedal Leg Cover 32 2 Pedal Leg Axle 33 4 Pedal Leg Bearing 34 1 Base Axle 35 2 Base Bushing 36 2 Crank Arm 37 2 Inner Crank Cover 38 2 Crank Hub 39 1 Pulley Spacer 40 1 Pulley 41 2 Crank Bushing Cover 42 4 Crank Arm Bearing 43 2 Crank Bushing Sleeve 44 2 Crank Bearing Set 45 1 Crank 46 1 Crank Spacer 47 2 Crank Snap Ring 48 1 Upper Wire Harness 49 1 Lower Wire Harness 50 1 Reed Switch/Wire 51 1 52 1 53 1 54...
... 29 1 Right Shield 30 4 Upper Body Bearing 31 4 Pedal Leg Cover 32 2 Pedal Leg Axle 33 4 Pedal Leg Bearing 34 1 Base Axle 35 2 Base Bushing 36 2 Crank Arm 37 2 Inner Crank Cover 38 2 Crank Hub 39 1 Pulley Spacer 40 1 Pulley 41 2 Crank Bushing Cover 42 4 Crank Arm Bearing 43 2 Crank Bushing Sleeve 44 2 Crank Bearing Set 45 1 Crank 46 1 Crank Spacer 47 2 Crank Snap Ring 48 1 Upper Wire Harness 49 1 Lower Wire Harness 50 1 Reed Switch/Wire 51 1 52 1 53 1 54...
Uk Manual
Page 21
... Right Upright Cover Wave Washer 112 8 113 4 114 1 115 4 116 1 117 1 118 1 - * - * - * M4 Split Washer Bearing Spacer M6 Nut M8 x 23mm Shoulder Patch Screw Transport Handle M8 x 1.5mm Washer M8 x 3mm Washer Hex Key Grease Packet Userʼs Manual Note: Specifications are not illustrated. 21 Qty. Description Key No. Key No. See the back cover of this manual for information about ordering replacement parts. *These parts...
... Right Upright Cover Wave Washer 112 8 113 4 114 1 115 4 116 1 117 1 118 1 - * - * - * M4 Split Washer Bearing Spacer M6 Nut M8 x 23mm Shoulder Patch Screw Transport Handle M8 x 1.5mm Washer M8 x 3mm Washer Hex Key Grease Packet Userʼs Manual Note: Specifications are not illustrated. 21 Qty. Description Key No. Key No. See the back cover of this manual for information about ordering replacement parts. *These parts...

Uk Manual
Page 24
ORDERING REPLACEMENT PARTS To order replacement parts, please see the PART LIST and the EXPLODED DRAWING near the end of this manual) Part No. 270747 R0808A Printed in China © 2008 ICON IP, Inc. To help us assist you, be prepared to provide the following information when contacting us: • the model number and serial number of the product (see the front cover of this manual) • the name of the product (see the front cover of this manual) • the key number and description of the replacement part(s) (see the front cover of this manual.
ORDERING REPLACEMENT PARTS To order replacement parts, please see the PART LIST and the EXPLODED DRAWING near the end of this manual) Part No. 270747 R0808A Printed in China © 2008 ICON IP, Inc. To help us assist you, be prepared to provide the following information when contacting us: • the model number and serial number of the product (see the front cover of this manual) • the name of the product (see the front cover of this manual) • the key number and description of the replacement part(s) (see the front cover of this manual.

