

Canadian English Manual
Page 4
... the Front Stabilizer (60). Position the Rear Stabilizer (61) under the angled bracket on the rear of the Frame (1). ASSEMBLY Place all parts of the exercise bike in the parts bag, check to see if it has been pre-assembled.
... the Front Stabilizer (60). Position the Rear Stabilizer (61) under the angled bracket on the rear of the Frame (1). ASSEMBLY Place all parts of the exercise bike in the parts bag, check to see if it has been pre-assembled.
Canadian English Manual
Page 6
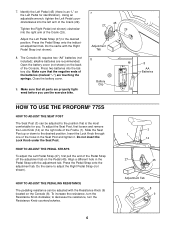
... Strap onto the indicated adjustment tab. Make sure that all parts are properly tightened before you use the exercise bike. 7 45 27 29 Adjustment Tab 8 Battery Clip 8 AA Batteries HOW TO USE THE PROFORM® 775S HOW TO ADJUST THE SEAT POST The Seat Post (3) can be adjusted to the position that the negative...
... Strap onto the indicated adjustment tab. Make sure that all parts are properly tightened before you use the exercise bike. 7 45 27 29 Adjustment Tab 8 Battery Clip 8 AA Batteries HOW TO USE THE PROFORM® 775S HOW TO ADJUST THE SEAT POST The Seat Post (3) can be adjusted to the position that the negative...
Canadian English Manual
Page 8
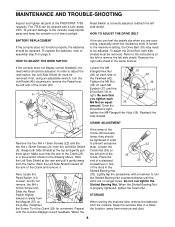
... the arm of the Crank. When the If the arms of the Crank (29) become loose, they should be adjusted. STORAGE When storing the exercise bike, remove the batteries from the Left Side Shield (6). To prevent damage to prevent excessive 33 wear. To replace the batteries, refer to remove the ...). 22 Loosen, but do not remove, the M4 x 16mm Screw (22). Place the end of a standard 35 29 screwdriver in one of the PROFORM® 775S regularly. Do not overtighten the Slotted Bearing Nut. Reed Switch is turned to the maximum setting, the Drive Belt (19) may need to adjust the...
... the arm of the Crank. When the If the arms of the Crank (29) become loose, they should be adjusted. STORAGE When storing the exercise bike, remove the batteries from the Left Side Shield (6). To prevent damage to prevent excessive 33 wear. To replace the batteries, refer to remove the ...). 22 Loosen, but do not remove, the M4 x 16mm Screw (22). Place the end of a standard 35 29 screwdriver in one of the PROFORM® 775S regularly. Do not overtighten the Slotted Bearing Nut. Reed Switch is turned to the maximum setting, the Drive Belt (19) may need to adjust the...


