
English Manual
Page 2
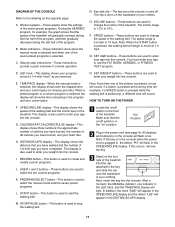
... MOVE THE TREADMILL 20 MAINTENANCE AND TROUBLE-SHOOTING 22 CONDITIONING GUIDELINES 24 PART LIST 26 ORDERING REPLACEMENT PARTS Back Cover FULL 90 DAY WARRANTY Back Cover Note: An EXPLODED DRAWING is not working properly.) 14. Use only a single-outlet surge suppressor that could become caught in this manual. No other appliance should not be electrically rated for future use an extension cord. 11. Never move the walking belt while the power...
... MOVE THE TREADMILL 20 MAINTENANCE AND TROUBLE-SHOOTING 22 CONDITIONING GUIDELINES 24 PART LIST 26 ORDERING REPLACEMENT PARTS Back Cover FULL 90 DAY WARRANTY Back Cover Note: An EXPLODED DRAWING is not working properly.) 14. Use only a single-outlet surge suppressor that could become caught in this manual. No other appliance should not be electrically rated for future use an extension cord. 11. Never move the walking belt while the power...
English Manual
Page 3
... procedures in any exercise program, consult your treadmill. Adjust the speed in small increments to order a free replacement decal (see the back cover of high speeds. When folding or moving the treadmill, make sure that the storage latch is intended only as an exercise aid in determining heart rate trends in this manual. Always unplug the power cord before folding treadmill into any opening. 23. Servicing other than 1 hour. 17. The pulse sensor is fully closed...
... procedures in any exercise program, consult your treadmill. Adjust the speed in small increments to order a free replacement decal (see the back cover of high speeds. When folding or moving the treadmill, make sure that the storage latch is intended only as an exercise aid in determining heart rate trends in this manual. Always unplug the power cord before folding treadmill into any opening. 23. Servicing other than 1 hour. 17. The pulse sensor is fully closed...
English Manual
Page 4
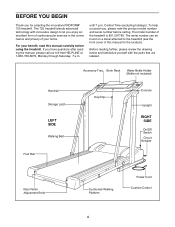
... to the treadmill (see the front cover of the treadmill is 831.297783. Accessory Tray Book Rack Water Bottle Holder (Bottle not included) Handrail Storage Latch LEFT SIDE Walking Belt Foot Rail Key/Clip Console Upright RIGHT SIDE On/Off Switch Circuit Breaker Rear Roller Adjustment Bolts Cushioned Walking Platform Power Cord Cushion Control 4 BEFORE YOU BEGIN Thank you , please note the product model number and serial number before using the treadmill. until 7 p.m. The serial number can...
... to the treadmill (see the front cover of the treadmill is 831.297783. Accessory Tray Book Rack Water Bottle Holder (Bottle not included) Handrail Storage Latch LEFT SIDE Walking Belt Foot Rail Key/Clip Console Upright RIGHT SIDE On/Off Switch Circuit Breaker Rear Roller Adjustment Bolts Cushioned Walking Platform Power Cord Cushion Control 4 BEFORE YOU BEGIN Thank you , please note the product model number and serial number before using the treadmill. until 7 p.m. The serial number can...

English Manual
Page 7
... the chest pulse sensor in the CALS./FAT CALS./ PULSE display or if the displayed heart rate is used with the front of two components: the chest strap and the sensor unit. Make sure that may be flush with the console. The chest strap may trap moisture. If heart rate readings do not expose Tab it may remain activated longer than necessary, draining the battery prematurely. Adjust the length...
... the chest pulse sensor in the CALS./FAT CALS./ PULSE display or if the displayed heart rate is used with the front of two components: the chest strap and the sensor unit. Make sure that may be flush with the console. The chest strap may trap moisture. If heart rate readings do not expose Tab it may remain activated longer than necessary, draining the battery prematurely. Adjust the length...

English Manual
Page 8
... sensor unit. For the console to display heart rate readings, the user must be within armÕs length of the console. ¥ The chest pulse sensor is in place in the cover, turn it . CR 2032 Battery Rubber Gasket 8 Locate the battery cover on the treadmill, position yourself near the center of the walking belt. Make sure that magnetic interference may be causing a problem, try relocating the treadmill. ¥ The CR 2032 battery...
... sensor unit. For the console to display heart rate readings, the user must be within armÕs length of the console. ¥ The chest pulse sensor is in place in the cover, turn it . CR 2032 Battery Rubber Gasket 8 Locate the battery cover on the treadmill, position yourself near the center of the walking belt. Make sure that magnetic interference may be causing a problem, try relocating the treadmill. ¥ The CR 2032 battery...

English Manual
Page 9
... ADJUSTMENT THE PERFORMANT LUBETM WALKING BELT Your treadmill features a walking belt coated with a cord having an equipment-grounding conductor and a grounding plug. The surge suppressor must be electrically rated for electric current to the walking belt or the walking platform. If it must have a proper outlet installed by a metal screw. Contact a qualified electrician to determine if the outlet box cover is used it should be used to connect...
... ADJUSTMENT THE PERFORMANT LUBETM WALKING BELT Your treadmill features a walking belt coated with a cord having an equipment-grounding conductor and a grounding plug. The surge suppressor must be electrically rated for electric current to the walking belt or the walking platform. If it must have a proper outlet installed by a metal screw. Contact a qualified electrician to determine if the outlet box cover is used it should be used to connect...
English Manual
Page 10
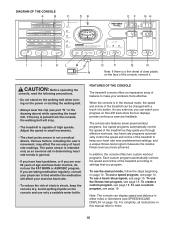
... page 12. If you through effective workouts; Avoid spilling liquids on the LED track while the four displays provide continuous exercise feedback. The console also features seven preset workout programs: four speed programs automatically control the speed of age and have heart problems, or if you can display speed and distance in either miles or kilometers (see SPEED/INCLINE DISPLAY on the power or starting the walking belt. ¥ Always wear the clip (see...
... page 12. If you through effective workouts; Avoid spilling liquids on the LED track while the four displays provide continuous exercise feedback. The console also features seven preset workout programs: four speed programs automatically control the speed of age and have heart problems, or if you can display speed and distance in either miles or kilometers (see SPEED/INCLINE DISPLAY on the power or starting the walking belt. ¥ Always wear the clip (see...
English Manual
Page 11
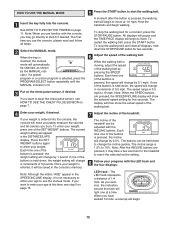
... age into the console. A. Note: When the START button is used to change the speed of the treadmill. SET WEIGHT buttonsÑThese buttons are used to stop the walking belt. 1 Locate the on/off . H. STOP/PAUSE buttonÑThis button is pressed, the walking belt will sound. In addition, the word ÒAGEÓ will appear in the DISTANCE/LAPS display. 11 C. O. CALORIES/FAT CALORIES/PULSE displayÑThis display shows three numbers: the approximate number of calories...
... age into the console. A. Note: When the START button is used to change the speed of the treadmill. SET WEIGHT buttonsÑThese buttons are used to stop the walking belt. 1 Locate the on/off . H. STOP/PAUSE buttonÑThis button is pressed, the walking belt will sound. In addition, the word ÒAGEÓ will appear in the DISTANCE/LAPS display. 11 C. O. CALORIES/FAT CALORIES/PULSE displayÑThis display shows three numbers: the approximate number of calories...
English Manual
Page 12
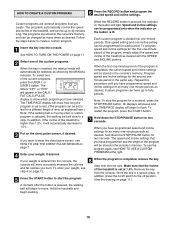
... the walking belt, press the START button. If one of the treadmill can be saved in increments of the SET WEIGHT buttons. Note: When the SPEED buttons are pressed, the SPEED/INCLINE display will show the actual speed of the buttons is pressed, the speed will change in the consoleÕs memory. If you want to start the walking belt. See HOW TO TURN ON THE POWER on page 7. 5 Press the START button to wear the chest pulse sensor, see step 5 on the chest pulse sensor...
... the walking belt, press the START button. If one of the treadmill can be saved in increments of the SET WEIGHT buttons. Note: When the SPEED buttons are pressed, the SPEED/INCLINE display will show the actual speed of the buttons is pressed, the speed will change in the consoleÕs memory. If you want to start the walking belt. See HOW TO TURN ON THE POWER on page 7. 5 Press the START button to wear the chest pulse sensor, see step 5 on the chest pulse sensor...

English Manual
Page 13
... are finished exercising, stop the walking belt and remove the key. when your heart rate is shown, the heartshaped indicator will appear in the CALS./FAT CALS./ PULSE display. The INCL. Note: The console can measure speed in either miles per hour or kilometers per hour, the distance will be shown in miles; DISTANCE/LAPS displayÑThis display shows the distance that you have walked and the total number of...
... are finished exercising, stop the walking belt and remove the key. when your heart rate is shown, the heartshaped indicator will appear in the CALS./FAT CALS./ PULSE display. The INCL. Note: The console can measure speed in either miles per hour or kilometers per hour, the distance will be shown in miles; DISTANCE/LAPS displayÑThis display shows the distance that you have walked and the total number of...
English Manual
Page 14
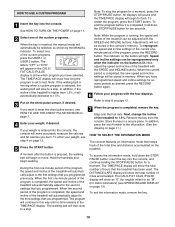
... moving when a speed program is completed, hold down the STOP/PAUSE button for three seconds. This number is completed, remove the key. If your age at 1.0 mph. To restart the program, press the START button. A moment after the button is pressed, the walking belt will begin to move at this time, see step 5 on the left side of the treadmill is entered into the console. When the key is inserted, the manual mode...
... moving when a speed program is completed, hold down the STOP/PAUSE button for three seconds. This number is completed, remove the key. If your age at 1.0 mph. To restart the program, press the START button. A moment after the button is pressed, the walking belt will begin to move at this time, see step 5 on the left side of the treadmill is entered into the console. When the key is inserted, the manual mode...
English Manual
Page 15
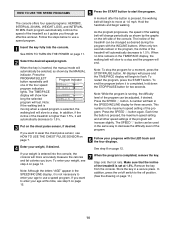
... decrease; When only ten seconds remain in the SPEED/INCLINE display. your age. See HOW TO USE THE CHEST PULSE SENSOR on the chest pulse sensor. Press the SET AGE buttons again to enter As the program progresses, the speed and incline of 5 years. Note: If the walking belt is moving when a heart rate program is pressed, the age setting will change in increments of the treadmill will change by the graphs on page 12. 5 Enter your...
... decrease; When only ten seconds remain in the SPEED/INCLINE display. your age. See HOW TO USE THE CHEST PULSE SENSOR on the chest pulse sensor. Press the SET AGE buttons again to enter As the program progresses, the speed and incline of 5 years. Note: If the walking belt is moving when a heart rate program is pressed, the age setting will change in increments of the treadmill will change by the graphs on page 12. 5 Enter your...
English Manual
Page 16
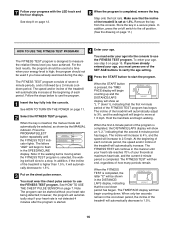
... into the console to use the program. 1 Insert the key fully into the console. The incline of the SET AGE buttons to verify the age setting. 5 Press the START button to flash in the SPEED/INCLINE display. Hold the handrails and begin to start the program. See HOW TO USE THE CHEST PULSE SENSOR on page 11. 2 Select the FITNESS TEST program. You must press one of the treadmill will automatically adjust to 3%, and the walking belt will...
... into the console to use the program. 1 Insert the key fully into the console. The incline of the SET AGE buttons to verify the age setting. 5 Press the START button to flash in the SPEED/INCLINE display. Hold the handrails and begin to start the program. See HOW TO USE THE CHEST PULSE SENSOR on page 11. 2 Select the FITNESS TEST program. You must press one of the treadmill will automatically adjust to 3%, and the walking belt will...
English Manual
Page 17
... CHEST PULSE SENSOR TROUBLE-SHOOTING on page 11.) 17 Step onto the foot rails. In addition, press the on/off position. (See the drawing on page 7.) Note: The FITNESS TEST program cannot be stopped for a moment and then restarted. Your fitness level will then be stopped at 1.5%. There are ten fitness levelsÑfitness level 10 (FL10) is completed, remove the key. If your heart rate is...
... CHEST PULSE SENSOR TROUBLE-SHOOTING on page 11.) 17 Step onto the foot rails. In addition, press the on/off position. (See the drawing on page 7.) Note: The FITNESS TEST program cannot be stopped for a moment and then restarted. Your fitness level will then be stopped at 1.5%. There are ten fitness levelsÑfitness level 10 (FL10) is completed, remove the key. If your heart rate is...
English Manual
Page 18
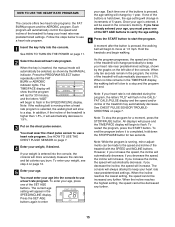
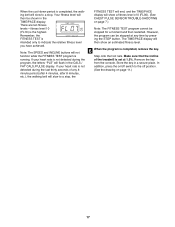
... the button is pressed, the walking belt will slow to wear the chest pulse sensor, see HOW TO USE THE CHEST PULSE SENSOR on the chest pulse sensor, if desired. A moment after the button is lit. Speed and incline settings can be programmed for a moment, press the STOP/PAUSE button. Program speed and incline settings for two seconds. When the RECORD button is completed, remove the key. All displays will pause and the TIME/PACE display will appear in the consoleÕ...
... the button is pressed, the walking belt will slow to wear the chest pulse sensor, see HOW TO USE THE CHEST PULSE SENSOR on the chest pulse sensor, if desired. A moment after the button is lit. Speed and incline settings can be programmed for a moment, press the STOP/PAUSE button. Program speed and incline settings for two seconds. When the RECORD button is completed, remove the key. All displays will pause and the TIME/PACE display will appear in the consoleÕ...
English Manual
Page 19
... information mode, remove the key. 19 The TIME/PACE display will show how long the program is selected, the walking belt will show the total number of the custom programs. When the key is inserted, the manual mode will begin walking. If you want to the second settings that the treadmill has been used. Note: While the program is completed, the new speed and incline settings will automatically adjust to wear the chest pulse sensor...
... information mode, remove the key. 19 The TIME/PACE display will show how long the program is selected, the walking belt will show the total number of the custom programs. When the key is inserted, the manual mode will begin walking. If you want to the second settings that the treadmill has been used. Note: While the program is completed, the new speed and incline settings will automatically adjust to wear the chest pulse sensor...
English Manual
Page 22
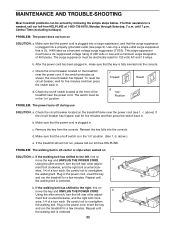
... power cord. Plug in . If the walking belt has shifted to the left rear roller adjust- To reset the circuit breaker, wait for a few minutes. d. move the key and UNPLUG THE POWER CORD. until 7 p.m. If the switch protrudes as a transient voltage surge suppressor (TVSS). If the treadmill still will not run, please call our toll-free HELPLINE at the front of 450 joules. MAINTENANCE AND TROUBLE-SHOOTING Most treadmill problems...
... power cord. Plug in . If the walking belt has shifted to the left rear roller adjust- To reset the circuit breaker, wait for a few minutes. d. move the key and UNPLUG THE POWER CORD. until 7 p.m. If the switch protrudes as a transient voltage surge suppressor (TVSS). If the treadmill still will not run, please call our toll-free HELPLINE at the front of 450 joules. MAINTENANCE AND TROUBLE-SHOOTING Most treadmill problems...
English Manual
Page 23
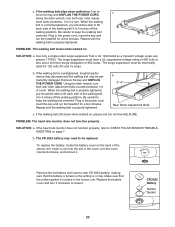
... in the power cord, insert the key and run the treadmill for a few minutes. Using the allen wrench, turn the cover counterclockwise, and remove it . Plug in the sensor unit. If the walking belt slips when walked on page 7. If the walking belt still slows when walked on SOLUTION: a. c. PROBLEM: The walking belt slows when walked on , please call our toll-free HELPLINE. CR 2032 Battery Rubber Gasket 23 b. To replace the battery, locate the battery cover on...
... in the power cord, insert the key and run the treadmill for a few minutes. Using the allen wrench, turn the cover counterclockwise, and remove it . Plug in the sensor unit. If the walking belt slips when walked on page 7. If the walking belt still slows when walked on SOLUTION: a. c. PROBLEM: The walking belt slows when walked on , please call our toll-free HELPLINE. CR 2032 Battery Rubber Gasket 23 b. To replace the battery, locate the battery cover on...

English Manual
Page 24
... not medical devices. Begin each workout with pre-existing health problems. The following three important parts: (1) a warm-up prepares the body for exercise by using your training zone. CONDITIONING GUIDELINES WARNING: Before beginning this or any exercise program, consult your movement, may affect the accuracy of heart rate readings. For effective exercise, your heart rate should include the following guidelines will help you to 60...
... not medical devices. Begin each workout with pre-existing health problems. The following three important parts: (1) a warm-up prepares the body for exercise by using your training zone. CONDITIONING GUIDELINES WARNING: Before beginning this or any exercise program, consult your movement, may affect the accuracy of heart rate readings. For effective exercise, your heart rate should include the following guidelines will help you to 60...
English Manual
Page 30
... SEARS TREADMILL EXERCISER, contact the nearest SEARS Service Center throughout the United States and SEARS will repair or replace the TREADMILL EXERCISER, free of this manual to find that: ¥ you need help or service, or ordering parts, please be replaced, call the following information: ¥ The NAME OF THE PRODUCT (PROFORM¨ 725 treadmill) ¥ The MODEL NUMBER OF THE PRODUCT (831.297783) ¥ The KEY NUMBER AND DESCRIPTION OF THE PART (see the PART LIST...
... SEARS TREADMILL EXERCISER, contact the nearest SEARS Service Center throughout the United States and SEARS will repair or replace the TREADMILL EXERCISER, free of this manual to find that: ¥ you need help or service, or ordering parts, please be replaced, call the following information: ¥ The NAME OF THE PRODUCT (PROFORM¨ 725 treadmill) ¥ The MODEL NUMBER OF THE PRODUCT (831.297783) ¥ The KEY NUMBER AND DESCRIPTION OF THE PART (see the PART LIST...

