
Canadian English Manual
Page 3
... not operate the treadmill where aerosol products are recommended for persons over the age of 35 or persons with pre-existing health problems. 2. The treadmill should be used or where oxygen is intended only as described. 3. Always wear athletic shoes; This is damaged, the walking belt may change speed, accelerate, or stop procedure before using the treadmill (see page 13), plug the power cord into a surge suppressor...
... not operate the treadmill where aerosol products are recommended for persons over the age of 35 or persons with pre-existing health problems. 2. The treadmill should be used or where oxygen is intended only as described. 3. Always wear athletic shoes; This is damaged, the walking belt may change speed, accelerate, or stop procedure before using the treadmill (see page 13), plug the power cord into a surge suppressor...
Canadian English Manual
Page 4
... representative. Servicing other than the procedures in the storage position. 23. This treadmill is running. Do not attempt to raise, lower, or move the treadmill until it is intended for the location of the treadmill regularly. SAVE THESE INSTRUCTIONS 4 Always unplug the power cord immediately after use only. Always remove the key, unplug the power cord, and switch the reset/off position when the treadmill is not in use. (See...
... representative. Servicing other than the procedures in the storage position. 23. This treadmill is running. Do not attempt to raise, lower, or move the treadmill until it is intended for the location of the treadmill regularly. SAVE THESE INSTRUCTIONS 4 Always unplug the power cord immediately after use only. Always remove the key, unplug the power cord, and switch the reset/off position when the treadmill is not in use. (See...

Canadian English Manual
Page 5
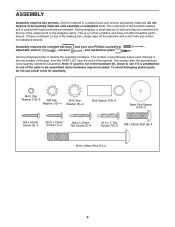
... us . Accessory Tray Handrail Upright Walking Belt Foot Rail Console Pulse Sensor Key/Clip Reset/Off Circuit Breaker Rear Roller Adjustment Bolts Platform Cushion 5 For your workouts at home more effective and enjoyable. The model number and the location of the serial number decal are shown on the front cover of this manual. The 7.0 PERSONAL FITNESS TRAINER treadmill offers a selection of other treadmills. ing this manual, please see the front cover of this manual carefully before contacting us assist...
... us . Accessory Tray Handrail Upright Walking Belt Foot Rail Console Pulse Sensor Key/Clip Reset/Off Circuit Breaker Rear Roller Adjustment Bolts Platform Cushion 5 For your workouts at home more effective and enjoyable. The model number and the location of the serial number decal are shown on the front cover of this manual. The 7.0 PERSONAL FITNESS TRAINER treadmill offers a selection of other treadmills. ing this manual, please see the front cover of this manual carefully before contacting us assist...
Canadian English Manual
Page 6
.... Use the drawings below each drawing is the key number of the part, from the PART LIST near the end of the walking belt or the shipping carton. The number in a cleared area and remove all packing materials. Assembly requires the included hex keys and your own Phillips screwdriver , adjustable wrench , scissors , and needlenose pliers . ASSEMBLY Assembly requires two persons. Note: The underside of the treadmill walking belt is...
.... Use the drawings below each drawing is the key number of the part, from the PART LIST near the end of the walking belt or the shipping carton. The number in a cleared area and remove all packing materials. Assembly requires the included hex keys and your own Phillips screwdriver , adjustable wrench , scissors , and needlenose pliers . ASSEMBLY Assembly requires two persons. Note: The underside of the treadmill walking belt is...

Canadian English Manual
Page 7
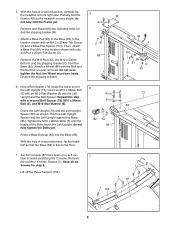
... discard the two indicated bolts (A) and the shipping bracket (B). Attach a Wheel (86) with an M4.2 x 25mm Tek Screw (2) and a Base Pad Spacer (104). the Wheel must turn freely. do not fully fold the Frame yet. Cut the tie securing the Upright Wire (77) to pull the Upright Wire out of a second person, carefully tip the treadmill onto its left side. Make...
... discard the two indicated bolts (A) and the shipping bracket (B). Attach a Wheel (86) with an M4.2 x 25mm Tek Screw (2) and a Base Pad Spacer (104). the Wheel must turn freely. do not fully fold the Frame yet. Cut the tie securing the Upright Wire (77) to pull the Upright Wire out of a second person, carefully tip the treadmill onto its left side. Make...
Canadian English Manual
Page 9
... this step with an M10 Star Washer (8) into the Base (85). Tighten the M10 x 96mm Bolts (5) until the heads of the Left Upright (73). Press a Base Endcap (82) into the Left Upright and the Bolt Spacer. Lift off the Pulse Support (109). 7 1 1 109 1 87 9 5. With the help of a second person, carefully tip the treadmill onto its right side. the Wheel must turn...
... this step with an M10 Star Washer (8) into the Base (85). Tighten the M10 x 96mm Bolts (5) until the heads of the Left Upright (73). Press a Base Endcap (82) into the Left Upright and the Bolt Spacer. Lift off the Pulse Support (109). 7 1 1 109 1 87 9 5. With the help of a second person, carefully tip the treadmill onto its right side. the Wheel must turn...

Canadian English Manual
Page 11
... Ties 77 78 Console Assembly 38 90 Console Wire Console Wire 77 Long Tie 11. Then, tighten all four Bolts. Remove the plastic ties from the console wire. Set the console assembly on the Right Upright (78) and the Left Upright (not shown). If necessary, press the Cage Nuts (38) into place. do not, turn one connector and try again. Remove the long tie from the Upright Wire (77) and the...
... Ties 77 78 Console Assembly 38 90 Console Wire Console Wire 77 Long Tie 11. Then, tighten all four Bolts. Remove the plastic ties from the console wire. Set the console assembly on the Right Upright (78) and the Left Upright (not shown). If necessary, press the Cage Nuts (38) into place. do not, turn one connector and try again. Remove the long tie from the Upright Wire (77) and the...
Canadian English Manual
Page 13
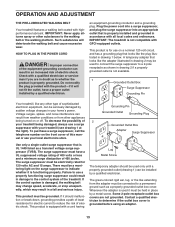
... AND ADJUSTMENT THE PRE-LUBRICATED WALKING BELT Your treadmill features a walking belt coated with a cord having Lug Metal Screw The temporary adapter should malfunction or break down, grounding provides a path of least resistance for use on the surge suppressor to the walking belt or the walking platform. To purchase a surge suppressor, call the telephone number on or off. The surge suppressor must be installed by sudden voltage changes...
... AND ADJUSTMENT THE PRE-LUBRICATED WALKING BELT Your treadmill features a walking belt coated with a cord having Lug Metal Screw The temporary adapter should malfunction or break down, grounding provides a path of least resistance for use on the surge suppressor to the walking belt or the walking platform. To purchase a surge suppressor, call the telephone number on or off. The surge suppressor must be installed by sudden voltage changes...

Canadian English Manual
Page 14
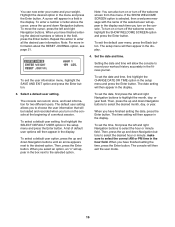
... refer to change the speed and incline of the treadmill with the consoleʼs premium stereo sound system while you get in either miles or kilometers. When you can even measure your heart rate using the treadmill. You can change the unit of measurement, see page 22). To turn on the console, remove the plastic. To use the manual mode, you use the manual mode, see page 21. To use a personal trainer workout, see...
... refer to change the speed and incline of the treadmill with the consoleʼs premium stereo sound system while you get in either miles or kilometers. When you can even measure your heart rate using the treadmill. You can change the unit of measurement, see page 22). To turn on the console, remove the plastic. To use the manual mode, you use the manual mode, see page 21. To use a personal trainer workout, see...

Canadian English Manual
Page 15
... console, adjust the position of your clothes. The setup menu will light. HOW TO TURN ON THE POWER Follow the steps below to the reset position. Next, locate the reset/off the demo mode, hold down , left, or right Navigation (NAV) buttons. Note: To exit the user mode at any time, press the Back button repeatedly until the manual mode is displayed in the display. 15 Switch the circuit breaker to personalize console settings...
... console, adjust the position of your clothes. The setup menu will light. HOW TO TURN ON THE POWER Follow the steps below to the reset position. Next, locate the reset/off the demo mode, hold down , left, or right Navigation (NAV) buttons. Note: To exit the user mode at any time, press the Back button repeatedly until the manual mode is displayed in the display. 15 Switch the circuit breaker to personalize console settings...
Canadian English Manual
Page 16
... desired user information. The default user setting allows you to choose the user information that will allow the console to record your weight. The console will then appear in the setup menu and press the Enter button. When you turn on or turn on the console at the beginning of a workout session. Repeat this menu. Note: For more information about the RESET JOURNAL option, see page 21. Set the...
... desired user information. The default user setting allows you to choose the user information that will allow the console to record your weight. The console will then appear in the setup menu and press the Enter button. When you turn on or turn on the console at the beginning of a workout session. Repeat this menu. Note: For more information about the RESET JOURNAL option, see page 21. Set the...

Canadian English Manual
Page 17
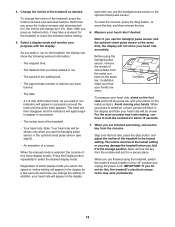
... the numbered Precision Quick Speed buttons, the walking belt will appear. Note: After you exercise, change speed until it . To identify yourself as desired by 0.1 mph; To start the walking belt, press the Start button, the Speed increase button, or one of 0.5 mph. HOW TO USE THE MANUAL MODE 1. Select the manual mode. Press the up and down a button, the speed setting will change in the display for the walking belt to move at 1 mph. If a personal trainer workout has been selected, remove the key...
... the numbered Precision Quick Speed buttons, the walking belt will appear. Note: After you exercise, change speed until it . To identify yourself as desired by 0.1 mph; To start the walking belt, press the Start button, the Speed increase button, or one of 0.5 mph. HOW TO USE THE MANUAL MODE 1. Select the manual mode. Press the up and down a button, the speed setting will change in the display for the walking belt to move at 1 mph. If a personal trainer workout has been selected, remove the key...
Canadian English Manual
Page 18
... you use the handgrip pulse sensor or the optional chest pulse sensor (see step 6). • An animation of a runner. Select a display mode and monitor your progress with your palms on the pulse bar. To reset the console, press the Stop button, remove the key, and then reinsert the key. 6. Before using the treadmill, switch the reset/off circuit breaker to select the desired display mode. For the most accurate heart rate reading, continue to reach the selected incline setting. 5. Change the incline...
... you use the handgrip pulse sensor or the optional chest pulse sensor (see step 6). • An animation of a runner. Select a display mode and monitor your progress with your palms on the pulse bar. To reset the console, press the Stop button, remove the key, and then reinsert the key. 6. Before using the treadmill, switch the reset/off circuit breaker to select the desired display mode. For the most accurate heart rate reading, continue to reach the selected incline setting. 5. Change the incline...
Canadian English Manual
Page 19
... TO USE A PERSONAL TRAINER WORKOUT 1. The walking belt will then slow to alert you are programmed for the second segment, the speed setting and/or incline setting will appear in the display. A small arrow below the profile will appear in the display for consecutive segments. Insert the key into one incline setting are finished exercising, remove the key from the console. Select a display mode and monitor your progress with the display. Select a personal trainer workout. If a different speed setting...
... TO USE A PERSONAL TRAINER WORKOUT 1. The walking belt will then slow to alert you are programmed for the second segment, the speed setting and/or incline setting will appear in the display. A small arrow below the profile will appear in the display for consecutive segments. Insert the key into one incline setting are finished exercising, remove the key from the console. Select a display mode and monitor your progress with the display. Select a personal trainer workout. If a different speed setting...

Canadian English Manual
Page 21
... manual. After you need an iFit Universal iPod Connector. Exit the user mode. Select the user mode. HOW TO USE THE STEREO SOUND SYSTEM This product has been designed specifically to work with iPod and has been certified by the developer to highlight the RESET JOURNAL option and press the Enter button. Make sure that the iFit Universal iPod Connector is fully plugged in the display...
... manual. After you need an iFit Universal iPod Connector. Exit the user mode. Select the user mode. HOW TO USE THE STEREO SOUND SYSTEM This product has been designed specifically to work with iPod and has been certified by the developer to highlight the RESET JOURNAL option and press the Enter button. Make sure that the iFit Universal iPod Connector is fully plugged in the display...

Canadian English Manual
Page 22
... INFORMATION MODE The console features an information mode that keeps track of the total distance that the walking belt has moved and the total number of hours that the walking belt has moved. When the information mode is selected. To purchase the optional chest pulse sensor, call the telephone number on and off the demo mode, press the Speed decrease button. Press the Speed increase button to set the contrast of miles (or kilometers) that the treadmill has been used . To turn on...
... INFORMATION MODE The console features an information mode that keeps track of the total distance that the walking belt has moved and the total number of hours that the walking belt has moved. When the information mode is selected. To purchase the optional chest pulse sensor, call the telephone number on and off the demo mode, press the Speed decrease button. Press the Speed increase button to set the contrast of miles (or kilometers) that the treadmill has been used . To turn on...

Canadian English Manual
Page 26
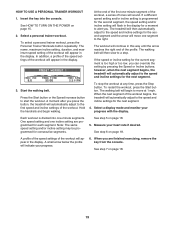
... changing, remove the key. Remove the key and UNPLUG THE POWER CORD. When the walking belt is about 1/8 in . 1 54 Top View 42 44 PROBLEM: The incline of the Pulley (44). Use only a single-outlet surge suppressor that the gap between the Magnet and the Reed Switch is properly tightened, you should be able to lift each edge of the walking belt 2 to 3 in the console, press one of a turn both rear roller bolts...
... changing, remove the key. Remove the key and UNPLUG THE POWER CORD. When the walking belt is about 1/8 in . 1 54 Top View 42 44 PROBLEM: The incline of the Pulley (44). Use only a single-outlet surge suppressor that the gap between the Magnet and the Reed Switch is properly tightened, you should be able to lift each edge of the walking belt 2 to 3 in the console, press one of a turn both rear roller bolts...

Canadian English Manual
Page 28
... your heart rate near the highest number in your training zone. (During the first few minutes of heart rate readings. For detailed exercise information, obtain a reputable book or consult your "training zone." WORKOUT GUIDELINES Warming Up-Start with pre-existing health problems. The pulse sensor is to the nearest ten years). EXERCISE GUIDELINES WARNING: Before beginning this or any exercise program, consult your exercise program. The lowest number is the heart rate for...
... your heart rate near the highest number in your training zone. (During the first few minutes of heart rate readings. For detailed exercise information, obtain a reputable book or consult your "training zone." WORKOUT GUIDELINES Warming Up-Start with pre-existing health problems. The pulse sensor is to the nearest ten years). EXERCISE GUIDELINES WARNING: Before beginning this or any exercise program, consult your exercise program. The lowest number is the heart rate for...
Canadian English Manual
Page 31
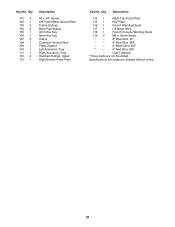
... Console Warning Decal 119 2 M4 x 15mm Screw *- 8" Blue Wire, 2F *- 6" Blue Wire, M/F *- 6" Black Wire, M/F *- 6" Red Wire, M/F *- Qty. Userʼs Manual *These parts are subject to change without notice. 31 Qty. 101 4 102 1 103 2 104 2 105 1 106 1 107 4 108 1 109 1 110 1 111 1 112 2 113 1 Description #3 x 1/4" Screw Lift Frame/Base Ground Wire Frame Endcap Base Pad Spacer 4mm Hex Key 5mm Hex Key Clamp Controller Ground Wire Pulse Support Left...
... Console Warning Decal 119 2 M4 x 15mm Screw *- 8" Blue Wire, 2F *- 6" Blue Wire, M/F *- 6" Black Wire, M/F *- 6" Red Wire, M/F *- Qty. Userʼs Manual *These parts are subject to change without notice. 31 Qty. 101 4 102 1 103 2 104 2 105 1 106 1 107 4 108 1 109 1 110 1 111 1 112 2 113 1 Description #3 x 1/4" Screw Lift Frame/Base Ground Wire Frame Endcap Base Pad Spacer 4mm Hex Key 5mm Hex Key Clamp Controller Ground Wire Pulse Support Left...

Canadian English Manual
Page 36
... to you specific legal rights. Some provinces do not allow limitations on how long an implied warranty lasts. ICON of removal or installation; To help us : • the model number and serial number of the product (see the front cover of this manual) • the name of the product (see the front cover of this manual) • the key number and description of the replacement part(s) (see the...
... to you specific legal rights. Some provinces do not allow limitations on how long an implied warranty lasts. ICON of removal or installation; To help us : • the model number and serial number of the product (see the front cover of this manual) • the name of the product (see the front cover of this manual) • the key number and description of the replacement part(s) (see the...

