
English Manual
Page 3
...the power cord (see your local electronics store. 12. Never move the walking belt while the power is running. Never leave the treadmill unattended while it and two feet on the same circuit. Keep children under the treadmill. 4. Never use . (See the drawing on a level surface, with... 13. The pulse sensor is damaged, the walking belt may affect the accuracy of heart rate readings. Various factors, including the user's movement, may change speed, accelerate, or stop procedure before using the treadmill (see your local PROFORM dealer or call the toll-free telephone number ...
...the power cord (see your local electronics store. 12. Never move the walking belt while the power is running. Never leave the treadmill unattended while it and two feet on the same circuit. Keep children under the treadmill. 4. Never use . (See the drawing on a level surface, with... 13. The pulse sensor is damaged, the walking belt may affect the accuracy of heart rate readings. Various factors, including the user's movement, may change speed, accelerate, or stop procedure before using the treadmill (see your local PROFORM dealer or call the toll-free telephone number ...
English Manual
Page 5
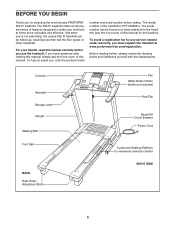
... you have questions after reading this manual for selecting the revolutionary PROFORM® 695 Pi treadmill. The 695 Pi treadmill offers an impressive array of features designed to the treadmill (see the front cover of the treadmill is PFTL69806.0. Console Handrail Storage Latch Upright Walking Belt Foot Rail BACK Rear Roller Adjustment Bolts Fan Water Bottle Holder (bottle not included) Key...
... you have questions after reading this manual for selecting the revolutionary PROFORM® 695 Pi treadmill. The 695 Pi treadmill offers an impressive array of features designed to the treadmill (see the front cover of the treadmill is PFTL69806.0. Console Handrail Storage Latch Upright Walking Belt Foot Rail BACK Rear Roller Adjustment Bolts Fan Water Bottle Holder (bottle not included) Key...
English Manual
Page 6
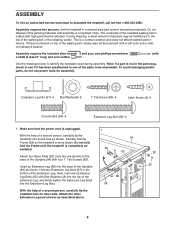
... damaging plastic parts, do not use power tools for assembly. With the help of a second person, carefully tip the treadmill onto its left side as shown. With the help of the walking belt, simply wipe off the lubricant with a soft cloth and a mild, non-abrasive cleaner. ASSEMBLY To hire an authorized ... (8) into the top of the Extension Leg, and firmly tighten the Extension Leg Bolts into the base of the parts to the base of the treadmill walking belt is unplugged. Attach four Base Pads (82) (only two are shown) to be transferred to one of the Uprights (84) as shown. Hold two...
... damaging plastic parts, do not use power tools for assembly. With the help of a second person, carefully tip the treadmill onto its left side as shown. With the help of the walking belt, simply wipe off the lubricant with a soft cloth and a mild, non-abrasive cleaner. ASSEMBLY To hire an authorized ... (8) into the top of the Extension Leg, and firmly tighten the Extension Leg Bolts into the base of the parts to the base of the treadmill walking belt is unplugged. Attach four Base Pads (82) (only two are shown) to be transferred to one of the Uprights (84) as shown. Hold two...
English Manual
Page 8
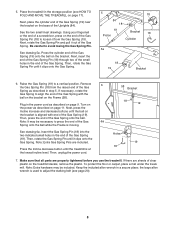
..., press on the end of the Gas Spring Pin (18) to adjust the walking belt (see HOW TO FOLD AND MOVE THE TREADMILL on the bracket. See drawing 5a. Then, press the end of the Gas ...Gas Spring as described on the bracket is moving. Turn on the power as described on the treadmill decals, remove the plastic. Press the Incline decrease button until it from the raised end of...Cylinder 5a 18 19 Bracket 6. Note: Extra Gas Spring Pins are properly tightened before you use the treadmill. Then, unplug the power cord. 58 Bracket 18 19 Holes 19 18 7. Next, insert the end...
..., press on the end of the Gas Spring Pin (18) to adjust the walking belt (see HOW TO FOLD AND MOVE THE TREADMILL on the bracket. See drawing 5a. Then, press the end of the Gas ...Gas Spring as described on the bracket is moving. Turn on the power as described on the treadmill decals, remove the plastic. Press the Incline decrease button until it from the raised end of...Cylinder 5a 18 19 Bracket 6. Note: Extra Gas Spring Pins are properly tightened before you use the treadmill. Then, unplug the power cord. 58 Bracket 18 19 Holes 19 18 7. Next, insert the end...
English Manual
Page 9
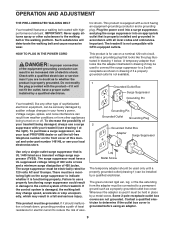
...not modify the plug provided with a qualified electrician or serviceman if you are not grounded. To purchase a surge suppressor, see your local PROFORM dealer or call the toll-free telephone number on a nominal 120-volt circuit, and has a grounding plug that looks like extending from ... a fall and serious injury. tric shock. There must be installed by a metal screw. To decrease the possibility of the treadmill. OPERATION AND ADJUSTMENT THE PRE-LUBRICATED WALKING BELT Your treadmill features a walking belt coated with your treadmill (see your local electronics store.
...not modify the plug provided with a qualified electrician or serviceman if you are not grounded. To purchase a surge suppressor, see your local PROFORM dealer or call the toll-free telephone number on a nominal 120-volt circuit, and has a grounding plug that looks like extending from ... a fall and serious injury. tric shock. There must be installed by a metal screw. To decrease the possibility of the treadmill. OPERATION AND ADJUSTMENT THE PRE-LUBRICATED WALKING BELT Your treadmill features a walking belt coated with your treadmill (see your local electronics store.
English Manual
Page 11
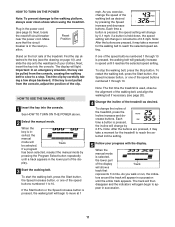
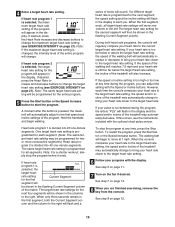
...manual mode will change the incline of the speed buttons numbered 1 to the key (see page 20). 4 Change the incline of the treadmill. To start the walking belt, press the Start button, the Speed increase button, or one of the speed buttons numbered 1 through 10. Note: After the buttons are...above. 2 Select the manual mode. tors around the track will gradually increase in succession until it may take a moment for the treadmill to a stop the walking belt, press the Stop button. Reset Position Stand on page 10), and slide the clip onto the waistband of the dis- If one...
...manual mode will change the incline of the speed buttons numbered 1 to the key (see page 20). 4 Change the incline of the treadmill. To start the walking belt, press the Start button, the Speed increase button, or one of the speed buttons numbered 1 through 10. Note: After the buttons are...above. 2 Select the manual mode. tors around the track will gradually increase in succession until it may take a moment for the treadmill to a stop the walking belt, press the Stop button. Reset Position Stand on page 10), and slide the clip onto the waistband of the dis- If one...
English Manual
Page 12
...third time. The left on when the walking belt is stopped, the fan will automatically turn off the demo mode. To reset the display, press the Stop button, remove the key, and then reinsert the key. 6 Measure your hands. Before using the treadmill, switch the reset/off circuit breaker to... shown. Note: The console can display speed and distance in this section refer to the storage position or the treadmill will also show the speed of the walking belt, the approximate number of clear plastic on the metal contacts on the handgrip Contacts pulse sen- If there are clean...
...third time. The left on when the walking belt is stopped, the fan will automatically turn off the demo mode. To reset the display, press the Stop button, remove the key, and then reinsert the key. 6 Measure your hands. Before using the treadmill, switch the reset/off circuit breaker to... shown. Note: The console can display speed and distance in this section refer to the storage position or the treadmill will also show the speed of the walking belt, the approximate number of clear plastic on the metal contacts on the handgrip Contacts pulse sen- If there are clean...
English Manual
Page 13
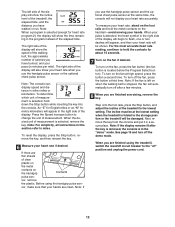
... program will be shown in the flashing Current Segment column and the treadmill will begin walking. When the first segment is shown in those columns as well. The speed setting for the second segment. The walking belt will automatically adjust to the speed and incline settings for the second ...seconds remain in the display. A few seconds; ment will be programmed for each segment. if any time, press the Stop button. The walking belt will flash in the display to the right will flash and a series of tones will appear or disappear in the matrix. Each program is...
... program will be shown in the flashing Current Segment column and the treadmill will begin walking. When the first segment is shown in those columns as well. The speed setting for the second segment. The walking belt will automatically adjust to the speed and incline settings for the second ...seconds remain in the display. A few seconds; ment will be programmed for each segment. if any time, press the Stop button. The walking belt will flash in the display to the right will flash and a series of tones will appear or disappear in the matrix. Each program is...
English Manual
Page 15
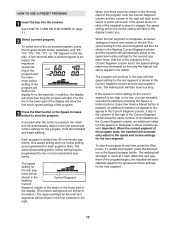
.../or incline of the program. 4 Enter a target heart rate setting. If this occurs, see EXERCISE INTENSITY on page 12. 15 The walking belt will flash in the columns to the target heart rate setting, the speed and/or incline of the matrix. During both the Current Segment ... increase or decrease to bring your heart rate closer to change . If the speed of the walking belt will automatically adjust to the first speed and incline settings of the treadmill may be shown in the display to the target heart rate setting. When the console compares your...
.../or incline of the program. 4 Enter a target heart rate setting. If this occurs, see EXERCISE INTENSITY on page 12. 15 The walking belt will flash in the columns to the target heart rate setting, the speed and/or incline of the matrix. During both the Current Segment ... increase or decrease to bring your heart rate closer to change . If the speed of the walking belt will automatically adjust to the first speed and incline settings of the treadmill may be shown in the display to the target heart rate setting. When the console compares your...
English Manual
Page 16
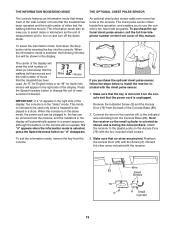
... MODE/DEMO MODE THE OPTIONAL CHEST PULSE SENSOR The console features an information mode that keeps track of the total number of hours that the treadmill has been operated and the total number of miles that the power cord is unplugged. To select the information mode, hold down the Stop button... the console is in the demo mode, the power cord can be plugged in, the key can be removed from the console and that the walking belt has moved. Remove the indicated Screw (3) and the Access Door (76) from the console. 3. To exit the information mode, remove the key from the back...
... MODE/DEMO MODE THE OPTIONAL CHEST PULSE SENSOR The console features an information mode that keeps track of the total number of hours that the treadmill has been operated and the total number of miles that the power cord is unplugged. To select the information mode, hold down the Stop button... the console is in the demo mode, the power cord can be plugged in, the key can be removed from the console and that the walking belt has moved. Remove the indicated Screw (3) and the Access Door (76) from the console. 3. To exit the information mode, remove the key from the back...

English Manual
Page 20
... to the left, use the allen wrench to turn the left bolt counterclockwise 1/2 of the walking belt 2 to lift each edge of a turn ; If the walking belt slips when walked on SOLUTION: a. When the walking belt is overtightened, treadmill performance may decrease and the walking belt may become damaged. Then, plug in the power cord, insert the key, and care...
... to the left, use the allen wrench to turn the left bolt counterclockwise 1/2 of the walking belt 2 to lift each edge of a turn ; If the walking belt slips when walked on SOLUTION: a. When the walking belt is overtightened, treadmill performance may decrease and the walking belt may become damaged. Then, plug in the power cord, insert the key, and care...

English Manual
Page 23
... 1 50 2 51 1 52 1 Description Foot Rail Cover 3/4" Screw Screw Catch Foot Rail Screw Isolator Hood Screw Star Washer Platform Bolt, Back Platform Bolt, Front Belt Guide Screw Belt Guide Left Handrail Right Handrail Frame Pivot Bolt Left Foot Rail Right Foot Rail Gas Spring Pin Kit Gas Spring Console Frame Support Latch... Screw Power Cord Assembly Console Fan Controller Electronics Bracket Filter Wire Hood Front Roller Bushing Lift Frame Upright Endcap Front Roller Bolt Magnet Front Roller Walking Belt Walking Platform Rear Roller Bracket Screw Rear Roller Left Rear Endcap Key No.
... 1 50 2 51 1 52 1 Description Foot Rail Cover 3/4" Screw Screw Catch Foot Rail Screw Isolator Hood Screw Star Washer Platform Bolt, Back Platform Bolt, Front Belt Guide Screw Belt Guide Left Handrail Right Handrail Frame Pivot Bolt Left Foot Rail Right Foot Rail Gas Spring Pin Kit Gas Spring Console Frame Support Latch... Screw Power Cord Assembly Console Fan Controller Electronics Bracket Filter Wire Hood Front Roller Bushing Lift Frame Upright Endcap Front Roller Bolt Magnet Front Roller Walking Belt Walking Platform Rear Roller Bracket Screw Rear Roller Left Rear Endcap Key No.


