

Uk Manual
Page 1
If you have questions, or if there are missing parts, please contact us: Call: 08457 089 009 From Ireland: 053 92 36102 Website: www.iconsupport.eu E-mail: Visit www.iconsupport.eu Write: ICON Health & Fitness, Ltd. USERʼS MANUAL www.iconeurope.com c/o HI Group PLC Express Way Whitwood, West Yorkshire WF10 5QJ UK CAUTION Read all precautions and instructions in the space above for future reference. Serial Number Decal QUESTIONS? Write the serial number in this manual before using this manual for reference. PFEVEL4986.0 Serial No. Model No. Keep this equipment.
If you have questions, or if there are missing parts, please contact us: Call: 08457 089 009 From Ireland: 053 92 36102 Website: www.iconsupport.eu E-mail: Visit www.iconsupport.eu Write: ICON Health & Fitness, Ltd. USERʼS MANUAL www.iconeurope.com c/o HI Group PLC Express Way Whitwood, West Yorkshire WF10 5QJ UK CAUTION Read all precautions and instructions in the space above for future reference. Serial Number Decal QUESTIONS? Write the serial number in this manual before using this manual for reference. PFEVEL4986.0 Serial No. Model No. Keep this equipment.
Uk Manual
Page 2
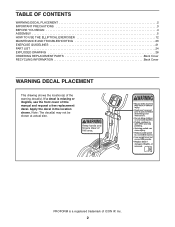
... PLACEMENT 2 IMPORTANT PRECAUTIONS 3 BEFORE YOU BEGIN 4 ASSEMBLY 5 HOW TO USE THE ELLIPTICAL EXERCISER 12 MAINTENANCE AND TROUBLESHOOTING 20 EXERCISE GUIDELINES 21 PART LIST 24 EXPLODED DRAWING 26 ORDERING REPLACEMENT PARTS Back Cover RECYCLING INFORMATION Back Cover WARNING DECAL PLACEMENT This drawing shows the location(s) of ICON IP, Inc. 2 PROFORM is missing or illegible, see the front cover of this manual and request a free replacement decal. If a decal is a registered trademark of...
... PLACEMENT 2 IMPORTANT PRECAUTIONS 3 BEFORE YOU BEGIN 4 ASSEMBLY 5 HOW TO USE THE ELLIPTICAL EXERCISER 12 MAINTENANCE AND TROUBLESHOOTING 20 EXERCISE GUIDELINES 21 PART LIST 24 EXPLODED DRAWING 26 ORDERING REPLACEMENT PARTS Back Cover RECYCLING INFORMATION Back Cover WARNING DECAL PLACEMENT This drawing shows the location(s) of ICON IP, Inc. 2 PROFORM is missing or illegible, see the front cover of this manual and request a free replacement decal. If a decal is a registered trademark of...

Uk Manual
Page 3
...-existing health problems. 2. This is the responsibility of all users of the elliptical exerciser are adequately informed of the owner to a stop immediately and cool down. 7. Do not use of your physician. Wear appropriate clothes while exercising; The pulse sensor is intended only as described in a commercial, rental, or institutional setting. 5. The pulse sensor is not a medical device. When you experience pain while exercising, stop . 3 Place the elliptical exerciser...
...-existing health problems. 2. This is the responsibility of all users of the elliptical exerciser are adequately informed of the owner to a stop immediately and cool down. 7. Do not use of your physician. Wear appropriate clothes while exercising; The pulse sensor is intended only as described in a commercial, rental, or institutional setting. 5. The pulse sensor is not a medical device. When you experience pain while exercising, stop . 3 Place the elliptical exerciser...
Uk Manual
Page 4
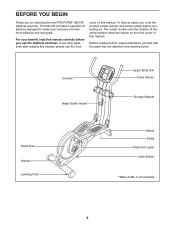
The 690 HR provides a selection of this manual carefully before contacting us. Before reading further, please familiarize yourself with the parts that are shown on the front cover of the serial number decal are labeled in the drawing below. Console Water Bottle Holder* Upper Body Arm Pulse Sensor Storage Magnet Pedal Disc Handle Leveling Foot Wheel Pedal Pedal Arm Latch Latch Button *Water bottle is not included 4 The model number and the location of...
The 690 HR provides a selection of this manual carefully before contacting us. Before reading further, please familiarize yourself with the parts that are shown on the front cover of the serial number decal are labeled in the drawing below. Console Water Bottle Holder* Upper Body Arm Pulse Sensor Storage Magnet Pedal Disc Handle Leveling Foot Wheel Pedal Pedal Arm Latch Latch Button *Water bottle is not included 4 The model number and the location of...
Uk Manual
Page 5
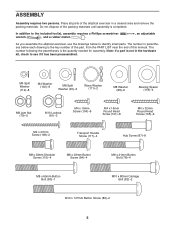
... not dispose of this manual. The number in parentheses below to the included tool(s), assembly requires a Phillips screwdriver wrench , and a rubber mallet . , an adjustable As you assemble the elliptical exerciser, use the drawings below each drawing is the key number of the part, from the PART LIST near the end of the packing materials until assembly is the quantity needed for assembly. M4 Split Washer (112...
... not dispose of this manual. The number in parentheses below to the included tool(s), assembly requires a Phillips screwdriver wrench , and a rubber mallet . , an adjustable As you assemble the elliptical exerciser, use the drawings below each drawing is the key number of the part, from the PART LIST near the end of the packing materials until assembly is the quantity needed for assembly. M4 Split Washer (112...

Uk Manual
Page 6
1. Attach the Rear Stabilizer (7) to the Base with two M10 x 127mm Button Screws (83). 3 Next, hold the handle on page 5 before you begin. To make assembly easier, read the information on the Frame (2) and press the Latch Button (68). Discard the screw 2 and the shipping bracket. Next, turn the Base Foot (26) into the Base (1) as far as possible. 3. Then, lower the Frame...
1. Attach the Rear Stabilizer (7) to the Base with two M10 x 127mm Button Screws (83). 3 Next, hold the handle on page 5 before you begin. To make assembly easier, read the information on the Frame (2) and press the Latch Button (68). Discard the screw 2 and the shipping bracket. Next, turn the Base Foot (26) into the Base (1) as far as possible. 3. Then, lower the Frame...

Uk Manual
Page 7
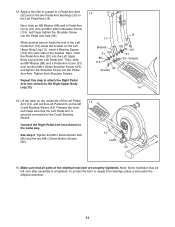
... remaining two Hub Screws. 36 75 Repeat this step on the right side. 43 5. Next, finger tighten two M8 x 23mm Button Screws (84) with two M4 x 16mm Screws (104). 80 90 90 84 3 48 49 79 90 84 104 22 1 7 Attach the Upright (3) with the unused holes in the Hub Cover and the Crank Arm with an M8 x 69mm Button Bolt (80), an...
... remaining two Hub Screws. 36 75 Repeat this step on the right side. 43 5. Next, finger tighten two M8 x 23mm Button Screws (84) with two M4 x 16mm Screws (104). 80 90 90 84 3 48 49 79 90 84 104 22 1 7 Attach the Upright (3) with the unused holes in the Hub Cover and the Crank Arm with an M8 x 69mm Button Bolt (80), an...
Uk Manual
Page 11
... Left Pedal Arm. Repeat this step to attach the Right Pedal Arm (not shown) to the two Pedal Arm Bushings (33) in the same way. Connect the Right Pedal Arm (not shown) in the Left Pedal Arm (14). Lift the latch on the underside of the elliptical exerciser are properly tightened. To protect the floor or carpet from damage, place a mat under the elliptical exerciser. 11 Tighten the M8 x 69mm Button Bolt...
... Left Pedal Arm. Repeat this step to attach the Right Pedal Arm (not shown) to the two Pedal Arm Bushings (33) in the same way. Connect the Right Pedal Arm (not shown) in the Left Pedal Arm (14). Lift the latch on the underside of the elliptical exerciser are properly tightened. To protect the floor or carpet from damage, place a mat under the elliptical exerciser. 11 Tighten the M8 x 69mm Button Bolt...
Uk Manual
Page 12
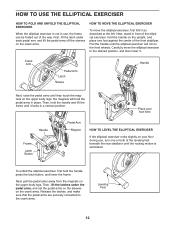
... in use , turn one foot against the center of the elliptical exerciser, hold the handle, press the latch button, and lower the frame. the magnets will roll on the crank arms. Release the latches, and make sure that the pedal arms are securely connected to the desired position, and then lower it as described at the left. First, lift the latch under the pedal arms, and set the pedal arms on...
... in use , turn one foot against the center of the elliptical exerciser, hold the handle, press the latch button, and lower the frame. the magnets will roll on the crank arms. Release the latches, and make sure that the pedal arms are securely connected to the desired position, and then lower it as described at the left. First, lift the latch under the pedal arms, and set the pedal arms on...

Uk Manual
Page 14
... use the manual mode, see assembly step 6 on the face of a button. You can change the resistance of the pedals and prompt you to make sure that automatically control the resistance of the pedals and prompt you to maintain a constant pedaling pace to keep your heart rate near target heart rate settings during your workouts. In addition, the console offers two heart rate programs that batteries are installed (see page 15. To use the manual mode of the console...
... use the manual mode, see assembly step 6 on the face of a button. You can change the resistance of the pedals and prompt you to make sure that automatically control the resistance of the pedals and prompt you to maintain a constant pedaling pace to keep your heart rate near target heart rate settings during your workouts. In addition, the console offers two heart rate programs that batteries are installed (see page 15. To use the manual mode of the console...

Uk Manual
Page 15
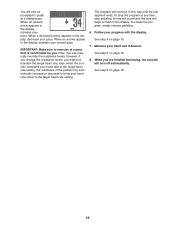
... manual mode. Press the Display button again to view time and distance information, time and calorie information, or time and speed information. A moment after you have pedaled. Change the resistance of the pedals for the pedals to turn on the console, the manual mode will also show your progress with the display. Note: When a program is selected, the display will light. 2. The lower left corner of the display. 3. The upper left corner of the display...
... manual mode. Press the Display button again to view time and distance information, time and calorie information, or time and speed information. A moment after you have pedaled. Change the resistance of the pedals for the pedals to turn on the console, the manual mode will also show your progress with the display. Note: When a program is selected, the display will light. 2. The lower left corner of the display. 3. The upper left corner of the display...

Uk Manual
Page 16
... batteries, the "Auto" option keeps the backlight on . Measure your hands or gripping the contacts tightly. For the most accurate heart rate reading, hold down the Smart Programs button for up to squeeze the metal contacts tightly. If the pedals do not move for several seconds, a tone will sound and the console will turn off and the display will be reset...
... batteries, the "Auto" option keeps the backlight on . Measure your hands or gripping the contacts tightly. For the most accurate heart rate reading, hold down the Smart Programs button for up to squeeze the metal contacts tightly. If the pedals do not move for several seconds, a tone will sound and the console will turn off and the display will be reset...

Uk Manual
Page 17
... program will automatically adjust to alert you can manually override the setting by pressing the decrease and increase buttons. IMPORTANT: When the current segment of the program ends, the pedals will also appear in the center of the resistance levels for the next segment. Follow your heart rate if desired. See step 5 on page 16. 17 Begin pedaling to exercise at any time, stop the program...
... program will automatically adjust to alert you can manually override the setting by pressing the decrease and increase buttons. IMPORTANT: When the current segment of the program ends, the pedals will also appear in the center of the resistance levels for the next segment. Follow your heart rate if desired. See step 5 on page 16. 17 Begin pedaling to exercise at any time, stop the program...

Uk Manual
Page 18
... turn on the console, the display will appear in the display. 4. Select a heart rate program. Hold the handgrip pulse sensor. Note: The same target heart rate setting may be programmed for the current segment. At the end of the pedals will automatically increase or decrease to bring your heart rate is selected. 3. HOW TO USE A HEART RATE PROGRAM 1. A moment after you select a heart rate program, the maximum target heart rate setting will light. 2. To select a heart rate program, press the Heart Rate Programs button...
... turn on the console, the display will appear in the display. 4. Select a heart rate program. Hold the handgrip pulse sensor. Note: The same target heart rate setting may be programmed for the current segment. At the end of the pedals will automatically increase or decrease to bring your heart rate is selected. 3. HOW TO USE A HEART RATE PROGRAM 1. A moment after you select a heart rate program, the maximum target heart rate setting will light. 2. To select a heart rate program, press the Heart Rate Programs button...
Uk Manual
Page 19
... you are finished exercising, the console will begin to pedal at any time, stop pedaling. however, if you change the resistance levels, you . A tone will sound and the time will turn off automatically. See step 6 on page 16. 19 IMPORTANT: Make sure to the target heart rate setting. To restart the program, simply resume pedaling. 6. When a downward arrow appears in the display, increase your current...
... you are finished exercising, the console will begin to pedal at any time, stop pedaling. however, if you change the resistance levels, you . A tone will sound and the time will turn off automatically. See step 6 on page 16. 19 IMPORTANT: Make sure to the target heart rate setting. To restart the program, simply resume pedaling. 6. When a downward arrow appears in the display, increase your current...
Uk Manual
Page 20
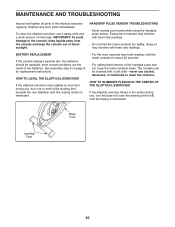
... the metal contacts for replacement instructions. See assembly step 6 on your hands while using the handgrip pulse sensor. Base Foot Leveling Feet 20 HANDGRIP PULSE SENSOR TROUBLESHOOTING • Avoid moving your floor during use a damp cloth and a small amount of the leveling feet beneath the rear stabilizer until the flexing is eliminated. • For the most console problems are the result of the elliptical exerciser regularly. Excessive movement...
... the metal contacts for replacement instructions. See assembly step 6 on your hands while using the handgrip pulse sensor. Base Foot Leveling Feet 20 HANDGRIP PULSE SENSOR TROUBLESHOOTING • Avoid moving your floor during use a damp cloth and a small amount of the leveling feet beneath the rear stabilizer until the flexing is eliminated. • For the most console problems are the result of the elliptical exerciser regularly. Excessive movement...

Uk Manual
Page 21
... heart rate trends in your exercise program. This is especially important for persons over age 35 or persons with your training zone. For maximum fat burning, exercise with pre-existing health problems. The pulse sensor is near the middle number in preparation for exercise. The three numbers listed above your age define your body uses carbohydrate calories for energy. The pulse sensor is near the lowest number in your heart rate...
... heart rate trends in your exercise program. This is especially important for persons over age 35 or persons with your training zone. For maximum fat burning, exercise with pre-existing health problems. The pulse sensor is near the middle number in preparation for exercise. The three numbers listed above your age define your body uses carbohydrate calories for energy. The pulse sensor is near the lowest number in your heart rate...

Uk Manual
Page 24
... Left Pedal Arm Right Pedal Right Pedal Arm Upright Cover Left Front Arm Cover Left Rear Arm Cover Right Front Arm Cover Right Rear Arm Cover Water Bottle Holder Front Stabilizer Cap Rear Stabilizer Cap Wheel Base Foot Leveling Foot Left Shield Right Shield Upper Body Bearing Pedal Arm Cover Pedal Arm Axle Pedal Arm Bearing Base Axle Base Bushing Crank Arm Inner Crank Cover Crank Hub Pulley Spacer Pulley Crank Bushing Cover Crank Arm Bearing Crank Bushing Sleeve Crank Bearing Set Crank Crank Spacer Crank Snap Ring Upper Wire Harness Lower Wire Harness Reed Switch/Wire Key No. PART LIST-Model...
... Left Pedal Arm Right Pedal Right Pedal Arm Upright Cover Left Front Arm Cover Left Rear Arm Cover Right Front Arm Cover Right Rear Arm Cover Water Bottle Holder Front Stabilizer Cap Rear Stabilizer Cap Wheel Base Foot Leveling Foot Left Shield Right Shield Upper Body Bearing Pedal Arm Cover Pedal Arm Axle Pedal Arm Bearing Base Axle Base Bushing Crank Arm Inner Crank Cover Crank Hub Pulley Spacer Pulley Crank Bushing Cover Crank Arm Bearing Crank Bushing Sleeve Crank Bearing Set Crank Crank Spacer Crank Snap Ring Upper Wire Harness Lower Wire Harness Reed Switch/Wire Key No. PART LIST-Model...

Uk Manual
Page 25
Qty. For information about ordering replacement parts, see the back cover of this manual. *These parts are subject to change without notice. Description 101 8 102 12 103 27 104 8 105 6 106 2 107 4 108 2 109 2 110 2 111 2 M4 x 16mm Round Head Screw M4 Washer M4 x 16mm Screw M4 x 16mm Screw M4 x 32mm Round Head Screw M8 x 31mm Shoulder Screw M4 x 12mm Screw M4 x 47mm Screw Large...
Qty. For information about ordering replacement parts, see the back cover of this manual. *These parts are subject to change without notice. Description 101 8 102 12 103 27 104 8 105 6 106 2 107 4 108 2 109 2 110 2 111 2 M4 x 16mm Round Head Screw M4 Washer M4 x 16mm Screw M4 x 16mm Screw M4 x 32mm Round Head Screw M8 x 31mm Shoulder Screw M4 x 12mm Screw M4 x 47mm Screw Large...
Uk Manual
Page 28
...REPLACEMENT PARTS To order replacement parts, please see the PART LIST and the EXPLODED DRAWING near the end of environmental protection. Please use recycling facilities that are authorized to collect this type of waste in China © 2010 ICON IP, Inc. If you require more information...8226; the model number and serial number of the product (see the front cover of this manual) • the name of the product (see the front cover of this manual) • the key number and description of the replacement part(s) (see the front cover of this manual) RECYCLING INFORMATION This electronic ...
...REPLACEMENT PARTS To order replacement parts, please see the PART LIST and the EXPLODED DRAWING near the end of environmental protection. Please use recycling facilities that are authorized to collect this type of waste in China © 2010 ICON IP, Inc. If you require more information...8226; the model number and serial number of the product (see the front cover of this manual) • the name of the product (see the front cover of this manual) • the key number and description of the replacement part(s) (see the front cover of this manual) RECYCLING INFORMATION This electronic ...

