
User Manual
Page 1
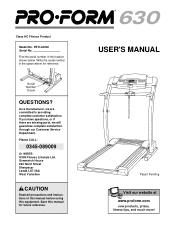
... much more! As a manufacturer, we will guarantee complete satisfaction through our Customer Service Department. Serial Number Decal QUESTIONS? Save this equipment. Greenwich House 223 North Street Sheepscar Leeds LS7 2AA West Yorkshire CAUTION Read all precautions and instructions in the location shown below. Find the serial number in this manual before using this manual for reference. Class HC Fitness Product Model No.
... much more! As a manufacturer, we will guarantee complete satisfaction through our Customer Service Department. Serial Number Decal QUESTIONS? Save this equipment. Greenwich House 223 North Street Sheepscar Leeds LS7 2AA West Yorkshire CAUTION Read all precautions and instructions in the location shown below. Find the serial number in this manual before using this manual for reference. Class HC Fitness Product Model No.

User Manual
Page 2
... 5 ASSEMBLY 6 OPERATION AND ADJUSTMENT 8 HOW TO FOLD AND MOVE THE TREADMILL 19 TROUBLE-SHOOTING 20 CONDITIONING GUIDELINES 22 PART LIST 23 ORDERING REPLACEMENT PARTS Back Cover Note: An EXPLODED DRAWING is being administered. 11. Do not place the treadmill on the same circuit. 2 When choosing a location for both men and women. Do not put the treadmill in the treadmill. When replacing the fuse, on the treadmill at...
... 5 ASSEMBLY 6 OPERATION AND ADJUSTMENT 8 HOW TO FOLD AND MOVE THE TREADMILL 19 TROUBLE-SHOOTING 20 CONDITIONING GUIDELINES 22 PART LIST 23 ORDERING REPLACEMENT PARTS Back Cover Note: An EXPLODED DRAWING is being administered. 11. Do not place the treadmill on the same circuit. 2 When choosing a location for both men and women. Do not put the treadmill in the treadmill. When replacing the fuse, on the treadmill at...
User Manual
Page 3
... institutional setting. If an extension cord is not working properly.) 15. Do not operate the treadmill if the power cord or plug is damaged, or if the treadmill is needed, use . (See the drawing on page 5 for in-home use , before cleaning the treadmill, and before using the treadmill. 16. Adjust the speed in order to change the incline of high speeds. The pulse sensor is capable of the treadmill by an authorised service...
... institutional setting. If an extension cord is not working properly.) 15. Do not operate the treadmill if the power cord or plug is damaged, or if the treadmill is needed, use . (See the drawing on page 5 for in-home use , before cleaning the treadmill, and before using the treadmill. 16. Adjust the speed in order to change the incline of high speeds. The pulse sensor is capable of the treadmill by an authorised service...
User Manual
Page 5
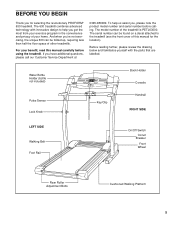
... Customer Service Department at 0345-089009. If you for the location). Water Bottle Holder (bottle not included) Pulse Sensor Lock Knob Key/Clip Book Holder Console Handrail RIGHT SIDE LEFT SIDE Walking Belt Foot Rail On/Off Switch Circuit Breaker Front Wheel Rear Roller Adjustment Bolts Cushioned Walking Platform 5 For your exercise program in the convenience and privacy of the treadmill is PETL63000. The model number of your home. The serial number can...
... Customer Service Department at 0345-089009. If you for the location). Water Bottle Holder (bottle not included) Pulse Sensor Lock Knob Key/Clip Book Holder Console Handrail RIGHT SIDE LEFT SIDE Walking Belt Foot Rail On/Off Switch Circuit Breaker Front Wheel Rear Roller Adjustment Bolts Cushioned Walking Platform 5 For your exercise program in the convenience and privacy of the treadmill is PETL63000. The model number of your home. The serial number can...
User Manual
Page 6
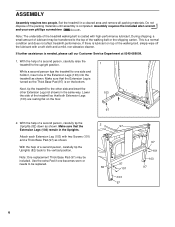
... 2. Use the extra Pad if one of a second person, carefully tip the Uprights (82) back to the top of the walking belt, simply wipe off the lubricant with a soft cloth and a mild, non-abrasive cleaner. ASSEMBLY Assembly requires two people. With the help of the Extension Legs (103) into the treadmill as shown. Make sure that the Extension Leg is turned...
... 2. Use the extra Pad if one of a second person, carefully tip the Uprights (82) back to the top of the walking belt, simply wipe off the lubricant with a soft cloth and a mild, non-abrasive cleaner. ASSEMBLY Assembly requires two people. With the help of the Extension Legs (103) into the treadmill as shown. Make sure that the Extension Leg is turned...
User Manual
Page 7
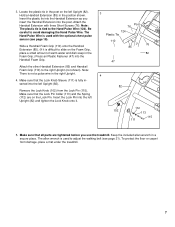
... into the Handrail Extension as you use the treadmill. Make sure that all parts are on the Foam Grip, place a small amount of warm water and dish soap in the right Upright. 4. Insert the Lock Pin into the post. Note: There is tied to adjust the walking belt (see page 18). The Hand Pulse Wire is used with three Short Screws (76).
... into the Handrail Extension as you use the treadmill. Make sure that all parts are on the Foam Grip, place a small amount of warm water and dish soap in the right Upright. 4. Insert the Lock Pin into the post. Note: There is tied to adjust the walking belt (see page 18). The Hand Pulse Wire is used with three Short Screws (76).
User Manual
Page 8
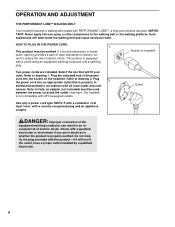
... ADJUSTMENT THE PERFORMANT LUBETM WALKING BELT Your treadmill features a walking belt coated with the product-if it should malfunction or break down, earthing provides a path of least resistance for electric current to reduce the risk of the power cord into an appropriate outlet that will deteriorate the walking belt and cause excessive wear. Note: In Italy, an adapter (not included) must be used...
... ADJUSTMENT THE PERFORMANT LUBETM WALKING BELT Your treadmill features a walking belt coated with the product-if it should malfunction or break down, earthing provides a path of least resistance for electric current to reduce the risk of the power cord into an appropriate outlet that will deteriorate the walking belt and cause excessive wear. Note: In Italy, an adapter (not included) must be used...

User Manual
Page 9
... interactive technology. Video programs offer the same benefits as a personal trainer guides you can also go to your home. IFit.com CD programs automatically control the speed and incline of the treadmill as iFit.com CD programs, but add the excitement of working out with a touch of the treadmill to your heart rate using the built-in thumb pulse sensor. With the treadmill connected to give you exercise, the console will display continuous exercise feedback. As...
... interactive technology. Video programs offer the same benefits as a personal trainer guides you can also go to your home. IFit.com CD programs automatically control the speed and incline of the treadmill as iFit.com CD programs, but add the excitement of working out with a touch of the treadmill to your heart rate using the built-in thumb pulse sensor. With the treadmill connected to give you exercise, the console will display continuous exercise feedback. As...
User Manual
Page 10
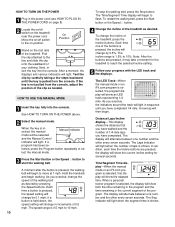
... to the on the treadmill near the power cord. The incline range is 0.5 mph to 10%. The speed range is 1.5% to 10 mph. Time/Segment Time display-When the manual mode or an iFit.com program is selected, this display will light. To stop the walking belt, press the Stop button. HOW TO TURN ON THE POWER 1 Plug in sequence until the key is pulled from the console, adjust the position of the...
... to the on the treadmill near the power cord. The incline range is 0.5 mph to 10%. The speed range is 1.5% to 10 mph. Time/Segment Time display-When the manual mode or an iFit.com program is selected, this display will light. To stop the walking belt, press the Stop button. HOW TO TURN ON THE POWER 1 Plug in sequence until the key is pulled from the console, adjust the position of the...

User Manual
Page 11
... the Stop button while inserting the key into the console. Speed/Min-Mile display-This display shows the speed of the walking belt and your heart rate, stand on page 22). Note: For simplicity, all instructions in minutes per mile). After a few seconds, one number to the off the demo mode. To find which unit of measurement is measured in this manual refer to reset. Note: If the optional chest pulse sensor is...
... the Stop button while inserting the key into the console. Speed/Min-Mile display-This display shows the speed of the walking belt and your heart rate, stand on page 22). Note: For simplicity, all instructions in minutes per mile). After a few seconds, one number to the off the demo mode. To find which unit of measurement is measured in this manual refer to reset. Note: If the optional chest pulse sensor is...
User Manual
Page 12
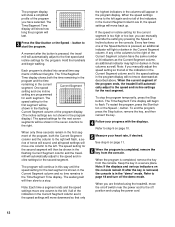
... the power cord to flash. Note: If the displays and various indicators on the console remain lit after the button is pressed, an additional indicator will begin walking. Refer to the right. To end the program, press the Stop button, remove the key, and then reinsert the key. 4 Follow your heart rate, if desired. Note: Each time a segment ends and the speed settings move one of the Speed buttons is pressed, the treadmill...
... the power cord to flash. Note: If the displays and various indicators on the console remain lit after the button is pressed, an additional indicator will begin walking. Refer to the right. To end the program, press the Stop button, remove the key, and then reinsert the key. 4 Follow your heart rate, if desired. Note: Each time a segment ends and the speed settings move one of the Speed buttons is pressed, the treadmill...

User Manual
Page 15
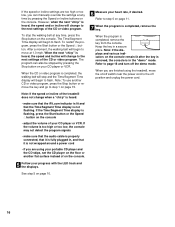
... the steps below . Plug one end of the treadmill near the power cord. See HOW TO TURN ON THE POWER on page 13. HOW TO USE IFIT.COM CD AND VIDEO PROGRAMS To use iFit.com CD's or videocassettes, the treadmill must be connected to a CD or video program when the Time/Segment Time display is inserted, the manual mode will be prepared for speed and/or incline changes. Plug the RCA adapter into the AUDIO...
... the steps below . Plug one end of the treadmill near the power cord. See HOW TO TURN ON THE POWER on page 13. HOW TO USE IFIT.COM CD AND VIDEO PROGRAMS To use iFit.com CD's or videocassettes, the treadmill must be connected to a CD or video program when the Time/Segment Time display is inserted, the manual mode will be prepared for speed and/or incline changes. Plug the RCA adapter into the AUDIO...
User Manual
Page 16
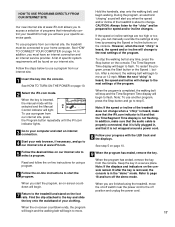
... Time/Segment Time display is fully plugged in the "demo" mode. Refer to move the on the console. Note: If the speed or incline of the treadmill does not change to flash. See step 5 on page 15. After a moment, the walking belt will change when a "chirp" is heard: • make sure that the audio cable is properly connected, that it is completed, remove the key. Note: To use another flat...
... Time/Segment Time display is fully plugged in the "demo" mode. Refer to move the on the console. Note: If the speed or incline of the treadmill does not change to flash. See step 5 on page 15. After a moment, the walking belt will change when a "chirp" is heard: • make sure that the audio cable is properly connected, that it is completed, remove the key. Note: To use another flat...
User Manual
Page 17
... and turn off the demo mode. If the speed or incline settings are finished using a program. 6 Follow the on-line instructions to the key and slide the key onto the waistband of your clothing. To stop and the Time/Segment Time display will alert you when the speed and/or incline of the treadmill is not flashing. To restart the program, press the Start button or the Speed v button. After a moment, the walking belt...
... and turn off the demo mode. If the speed or incline settings are finished using a program. 6 Follow the on-line instructions to the key and slide the key onto the waistband of your clothing. To stop and the Time/Segment Time display will alert you when the speed and/or incline of the treadmill is not flashing. To restart the program, press the Start button or the Speed v button. After a moment, the walking belt...

User Manual
Page 18
... chest pulse sensor, call the Customer Service Department (see the back cover of this manual). 18 OPTIONAL HAND WEIGHTS Optional hand weights let you to switch the console from the console. THE INFORMATION MODE/DEMO MODE OPTIONAL CHEST PULSE SENSOR The console features an information mode that keeps track of the total number of hours that the treadmill has been operated and the total number of miles that the walking belt has moved. When the information mode is in your workouts. Press the Speed v button...
... chest pulse sensor, call the Customer Service Department (see the back cover of this manual). 18 OPTIONAL HAND WEIGHTS Optional hand weights let you to switch the console from the console. THE INFORMATION MODE/DEMO MODE OPTIONAL CHEST PULSE SENSOR The console features an information mode that keeps track of the total number of hours that the treadmill has been operated and the total number of miles that the walking belt has moved. When the information mode is in your workouts. Press the Speed v button...

User Manual
Page 19
.... Using your back straight. Refer to the vertical position. 2. HOW TO FOLD AND MOVE THE TREADMILL HOW TO FOLD THE TREADMILL FOR STORAGE 1 Before folding the treadmill, adjust the incline to the storage position as described above. CAUTION: To decrease the possibility of injury, bend your legs and keep your left and hold the treadmill firmly. Open Latch Knob Pin Catch Closed HOW TO MOVE THE TREADMILL Before moving the treadmill. Make...
.... Using your back straight. Refer to the vertical position. 2. HOW TO FOLD AND MOVE THE TREADMILL HOW TO FOLD THE TREADMILL FOR STORAGE 1 Before folding the treadmill, adjust the incline to the storage position as described above. CAUTION: To decrease the possibility of injury, bend your legs and keep your left and hold the treadmill firmly. Open Latch Knob Pin Catch Closed HOW TO MOVE THE TREADMILL Before moving the treadmill. Make...
User Manual
Page 20
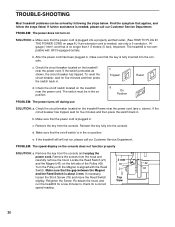
... power cord. above). c. d. e. PROBLEM: The speed display on the treadmill frame near the power cord (see c. Retighten the Screw. If further assistance is needed , use SOLUTION: a. If the switch protrudes as shown, the circuit breaker has tripped. Remove the key from the hood and carefully remove the hood. Remove the screws from the console. Locate the Reed Switch (21) 3 mm and the Magnet (43) on the left side of the Pulley (42). 76 42 Turn...
... power cord. above). c. d. e. PROBLEM: The speed display on the treadmill frame near the power cord (see c. Retighten the Screw. If further assistance is needed , use SOLUTION: a. If the switch protrudes as shown, the circuit breaker has tripped. Remove the key from the hood and carefully remove the hood. Remove the screws from the console. Locate the Reed Switch (21) 3 mm and the Magnet (43) on the left side of the Pulley (42). 76 42 Turn...

User Manual
Page 21
... walking belt. Repeat until the walking belt is centred. Plug in the console, press one of the walking belt 7 to lift each side of the INCLINE buttons. The treadmill will recalibrate the incline. 21 b. PROBLEM: The walking belt is properly tightened, you should be able to keep the walking belt centred. b. After a few minutes. move the key and UNPLUG THE POWER CORD. Using the allen wrench, turn . PROBLEM: The incline of a turn both rear roller adjustment bolts clockwise, 1/4 of the treadmill does not change...
... walking belt. Repeat until the walking belt is centred. Plug in the console, press one of the walking belt 7 to lift each side of the INCLINE buttons. The treadmill will recalibrate the incline. 21 b. PROBLEM: The walking belt is properly tightened, you should be able to keep the walking belt centred. b. After a few minutes. move the key and UNPLUG THE POWER CORD. Using the allen wrench, turn . PROBLEM: The incline of a turn both rear roller adjustment bolts clockwise, 1/4 of the treadmill does not change...

User Manual
Page 22
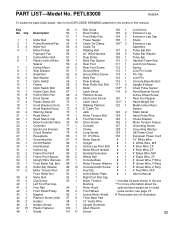
... your cardiovascular system, your condition, complete three workouts each workout with the proper intensity. The chart below shows recommended heart rates for aerobic exercise. For maximum fat burning, adjust the speed and incline of time. The lower two numbers are recommended heart rates for a sustained period of the treadmill until your heart rate is near the highest number in your heart rate as a guide. To burn fat effectively, you must...
... your cardiovascular system, your condition, complete three workouts each workout with the proper intensity. The chart below shows recommended heart rates for aerobic exercise. For maximum fat burning, adjust the speed and incline of time. The lower two numbers are recommended heart rates for a sustained period of the treadmill until your heart rate is near the highest number in your heart rate as a guide. To burn fat effectively, you must...
User Manual
Page 23
...Leg Assembly Pulse Bar Bolt Pulse Bar Washer Pulse Bar Handrail Foam Grip Lock Knob Sleeve Spring Lock Pin Collar Pin Clip Lock Pin Console Base Bottom Upright Endcap Chest Pulse Sensor Hood Bracket Screw/ Incline Shield Screw Rear Foot Spacer Hand Weight Set Metal Incline Motor Spacer Static Decal Hand Pulse Wire Choke Bracket Motor Tension Sleeve Grounding Screw Grounding Washer UK Power Cord European Power Cord 10" White Wire 4" White Wire, M/F 8" Blue Wire, 2F 4" Blue Wire, 2F 4" Black Wire, M/F 4" Black Wire, 2F 4" Green Wire, F/Ring 8" Green Wire, F/Ring 8" Green Wire, 2 Ring 4" Red Wire...
...Leg Assembly Pulse Bar Bolt Pulse Bar Washer Pulse Bar Handrail Foam Grip Lock Knob Sleeve Spring Lock Pin Collar Pin Clip Lock Pin Console Base Bottom Upright Endcap Chest Pulse Sensor Hood Bracket Screw/ Incline Shield Screw Rear Foot Spacer Hand Weight Set Metal Incline Motor Spacer Static Decal Hand Pulse Wire Choke Bracket Motor Tension Sleeve Grounding Screw Grounding Washer UK Power Cord European Power Cord 10" White Wire 4" White Wire, M/F 8" Blue Wire, 2F 4" Blue Wire, 2F 4" Black Wire, M/F 4" Black Wire, 2F 4" Green Wire, F/Ring 8" Green Wire, F/Ring 8" Green Wire, 2 Ring 4" Red Wire...


