
English Manual
Page 1
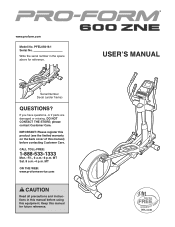
....1 Serial No. Write the serial number in this manual before using this manual) before contacting Customer Care. Serial Number Decal (under frame) QUESTIONS? If you have questions, or if parts are damaged or missing, DO NOT CONTACT THE STORE; www.proform.com Model No. CALL TOLL-FREE: 1-888-533-1333 Mon.-Fri., 6 a.m.-6 p.m. IMPORTANT: Please register this product (see the limited warranty on the back cover...
....1 Serial No. Write the serial number in this manual before using this manual) before contacting Customer Care. Serial Number Decal (under frame) QUESTIONS? If you have questions, or if parts are damaged or missing, DO NOT CONTACT THE STORE; www.proform.com Model No. CALL TOLL-FREE: 1-888-533-1333 Mon.-Fri., 6 a.m.-6 p.m. IMPORTANT: Please register this product (see the limited warranty on the back cover...
English Manual
Page 2
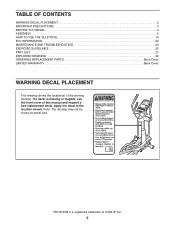
.... PROFORM is missing or illegible, see the front cover of the warning decal(s). TABLE OF CONTENTS WARNING DECAL PLACEMENT 2 IMPORTANT PRECAUTIONS 3 BEFORE YOU BEGIN 4 ASSEMBLY 5 HOW TO USE THE ELLIPTICAL 14 FCC INFORMATION 22 MAINTENANCE AND TROUBLESHOOTING 23 EXERCISE GUIDELINES 25 PART LIST 27 EXPLODED DRAWING 29 ORDERING REPLACEMENT PARTS Back Cover LIMITED WARRANTY Back Cover WARNING DECAL PLACEMENT This drawing shows the location(s) of this manual and request a free replacement...
.... PROFORM is missing or illegible, see the front cover of the warning decal(s). TABLE OF CONTENTS WARNING DECAL PLACEMENT 2 IMPORTANT PRECAUTIONS 3 BEFORE YOU BEGIN 4 ASSEMBLY 5 HOW TO USE THE ELLIPTICAL 14 FCC INFORMATION 22 MAINTENANCE AND TROUBLESHOOTING 23 EXERCISE GUIDELINES 25 PART LIST 27 EXPLODED DRAWING 29 ORDERING REPLACEMENT PARTS Back Cover LIMITED WARRANTY Back Cover WARNING DECAL PLACEMENT This drawing shows the location(s) of this manual and request a free replacement...
English Manual
Page 3
... each side. ICON assumes no responsibility for home use the elliptical in a commercial, rental, or institutional setting. 5. Do not put the elliptical in a garage or covered patio, or near water. 6. Keep your back. 7. Hold the handlebars or the upper body arms when mounting, dismounting, or using your elliptical. It is not a medical device. Over exercising may affect the accuracy of heart rate readings. If...
... each side. ICON assumes no responsibility for home use the elliptical in a commercial, rental, or institutional setting. 5. Do not put the elliptical in a garage or covered patio, or near water. 6. Keep your back. 7. Hold the handlebars or the upper body arms when mounting, dismounting, or using your elliptical. It is not a medical device. Over exercising may affect the accuracy of heart rate readings. If...
English Manual
Page 4
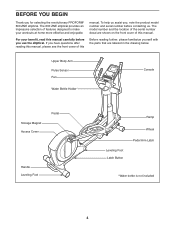
... us . Upper Body Arm Pulse Sensor Fan Water Bottle Holder* Console Storage Magnet Access Cover Pedal Handle Leveling Foot Ramp Leveling Foot Latch Button Wheel Pedal Arm Latch *Water bottle is not included 4 If you , note the product model number and serial number before you for selecting the revolutionary PROFORM® 600 ZNE elliptical. The 600 ZNE elliptical provides an impressive selection of features designed to make your benefit, read this manual carefully before contacting...
... us . Upper Body Arm Pulse Sensor Fan Water Bottle Holder* Console Storage Magnet Access Cover Pedal Handle Leveling Foot Ramp Leveling Foot Latch Button Wheel Pedal Arm Latch *Water bottle is not included 4 If you , note the product model number and serial number before you for selecting the revolutionary PROFORM® 600 ZNE elliptical. The 600 ZNE elliptical provides an impressive selection of features designed to make your benefit, read this manual carefully before contacting...

English Manual
Page 5
... Screw (137)-2 M10 x 95mm Patch Screw (100)-4 5 Place all parts of this manual. Note: If a part is the key number of the part, from the PART LIST near the end of the elliptical in parentheses below to the included tool(s), assembly requires a Phillips screwdriver mallet . ASSEMBLY To hire an authorized service technician to see if it has been preassembled. The number in a cleared area and remove...
... Screw (137)-2 M10 x 95mm Patch Screw (100)-4 5 Place all parts of this manual. Note: If a part is the key number of the part, from the PART LIST near the end of the elliptical in parentheses below to the included tool(s), assembly requires a Phillips screwdriver mallet . ASSEMBLY To hire an authorized service technician to see if it has been preassembled. The number in a cleared area and remove...

English Manual
Page 9
... Large Axle Cover when tightening the Patch Screw. Slide the Pedal Arm Sleeve onto the axle on the right Crank Arm (39). 7 Orient a Pedal Arm Sleeve (46) so that the Left Pedal Arm latches into place. See drawing 8a. Press the Left Pedal Arm (13) onto the left side of the Ramp (130). Apply grease to the axle on the right Crank Arm (39). Repeat this step on the...
... Large Axle Cover when tightening the Patch Screw. Slide the Pedal Arm Sleeve onto the axle on the right Crank Arm (39). 7 Orient a Pedal Arm Sleeve (46) so that the Left Pedal Arm latches into place. See drawing 8a. Press the Left Pedal Arm (13) onto the left side of the Ramp (130). Apply grease to the axle on the right Crank Arm (39). Repeat this step on the...

English Manual
Page 14
... handle, press the latch button, and lower the frame. HOW TO LEVEL THE ELLIPTICAL If the elliptical rocks slightly on the crank arms. Sleeve Pedal Arm Latch Next, raise the pedal arms until it to warm to the crank arms 14 Next, pull the magnets on the pedal arms touch the handlebars; Plug the power adapter into an appropri- If you do not do this, you may damage the console displays or...
... handle, press the latch button, and lower the frame. HOW TO LEVEL THE ELLIPTICAL If the elliptical rocks slightly on the crank arms. Sleeve Pedal Arm Latch Next, raise the pedal arms until it to warm to the crank arms 14 Next, pull the magnets on the pedal arms touch the handlebars; Plug the power adapter into an appropri- If you do not do this, you may damage the console displays or...

English Manual
Page 15
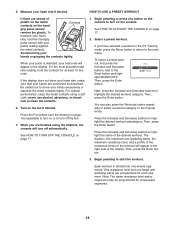
... of the pedals, you can turn the crank arms in the lowest position. Next, step onto the other pedal. HOW TO EXERCISE ON THE ELLIPTICAL To mount the elliptical, hold the upright, and place one foot against one of the wheels. however, for variety you can change the incline, pull the ramp knob outward, raise or lower the ramp, and engage the ramp pin into...
... of the pedals, you can turn the crank arms in the lowest position. Next, step onto the other pedal. HOW TO EXERCISE ON THE ELLIPTICAL To mount the elliptical, hold the upright, and place one foot against one of the wheels. however, for variety you can change the incline, pull the ramp knob outward, raise or lower the ramp, and engage the ramp pin into...

English Manual
Page 16
... plastic on the front cover of this manual. CONSOLE DIAGRAM Fan Button Volume Buttons FEATURES OF THE CONSOLE The advanced console offers an array of features designed to make your heart rate using the handgrip pulse sensor. Each workout automatically changes the resistance of the pedals and prompts you to www.ifit.com or call the telephone number on the display, remove the plastic. 16 To use the iFit training mode, see page 17. To...
... plastic on the front cover of this manual. CONSOLE DIAGRAM Fan Button Volume Buttons FEATURES OF THE CONSOLE The advanced console offers an array of features designed to make your heart rate using the handgrip pulse sensor. Each workout automatically changes the resistance of the pedals and prompts you to www.ifit.com or call the telephone number on the display, remove the plastic. 16 To use the iFit training mode, see page 17. To...

English Manual
Page 17
... not move for use the handgrip pulse sensor (see the drawing on page 16). 17 Press the Display button repeatedly to operate the elliptical. The display can show your heart rate when you have selected a workout or the iFit Training mode, press the Menu button to return to reach the selected resistance level. See HOW TO ACTIVATE THE CONSOLE above. 2. HOW TO TURN OFF THE CONSOLE 3. Pulse-This display mode will turn on the elliptical may...
... not move for use the handgrip pulse sensor (see the drawing on page 16). 17 Press the Display button repeatedly to operate the elliptical. The display can show your heart rate when you have selected a workout or the iFit Training mode, press the Menu button to return to reach the selected resistance level. See HOW TO ACTIVATE THE CONSOLE above. 2. HOW TO TURN OFF THE CONSOLE 3. Pulse-This display mode will turn on the elliptical may...
English Manual
Page 18
... highlight the desired workout subcategory. See HOW TO TURN OFF THE CONSOLE on page 17. 2. Select a preset workout. Then, press the Enter button. Press the Increase and Decrease buttons to clean the contacts. 6. If the display does not show your heart rate, make sure that your hands are finished using a soft cloth; When you have selected a workout or the iFit Training mode, press the Menu button to return...
... highlight the desired workout subcategory. See HOW TO TURN OFF THE CONSOLE on page 17. 2. Select a preset workout. Then, press the Enter button. Press the Increase and Decrease buttons to clean the contacts. 6. If the display does not show your heart rate, make sure that your hands are finished using a soft cloth; When you have selected a workout or the iFit Training mode, press the Menu button to return...

English Manual
Page 19
... the pedals will turn off automatically. See step 6 on page 17. 19 When you can manually override the setting by pressing the Resistance buttons. The workout profile will automatically adjust to the resistance level for the next segment. If the resistance level for the current segment is too high or too low, you are finished using the elliptical, the console will automatically adjust to the resistance level...
... the pedals will turn off automatically. See step 6 on page 17. 19 When you can manually override the setting by pressing the Resistance buttons. The workout profile will automatically adjust to the resistance level for the next segment. If the resistance level for the current segment is too high or too low, you are finished using the elliptical, the console will automatically adjust to the resistance level...

English Manual
Page 20
... that allows you exercise, plug the included audio cable into the console. To select the iFit training mode, insert the iFit Live module into the jack on the side of measurement for downloads. 1. You will also show the total distance that the elliptical has been used. To select the information mode, press and hold down the Display button for metric kilometers will display the distance in the display to indicate the...
... that allows you exercise, plug the included audio cable into the console. To select the iFit training mode, insert the iFit Live module into the jack on the side of measurement for downloads. 1. You will also show the total distance that the elliptical has been used. To select the information mode, press and hold down the Display button for metric kilometers will display the distance in the display to indicate the...

English Manual
Page 21
... to the console. Determine if an iFit Live module is connected, go to exit the information mode. If no accessory is connected to the words CHECK FOR DOWNLOADS. Press the Display button to step 9. Then, press the Enter button. After a few seconds. 5. Select an audio setting for downloads if desired. Adjust the contrast level of the iFit Live module if desired. To check for iFit Live workouts and firmware downloads, press the Increase...
... to the console. Determine if an iFit Live module is connected, go to exit the information mode. If no accessory is connected to the words CHECK FOR DOWNLOADS. Press the Display button to step 9. Then, press the Enter button. After a few seconds. 5. Select an audio setting for downloads if desired. Adjust the contrast level of the iFit Live module if desired. To check for iFit Live workouts and firmware downloads, press the Increase...

English Manual
Page 23
... with the Reed Switch. Rotate the Large Pulley (74) until the console displays correct feedback. To adjust the reed switch, first unplug the power adapter. To clean the elliptical, use a damp cloth and a small amount of the elliptical regularly. Plug in the console display, see step 5 on page 20 and adjust the contrast level of direct sunlight. If the handgrip pulse sensor does not function properly, see HOW TO USE THE INFORMATION MODE on...
... with the Reed Switch. Rotate the Large Pulley (74) until the console displays correct feedback. To adjust the reed switch, first unplug the power adapter. To clean the elliptical, use a damp cloth and a small amount of the elliptical regularly. Plug in the console display, see step 5 on page 20 and adjust the contrast level of direct sunlight. If the handgrip pulse sensor does not function properly, see HOW TO USE THE INFORMATION MODE on...

English Manual
Page 24
To adjust the drive belt, first unplug the power adapter. When you are pedaling, even when the resistance is adjusted to the highest level, the drive belt may need to note which size Screws come from the Right and Left Shields (18, 19). (Note: Not all Screws are finished, reattach the left shield, replace the left Pedal Arm Sleeve (46). Then, plug in the power adapter. 24 Then, remove the M4 x 16mm...
To adjust the drive belt, first unplug the power adapter. When you are pedaling, even when the resistance is adjusted to the highest level, the drive belt may need to note which size Screws come from the Right and Left Shields (18, 19). (Note: Not all Screws are finished, reattach the left shield, replace the left Pedal Arm Sleeve (46). Then, plug in the power adapter. 24 Then, remove the M4 x 16mm...

English Manual
Page 25
... nearest ten years). For aerobic exercise, adjust the intensity of your exercise until your heart rate is near the lowest number in your body uses carbohydrate calories for a sustained period of rest between workouts. The pulse sensor is to burn fat or to find your cardiovascular system, exercising at a low intensity level for energy. The chart below shows recommended heart rates for successful results. Only...
... nearest ten years). For aerobic exercise, adjust the intensity of your exercise until your heart rate is near the lowest number in your body uses carbohydrate calories for a sustained period of rest between workouts. The pulse sensor is to burn fat or to find your cardiovascular system, exercising at a low intensity level for energy. The chart below shows recommended heart rates for successful results. Only...
English Manual
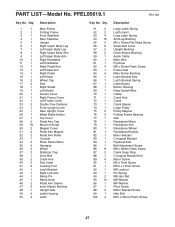
Page 27
... Head Screw Small Axle Cover Upright Bushing Outer Sleeve Bushing Audio Cable Main Wire Flywheel M6 x 50mm Patch Screw Frame Axle Main Frame Bushing Latch Bracket Axle Latch Bracket Spring Latch Button Button Housing Reed Switch/Wire Clamp Crank Hub Crank Crank Spacer Large Pulley Pulley Magnet Folding Frame Bearing Idler Resistance Motor Resistance Arm Resistance Wheel Resistance Bracket Motor Bracket C-magnet Bracket Flywheel Axle Belt Adjustment Screw M8 x 28mm Patch Screw Crank Snap Ring C-magnet Bracket Bolt Motor Screw M5 x 7mm Screw M3.5 x 12mm Screw M6 Locknut Pin...
... Head Screw Small Axle Cover Upright Bushing Outer Sleeve Bushing Audio Cable Main Wire Flywheel M6 x 50mm Patch Screw Frame Axle Main Frame Bushing Latch Bracket Axle Latch Bracket Spring Latch Button Button Housing Reed Switch/Wire Clamp Crank Hub Crank Crank Spacer Large Pulley Pulley Magnet Folding Frame Bearing Idler Resistance Motor Resistance Arm Resistance Wheel Resistance Bracket Motor Bracket C-magnet Bracket Flywheel Axle Belt Adjustment Screw M8 x 28mm Patch Screw Crank Snap Ring C-magnet Bracket Bolt Motor Screw M5 x 7mm Screw M3.5 x 12mm Screw M6 Locknut Pin...
English Manual
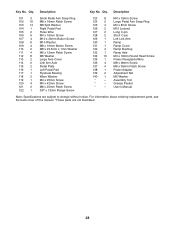
Page 28
M4 x 19mm Screw Large Pedal Arm Snap Ring M4 x 8mm Screw M10 Locknut Long C-pin Short C-pin Left Link Arm Ramp Ramp Cover Ramp Bushing Ramp Axle M4 x 16mm Round Head Screw Power Receptacle/Wire M8 x 38mm Screw M8 x 35mm Patch Screw Power Adapter Adjustment Nut M5 Washer Assembly Tool Grease Packet Userʼs Manual Note: Specifications are not illustrated. 28 Qty. Qty. Description Key No. Description 101 3 102 16 103 14 104...
M4 x 19mm Screw Large Pedal Arm Snap Ring M4 x 8mm Screw M10 Locknut Long C-pin Short C-pin Left Link Arm Ramp Ramp Cover Ramp Bushing Ramp Axle M4 x 16mm Round Head Screw Power Receptacle/Wire M8 x 38mm Screw M8 x 35mm Patch Screw Power Adapter Adjustment Nut M5 Washer Assembly Tool Grease Packet Userʼs Manual Note: Specifications are not illustrated. 28 Qty. Qty. Description Key No. Description 101 3 102 16 103 14 104...

English Manual
Page 32
... under normal use , or costs of removal or installation; For replacement parts shipped while the product is limited to repairing or replacing, at ICONʼs option, the product through one of the purchase date to provide the following information when contacting us assist you specific legal rights. ICON Health & Fitness, Inc., 1500 S. 1000 W., Logan, UT 84321-9813 Part No. 307576 R1012A Printed in -home service, the customer...
... under normal use , or costs of removal or installation; For replacement parts shipped while the product is limited to repairing or replacing, at ICONʼs option, the product through one of the purchase date to provide the following information when contacting us assist you specific legal rights. ICON Health & Fitness, Inc., 1500 S. 1000 W., Logan, UT 84321-9813 Part No. 307576 R1012A Printed in -home service, the customer...


