

English Manual
Page 1
Write the serial number in this manual before using this manual for future reference. USER'S MANUAL SEARS, ROEBUCK AND CO., HOFFMAN ESTATES, IL 60179 Model No. 831.297671 Serial No. Save this equipment. Serial Number Decal CAUTION Read all precautions and instructions in the space above for future reference.
Write the serial number in this manual before using this manual for future reference. USER'S MANUAL SEARS, ROEBUCK AND CO., HOFFMAN ESTATES, IL 60179 Model No. 831.297671 Serial No. Save this equipment. Serial Number Decal CAUTION Read all precautions and instructions in the space above for future reference.
English Manual
Page 2
... air openings. Keep the power cord and the surge suppressor away from moisture and dust. Do not wear loose clothing that all users of this manual. TABLE OF CONTENTS IMPORTANT PRECAUTIONS 2 BEFORE YOU BEGIN 4 ASSEMBLY 5 OPERATION AND ADJUSTMENT 7 HOW TO FOLD AND MOVE THE TREADMILL 10 MAINTENANCE AND TROUBLE-SHOOTING 12 CONDITIONING GUIDELINES 14 PART LIST 15 ORDERING REPLACEMENT PARTS Back Cover FULL 90 DAY WARRANTY Back Cover Note...
... air openings. Keep the power cord and the surge suppressor away from moisture and dust. Do not wear loose clothing that all users of this manual. TABLE OF CONTENTS IMPORTANT PRECAUTIONS 2 BEFORE YOU BEGIN 4 ASSEMBLY 5 OPERATION AND ADJUSTMENT 7 HOW TO FOLD AND MOVE THE TREADMILL 10 MAINTENANCE AND TROUBLE-SHOOTING 12 CONDITIONING GUIDELINES 14 PART LIST 15 ORDERING REPLACEMENT PARTS Back Cover FULL 90 DAY WARRANTY Back Cover Note...
English Manual
Page 3
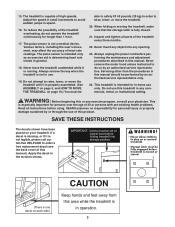
... an exercise aid in determining heart rate trends in the location shown. Apply the decal in general. 18. Do not attempt to order a free replacement decal (see the back cover of this or any object into storage position. (There is not in speed. 16. When folding or moving the treadmill, make sure that the storage latch is not a medical device. Always unplug the power cord before using. SEARS...
... an exercise aid in determining heart rate trends in the location shown. Apply the decal in general. 18. Do not attempt to order a free replacement decal (see the back cover of this or any object into storage position. (There is not in speed. 16. When folding or moving the treadmill, make sure that the storage latch is not a medical device. Always unplug the power cord before using. SEARS...

English Manual
Page 4
....297671. Central Time (excluding holidays). To help us assist you have questions after reading the manual, please call our toll-free HELPLINE at 1-800-736-6879, Monday through Saturday, 7 a.m. Accessory Tray Book Rack Water Bottle Holder (Bottle not included) Handrail Storage Latch Key/Clip Console Upright LEFT SIDE Walking Belt Foot Rail RIGHT SIDE Circuit Breaker Rear Roller Adjustment Bolts Cushioned Walking Platform Power Cord 4 until 7 p.m.
....297671. Central Time (excluding holidays). To help us assist you have questions after reading the manual, please call our toll-free HELPLINE at 1-800-736-6879, Monday through Saturday, 7 a.m. Accessory Tray Book Rack Water Bottle Holder (Bottle not included) Handrail Storage Latch Key/Clip Console Upright LEFT SIDE Walking Belt Foot Rail RIGHT SIDE Circuit Breaker Rear Roller Adjustment Bolts Cushioned Walking Platform Power Cord 4 until 7 p.m.
English Manual
Page 5
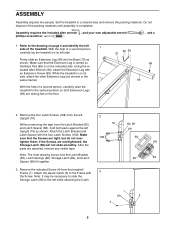
... adjustable wrench phillips screwdriver . , and a 1. With the help of the treadmill. Note: It may be necessary to slide the Storage Latch (69) to the Frame with an Extension Screw (93). ASSEMBLY Assembly requires two people. Remove the four Latch Screws (108) from the treadmill Frame (1). Remove the indicated Screw (4) from the left while attaching the Catch. 1 69 5 4 5 Attach the plastic Catch (5) to the left 2 Upright (70). Attach...
... adjustable wrench phillips screwdriver . , and a 1. With the help of the treadmill. Note: It may be necessary to slide the Storage Latch (69) to the Frame with an Extension Screw (93). ASSEMBLY Assembly requires two people. Remove the four Latch Screws (108) from the treadmill Frame (1). Remove the indicated Screw (4) from the left while attaching the Catch. 1 69 5 4 5 Attach the plastic Catch (5) to the left 2 Upright (70). Attach...
English Manual
Page 6
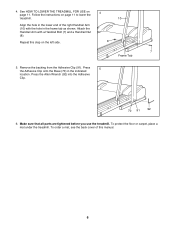
... treadmill. Repeat this manual. 6 Press the Allen Wrench (92) into the Adhesive Clip. 70 91 92 6. Attach the Handrail Arm with the hole in the frame tab as shown. Make sure that all parts are tightened before you use the treadmill. Follow the instructions on 4 page 11. To order a mat, see the back cover of the right Handrail Arm (10) with a Handrail Bolt...
... treadmill. Repeat this manual. 6 Press the Allen Wrench (92) into the Adhesive Clip. 70 91 92 6. Attach the Handrail Arm with the hole in the frame tab as shown. Make sure that all parts are tightened before you use the treadmill. Follow the instructions on 4 page 11. To order a mat, see the back cover of the right Handrail Arm (10) with a Handrail Bolt...
English Manual
Page 7
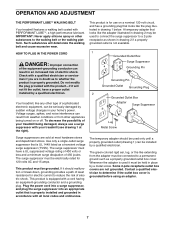
.... This product must be installed by a qualified electrician. Some 2-pole receptacle outlet box covers are sold at the right). HOW TO PLUG IN THE POWER CORD DANGER: Improper connection of least resistance for use a surge suppressor with all local codes and ordinances. Check with PERFORMANT LUBETM, a high-performance lubricant. A temporary adapter that looks like the adapter illustrated in your treadmill (see drawing 1 at...
.... This product must be installed by a qualified electrician. Some 2-pole receptacle outlet box covers are sold at the right). HOW TO PLUG IN THE POWER CORD DANGER: Improper connection of least resistance for use a surge suppressor with all local codes and ordinances. Check with PERFORMANT LUBETM, a high-performance lubricant. A temporary adapter that looks like the adapter illustrated in your treadmill (see drawing 1 at...
English Manual
Page 8
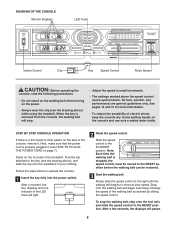
... the console. 1 Insert the key fully into the power switch. After a few seconds, the displays will light. 2 Reset the speed control. Next, make sure that the power cord is removed from the console, the walking belt will stop the walking belt, step onto the foot rails and slide the speed control to the RESET position before the walking belt can be restarted. 3 Start the walking belt. Find the clip attached to move at slow speed. Step onto the walking belt and begin exercising...
... the console. 1 Insert the key fully into the power switch. After a few seconds, the displays will light. 2 Reset the speed control. Next, make sure that the power cord is removed from the console, the walking belt will stop the walking belt, step onto the foot rails and slide the speed control to the RESET position before the walking belt can be restarted. 3 Start the walking belt. Find the clip attached to move at slow speed. Step onto the walking belt and begin exercising...
English Manual
Page 9
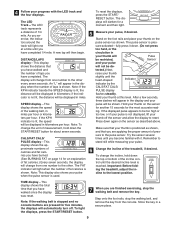
... the walking belt, in kilometers; cator is lit, the PULSE display distance will be displayed in - indicator is ing the treadmill, adjust the in miles. and that your ters per hour. ries you ex- 5 Measure your thumb at a time until the heart-shaped Indicator every seven seconds. To change from one number to the other . Step onto the foot rails, stop the walking belt, and remove the key...
... the walking belt, in kilometers; cator is lit, the PULSE display distance will be displayed in - indicator is ing the treadmill, adjust the in miles. and that your ters per hour. ries you ex- 5 Measure your thumb at a time until the heart-shaped Indicator every seven seconds. To change from one number to the other . Step onto the foot rails, stop the walking belt, and remove the key...
English Manual
Page 10
... ends of injury, use extreme caution while moving the treadmill, convert the treadmill to the desired location. Place one foot on the wheels. Do not attempt to move the treadmill to the storage position as shown. 2. If the incline is closed fully over the latch catch. HOW TO FOLD AND MOVE THE TREADMILL HOW TO FOLD THE TREADMILL FOR STORAGE Before folding the treadmill, adjust the incline to safely lift...
... ends of injury, use extreme caution while moving the treadmill, convert the treadmill to the desired location. Place one foot on the wheels. Do not attempt to move the treadmill to the storage position as shown. 2. If the incline is closed fully over the latch catch. HOW TO FOLD AND MOVE THE TREADMILL HOW TO FOLD THE TREADMILL FOR STORAGE Before folding the treadmill, adjust the incline to safely lift...
English Manual
Page 11
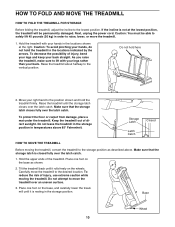
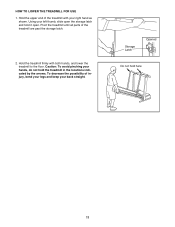
Pivot the treadmill until all parts of injury, bend your legs and keep your left thumb, slide open the storage latch and hold it open. Hold the treadmill firmly with your hands, do not hold here 11 Storage Latch Opened Do not hold the treadmill in the locations indicated by the arrows. Caution: To avoid pinching your right hand as shown. Hold the upper end of the treadmill with both hands, and lower the treadmill to the floor. Using your back straight. To decrease the possibility of the treadmill are past the storage latch. 2. HOW TO LOWER THE TREADMILL FOR USE 1.
Pivot the treadmill until all parts of injury, bend your legs and keep your left thumb, slide open the storage latch and hold it open. Hold the treadmill firmly with your hands, do not hold here 11 Storage Latch Opened Do not hold the treadmill in the locations indicated by the arrows. Caution: To avoid pinching your right hand as shown. Hold the upper end of the treadmill with both hands, and lower the treadmill to the floor. Using your back straight. To decrease the possibility of the treadmill are past the storage latch. 2. HOW TO LOWER THE TREADMILL FOR USE 1.

English Manual
Page 12
... the power cord is plugged in . If nec- 15 37 essary, loosen the Screw (14) and move the Reed Switch slightly. b. Remove the screws from the console. Carefully remove the hood. Reinsert the key fully into the console. (See step 1 on the treadmill frame near the power cord. until the Magnet is aligned with this treadmill. MAINTENANCE AND TROUBLE-SHOOTING For your treadmill in . Check the circuit breaker located on page 8.) c. Most treadmill problems can...
... the power cord is plugged in . If nec- 15 37 essary, loosen the Screw (14) and move the Reed Switch slightly. b. Remove the screws from the console. Carefully remove the hood. Reinsert the key fully into the console. (See step 1 on the treadmill frame near the power cord. until the Magnet is aligned with this treadmill. MAINTENANCE AND TROUBLE-SHOOTING For your treadmill in . Check the circuit breaker located on page 8.) c. Most treadmill problems can...
English Manual
Page 13
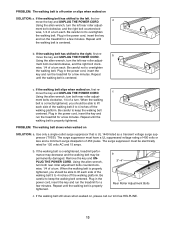
... tightened, you should be electrically rated for a few minutes. Be careful to 4 inches off the walking platform. b 3ÓÐ4Ó Rear Roller Adjustment Bolts c. Be careful not to the right, first re- Plug in the power cord, insert the key and run the treadmill for a few minutes. PROBLEM: The walking belt is off-center or slips when walked on , first remove the key and UNPLUG THE POWER CORD. b. If the walking belt slips when walked...
... tightened, you should be electrically rated for a few minutes. Be careful to 4 inches off the walking platform. b 3ÓÐ4Ó Rear Roller Adjustment Bolts c. Be careful not to the right, first re- Plug in the power cord, insert the key and run the treadmill for a few minutes. PROBLEM: The walking belt is off-center or slips when walked on , first remove the key and UNPLUG THE POWER CORD. b. If the walking belt slips when walked...
English Manual
Page 14
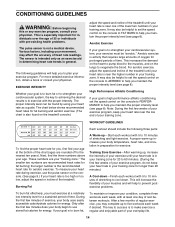
... three numbers above your training zone. Aerobic Exercise If your goal is high performance athletic conditioning, set the speed control on the console to FAT BURN to use the pulse sensor on the treadmill console.) adjust the speed and incline of the treadmill until your heart rate is intended only as a guide. For more detailed exercise information, obtain a book or consult your physician. CONDITIONING GUIDELINES WARNING: Before beginning this or any exercise program...
... three numbers above your training zone. Aerobic Exercise If your goal is high performance athletic conditioning, set the speed control on the console to FAT BURN to use the pulse sensor on the treadmill console.) adjust the speed and incline of the treadmill until your heart rate is intended only as a guide. For more detailed exercise information, obtain a book or consult your physician. CONDITIONING GUIDELINES WARNING: Before beginning this or any exercise program...
English Manual
Page 15
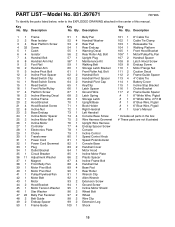
...Description Key No. Bolt Handrail Bolt Handrail Pivot Spacer Handrail Pivot Cap Key/Clip Latch Spacer Ground Wire Latch Spring Storage Latch Upright/Base Book Holder Right Handrail Left Handrail Console Base Screw Wire Harness Grommet Upright Wire Harness Endcap Spacer Screw Console Incline Control Speed Control Knob Speed Potentiometer Console Base Handrail Cover Motor Hood Incline Motor Plate Plastic Spacer Incline Frame Bolt Handrail Nut Base Pad Rear Roller Wrench Clip Allen Wrench Extension Screw Ground Screw Incline Motor Shield Wheel Bolt Wheel Wire Clip Extension Leg Shock...
...Description Key No. Bolt Handrail Bolt Handrail Pivot Spacer Handrail Pivot Cap Key/Clip Latch Spacer Ground Wire Latch Spring Storage Latch Upright/Base Book Holder Right Handrail Left Handrail Console Base Screw Wire Harness Grommet Upright Wire Harness Endcap Spacer Screw Console Incline Control Speed Control Knob Speed Potentiometer Console Base Handrail Cover Motor Hood Incline Motor Plate Plastic Spacer Incline Frame Bolt Handrail Nut Base Pad Rear Roller Wrench Clip Allen Wrench Extension Screw Ground Screw Incline Motor Shield Wheel Bolt Wheel Wire Clip Extension Leg Shock...
English Manual
Page 18
... schedule repair service call the toll-free numbers listed at the left. Model No. 831.297671 QUESTIONS? This warranty gives you specific legal rights, and you need to be prepared to provide the following information: ¥ The NAME OF THE PRODUCT (PROFORM¨ 585 treadmill) ¥ The MODEL NUMBER OF THE PRODUCT (831.297671) ¥ The KEY NUMBER AND DESCRIPTION OF THE PART (see the PART LIST on a decal attached to...
... schedule repair service call the toll-free numbers listed at the left. Model No. 831.297671 QUESTIONS? This warranty gives you specific legal rights, and you need to be prepared to provide the following information: ¥ The NAME OF THE PRODUCT (PROFORM¨ 585 treadmill) ¥ The MODEL NUMBER OF THE PRODUCT (831.297671) ¥ The KEY NUMBER AND DESCRIPTION OF THE PART (see the PART LIST on a decal attached to...


