

English Manual
Page 1
... complete satisfaction through direct assistance from our factory. MST VISIT OUR WEBSITE: www.proformfitness.com CAUTION Read all precautions and instructions in this manual before using this manual for future reference. ¨ USER'S MANUAL CUSTOMER HOT LINE: 1-800-999-3756 Mon.ÐFri., 6 a.m.Ð6 p.m. Model No...
... complete satisfaction through direct assistance from our factory. MST VISIT OUR WEBSITE: www.proformfitness.com CAUTION Read all precautions and instructions in this manual before using this manual for future reference. ¨ USER'S MANUAL CUSTOMER HOT LINE: 1-800-999-3756 Mon.ÐFri., 6 a.m.Ð6 p.m. Model No...

English Manual
Page 2
... a mat under the age of 12 and pets away from the treadmill at least eight feet of clearance behind it. Wear appropriate exercise clothing when using the treadmill. When connecting the power cord (see page 7), plug the power cord into a surge protector (not included) and plug the surge protector...surge protector, rated at a time. 9. Do not put the treadmill in a garage or covered patio, or near water. 5. The treadmill should be used or where oxygen is the responsibility of the owner to ensure that blocks air openings. Never allow more than 250 pounds. 8. Do not place the ...
... a mat under the age of 12 and pets away from the treadmill at least eight feet of clearance behind it. Wear appropriate exercise clothing when using the treadmill. When connecting the power cord (see page 7), plug the power cord into a surge protector (not included) and plug the surge protector...surge protector, rated at a time. 9. Do not put the treadmill in a garage or covered patio, or near water. 5. The treadmill should be used or where oxygen is the responsibility of the owner to ensure that blocks air openings. Never allow more than 250 pounds. 8. Do not place the ...

English Manual
Page 3
... placed on page 10.) You must be performed by an authorized service representative. Apply the decal in general. 17. Always hold the handrails while using . The pulse sensor is fully closed. 21. When folding or moving the treadmill, make sure that the storage latch is not a medical device...the on the walking belt. Never remove the motor hood unless instructed to the off switch.) 18. WARNING: Before beginning this treadmill in use this or any opening. Never start the treadmill while you are standing on /off position when the treadmill is running. Always unplug the power...
... placed on page 10.) You must be performed by an authorized service representative. Apply the decal in general. 17. Always hold the handrails while using . The pulse sensor is fully closed. 21. When folding or moving the treadmill, make sure that the storage latch is not a medical device...the on the walking belt. Never remove the motor hood unless instructed to the off switch.) 18. WARNING: Before beginning this treadmill in use this or any opening. Never start the treadmill while you are standing on /off position when the treadmill is running. Always unplug the power...
English Manual
Page 4
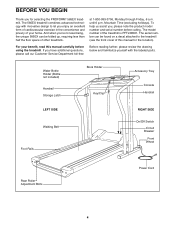
... treadmill combines advanced technology with the labeled parts. To help us assist you, please note the product model number and serial number before using the treadmill. For your home. Water Bottle Holder (Bottle not included) Handrail Storage Latch Book Holder Key/Clip Accessory Tray Console Handrail ...the unique 585EX can be folded up, requiring less than half the floor space of your benefit, read this manual for selecting the PROFORM¨ 585EX treadmill. And when you enjoy an excellent form of cardiovascular exercise in the convenience and privacy of other treadmills. at ...
... treadmill combines advanced technology with the labeled parts. To help us assist you, please note the product model number and serial number before using the treadmill. For your home. Water Bottle Holder (Bottle not included) Handrail Storage Latch Book Holder Key/Clip Accessory Tray Console Handrail ...the unique 585EX can be folded up, requiring less than half the floor space of your benefit, read this manual for selecting the PROFORM¨ 585EX treadmill. And when you enjoy an excellent form of cardiovascular exercise in the convenience and privacy of other treadmills. at ...
English Manual
Page 5
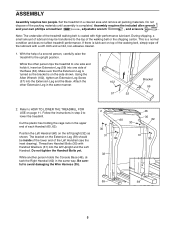
...turned so the bracket is coated with a soft cloth and a mild, non-abrasive cleaner. 1. With the help of the packing materials until assembly is completed. Using the Allen Wrench (102), tighten an Extension Leg Screw (57) into the left Upright (32) as shown. Note: The underside of the walking belt, simply... raise the treadmill to the top of each Handrail (60, 62). Attach the other person tips the treadmill to HOW TO LOWER THE TREADMILL FOR USE on the Extension Leg (59) should be transferred to the upright position. Refer to one side and holds it, insert an Extension Leg (59) ...
...turned so the bracket is coated with a soft cloth and a mild, non-abrasive cleaner. 1. With the help of the packing materials until assembly is completed. Using the Allen Wrench (102), tighten an Extension Leg Screw (57) into the left Upright (32) as shown. Note: The underside of the walking belt, simply... raise the treadmill to the top of each Handrail (60, 62). Attach the other person tips the treadmill to HOW TO LOWER THE TREADMILL FOR USE on the Extension Leg (59) should be transferred to the upright position. Refer to one side and holds it, insert an Extension Leg (59) ...

English Manual
Page 6
Insert any slack into the Adhesive Clip. 32 102 101 7. Tighten all parts are tightened before you use the treadmill. Make sure that all parts used in this step and in the same way. To protect the floor or carpet, place a mat under the Console Base as shown. 3. Attach the lower ...
Insert any slack into the Adhesive Clip. 32 102 101 7. Tighten all parts are tightened before you use the treadmill. Make sure that all parts used in this step and in the same way. To protect the floor or carpet, place a mat under the Console Base as shown. 3. Attach the lower ...

English Manual
Page 7
...seriously damaged by a qualified electrician. Contact a qualified electrician to reduce the risk of the equipment-grounding conductor can be grounded. Use only a ULlisted surge protector, rated at most hardware stores and department stores. Plug the power cord into an ap- They ... Plug Grounding Plug Surge protectors are not grounded. OPERATION AND ADJUSTMENT THE PERFORMANT LUBETM WALKING BELT electric shock. This product must be used to connect the surge protector to a 2-pole receptacle as to a permanent ground such as a properly grounded outlet box cover. ...
...seriously damaged by a qualified electrician. Contact a qualified electrician to reduce the risk of the equipment-grounding conductor can be grounded. Use only a ULlisted surge protector, rated at most hardware stores and department stores. Plug the power cord into an ap- They ... Plug Grounding Plug Surge protectors are not grounded. OPERATION AND ADJUSTMENT THE PERFORMANT LUBETM WALKING BELT electric shock. This product must be used to connect the surge protector to a 2-pole receptacle as to a permanent ground such as a properly grounded outlet box cover. ...

English Manual
Page 8
... spilling liquids on /off switch near the power cord is stopped, the speed control must be moved to the key (see the drawing above) while using the treadmill. Stand on position. Follow the steps below to the RESET position. Slowly slide the speed control to the right until the walking belt... on the foot rails of the walking belt as desired by sliding the speed control. Next, make sure that Position the on the console and use only a sealable water bottle. Slide the speed control to move at slow speed.
... spilling liquids on /off switch near the power cord is stopped, the speed control must be moved to the key (see the drawing above) while using the treadmill. Stand on position. Follow the steps below to the RESET position. Slowly slide the speed control to the right until the walking belt... on the foot rails of the walking belt as desired by sliding the speed control. Next, make sure that Position the on the console and use only a sealable water bottle. Slide the speed control to move at slow speed.

English Manual
Page 9
... have burned. (See BURNING FAT on page 14 for about seven seconds. The pulse sensor is shown. Hold your pulse when the pulse sensor is used. Note: To change from the console. Note: This display also shows your thumb on the sensor as shown, and that you have walked since the...
... have burned. (See BURNING FAT on page 14 for about seven seconds. The pulse sensor is shown. Hold your pulse when the pulse sensor is used. Note: To change from the console. Note: This display also shows your thumb on the sensor as shown, and that you have walked since the...

English Manual
Page 10
Using your back. Do not hold the treadmill firmly. Place one foot against a wheel. Raise the treadmill about halfway to the storage position. To protect the ... storage latch is not done, the treadmill may be permanently damaged. If this is fully engaged over the catch. Keep the treadmill out of injury, use extreme caution while moving the treadmill, convert the treadmill to the lowest position. Do not leave the treadmill in the storage position in the locations...
Using your back. Do not hold the treadmill firmly. Place one foot against a wheel. Raise the treadmill about halfway to the storage position. To protect the ... storage latch is not done, the treadmill may be permanently damaged. If this is fully engaged over the catch. Keep the treadmill out of injury, use extreme caution while moving the treadmill, convert the treadmill to the lowest position. Do not leave the treadmill in the storage position in the locations...
English Manual
Page 11
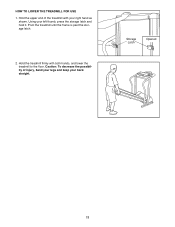
HOW TO LOWER THE TREADMILL FOR USE 1. Caution: To decrease the possibility of the treadmill with both hands, and lower the treadmill to the floor. Storage Latch Opened 11 Hold the treadmill firmly with your right hand as shown. Using your back straight. Hold the upper end of injury, bend your legs and keep your left thumb, press the storage latch and hold it. Pivot the treadmill until the frame is past the storage latch. 2.
HOW TO LOWER THE TREADMILL FOR USE 1. Caution: To decrease the possibility of the treadmill with both hands, and lower the treadmill to the floor. Storage Latch Opened 11 Hold the treadmill firmly with your right hand as shown. Using your back straight. Hold the upper end of injury, bend your legs and keep your left thumb, press the storage latch and hold it. Pivot the treadmill until the frame is past the storage latch. 2.

English Manual
Page 12
...8.) c. Retighten the Screw. until the Magnet is fully inserted into a properly grounded outlet. (See HOW TO PLUG IN THE POWER CORD on page 7.) Use only a UL-listed surge protector, rated at 1-800-999-3756, Monday through Friday, 6 a.m. If the switch protrudes as shown, the circuit breaker has ...not turn on the treadmill near the power cord. Make sure that the power cord is plugged into the console. (See step 1 on /off during use SOLUTION: a. b. Check the on page 8.) d. Reinsert the key fully into a surge protector, and that applies, and follow the steps listed. ...
...8.) c. Retighten the Screw. until the Magnet is fully inserted into a properly grounded outlet. (See HOW TO PLUG IN THE POWER CORD on page 7.) Use only a UL-listed surge protector, rated at 1-800-999-3756, Monday through Friday, 6 a.m. If the switch protrudes as shown, the circuit breaker has ...not turn on the treadmill near the power cord. Make sure that the power cord is plugged into the console. (See step 1 on /off during use SOLUTION: a. b. Check the on page 8.) d. Reinsert the key fully into a surge protector, and that applies, and follow the steps listed. ...

English Manual
Page 13
...properly tightened, you should be permanently damaged. Plug in the power cord, insert the key and run the treadmill for a few minutes. Using b the allen wrench, turn the left rear roller adjustment bolt clockwise, and the right bolt counterclockwise, 1/4 of a turn each .... is off the walking platform. Be careful to keep the walking belt centered. If the walking belt still slows when walked on SOLUTION: a. Using a the allen wrench, turn both rear roller adjustment bolts counterclockwise, 1/4 of a turn . b 2ÓÐ3Ó Rear Roller Adjustment Bolts...
...properly tightened, you should be permanently damaged. Plug in the power cord, insert the key and run the treadmill for a few minutes. Using b the allen wrench, turn the left rear roller adjustment bolt clockwise, and the right bolt counterclockwise, 1/4 of a turn each .... is off the walking platform. Be careful to keep the walking belt centered. If the walking belt still slows when walked on SOLUTION: a. Using a the allen wrench, turn both rear roller adjustment bolts counterclockwise, 1/4 of a turn . b 2ÓÐ3Ó Rear Roller Adjustment Bolts...
English Manual
Page 14
...20 minutes.) Breathe regularly and deeply as you , first find your training zone, or set the speed control on the console to plan your body uses easily accessible carbohydrate calories for energy. RememberÑthese are rounded off to oxygenate the blood. For more detailed exercise information, obtain a reputable book...burn fat, adjust the speed and incline of the treadmill until your heart rate is to burn fat or to strengthen your body begin to use the pulse sensor on the lungs to the nearest ten years). The proper intensity level can be Òaerobic.Ó Aerobic exercise is ...
...20 minutes.) Breathe regularly and deeply as you , first find your training zone, or set the speed control on the console to plan your body uses easily accessible carbohydrate calories for energy. RememberÑthese are rounded off to oxygenate the blood. For more detailed exercise information, obtain a reputable book...burn fat, adjust the speed and incline of the treadmill until your heart rate is to burn fat or to strengthen your body begin to use the pulse sensor on the lungs to the nearest ten years). The proper intensity level can be Òaerobic.Ó Aerobic exercise is ...

English Manual
Page 16
... Bolt Latch Warning Decal Belly Pan Screw Belly Pan Isolator Frame Pivot Bolt Hood Screw/Bracket Screw Hood Key/Clip Book Rack Battery Cover Not Used Incline Control Speed Control Speed Potentiometer Screw Rear Platform Screw Handrail Bolt Handrail Washer Upright/Base Latch Spacer Latch Wire Harness Grommet Incline Motor Nut...
... Bolt Latch Warning Decal Belly Pan Screw Belly Pan Isolator Frame Pivot Bolt Hood Screw/Bracket Screw Hood Key/Clip Book Rack Battery Cover Not Used Incline Control Speed Control Speed Potentiometer Screw Rear Platform Screw Handrail Bolt Handrail Washer Upright/Base Latch Spacer Latch Wire Harness Grommet Incline Motor Nut...

English Manual
Page 18
...product to be prepared to give the following information: ¥ The MODEL NUMBER OF THE PRODUCT (PFTL58581). ¥ The NAME OF THE PRODUCT (PROFORM¨ 585EX treadmill). ¥ The SERIAL NUMBER OF THE PRODUCT (see the front cover of this manual). ¥ The KEY NUMBER AND DESCRIPTION... of ninety (90) days from state to the center of incidental or consequential damages. Accordingly, the above is in connection with the use and service conditions, for indirect, special or consequential damages arising out of or in lieu of any implied warranties of its authorized service centers...
...product to be prepared to give the following information: ¥ The MODEL NUMBER OF THE PRODUCT (PFTL58581). ¥ The NAME OF THE PRODUCT (PROFORM¨ 585EX treadmill). ¥ The SERIAL NUMBER OF THE PRODUCT (see the front cover of this manual). ¥ The KEY NUMBER AND DESCRIPTION... of ninety (90) days from state to the center of incidental or consequential damages. Accordingly, the above is in connection with the use and service conditions, for indirect, special or consequential damages arising out of or in lieu of any implied warranties of its authorized service centers...

