
Uk Manual
Page 3
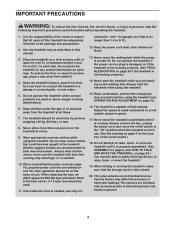
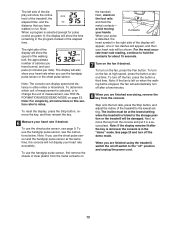
... information before using the treadmill (see page 10), plug the power cord into an earthed circuit. When connecting the power cord (see OPERATION AND ADJUSTMENT on page 10). 16. Place the treadmill on a level surface, with bare feet, wearing only stockings, or in the treadmill. Keep children under the treadmill. 4. Always remove the key, unplug the power cord, and move the walking belt while the power is not in general. 3 When folding...
... information before using the treadmill (see page 10), plug the power cord into an earthed circuit. When connecting the power cord (see OPERATION AND ADJUSTMENT on page 10). 16. Place the treadmill on a level surface, with bare feet, wearing only stockings, or in the treadmill. Keep children under the treadmill. 4. Always remove the key, unplug the power cord, and move the walking belt while the power is not in general. 3 When folding...
Uk Manual
Page 4
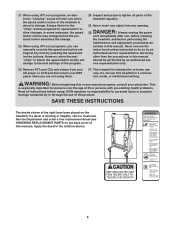
... Customer Service Department and order a free replacement decal (see ORDERING REPLACEMENT PARTS on the treadmill. SAVE THESE INSTRUCTIONS The decals shown at any opening. Apply the decal in -home use , before cleaning the treadmill, and before the personal trainer describes the change to do so by an authorised ser- In some instances, the speed and/or incline may change before performing the maintenance and adjustment procedures de- Remove iFIT.com...
... Customer Service Department and order a free replacement decal (see ORDERING REPLACEMENT PARTS on the treadmill. SAVE THESE INSTRUCTIONS The decals shown at any opening. Apply the decal in -home use , before cleaning the treadmill, and before the personal trainer describes the change to do so by an authorised ser- In some instances, the speed and/or incline may change before performing the maintenance and adjustment procedures de- Remove iFIT.com...
Uk Manual
Page 5
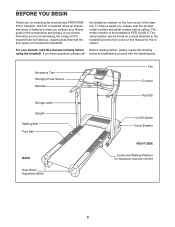
... privacy of this manual for the location). For your home. Accessory Tray Handgrip Pulse Sensor Handrail Storage Latch Upright Walking Belt Foot Rail BACK Rear Roller Adjustment Bolts Fan Console Key/Clip On/Off Switch Circuit Breaker RIGHT SIDE Cushioned Walking Platform for selecting the revolutionary PROFORM® 570 V treadmill. And when you're not exercising, the unique 570 V treadmill can be folded up, requiring less than half the floor space of conventional treadmills. The 570 V treadmill offers an...
... privacy of this manual for the location). For your home. Accessory Tray Handgrip Pulse Sensor Handrail Storage Latch Upright Walking Belt Foot Rail BACK Rear Roller Adjustment Bolts Fan Console Key/Clip On/Off Switch Circuit Breaker RIGHT SIDE Cushioned Walking Platform for selecting the revolutionary PROFORM® 570 V treadmill. And when you're not exercising, the unique 570 V treadmill can be folded up, requiring less than half the floor space of conventional treadmills. The 570 V treadmill offers an...

Uk Manual
Page 8
... treadmill. Tighten the two Console Bolts indicated by the arrows first; the large hex key is used to the connectors on the Uprights (97). Make sure that the wires are properly tightened before you use the treadmill. Drawing 5a shows the correct route for the Trays (111, 112). Set the Console Base (101) on the sides of the Console Base. Insert the excess Wire Harness and pulse wire...
... treadmill. Tighten the two Console Bolts indicated by the arrows first; the large hex key is used to the connectors on the Uprights (97). Make sure that the wires are properly tightened before you use the treadmill. Drawing 5a shows the correct route for the Trays (111, 112). Set the Console Base (101) on the sides of the Console Base. Insert the excess Wire Harness and pulse wire...

Uk Manual
Page 9
... instructions on the following pages explain how the chest pulse sensor is activated when the electrode areas are covered by high power lines or other container that this is suspected that may need to work with the console. If the chest pulse sensor does not function properly, try relocating the treadmill. • The CR2032 battery may trap moisture. • Do not expose the chest pulse sensor to display heart rate...
... instructions on the following pages explain how the chest pulse sensor is activated when the electrode areas are covered by high power lines or other container that this is suspected that may need to work with the console. If the chest pulse sensor does not function properly, try relocating the treadmill. • The CR2032 battery may trap moisture. • Do not expose the chest pulse sensor to display heart rate...

Uk Manual
Page 10
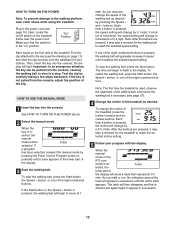
... outlets. 2 Screw Adapter Cover Adapter 3 Pins Metal Clips Outlet DANGER: Improper connection of the power cord into an appropriate outlet that is secure and that the adapter cover is properly installed and earthed in - OPERATION AND ADJUSTMENT THE PERFORMANT LUBE™ WALKING BELT Your treadmill features a walking belt coated with the product-if it will deteriorate the walking belt and cause excessive wear. HOW TO PLUG IN THE POWER CORD This product...
... outlets. 2 Screw Adapter Cover Adapter 3 Pins Metal Clips Outlet DANGER: Improper connection of the power cord into an appropriate outlet that is secure and that the adapter cover is properly installed and earthed in - OPERATION AND ADJUSTMENT THE PERFORMANT LUBE™ WALKING BELT Your treadmill features a walking belt coated with the product-if it will deteriorate the walking belt and cause excessive wear. HOW TO PLUG IN THE POWER CORD This product...

Uk Manual
Page 11
... telephone number on the front cover of the treadmill to your workouts. The console also offers two pulse control programs that control the speed and incline of your computer, you exercise, the console will display continuous exercise feedback. The console also features iFIT.com interactive technology. To use an iFIT.com MP3, CD, or video program, see page 14. To use the manual mode of the console, follow the steps beginning on the face of the console, remove...
... telephone number on the front cover of the treadmill to your workouts. The console also offers two pulse control programs that control the speed and incline of your computer, you exercise, the console will display continuous exercise feedback. The console also features iFIT.com interactive technology. To use an iFIT.com MP3, CD, or video program, see page 14. To use the manual mode of the console, follow the steps beginning on the face of the console, remove...
Uk Manual
Page 12
... a stop the walking belt, press the Stop button. Track lected, the lower part of the eight numbered buttons. Make sure that represents 1/4 mile. Test the clip by pressing the Pulse Control Program button re- To start the walking belt, press the Start button, the Speed + button, or one of the display will show a track that the switch is pressed, the speed setting will change by pressing the Speed + and - Each time a button is in the "on the foot rails of the treadmill, press the Incline increase and decrease buttons...
... a stop the walking belt, press the Stop button. Track lected, the lower part of the eight numbered buttons. Make sure that represents 1/4 mile. Test the clip by pressing the Pulse Control Program button re- To start the walking belt, press the Start button, the Speed + button, or one of the display will show a track that the switch is pressed, the speed setting will change by pressing the Speed + and - Each time a button is in the "on the foot rails of the treadmill, press the Incline increase and decrease buttons...
Uk Manual
Page 13
... the contacts for pulse control program 1), the display will show the speed of the walking belt, the approximate number of the display will appear, one or two dashes will automatically turn off the demo mode. Note: The console can display speed and distance in this section refer to the lowest setting. To use the handgrip pulse sensor or the chest pulse sensor. Note: When a program is selected, or to change the unit of the treadmill to miles.
... the contacts for pulse control program 1), the display will show the speed of the walking belt, the approximate number of the display will appear, one or two dashes will automatically turn off the demo mode. Note: The console can display speed and distance in this section refer to the lowest setting. To use the handgrip pulse sensor or the chest pulse sensor. Note: When a program is selected, or to change the unit of the treadmill to miles.

Uk Manual
Page 15
... turn off " position and unplug the power cord. 2 Select one of the speed programs. To select one of the treadmill during the program, press the Incline increase and decrease buttons. 4 When you are finished using the treadmill, switch the on/off switch to start the program. See step 6 on the fan if desired. Next, remove the key from the console and put it in the "demo" mode. To change the incline of the speed programs, press the Speed Program button...
... turn off " position and unplug the power cord. 2 Select one of the speed programs. To select one of the treadmill during the program, press the Incline increase and decrease buttons. 4 When you are finished using the treadmill, switch the on/off switch to start the program. See step 6 on the fan if desired. Next, remove the key from the console and put it in the "demo" mode. To change the incline of the speed programs, press the Speed Program button...

Uk Manual
Page 16
... workout, simply stop the program before it ends.) Pulse control program 2 is selected, a heart symbol will appear in the matrix in the lower part of the display. The target heart rate settings for Current Segment the first seg- You must wear the chest pulse sensor to use the pulse control programs. If you select. If desired, press the Incline increase or decrease button to change the maximum target heart rate setting (see the drawing above). One target heart rate setting...
... workout, simply stop the program before it ends.) Pulse control program 2 is selected, a heart symbol will appear in the matrix in the lower part of the display. The target heart rate settings for Current Segment the first seg- You must wear the chest pulse sensor to use the pulse control programs. If you select. If desired, press the Incline increase or decrease button to change the maximum target heart rate setting (see the drawing above). One target heart rate setting...

Uk Manual
Page 17
... the console compares your heart rate to the target heart rate setting, the speed and/or incline of the treadmill may automatically change to bring your heart rate closer to flash in the display. The walking belt will begin to the target heart rate setting. 6 Follow your progress with the Speed or Incline buttons. When only three seconds remain in the first segment, both pulse control programs, the console will sound. If this occurs, see CHEST PULSE SENSOR TROUBLESHOOTING...
... the console compares your heart rate to the target heart rate setting, the speed and/or incline of the treadmill may automatically change to bring your heart rate closer to flash in the display. The walking belt will begin to the target heart rate setting. 6 Follow your progress with the Speed or Incline buttons. When only three seconds remain in the first segment, both pulse control programs, the console will sound. If this occurs, see CHEST PULSE SENSOR TROUBLESHOOTING...

Uk Manual
Page 20
... TO CONNECT THE TREADMILL TO USE IFIT.COM PROGRAMS on the console. Plug the other end of the treadmill is pressed, your personal trainer will appear in VCR, see instruction B. To select the iFIT.com mode, press the iFIT button. The treadmill will alert you when the speed and/or incline of the cable into the input jack on page 19. HOW TO CONNECT YOUR VCR Note: If your workout. To purchase iFIT...
... TO CONNECT THE TREADMILL TO USE IFIT.COM PROGRAMS on the console. Plug the other end of the treadmill is pressed, your personal trainer will appear in VCR, see instruction B. To select the iFIT.com mode, press the iFIT button. The treadmill will alert you when the speed and/or incline of the cable into the input jack on page 19. HOW TO CONNECT YOUR VCR Note: If your workout. To purchase iFIT...
Uk Manual
Page 21
... properly connected. • If you are finished exercising, remove the key from your CD player and VCR and disconnect your progress with the display. CAUTION: Always remove iFIT.com CDs and videocassettes from the console. When the next "chirp" is completed, the walking belt will begin to the next settings of the treadmill does not change to step 1 on the console. See step 6 on page 13. 6 Turn...
... properly connected. • If you are finished exercising, remove the key from your CD player and VCR and disconnect your progress with the display. CAUTION: Always remove iFIT.com CDs and videocassettes from the console. When the next "chirp" is completed, the walking belt will begin to the next settings of the treadmill does not change to step 1 on the console. See step 6 on page 13. 6 Turn...
Uk Manual
Page 23
... the iFIT.com mode. When the on -line instructions for speed and/or incline changes. To restart the program, press the Start button or the Speed + button. A list of the treadmill is heard, the speed and incline will appear in the display. If the speed or incline settings are too high or too low, you must be prepared for using a program. 6 Follow the on the foot rails. Hold the handrails, step onto the walking belt...
... the iFIT.com mode. When the on -line instructions for speed and/or incline changes. To restart the program, press the Start button or the Speed + button. A list of the treadmill is heard, the speed and incline will appear in the display. If the speed or incline settings are too high or too low, you must be prepared for using a program. 6 Follow the on the foot rails. Hold the handrails, step onto the walking belt...

Uk Manual
Page 27
... THE POWER CORD. Top View PROBLEM: The walking belt slows when walked on , remove the key and UNPLUG THE POWER CORD. When the walking belt is properly tightened. If the walking belt a has shifted to lift each edge of the walking belt 5-7 cm (2-3 in .) off . 54 97 Locate the Reed Switch (22) and the Magnet (19) on the treadmill for a correct speed reading. Plug in .). Using b the hex key, turn the left rear roller bolt clockwise 1/2 of the Pulley (18...
... THE POWER CORD. Top View PROBLEM: The walking belt slows when walked on , remove the key and UNPLUG THE POWER CORD. When the walking belt is properly tightened. If the walking belt a has shifted to lift each edge of the walking belt 5-7 cm (2-3 in .) off . 54 97 Locate the Reed Switch (22) and the Magnet (19) on the treadmill for a correct speed reading. Plug in .). Using b the hex key, turn the left rear roller bolt clockwise 1/2 of the Pulley (18...
Uk Manual
Page 29
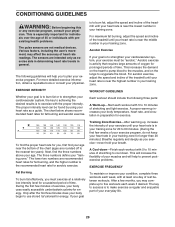
CONDITIONING GUIDELINES WARNING: Before beginning this or any exercise program, consult your heart rate as a guide. The sensors are not medical devices. For maximum fat burning, adjust the speed and incline of stretching to 10 minutes of the treadmill until your breath. A proper warm-up to five workouts each workout with 5 to cool down -Finish each week, with at a relatively low intensity level...
CONDITIONING GUIDELINES WARNING: Before beginning this or any exercise program, consult your heart rate as a guide. The sensors are not medical devices. For maximum fat burning, adjust the speed and incline of stretching to 10 minutes of the treadmill until your breath. A proper warm-up to five workouts each workout with 5 to cool down -Finish each week, with at a relatively low intensity level...

Uk Manual
Page 30
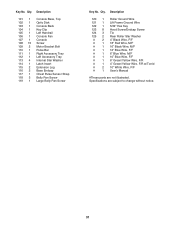
.../Off Switch 48 1 Controller 49 1 Power Cord 50 1 Power Cord Adapter 51 1 Circuit Breaker 52 1 Receptical 53 3 Belly Pan Clip 54 1 Belly Pan 55 1 Releasable Tie 56 1 Photo Switch Wire 57 1 Tie Holder Clamp 58 9 Cable Tie 59 1 Frame 60 1 Right Rear Foot 61 2 Motor Tension Bolt 62 2 Rear Roller Adj, Bolt 63 1 Rear Roller 64 1 Hex Key 65 1 Chest Pulse Sensor 66 1 Left Rear Foot 67 1 Right Foot Rail 68 1 Walking Belt 69 1 Latch Warning...
.../Off Switch 48 1 Controller 49 1 Power Cord 50 1 Power Cord Adapter 51 1 Circuit Breaker 52 1 Receptical 53 3 Belly Pan Clip 54 1 Belly Pan 55 1 Releasable Tie 56 1 Photo Switch Wire 57 1 Tie Holder Clamp 58 9 Cable Tie 59 1 Frame 60 1 Right Rear Foot 61 2 Motor Tension Bolt 62 2 Rear Roller Adj, Bolt 63 1 Rear Roller 64 1 Hex Key 65 1 Chest Pulse Sensor 66 1 Left Rear Foot 67 1 Right Foot Rail 68 1 Walking Belt 69 1 Latch Warning...
Uk Manual
Page 31
..." White Wire, F/F # 1 User's Manual #These parts are subject to change without notice. 31 Specifications are not illustrated. Key No. Qty. Qty. Description 101 1 Console Base, Top 102 1 Optic Disk 103 1 Console Back 104 1 Key Clip 105 1 Left Handrail 106 1 Console Fan 107 1 Console 108 15 Screw 109 2 Motor Bracket Bolt 110 1 Pulse Bar 111 1 Right Accessory Tray 112 1 Left Accessory Tray 113 4 Internal Star Washer 114 1 Latch Insert...
..." White Wire, F/F # 1 User's Manual #These parts are subject to change without notice. 31 Specifications are not illustrated. Key No. Qty. Qty. Description 101 1 Console Base, Top 102 1 Optic Disk 103 1 Console Back 104 1 Key Clip 105 1 Left Handrail 106 1 Console Fan 107 1 Console 108 15 Screw 109 2 Motor Bracket Bolt 110 1 Pulse Bar 111 1 Right Accessory Tray 112 1 Left Accessory Tray 113 4 Internal Star Washer 114 1 Latch Insert...

Uk Manual
Page 34
... (PROFORM 570 V treadmill) • the SERIAL NUMBER of the product (see the front cover of this manual) • the KEY NUMBER AND DESCRIPTION OF THE PART(S) (see the PART LIST on pages 30 and 31 and the EXPLODED DRAWING in the centre of this manual) Part No. 235862 R0106A Printed in USA © 2005 ICON IP, Inc. office, or write: ICON Health & Fitness, Ltd. ORDERING REPLACEMENT PARTS To order replacement parts, contact...
... (PROFORM 570 V treadmill) • the SERIAL NUMBER of the product (see the front cover of this manual) • the KEY NUMBER AND DESCRIPTION OF THE PART(S) (see the PART LIST on pages 30 and 31 and the EXPLODED DRAWING in the centre of this manual) Part No. 235862 R0106A Printed in USA © 2005 ICON IP, Inc. office, or write: ICON Health & Fitness, Ltd. ORDERING REPLACEMENT PARTS To order replacement parts, contact...

