

English Manual
Page 2
TABLE OF CONTENTS IMPORTANT PRECAUTIONS 3 BEFORE YOU BEGIN 4 PART IDENTIFICATION CHART 5 ASSEMBLY 6 HOW TO USE THE ELLIPTICAL TRAINER 9 MAINTENANCE 11 CONDITIONING GUIDELINES 12 PART LIST 14 EXPLODED DRAWING 15 HOW TO ORDER REPLACEMENT PARTS Back Cover FULL 90 DAY WARRANTY Back Cover 2
TABLE OF CONTENTS IMPORTANT PRECAUTIONS 3 BEFORE YOU BEGIN 4 PART IDENTIFICATION CHART 5 ASSEMBLY 6 HOW TO USE THE ELLIPTICAL TRAINER 9 MAINTENANCE 11 CONDITIONING GUIDELINES 12 PART LIST 14 EXPLODED DRAWING 15 HOW TO ORDER REPLACEMENT PARTS Back Cover FULL 90 DAY WARRANTY Back Cover 2
English Manual
Page 3
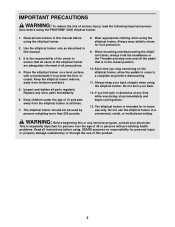
... Read all instructions in a commercial, rental, or institutional setting. WARNING: Before beginning this product. 3 tions before using the PROFORM® 545E elliptical trainer. 1. If you stop immediately and begin cooling down. 13. SEARS assumes no responsibility for foot protection. 9. Keep ...manual before using the elliptical trainer. 2. The elliptical trainer should not be used by or through the use of all parts regularly. This is intended for persons over the age of serious injury, read the following important precau- IMPORTANT PRECAUTIONS WARNING...
... Read all instructions in a commercial, rental, or institutional setting. WARNING: Before beginning this product. 3 tions before using the PROFORM® 545E elliptical trainer. 1. If you stop immediately and begin cooling down. 13. SEARS assumes no responsibility for foot protection. 9. Keep ...manual before using the elliptical trainer. 2. The elliptical trainer should not be used by or through the use of all parts regularly. This is intended for persons over the age of serious injury, read the following important precau- IMPORTANT PRECAUTIONS WARNING...
English Manual
Page 4
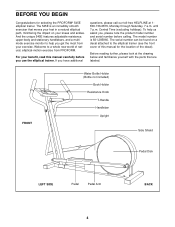
...manual carefully before calling. until 7 p.m. The serial number can be found on your exercise. For your benefit, read this manual for selecting the PROFORM® 545E elliptical trainer. Before reading further, please look at 1800-736-6879, Monday through Saturday, 7 a.m. Welcome to a whole new world of natural... number before you have additional questions, please call our toll-free HELPLINE at the drawing below and familiarize yourself with the parts that moves your feet in a natural elliptical path, minimizing the impact on a decal attached to help us assist you get the...
...manual carefully before calling. until 7 p.m. The serial number can be found on your exercise. For your benefit, read this manual for selecting the PROFORM® 545E elliptical trainer. Before reading further, please look at 1800-736-6879, Monday through Saturday, 7 a.m. Welcome to a whole new world of natural... number before you have additional questions, please call our toll-free HELPLINE at the drawing below and familiarize yourself with the parts that moves your feet in a natural elliptical path, minimizing the impact on a decal attached to help us assist you get the...
English Manual
Page 5
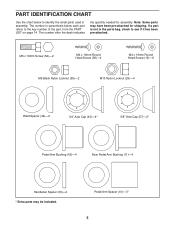
Note: Some parts may be included. If a part is not in the parts bag, check to identify the small parts used in parenthesis below to see if it has been pre-attached. M6 x 16mm Screw (54)-2 M4 x 16mm Round Head Screw (38)-4 M4 x 19mm Round ... Bushing (42)-4 Rear Pedal Arm Bushing (11)-4 Handlebar Spacer (39)-2 * Extra parts may have been pre-attached for assembly. Pedal Arm Spacer (41)-3* 5 PART IDENTIFICATION CHART Use the chart below each part refers to the key number of the part, from the PART LIST on page 14. The number after the dash indicates the quantity...
Note: Some parts may be included. If a part is not in the parts bag, check to identify the small parts used in parenthesis below to see if it has been pre-attached. M6 x 16mm Screw (54)-2 M4 x 16mm Round Head Screw (38)-4 M4 x 19mm Round ... Bushing (42)-4 Rear Pedal Arm Bushing (11)-4 Handlebar Spacer (39)-2 * Extra parts may have been pre-attached for assembly. Pedal Arm Spacer (41)-3* 5 PART IDENTIFICATION CHART Use the chart below each part refers to the key number of the part, from the PART LIST on page 14. The number after the dash indicates the quantity...
English Manual
Page 6
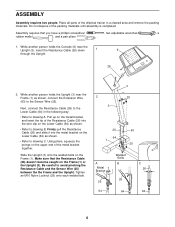
Place all parts of the Resistance Cable (26) into the metal bracket on the Lower Cable (64) as shown. • Refer to drawing B. While another person holds the ...
Place all parts of the Resistance Cable (26) into the metal bracket on the Lower Cable (64) as shown. • Refer to drawing B. While another person holds the ...
English Manual
Page 7
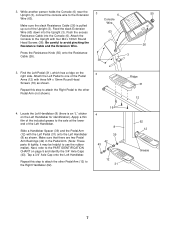
...(there is pulled Wire up out of the Upright (3). Make sure that there are two Pedal Arm Bushings (42) in the Pedal Arm. (Note: These parts fit tightly; Repeat this step to the axle at the lower end of the Pedal Arms (12) with four M4 x 16mm Round Head Screws (38... Left Handlebar. Console Make sure the slack Resistance Cable (26) is an "L" sticker on the Left Handlebar for identification). Attach the Left Pedal to the PART IDENTIFICATION CHART on the 3 right side. Slide a Handlebar Spacer (39) and the Pedal Arm (12) with the Left Pedal (31) onto the Left Handlebar ...
...(there is pulled Wire up out of the Upright (3). Make sure that there are two Pedal Arm Bushings (42) in the Pedal Arm. (Note: These parts fit tightly; Repeat this step to the axle at the lower end of the Pedal Arms (12) with four M4 x 16mm Round Head Screws (38... Left Handlebar. Console Make sure the slack Resistance Cable (26) is an "L" sticker on the Left Handlebar for identification). Attach the Left Pedal to the PART IDENTIFICATION CHART on the 3 right side. Slide a Handlebar Spacer (39) and the Pedal Arm (12) with the Left Pedal (31) onto the Left Handlebar ...
English Manual
Page 8
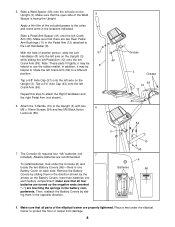
Make sure that all four batteries are turned so the negative ends (marked "-") are recommended. Note: These parts fit tightly; Alkaline batteries are touching the springs in the Pedal Arm (12) attached to use the rubber mallet. Then, reattach the ... Spacer (49) onto the left axle on the Upright (3). Tap a 5/8" Axle Cap (57) onto the left axle on the Upright (3). Make sure that all parts of another person, slide the Left 57 Handlebar (8) onto the left axle on each battery compartment; The Console (6) requires four "AA" batteries (not 7 included). ...
Make sure that all four batteries are turned so the negative ends (marked "-") are recommended. Note: These parts fit tightly; Alkaline batteries are touching the springs in the Pedal Arm (12) attached to use the rubber mallet. Then, reattach the ... Spacer (49) onto the left axle on the Upright (3). Tap a 5/8" Axle Cap (57) onto the left axle on the Upright (3). Make sure that all parts of another person, slide the Left 57 Handlebar (8) onto the left axle on each battery compartment; The Console (6) requires four "AA" batteries (not 7 included). ...
English Manual
Page 11
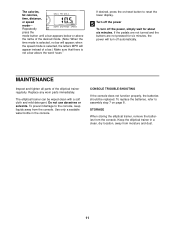
...sure that there is selected, no bar will turn off the power, simply wait for six minutes, the power will appear; Replace any worn parts immediately. STORAGE When storing the elliptical trainer, remove the batteries from the console. Repeatedly press the mode button until a bar appears below or...about six minutes. Do not use abrasives or solvents. The calories, fat calories, time, distance, or speed mode- MAINTENANCE Inspect and tighten all parts of the desired mode. (Note: When the time mode is not a bar above the word "scan." CONSOLE TROUBLE-SHOOTING If the console does...
...sure that there is selected, no bar will turn off the power, simply wait for six minutes, the power will appear; Replace any worn parts immediately. STORAGE When storing the elliptical trainer, remove the batteries from the console. Repeatedly press the mode button until a bar appears below or...about six minutes. Do not use abrasives or solvents. The calories, fat calories, time, distance, or speed mode- MAINTENANCE Inspect and tighten all parts of the desired mode. (Note: When the time mode is not a bar above the word "scan." CONSOLE TROUBLE-SHOOTING If the console does...

English Manual
Page 12
..., if your six-second heartbeat count is 14, your heart rate is 140 beats per minute. (A six-second count is make exercise a regular and enjoyable part of stretching and light exercise (see page 13). This will increase the flexibility of your muscles and will help to 30 minutes of oxygen for... to prevent post-exercise problems. EXERCISE FREQUENCY To maintain or improve your condition, plan three workouts each week, if desired. CONDITIONING GUIDELINES The following three parts: To find your everyday life. 12
..., if your six-second heartbeat count is 14, your heart rate is 140 beats per minute. (A six-second count is make exercise a regular and enjoyable part of stretching and light exercise (see page 13). This will increase the flexibility of your muscles and will help to 30 minutes of oxygen for... to prevent post-exercise problems. EXERCISE FREQUENCY To maintain or improve your condition, plan three workouts each week, if desired. CONDITIONING GUIDELINES The following three parts: To find your everyday life. 12
English Manual
Page 14
Qty. "*" indicates that an extra part may be included. Description 1 1 Frame 2 2 T-Handle Endcap 3 1 Upright 4 1 Right Side Shield 5 1 Left Side Shield 6 1 Console 7 2 Foam Handlebar Grip 8 1 Left Handlebar 9 2 M8 Lock ... Cable 65 1 Console Back 66 2 Battery Cover # 1 User's Manual # 2 Side Shield Decal # 1 Warning Decal # 1 Hardware Kit # 1 Grease Packet Note: "#" indicates a non-illustrated part. PART LIST-Model No. 831.285960 R0501A Key No. Specifications are subject to change without notice. See the back cover of this manual for information about...
Qty. "*" indicates that an extra part may be included. Description 1 1 Frame 2 2 T-Handle Endcap 3 1 Upright 4 1 Right Side Shield 5 1 Left Side Shield 6 1 Console 7 2 Foam Handlebar Grip 8 1 Left Handlebar 9 2 M8 Lock ... Cable 65 1 Console Back 66 2 Battery Cover # 1 User's Manual # 2 Side Shield Decal # 1 Warning Decal # 1 Hardware Kit # 1 Grease Packet Note: "#" indicates a non-illustrated part. PART LIST-Model No. 831.285960 R0501A Key No. Specifications are subject to change without notice. See the back cover of this manual for information about...
English Manual
Page 16
...-7 pm Central Time (excluding holidays) The model number and serial number of the decal. All replacement parts are listed on a decal attached to the frame. When requesting help assembling or operating the PROFORM® 545E • a part is used commercially or for immediate purchase or special order when you need help or service, or...
...-7 pm Central Time (excluding holidays) The model number and serial number of the decal. All replacement parts are listed on a decal attached to the frame. When requesting help assembling or operating the PROFORM® 545E • a part is used commercially or for immediate purchase or special order when you need help or service, or...


