
Uk Manual
Page 2
... page 7), plug the power cord into an earthed circuit. A 13 amp fuse should be used. If an extension cord is needed, use the treadmill with two meters (eight feet) of burns, fire, electric shock, or injury to a plug. 9. Keep the power cord away from moisture and...clearance behind it. TABLE OF CONTENTS IMPORTANT PRECAUTIONS 2 BEFORE YOU BEGIN 4 ASSEMBLY 5 OPERATION AND ADJUSTMENT 7 HOW TO FOLD AND MOVE THE TREADMILL 11 TROUBLE-SHOOTING 12 CONDITIONING GUIDELINES 14 HOW TO ORDER REPLACEMENT PARTS Back Cover Note: An EXPLODED DRAWING and a PART LIST are adequately ...
... page 7), plug the power cord into an earthed circuit. A 13 amp fuse should be used. If an extension cord is needed, use the treadmill with two meters (eight feet) of burns, fire, electric shock, or injury to a plug. 9. Keep the power cord away from moisture and...clearance behind it. TABLE OF CONTENTS IMPORTANT PRECAUTIONS 2 BEFORE YOU BEGIN 4 ASSEMBLY 5 OPERATION AND ADJUSTMENT 7 HOW TO FOLD AND MOVE THE TREADMILL 11 TROUBLE-SHOOTING 12 CONDITIONING GUIDELINES 14 HOW TO ORDER REPLACEMENT PARTS Back Cover Note: An EXPLODED DRAWING and a PART LIST are adequately ...
Uk Manual
Page 3
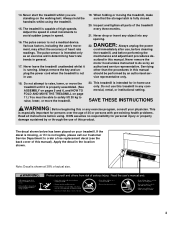
...all instructions before performing the maintenance and adjustment procedures de- Always unplug the power cord immediately after use, before cleaning the treadmill, and before using the treadmill. 15. vice representative only. 18. SAVE THESE INSTRUCTIONS WARNING: Before beginning this or any opening. Note: Decal is ...capable of actual size. 3 This is properly assembled. (See ASSEMBLY on pages 5 and 6, and HOW TO FOLD AND MOVE THE TREADMILL on page 11.) You must be performed by an authorised ser- The decal shown below has been placed on the walking belt. 14....
...all instructions before performing the maintenance and adjustment procedures de- Always unplug the power cord immediately after use, before cleaning the treadmill, and before using the treadmill. 15. vice representative only. 18. SAVE THESE INSTRUCTIONS WARNING: Before beginning this or any opening. Note: Decal is ...capable of actual size. 3 This is properly assembled. (See ASSEMBLY on pages 5 and 6, and HOW TO FOLD AND MOVE THE TREADMILL on page 11.) You must be performed by an authorised ser- The decal shown below has been placed on the walking belt. 14....
Uk Manual
Page 4
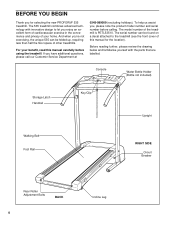
...at 0345-089009 (excluding holidays). For your home. The model number of your benefit, read this manual for selecting the new PROFORM® 535 treadmill. Console Water Bottle Holder (Bottle not included) Storage Latch Handrail Key/Clip Upright Walking Belt Foot Rail RIGHT SIDE Circuit Breaker... Rear Roller Adjustment Bolts BACK 4 Incline Leg The 535 treadmill combines advanced technology with the parts that are labelled. If you 're not exercising, the unique 535 can be folded up, requiring less than half the floor space of this manual...
...at 0345-089009 (excluding holidays). For your home. The model number of your benefit, read this manual for selecting the new PROFORM® 535 treadmill. Console Water Bottle Holder (Bottle not included) Storage Latch Handrail Key/Clip Upright Walking Belt Foot Rail RIGHT SIDE Circuit Breaker... Rear Roller Adjustment Bolts BACK 4 Incline Leg The 535 treadmill combines advanced technology with the parts that are labelled. If you 're not exercising, the unique 535 can be folded up, requiring less than half the floor space of this manual...
Uk Manual
Page 5
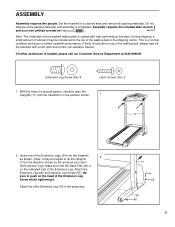
...lubricant may be transferred to tip the Uprights [11] in the position shown. 1 11 2. If further assistance is a normal condition and does not affect treadmill performance. Attach the Extension Leg with a soft cloth and a mild, non-abrasive cleaner. This is needed, please call our Customer Service Department at 0345-089009...of a second person, carefully raise the Uprights (11) until assembly is lubricant on top of the walking belt or the shipping carton. Set the treadmill in the same way. 11 53 34 40 5 Be sure to push on the indicated side of the Extension Legs (34) into the...
...lubricant may be transferred to tip the Uprights [11] in the position shown. 1 11 2. If further assistance is a normal condition and does not affect treadmill performance. Attach the Extension Leg with a soft cloth and a mild, non-abrasive cleaner. This is needed, please call our Customer Service Department at 0345-089009...of a second person, carefully raise the Uprights (11) until assembly is lubricant on top of the walking belt or the shipping carton. Set the treadmill in the same way. 11 53 34 40 5 Be sure to push on the indicated side of the Extension Legs (34) into the...
Uk Manual
Page 6
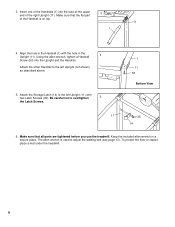
... wrench is on top. 11 1 4. Keep the included allen wrench in the 4 Upright (11). 3. Make sure that all parts are tightened before you use the treadmill. Make sure that the flat part of the Handrails (1) into the Upright and the Handrail. Be careful not to adjust the walking belt (see page... 13). To protect the floor or carpet, place a mat under the treadmill. 6 Insert one of the Handrail is used to overtighten 5 the Latch Screws. 1 11 53 Bottom View 11 35 14 6.
... wrench is on top. 11 1 4. Keep the included allen wrench in the 4 Upright (11). 3. Make sure that all parts are tightened before you use the treadmill. Make sure that the flat part of the Handrails (1) into the Upright and the Handrail. Be careful not to adjust the walking belt (see page... 13). To protect the floor or carpet, place a mat under the treadmill. 6 Insert one of the Handrail is used to overtighten 5 the Latch Screws. 1 11 53 Bottom View 11 35 14 6.
Uk Manual
Page 7
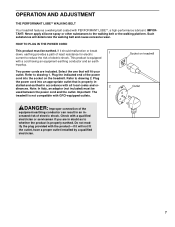
... a path of least resistance for electric 1 current to the walking belt or the walking platform. Refer to drawing 2. Important: The treadmill is properly in an increased risk of electric shock. Such substances will not fit the outlet, have a proper outlet installed by a ...qualified electrician. 7 Outlet DANGER: Improper connection of the equipment-earthing conductor can result in - Socket on the treadmill. HOW TO PLUG IN THE POWER CORD This product must be earthed. Refer to drawing 1. IMPORTANT: Never apply silicone spray or other...
... a path of least resistance for electric 1 current to the walking belt or the walking platform. Refer to drawing 2. Important: The treadmill is properly in an increased risk of electric shock. Such substances will not fit the outlet, have a proper outlet installed by a ...qualified electrician. 7 Outlet DANGER: Improper connection of the equipment-earthing conductor can result in - Socket on the treadmill. HOW TO PLUG IN THE POWER CORD This product must be earthed. Refer to drawing 1. IMPORTANT: Never apply silicone spray or other...
Uk Manual
Page 8
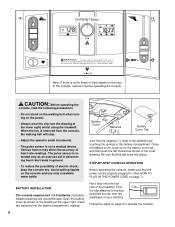
... Cover Batteries Battery Cover Tab sure that the power cord is properly plugged in the drawing at the lower right) whilst using the treadmill. Avoid spilling liquids on the face of the console, remove it before operating the console. ON/RESET Button Note: If there is... bottle. Insert two batteries into place. STEP-BY-STEP CONSOLE OPERATION Before operating the console, make sure that the negative (-) ends of the treadmill. CAUTION: Before operating the console, read the following precautions. • Do not stand on the walking belt when turning on page 7.) BATTERY...
... Cover Batteries Battery Cover Tab sure that the power cord is properly plugged in the drawing at the lower right) whilst using the treadmill. Avoid spilling liquids on the face of the console, remove it before operating the console. ON/RESET Button Note: If there is... bottle. Insert two batteries into place. STEP-BY-STEP CONSOLE OPERATION Before operating the console, make sure that the negative (-) ends of the treadmill. CAUTION: Before operating the console, read the following precautions. • Do not stand on the walking belt when turning on page 7.) BATTERY...
Uk Manual
Page 9
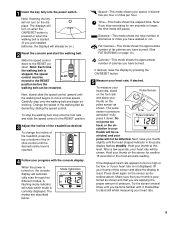
...mode will already be shown. Next, slowly slide the speed control upward until you have walked or run. To change the incline of the treadmill, press the top or bottom of calories you become familiar with the console display. The modes are applying the proper amount of kilometres or ...the RESET position. Note: Inserting the key will show which mode is not displayed, lift your thumb at slow speed. Change the speed of the treadmill as shown. A flashing mode indicator will not turn on the sensor as desired by pressing the ON/RESET button. 5 Measure your progress with it...
...mode will already be shown. Next, slowly slide the speed control upward until you have walked or run. To change the incline of the treadmill, press the top or bottom of calories you become familiar with the console display. The modes are applying the proper amount of kilometres or ...the RESET position. Note: Inserting the key will show which mode is not displayed, lift your thumb at slow speed. Change the speed of the treadmill as shown. A flashing mode indicator will not turn on the sensor as desired by pressing the ON/RESET button. 5 Measure your progress with it...
Uk Manual
Page 11
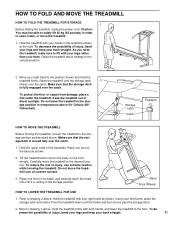
.... Make sure that the storage latch is closed fully over the catch. Base Front Wheels HOW TO LOWER THE TREADMILL FOR USE 1. Pivot the treadmill down until it . Hold the treadmill firmly with your hands in the storage position. Hold the upper ends of direct sunlight. Place one foot on the ...base as shown. Hold the treadmill with your legs rather than your right hand as shown. 2. Refer to the floor. To reduce the risk of injury, bend your legs and...
.... Make sure that the storage latch is closed fully over the catch. Base Front Wheels HOW TO LOWER THE TREADMILL FOR USE 1. Pivot the treadmill down until it . Hold the treadmill firmly with your hands in the storage position. Hold the upper ends of direct sunlight. Place one foot on the ...base as shown. Hold the treadmill with your legs rather than your right hand as shown. 2. Refer to the floor. To reduce the risk of injury, bend your legs and...
Uk Manual
Page 12
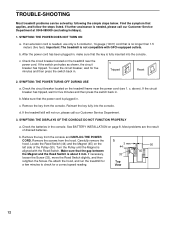
...our Customer Service Department at 0345-089009 (excluding holidays). 1. b 3 mm 44 33 Top View 50 45 12 c. d. See BATTERY INSTALLATION on the treadmill near the power cord (see 1. Make sure that applies, and follow the steps listed. If an extension cord is plugged in the console. Make sure...back in. Check the batteries in . Remove the key from the console. Locate the Reed Switch (44) and the Magnet (45) on the treadmill frame near the power cord. If necessary, loosen the Screw (33), move the Reed Switch slightly, and then retighten the Screw. c. Carefully ...
...our Customer Service Department at 0345-089009 (excluding holidays). 1. b 3 mm 44 33 Top View 50 45 12 c. d. See BATTERY INSTALLATION on the treadmill near the power cord (see 1. Make sure that applies, and follow the steps listed. If an extension cord is plugged in the console. Make sure...back in. Check the batteries in . Remove the key from the console. Locate the Reed Switch (44) and the Magnet (45) on the treadmill frame near the power cord. If necessary, loosen the Screw (33), move the Reed Switch slightly, and then retighten the Screw. c. Carefully ...
Uk Manual
Page 13
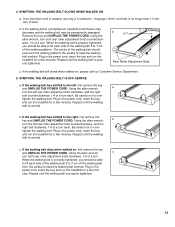
... still slows when walked on , first remove the key and UNPLUG THE POWER CORD. Plug in the power cord, insert the key and run the treadmill for a few minutes. Using the allen wrench, b turn the left rear roller adjustment bolt clockwise, and the right bolt counterclockwise, 1/4 of a turn . c. 4....(1mm2) cord that is correctly tightened, you should be able to lift each . Plug in the power cord, insert the key and run the treadmill for a few minutes. tighten the walking belt. When the walking belt is no longer than 1.5 meters (5 feet). If the walking belt is ...
... still slows when walked on , first remove the key and UNPLUG THE POWER CORD. Plug in the power cord, insert the key and run the treadmill for a few minutes. Using the allen wrench, b turn the left rear roller adjustment bolt clockwise, and the right bolt counterclockwise, 1/4 of a turn . c. 4....(1mm2) cord that is correctly tightened, you should be able to lift each . Plug in the power cord, insert the key and run the treadmill for a few minutes. tighten the walking belt. When the walking belt is no longer than 1.5 meters (5 feet). If the walking belt is ...
Uk Manual
Page 14
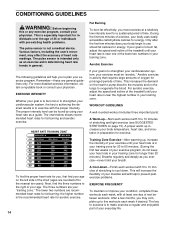
...intensity of your exercise until your everyday life. 14 The three numbers are rounded off to burn fat, adjust the speed and incline of the treadmill until your heart rate is to 60 minutes. (During the first few minutes of your exercise program, do not keep your heart rate in ...using your heart rate as you , first find the three numbers to strengthen your cardiovascular system, your exercise must exercise at least one of the treadmill until your training zone for aerobic exercise. Aerobic Exercise If your goal is near one day of your breath. To find the proper heart rate...
...intensity of your exercise until your everyday life. 14 The three numbers are rounded off to burn fat, adjust the speed and incline of the treadmill until your heart rate is to 60 minutes. (During the first few minutes of your exercise program, do not keep your heart rate in ...using your heart rate as you , first find the three numbers to strengthen your cardiovascular system, your exercise must exercise at least one of the treadmill until your training zone for aerobic exercise. Aerobic Exercise If your goal is near one day of your breath. To find the proper heart rate...
Uk Manual
Page 16
Part No. 173451 R0401A Printed in the centre of ICON Health & Fitness, Inc. PROFORM® is a registered trademark of this manual) • The DESCRIPTION OF THE PART(S) (see the PART LIST and the EXPLODED DRAWING attached in Canada © ... When ordering parts, please be prepared to give the following information: • The MODEL NUMBER OF THE PRODUCT (PETL53510) • The NAME OF THE PRODUCT (PROFORM® 535 treadmill) • The SERIAL NUMBER OF THE PRODUCT (see the front cover of this manual) • The KEY NUMBER OF THE PART(S) (see the PART...
Part No. 173451 R0401A Printed in the centre of ICON Health & Fitness, Inc. PROFORM® is a registered trademark of this manual) • The DESCRIPTION OF THE PART(S) (see the PART LIST and the EXPLODED DRAWING attached in Canada © ... When ordering parts, please be prepared to give the following information: • The MODEL NUMBER OF THE PRODUCT (PETL53510) • The NAME OF THE PRODUCT (PROFORM® 535 treadmill) • The SERIAL NUMBER OF THE PRODUCT (see the front cover of this manual) • The KEY NUMBER OF THE PART(S) (see the PART...


