
English Manual
Page 1
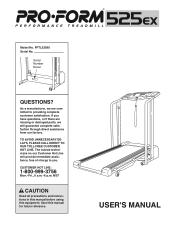
... have questions, or if there are missing or damaged parts, we are committed to providing complete customer satisfaction. If you . TO AVOID UNNECESSARY DELAYS, PLEASE CALL DIRECT TO OUR TOLL-FREE CUSTOMER HOT LINE. Save this equipment. PFTL52580 Serial No. MST CAUTION Read all precautions and instructions in this manual before using this manual for future reference. ¨...
... have questions, or if there are missing or damaged parts, we are committed to providing complete customer satisfaction. If you . TO AVOID UNNECESSARY DELAYS, PLEASE CALL DIRECT TO OUR TOLL-FREE CUSTOMER HOT LINE. Save this equipment. PFTL52580 Serial No. MST CAUTION Read all precautions and instructions in this manual before using this manual for future reference. ¨...
English Manual
Page 2
... 4 if the treadmill is being administered. 6. Wear appropriate exercise clothing when using the treadmill. TABLE OF CONTENTS IMPORTANT PRECAUTIONS 2 BEFORE YOU BEGIN 4 ASSEMBLY 5 OPERATION AND ADJUSTMENT 7 HOW TO FOLD AND MOVE THE TREADMILL 10 MAINTENANCE AND TROUBLE-SHOOTING 12 CONDITIONING GUIDELINES 14 ORDERING REPLACEMENT PARTS Back Cover LIMITED WARRANTY Back Cover Note: An EXPLODED DRAWING and PART LIST are attached to the center of this treadmill are adequately informed of all warnings...
... 4 if the treadmill is being administered. 6. Wear appropriate exercise clothing when using the treadmill. TABLE OF CONTENTS IMPORTANT PRECAUTIONS 2 BEFORE YOU BEGIN 4 ASSEMBLY 5 OPERATION AND ADJUSTMENT 7 HOW TO FOLD AND MOVE THE TREADMILL 10 MAINTENANCE AND TROUBLE-SHOOTING 12 CONDITIONING GUIDELINES 14 ORDERING REPLACEMENT PARTS Back Cover LIMITED WARRANTY Back Cover Note: An EXPLODED DRAWING and PART LIST are attached to the center of this treadmill are adequately informed of all warnings...
English Manual
Page 3
... with pre-existing health problems. Read all parts of this manual should be able to avoid sudden jumps in the location shown. 3 Do not change the incline of this treadmill in order to order a free replacement decal (see ORDERING REPLACEMENT PARTS on the walking belt. Always unplug the power cord immediately after use this manual). This is properly assembled. (See ASSEMBLY on page 5, and HOW TO MOVE THE TREADMILL on your physician...
... with pre-existing health problems. Read all parts of this manual should be able to avoid sudden jumps in the location shown. 3 Do not change the incline of this treadmill in order to order a free replacement decal (see ORDERING REPLACEMENT PARTS on the walking belt. Always unplug the power cord immediately after use this manual). This is properly assembled. (See ASSEMBLY on page 5, and HOW TO MOVE THE TREADMILL on your physician...
English Manual
Page 4
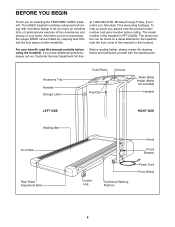
... call our Customer Service Department toll-free Before reading further, please review the drawing below and familiarize yourself with innovative design to the treadmill (see the front cover of other treadmills. Accessory Tray Handrail Storage Latch Towel Rack Console Key/Clip Water Bottle Holder (Bottle not included) Handrail LEFT SIDE RIGHT SIDE Walking Belt Foot Rails Rear Roller Adjustment Bolts Incline Leg Cushioned Walking Platform Hood Circuit Breaker Power Cord Front Wheel 4
... call our Customer Service Department toll-free Before reading further, please review the drawing below and familiarize yourself with innovative design to the treadmill (see the front cover of other treadmills. Accessory Tray Handrail Storage Latch Towel Rack Console Key/Clip Water Bottle Holder (Bottle not included) Handrail LEFT SIDE RIGHT SIDE Walking Belt Foot Rails Rear Roller Adjustment Bolts Incline Leg Cushioned Walking Platform Hood Circuit Breaker Power Cord Front Wheel 4
English Manual
Page 5
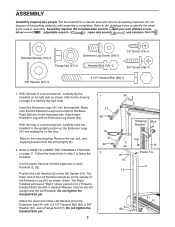
... Bolt (15)Ð2 1/2" Screw (13)Ð2 3/4" Screw (59)Ð4 3/8" Washer (61)Ð2 3 1/2" Handrail Bolt (89)Ð2 1. With the help of the Extension Leg (41) as shown (refer to lower the treadmill. Remove the nut, bolt, and shipping bracket from the left Upright (14). Refer to identify the right side). Attach the lower end of the packing materials until assembly is completed. Set the treadmill in step...
... Bolt (15)Ð2 1/2" Screw (13)Ð2 3/4" Screw (59)Ð4 3/8" Washer (61)Ð2 3 1/2" Handrail Bolt (89)Ð2 1. With the help of the Extension Leg (41) as shown (refer to lower the treadmill. Remove the nut, bolt, and shipping bracket from the left Upright (14). Refer to identify the right side). Attach the lower end of the packing materials until assembly is completed. Set the treadmill in step...
English Manual
Page 6
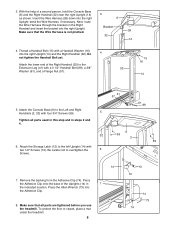
... Adhesive Clip. 8. Attach the Console Base (6) to the Extension Leg (41) with four 3/4Ó Screws (59). 5 Tighten all parts are tightened before you use the treadmill. bend the Wire Harness, if necessary. Thread a Handrail Bolt (15) with two 1/2Ó Screws (13). Attach the Storage Latch (12) to overtighten the 6 Screws. 14 7. Press the Allen Wrench (73) into the right Upright. Bracket 26 32 14 4. Attach the lower end of a second...
... Adhesive Clip. 8. Attach the Console Base (6) to the Extension Leg (41) with four 3/4Ó Screws (59). 5 Tighten all parts are tightened before you use the treadmill. bend the Wire Harness, if necessary. Thread a Handrail Bolt (15) with two 1/2Ó Screws (13). Attach the Storage Latch (12) to overtighten the 6 Screws. 14 7. Press the Allen Wrench (73) into the right Upright. Bracket 26 32 14 4. Attach the lower end of a second...
English Manual
Page 7
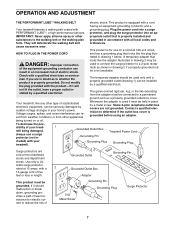
... a Your treadmill features a walking belt coated with a 14-gauge cord of electric shock. used it must be connected to a 2-pole receptacle as a properly grounded outlet box cover. Plug the power cord into an ap- A temporary adapter that looks like any other appliances Whenever the adapter is grounded before using an adapter. Do not modify the plug provided with your homeÕs power. Your treadmill, like the plug illus- Contact...
... a Your treadmill features a walking belt coated with a 14-gauge cord of electric shock. used it must be connected to a 2-pole receptacle as a properly grounded outlet box cover. Plug the power cord into an ap- A temporary adapter that looks like any other appliances Whenever the adapter is grounded before using an adapter. Do not modify the plug provided with your homeÕs power. Your treadmill, like the plug illus- Contact...
English Manual
Page 8
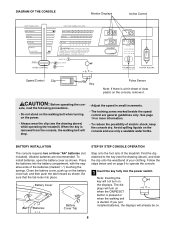
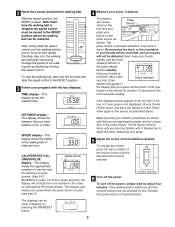
... install batteries, open the battery cover as shown. Close the battery cover, push up on when the ON/RESET button is pressed or when the walking belt is started. Alkaline batteries are general guidelines only. Find the clip attached to operate the console. 1 Insert the key fully into place. The displays will not turn on the battery cover tab, and then push the tab forward as shown. DIAGRAM OF THE CONSOLE Monitor Displays Incline Control Speed Control Clip Pulse Sensor Key Note...
... install batteries, open the battery cover as shown. Close the battery cover, push up on when the ON/RESET button is pressed or when the walking belt is started. Alkaline batteries are general guidelines only. Find the clip attached to operate the console. 1 Insert the key fully into place. The displays will not turn on the battery cover tab, and then push the tab forward as shown. DIAGRAM OF THE CONSOLE Monitor Displays Incline Control Speed Control Clip Pulse Sensor Key Note...
English Manual
Page 9
... console buttons are applying the proper amount of the walking belt, in the pulse display flashes steadily. SPEED displayÑThis display shows the speed of pressure to reset. shaped indicator in miles per hour. To turn off the power. Slide the speed control to move at this level. Note: Each time the walking belt is pressure activatedÑfully press it . Carefully step onto the walking belt and begin exercising. Change the speed of the treadmill...
... console buttons are applying the proper amount of the walking belt, in the pulse display flashes steadily. SPEED displayÑThis display shows the speed of pressure to reset. shaped indicator in miles per hour. To turn off the power. Slide the speed control to move at this level. Note: Each time the walking belt is pressure activatedÑfully press it . Carefully step onto the walking belt and begin exercising. Change the speed of the treadmill...

English Manual
Page 10
... a mat under the treadmill. Carefully move the treadmill over the catch. Hold the treadmill with your legs rather than your back straight. Move your hands in the storage position. Make sure that the storage latch is closed fully over the catch. HOW TO MOVE THE TREADMILL Before moving the treadmill. HOW TO FOLD AND MOVE THE TREADMILL HOW TO FOLD THE TREADMILL FOR STORAGE Unplug the power cord. CAUTION: You must...
... a mat under the treadmill. Carefully move the treadmill over the catch. Hold the treadmill with your legs rather than your back straight. Move your hands in the storage position. Make sure that the storage latch is closed fully over the catch. HOW TO MOVE THE TREADMILL Before moving the treadmill. HOW TO FOLD AND MOVE THE TREADMILL HOW TO FOLD THE TREADMILL FOR STORAGE Unplug the power cord. CAUTION: You must...
English Manual
Page 11
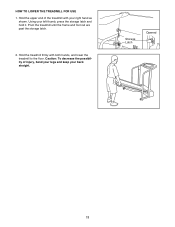
Caution: To decrease the possibility of the treadmill with both hands, and lower the treadmill to the floor. Using your back straight. Hold the treadmill firmly with your right hand as shown. Pivot the treadmill until the frame and foot rail are past the storage latch. 2. Storage Latch Opened 11 HOW TO LOWER THE TREADMILL FOR USE 1. Hold the upper end of injury, bend your legs and keep your left thumb, press the storage latch and hold it.
Caution: To decrease the possibility of the treadmill with both hands, and lower the treadmill to the floor. Using your back straight. Hold the treadmill firmly with your right hand as shown. Pivot the treadmill until the frame and foot rail are past the storage latch. 2. Storage Latch Opened 11 HOW TO LOWER THE TREADMILL FOR USE 1. Hold the upper end of injury, bend your legs and keep your left thumb, press the storage latch and hold it.
English Manual
Page 12
... Screw. Find the symptom that the key is about 1/8Ó. PROBLEM: The displays of the Pulley (85). c. Remove the key from the console and UPLUG THE POWER CORD. Locate the Reed Switch (86) and the Magnet (87) on page 8.) c. until the Magnet is needed, please call our Customer Service Department, toll-free. b. c Tripped Reset Tripped Reset PROBLEM: The power turns off during use SOLUTION: a. Check the circuit breaker located on the treadmill near the power cord...
... Screw. Find the symptom that the key is about 1/8Ó. PROBLEM: The displays of the Pulley (85). c. Remove the key from the console and UPLUG THE POWER CORD. Locate the Reed Switch (86) and the Magnet (87) on page 8.) c. until the Magnet is needed, please call our Customer Service Department, toll-free. b. c Tripped Reset Tripped Reset PROBLEM: The power turns off during use SOLUTION: a. Check the circuit breaker located on the treadmill near the power cord...
English Manual
Page 13
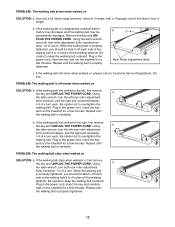
... the walking belt still slows when walked on SOLUTION: a. Using the allen wrench, turn the left rear roller adjustment bolt counterclockwise, and the right bolt clockwise, 1/4 of a turn each side of the walking belt 3 to 4 inches off -center when walked on SOLUTION: a. Plug in the power cord, insert the key and run the treadmill for a few minutes. Repeat until the walking belt is centered. PROBLEM: The walking belt slips when walked on , please call our Customer Service...
... the walking belt still slows when walked on SOLUTION: a. Using the allen wrench, turn the left rear roller adjustment bolt counterclockwise, and the right bolt clockwise, 1/4 of a turn each side of the walking belt 3 to 4 inches off -center when walked on SOLUTION: a. Plug in the power cord, insert the key and run the treadmill for a few minutes. Repeat until the walking belt is centered. PROBLEM: The walking belt slips when walked on , please call our Customer Service...

English Manual
Page 14
..., set the speed control on the bottom of the chart (ages are rounded off to exercise with preexisting health problems. The pulse sensor is to oxygenate the blood. If your goal is to burn fat, adjust the speed and incline of the treadmill until your heart rate is near the low end of your exercise program, do not keep your heart rate near the low end of exercise, your training zone...
..., set the speed control on the bottom of the chart (ages are rounded off to exercise with preexisting health problems. The pulse sensor is to oxygenate the blood. If your goal is to burn fat, adjust the speed and incline of the treadmill until your heart rate is near the low end of your exercise program, do not keep your heart rate near the low end of exercise, your training zone...

English Manual
Page 15
...both legs. Bend your front leg, lean forward and move your toes as far as possible. Hold for 15 counts, then relax. 5 Repeat 3 times for 15 counts, then relax. The key to make exercise a regular and enjoyable part of the other hand. SUGGESTED STRETCHES The correct form ... lower back and groin. 3 3. Stretches: Quadriceps and hip muscles. 5. Repeat 3 times. Stretches: Quadriceps and hip muscles. 1 2 4 15 Toe Touch Stretch Stand with one leg in the drawings at least one foot with the soles of the achilles tendons, bend your condition, complete three workouts...
...both legs. Bend your front leg, lean forward and move your toes as far as possible. Hold for 15 counts, then relax. 5 Repeat 3 times for 15 counts, then relax. The key to make exercise a regular and enjoyable part of the other hand. SUGGESTED STRETCHES The correct form ... lower back and groin. 3 3. Stretches: Quadriceps and hip muscles. 5. Repeat 3 times. Stretches: Quadriceps and hip muscles. 1 2 4 15 Toe Touch Stretch Stand with one leg in the drawings at least one foot with the soles of the achilles tendons, bend your condition, complete three workouts...

English Manual
Page 16
...Rear Isolator Screw Console Base Speed Control Knob Speed Potentiometer Battery Cover Incline Motor Console Assembly Storage Latch 1/2Ó Screw Upright/Base Handrail Bolt Handrail Washer Motor Belt Motor Swivel Nut Motor/Pulley/Flywheel/Fan Pulley/Flywheel/Fan Motor Motor Tension Bolt/Incline Bolt Motor Tension Washer Motor Tension Star Washer Motor Swivel Bolt Wire Harness Ground Wire Screw Hood Hood Shield Screw Latch Decal Right Handrail Frame Pivot Bolt Extension Leg Screw Electronics Screw Base Pad Wheel Bolt Wheel Wheel Nut/Base Pivot Nut Controller Extension Leg Circuit Breaker Power...
...Rear Isolator Screw Console Base Speed Control Knob Speed Potentiometer Battery Cover Incline Motor Console Assembly Storage Latch 1/2Ó Screw Upright/Base Handrail Bolt Handrail Washer Motor Belt Motor Swivel Nut Motor/Pulley/Flywheel/Fan Pulley/Flywheel/Fan Motor Motor Tension Bolt/Incline Bolt Motor Tension Washer Motor Tension Star Washer Motor Swivel Bolt Wire Harness Ground Wire Screw Hood Hood Shield Screw Latch Decal Right Handrail Frame Pivot Bolt Extension Leg Screw Electronics Screw Base Pad Wheel Bolt Wheel Wheel Nut/Base Pivot Nut Controller Extension Leg Circuit Breaker Power...
English Manual
Page 18
... when calling. LIMITED WARRANTY ICON Health & Fitness, Inc. (ICON), warrants this product to be prepared to give the following information: ¥ The MODEL NUMBER OF THE PRODUCT (PFTL52580). ¥ The NAME OF THE PRODUCT (PROFORM¨ 525EX treadmill). ¥ The SERIAL NUMBER OF THE PRODUCT (see the front cover of this manual). ¥ The KEY NUMBER AND DESCRIPTION OF THE PART(S) (see the EXPLODED DRAWING and PART LIST attached to the...
... when calling. LIMITED WARRANTY ICON Health & Fitness, Inc. (ICON), warrants this product to be prepared to give the following information: ¥ The MODEL NUMBER OF THE PRODUCT (PFTL52580). ¥ The NAME OF THE PRODUCT (PROFORM¨ 525EX treadmill). ¥ The SERIAL NUMBER OF THE PRODUCT (see the front cover of this manual). ¥ The KEY NUMBER AND DESCRIPTION OF THE PART(S) (see the EXPLODED DRAWING and PART LIST attached to the...

