
User Manual
Page 1
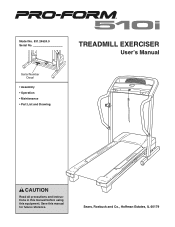
Serial Number Decal • Assembly • Operation • Maintenance • Part List and Drawing TREADMILL EXERCISER User's Manual CAUTION Read all precautions and instructions in this manual before using this manual for future reference. Save this equipment. Sears, Roebuck and Co., Hoffman Estates, IL 60179 Model No. 831.24624.0 Serial No.
Serial Number Decal • Assembly • Operation • Maintenance • Part List and Drawing TREADMILL EXERCISER User's Manual CAUTION Read all precautions and instructions in this manual before using this manual for future reference. Save this equipment. Sears, Roebuck and Co., Hoffman Estates, IL 60179 Model No. 831.24624.0 Serial No.
User Manual
Page 3
.... Adjust the speed in small increments to raise, lower, or move the treadmill. 21. Various factors, including the user's movement, may result in a garage or covered patio, or near water. 12. Never move the walking belt while the power is fully closed. 3 Do not operate the treadmill if the power cord or plug is damaged, or if the treadmill is intended only as described. 3. When connecting the power cord...
.... Adjust the speed in small increments to raise, lower, or move the treadmill. 21. Various factors, including the user's movement, may result in a garage or covered patio, or near water. 12. Never move the walking belt while the power is fully closed. 3 Do not operate the treadmill if the power cord or plug is damaged, or if the treadmill is intended only as described. 3. When connecting the power cord...

User Manual
Page 4
...-free 1-888-533-1333 and order a free replacement decal. Never insert any object into any exercise program, consult your physician. Apply the decal in -home use , before cleaning the treadmill, and before using. tenance and adjustment procedures de- This is especially important for persons over the age of 35 or persons with pre-existing health problems. Read all parts of this treadmill in this manual...
...-free 1-888-533-1333 and order a free replacement decal. Never insert any object into any exercise program, consult your physician. Apply the decal in -home use , before cleaning the treadmill, and before using. tenance and adjustment procedures de- This is especially important for persons over the age of 35 or persons with pre-existing health problems. Read all parts of this treadmill in this manual...
User Manual
Page 5
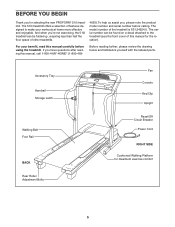
... review the drawing below and familiarize yourself with the labeled parts. For your workouts at home more effective and enjoyable. BEFORE YOU BEGIN Thank you have questions after reading this manual for the location). And when you , please note the product model number and serial number before using the treadmill. Accessory Tray Handrail Storage Latch Walking Belt Foot Rail BACK Rear Roller Adjustment Bolts Fan Console Key/Clip Upright Reset/Off Circuit Breaker Power Cord RIGHT...
... review the drawing below and familiarize yourself with the labeled parts. For your workouts at home more effective and enjoyable. BEFORE YOU BEGIN Thank you have questions after reading this manual for the location). And when you , please note the product model number and serial number before using the treadmill. Accessory Tray Handrail Storage Latch Walking Belt Foot Rail BACK Rear Roller Adjustment Bolts Fan Console Key/Clip Upright Reset/Off Circuit Breaker Power Cord RIGHT...

User Manual
Page 6
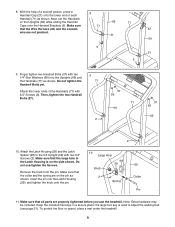
... materials until the treadmill is completed. If there is the key number of lubricant may be transferred to be assembled. Insert an Extension Leg (63) into the top of the walking belt or the shipping carton. ASSEMBLY Assembly requires two persons. If a part is unplugged. To avoid damaging plastic parts, do not use power tools for assembly. Note: The underside of the treadmill walking belt is preattached to...
... materials until the treadmill is completed. If there is the key number of lubricant may be transferred to be assembled. Insert an Extension Leg (63) into the top of the walking belt or the shipping carton. ASSEMBLY Assembly requires two persons. If a part is unplugged. To avoid damaging plastic parts, do not use power tools for assembly. Note: The underside of the treadmill walking belt is preattached to...

User Manual
Page 8
... CONNECTED PROPERLY, THE CONSOLE MAY BE DAMAGED WHEN THE POWER IS TURNED ON. 5. Set the Console (43) face-down on one connector and try again. Remove the tie holding the Wire Harness (42) to the left Upright (not shown) in the top as described above. Note: There are no wires on the Console (43). 2 Attach the Handrail with a 3/4" Screw (2). Console Wire Make sure that the console wire...
... CONNECTED PROPERLY, THE CONSOLE MAY BE DAMAGED WHEN THE POWER IS TURNED ON. 5. Set the Console (43) face-down on one connector and try again. Remove the tie holding the Wire Harness (42) to the left Upright (not shown) in the top as described above. Note: There are no wires on the Console (43). 2 Attach the Handrail with a 3/4" Screw (2). Console Wire Make sure that the console wire...
User Manual
Page 9
... the included hex keys in the Latch Housing is used to the left Upright (69) with two 3/4" Screws (2). Do not overtighten the Screws. Make sure that the Wire Harness (42) and the console wire are properly tightened before you use the treadmill. Next, set the Handrails on the side shown. Attach the Latch Housing (29) and the Latch Spacer (98) to adjust the walking belt (see page 21). With...
... the included hex keys in the Latch Housing is used to the left Upright (69) with two 3/4" Screws (2). Do not overtighten the Screws. Make sure that the Wire Harness (42) and the console wire are properly tightened before you use the treadmill. Next, set the Handrails on the side shown. Attach the Latch Housing (29) and the Latch Spacer (98) to adjust the walking belt (see page 21). With...
User Manual
Page 10
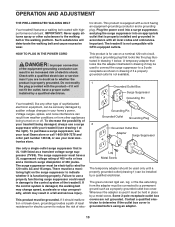
... TO PLUG IN THE POWER CORD DANGER: Improper connection of the equipment-grounding conductor can result in an increased risk of sophisticated electronic equipment, can be installed by a qualified electrician. Check with all local codes and ordinances. Your treadmill, like the adapter illustrated in doubt as shown in place by sudden voltage changes in damage to the walking belt or the walking...
... TO PLUG IN THE POWER CORD DANGER: Improper connection of the equipment-grounding conductor can result in an increased risk of sophisticated electronic equipment, can be installed by a qualified electrician. Check with all local codes and ordinances. Your treadmill, like the adapter illustrated in doubt as shown in place by sudden voltage changes in damage to the walking belt or the walking...

User Manual
Page 11
... your workouts more effective and enjoyable. To use a distance goal program, see page 16. 11 CONSOLE DIAGRAM Key Clip Note: If there are sheets of the treadmill as it guides you through an effective workout. You can change the speed and incline of the treadmill with the touch of the treadmill to make your heart rate using the builtin pulse sensor. The console also features two speed programs. Each program automatically controls the speed and incline of...
... your workouts more effective and enjoyable. To use a distance goal program, see page 16. 11 CONSOLE DIAGRAM Key Clip Note: If there are sheets of the treadmill as it guides you through an effective workout. You can change the speed and incline of the treadmill with the touch of the treadmill to make your heart rate using the builtin pulse sensor. The console also features two speed programs. Each program automatically controls the speed and incline of...
User Manual
Page 12
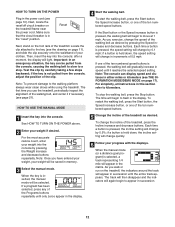
... power cord. Note: Once you exercise, change the incline of the treadmill. if a button is in increments of your progress with the displays. HOW TO TURN ON THE POWER Plug in this section refer to kilometers. Make sure that the circuit breaker is held down , the incline setting will be selected. If a program has been selected, press any of the walking belt as desired. When the manual mode (or a distance...
... power cord. Note: Once you exercise, change the incline of the treadmill. if a button is in increments of your progress with the displays. HOW TO TURN ON THE POWER Plug in this section refer to kilometers. Make sure that the circuit breaker is held down , the incline setting will be selected. If a program has been selected, press any of the walking belt as desired. When the manual mode (or a distance...

User Manual
Page 13
... high speed, press the button a second time. When a distance goal program is folded to the storage position, or the treadmill will show the speed of the walking belt and the approximate number of the elapsed time. In addition, make sure that you have walked or run. To turn off " position and unplug the power cord. 13 The lower left or lower right display. When you are most accurate heart rate reading...
... high speed, press the button a second time. When a distance goal program is folded to the storage position, or the treadmill will show the speed of the walking belt and the approximate number of the elapsed time. In addition, make sure that you have walked or run. To turn off " position and unplug the power cord. 13 The lower left or lower right display. When you are most accurate heart rate reading...
User Manual
Page 14
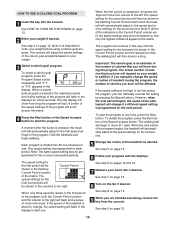
... number of the program will be affected. To restart the program, press the Start button or the Speed increase button. HOW TO USE A CALORIE GOAL PROGRAM 1 Insert the key into 30 one column to alert you manually change , the speed setting will continue in this way until "P 1" or "P 2" appears in the display to the left. Note: It is pressed, the treadmill will depend on page 12. The console will move...
... number of the program will be affected. To restart the program, press the Start button or the Speed increase button. HOW TO USE A CALORIE GOAL PROGRAM 1 Insert the key into 30 one column to alert you manually change , the speed setting will continue in this way until "P 1" or "P 2" appears in the display to the left. Note: It is pressed, the treadmill will depend on page 12. The console will move...
User Manual
Page 15
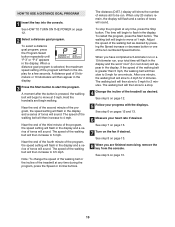
... the treadmill at 1 mph. Note: To change the speed of the walking belt or the incline of the walking belt will sound. The distance (DIST.) display will show the number of the walking belt will slow to move at any time, press the Stop button. The time will begin to 4 mph for one minute, the walking belt will then increase to 4 mph. HOW TO USE A DISTANCE GOAL PROGRAM 1 Insert the key into the console...
... the treadmill at 1 mph. Note: To change the speed of the walking belt or the incline of the walking belt will sound. The distance (DIST.) display will show the number of the walking belt will slow to move at any time, press the Stop button. The time will begin to 4 mph for one minute, the walking belt will then increase to 4 mph. HOW TO USE A DISTANCE GOAL PROGRAM 1 Insert the key into the console...
User Manual
Page 16
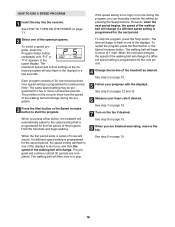
... change . See step 9 on page 12. 5 Follow your heart rate if desired. HOW TO USE A SPEED PROGRAM 1 Insert the key into the console. Hold the handrails and begin to start the program. If a different speed setting is programmed for a few seconds. The walking belt will flash in the display for the next period. 4 Change the incline of the speed programs. To select a speed program, press the Program Select button repeatedly until all 30 periods are finished exercising, remove...
... change . See step 9 on page 12. 5 Follow your heart rate if desired. HOW TO USE A SPEED PROGRAM 1 Insert the key into the console. Hold the handrails and begin to start the program. If a different speed setting is programmed for a few seconds. The walking belt will flash in the display for the next period. 4 Change the incline of the speed programs. To select a speed program, press the Program Select button repeatedly until all 30 periods are finished exercising, remove...

User Manual
Page 17
... Speed decrease button so the "d" disappears. IMPORTANT: If a "d" appears in the lower right display, the console is in the lower right display. The lower left display will show the total number of kilometers (or miles) that the walking belt has moved. This mode is selected, the following information will be shown: An "E" (for English) or an "M" (for the console. THE INFORMATION MODE/DEMO MODE The console features an information mode that keeps track of treadmill usage information...
... Speed decrease button so the "d" disappears. IMPORTANT: If a "d" appears in the lower right display, the console is in the lower right display. The lower left display will show the total number of kilometers (or miles) that the walking belt has moved. This mode is selected, the following information will be shown: An "E" (for English) or an "M" (for the console. THE INFORMATION MODE/DEMO MODE The console features an information mode that keeps track of treadmill usage information...
User Manual
Page 20
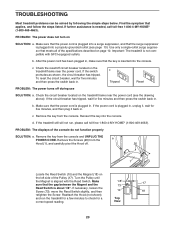
... Reset PROBLEM: The power turns off circuit breaker located on page 10. Make sure that applies, and follow the steps listed. Remove the key from the console. If necessary, loosen the Screw (73), move the Reed Switch slightly, and then 10 18 retighten the Screw. Reattach the Hood (not shown), and run , please call toll-free 1-800-4-MY-HOME® (1-800-469-4663). Find the symptom that the power cord...
... Reset PROBLEM: The power turns off circuit breaker located on page 10. Make sure that applies, and follow the steps listed. Remove the key from the console. If necessary, loosen the Screw (73), move the Reed Switch slightly, and then 10 18 retighten the Screw. Reattach the Hood (not shown), and run , please call toll-free 1-800-4-MY-HOME® (1-800-469-4663). Find the symptom that the power cord...
User Manual
Page 21
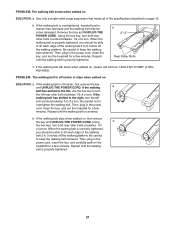
... a turn both rear roller bolts counterclockwise, 1/4 of the walking belt 2 to 3 inches off the walking platform. If the walking belt slips when walked on , please call toll-free 1-800-4-MY-HOME® (1-800469-4663). Remove the key and UNPLUG THE POWER CORD. Be careful to lift each edge of the specifications described on SOLUTION: a. Then, plug in the power cord, insert the key, and run the treadmill for a few minutes. PROBLEM: The walking belt slows when walked...
... a turn both rear roller bolts counterclockwise, 1/4 of the walking belt 2 to 3 inches off the walking platform. If the walking belt slips when walked on , please call toll-free 1-800-4-MY-HOME® (1-800469-4663). Remove the key and UNPLUG THE POWER CORD. Be careful to lift each edge of the specifications described on SOLUTION: a. Then, plug in the power cord, insert the key, and run the treadmill for a few minutes. PROBLEM: The walking belt slows when walked...
User Manual
Page 22
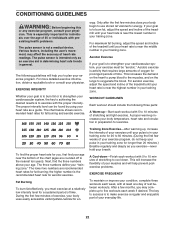
.... This is to exercise with preexisting health problems. The pulse sensor is near the highest number in your exercise program. For maximum fat burning, adjust the speed and incline of exercise, your body uses easily accessible carbohydrate calories for 20 to plan your training zone for en- To find the proper heart rate for fat burning; The key to success is especially important for aerobic exercise. EXERCISE INTENSITY Whether your...
.... This is to exercise with preexisting health problems. The pulse sensor is near the highest number in your exercise program. For maximum fat burning, adjust the speed and incline of exercise, your body uses easily accessible carbohydrate calories for 20 to plan your training zone for en- To find the proper heart rate for fat burning; The key to success is especially important for aerobic exercise. EXERCISE INTENSITY Whether your...
User Manual
Page 23
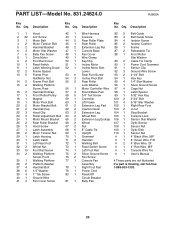
... 3/4" Screw 43 1 Console 83 4 Belt Guide Screw 3 1 Motor Belt 44 2 Rear Roller Plate 84 4 Isolator Screw 4 2 Motor Tension Bolt 45 1 Rear Roller 85 2 Isolator Cushion 5 2 Handrail Bracket 46 2 Extension Leg Nut 86 1 Frame 6 3 Motor Star Washer 47 1 Console Base 87 2 Releasable Tie 7 5 Belly Pan Screw 48 1 Fan Cover 88 1 Front Roller 8 1 Drive Motor 49 1 Wire Clamp Star Washer 9 2 Foot Rail Cover 50 1 Key/Clip 89 2 Cable Tie Clamp 10 1 Reed Switch 51 1 Incline Motor 90 1 Power Cord Grommet 11 1 Latch Warning Decal 52 1 Incline Motor Bolt...
... 3/4" Screw 43 1 Console 83 4 Belt Guide Screw 3 1 Motor Belt 44 2 Rear Roller Plate 84 4 Isolator Screw 4 2 Motor Tension Bolt 45 1 Rear Roller 85 2 Isolator Cushion 5 2 Handrail Bracket 46 2 Extension Leg Nut 86 1 Frame 6 3 Motor Star Washer 47 1 Console Base 87 2 Releasable Tie 7 5 Belly Pan Screw 48 1 Fan Cover 88 1 Front Roller 8 1 Drive Motor 49 1 Wire Clamp Star Washer 9 2 Foot Rail Cover 50 1 Key/Clip 89 2 Cable Tie Clamp 10 1 Reed Switch 51 1 Incline Motor 90 1 Power Cord Grommet 11 1 Latch Warning Decal 52 1 Incline Motor Bolt...

User Manual
Page 28
... the replacement parts, accessories, and user's manuals that you may also have other rights which vary from the date of Sears Brands, LLC ® Marca Registrada / TM Marca de Fábrica / SM Marca de Servicio de Sears Brands, LLC 90 DAY FULL WARRANTY If this Sears Treadmill Exerciser fails due to a defect in USA © 2006 ICON IP, Inc. The drive motor is used...
... the replacement parts, accessories, and user's manuals that you may also have other rights which vary from the date of Sears Brands, LLC ® Marca Registrada / TM Marca de Fábrica / SM Marca de Servicio de Sears Brands, LLC 90 DAY FULL WARRANTY If this Sears Treadmill Exerciser fails due to a defect in USA © 2006 ICON IP, Inc. The drive motor is used...


