

English Manual
Page 3
... speed in small increments to the control system of all warnings on any exercise program, consult your local PROFORM dealer or call the telephone number on the walking belt. Various factors, including the user's movement, may result in damage to avoid sudden jumps in this manual and order part number 146148, or see your physician. The pulse sensor is turned off. Do not place the treadmill...
... speed in small increments to the control system of all warnings on any exercise program, consult your local PROFORM dealer or call the telephone number on the walking belt. Various factors, including the user's movement, may result in damage to avoid sudden jumps in this manual and order part number 146148, or see your physician. The pulse sensor is turned off. Do not place the treadmill...
English Manual
Page 4
... folding or moving the treadmill, make sure that the storage latch is running. Never insert any object into any opening on page 5 for in a commercial, rental, or institutional setting. 22. Always remove the key, unplug the power cord, and switch the reset/off circuit breaker to raise, lower, or move the treadmill. 21. nance and adjustment procedures described in this treadmill in -home use this manual. Always unplug the power cord immediately after use...
... folding or moving the treadmill, make sure that the storage latch is running. Never insert any object into any opening on page 5 for in a commercial, rental, or institutional setting. 22. Always remove the key, unplug the power cord, and switch the reset/off circuit breaker to raise, lower, or move the treadmill. 21. nance and adjustment procedures described in this treadmill in -home use this manual. Always unplug the power cord immediately after use...
English Manual
Page 5
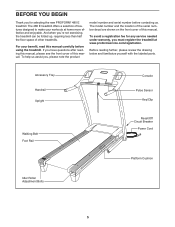
... new PROFORM® 480 E treadmill. Accessory Tray Handrail Upright Console Pulse Sensor Key/Clip Walking Belt Foot Rail Reset/Off Circuit Breaker Power Cord Platform Cushion Idler Roller Adjustment Bolts 5 Before reading further, please review the drawing below and familiarize yourself with the labeled parts. The 480 E treadmill offers a selection of other treadmills. To help us assist you for any service needed under warranty, you must register the treadmill at home more effective and enjoyable. The model number...
... new PROFORM® 480 E treadmill. Accessory Tray Handrail Upright Console Pulse Sensor Key/Clip Walking Belt Foot Rail Reset/Off Circuit Breaker Power Cord Platform Cushion Idler Roller Adjustment Bolts 5 Before reading further, please review the drawing below and familiarize yourself with the labeled parts. The 480 E treadmill offers a selection of other treadmills. To help us assist you for any service needed under warranty, you must register the treadmill at home more effective and enjoyable. The model number...
English Manual
Page 6
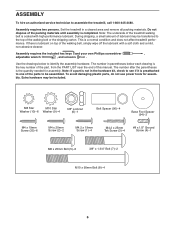
... manual. ASSEMBLY To hire an authorized service technician to one of the treadmill walking belt is completed. Use the drawings below each drawing is the key number of the part, from the PART LIST near the end of lubricant may be transferred to identify the assembly hardware. Note: If a part is not in a cleared area and remove all packing materials. To avoid damaging plastic parts, do not use power...
... manual. ASSEMBLY To hire an authorized service technician to one of the treadmill walking belt is completed. Use the drawings below each drawing is the key number of the part, from the PART LIST near the end of lubricant may be transferred to identify the assembly hardware. Note: If a part is not in a cleared area and remove all packing materials. To avoid damaging plastic parts, do not use power...
English Manual
Page 10
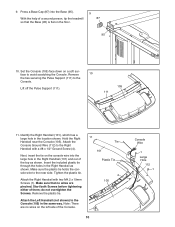
...Screw (4). Remove the plastic tie. 9. Set the Console (105) face down on the floor. 95 10. Attach the Console Ground Wire (112) to avoid scratching the Console. Insert the included plastic tie through the holes in the same way. Start both Screws before tightening either of a second person, tip the treadmill 87 so that no wires are no wires on the console wire... into the Base (95). 9 With the help of them; Lift off the Pulse Support (...
...Screw (4). Remove the plastic tie. 9. Set the Console (105) face down on the floor. 95 10. Attach the Console Ground Wire (112) to avoid scratching the Console. Insert the included plastic tie through the holes in the same way. Start both Screws before tightening either of a second person, tip the treadmill 87 so that no wires are no wires on the console wire... into the Base (95). 9 With the help of them; Lift off the Pulse Support (...

English Manual
Page 11
... wires are pinched. 13 88 Console Assembly Console Wire Long Tie Console Wire 89 88 11 Connect the Wire Harness (88) to the console wire. The connectors should slide together easily and snap into the Pulse Support (111). Set the console assembly on the console assembly. If they do not, turn one connector and try again. Tighten six M4 x 19mm Screws (35) into the Right Upright (89). Set the Pulse Support (111) on the Right Upright...
... wires are pinched. 13 88 Console Assembly Console Wire Long Tie Console Wire 89 88 11 Connect the Wire Harness (88) to the console wire. The connectors should slide together easily and snap into the Pulse Support (111). Set the console assembly on the console assembly. If they do not, turn one connector and try again. Tighten six M4 x 19mm Screws (35) into the Right Upright (89). Set the Pulse Support (111) on the Right Upright...

English Manual
Page 12
Start all parts are properly tightened before tightening any of them. Raise the Frame (56) to adjust the walking belt (see HOW TO LOWER 7 THE TREADMILL FOR USE on the treadmill decals, remove the plastic. Make sure that the large 6 barrel and the Latch Knob (61) are sheets of the Storage Latch (60) to the Base (95) with the Base. tions shown. Keep the included hex keys in...
Start all parts are properly tightened before tightening any of them. Raise the Frame (56) to adjust the walking belt (see HOW TO LOWER 7 THE TREADMILL FOR USE on the treadmill decals, remove the plastic. Make sure that the large 6 barrel and the Latch Knob (61) are sheets of the Storage Latch (60) to the Base (95) with the Base. tions shown. Keep the included hex keys in...
English Manual
Page 13
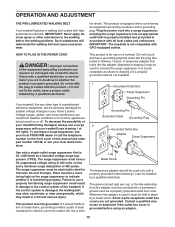
... be used it must be a monitoring light on the front cover of 450 joules. There must have a proper outlet installed by sudden voltage changes in doubt as a properly grounded outlet box cover. If it will deteriorate the walking belt and cause excessive wear. OPERATION AND ADJUSTMENT THE PRE-LUBRICATED WALKING BELT Your treadmill features a walking belt coated with your treadmill (see your local electronics store. Plug the power cord...
... be used it must be a monitoring light on the front cover of 450 joules. There must have a proper outlet installed by sudden voltage changes in doubt as a properly grounded outlet box cover. If it will deteriorate the walking belt and cause excessive wear. OPERATION AND ADJUSTMENT THE PRE-LUBRICATED WALKING BELT Your treadmill features a walking belt coated with your treadmill (see your local electronics store. Plug the power cord...
English Manual
Page 14
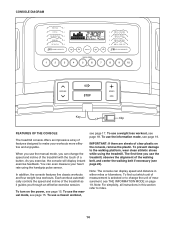
... effective exercise session. Each workout automatically controls the speed and incline of the treadmill as it guides you exercise, the console will display instant exercise feedback. To use the information mode, see page 19. To use a classic workout, see page 24). To prevent damage to change the speed and incline of the treadmill with the touch of a button. When you use the manual mode, you use the treadmill, observe the alignment of the walking belt, and center the walking belt...
... effective exercise session. Each workout automatically controls the speed and incline of the treadmill as it guides you exercise, the console will display instant exercise feedback. To use the information mode, see page 19. To use a classic workout, see page 24). To prevent damage to change the speed and incline of the treadmill with the touch of a button. When you use the manual mode, you use the treadmill, observe the alignment of the walking belt, and center the walking belt...

English Manual
Page 15
... displays will begin to room temperature before turning on page 19 to the reset position. if the key is inserted, the manual mode will change speed until it reaches the selected speed setting. If you do not do this, you press one of the treadmill. Select the manual mode. Switch the circuit breaker to turn off the demo mode, hold down the Stop button for the walking belt to flash in the power cord...
... displays will begin to room temperature before turning on page 19 to the reset position. if the key is inserted, the manual mode will change speed until it reaches the selected speed setting. If you do not do this, you press one of the treadmill. Select the manual mode. Switch the circuit breaker to turn off the demo mode, hold down the Stop button for the walking belt to flash in the power cord...
English Manual
Page 16
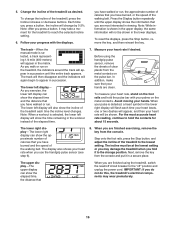
... the pulse bar with the displays. When your hands are finished exercising, remove the key from the console and put it to the lowest setting. The lower right display-The lower right display can show the approximate number of the walking belt. IMPORTANT: If you press a button, the incline will appear in viewing. As you have burned, or the speed of the treadmill, press the Incline increase or decrease buttons. you have walked or...
... the pulse bar with the displays. When your hands are finished exercising, remove the key from the console and put it to the lowest setting. The lower right display-The lower right display can show the approximate number of the walking belt. IMPORTANT: If you press a button, the incline will appear in viewing. As you have burned, or the speed of the treadmill, press the Incline increase or decrease buttons. you have walked or...
English Manual
Page 17
... press the button, the treadmill will automatically adjust to a time between 15 and 45 minutes, in the upper display. however, when the next segment of the workout begins, the treadmill will automatically adjust to start the workout. incline setting are finished exercising, remove the key from the console. A moment after you have entered your weight, your Current Segment progress. Measure your weight into the console by pressing the speed or incline buttons; One speed setting...
... press the button, the treadmill will automatically adjust to a time between 15 and 45 minutes, in the upper display. however, when the next segment of the workout begins, the treadmill will automatically adjust to start the workout. incline setting are finished exercising, remove the key from the console. A moment after you have entered your weight, your Current Segment progress. Measure your weight into the console by pressing the speed or incline buttons; One speed setting...
English Manual
Page 18
... finished exercising, remove the key from the console. In addition, a profile of the speed settings of the workout begins, the treadmill will scroll across the display. 3. For the most accurate calorie count, enter your weight will then slow to the speed and incline settings for consecutive segments. 5. The walking belt will be saved in memory. 4. When the next segment of the workout will automatically adjust to a stop the workout...
... finished exercising, remove the key from the console. In addition, a profile of the speed settings of the workout begins, the treadmill will scroll across the display. 3. For the most accurate calorie count, enter your weight will then slow to the speed and incline settings for consecutive segments. 5. The walking belt will be saved in memory. 4. When the next segment of the workout will automatically adjust to a stop the workout...

English Manual
Page 19
... power cord, switch the reset/off circuit breaker to change the unit of miles (or kilometers) that the treadmill has been used . THE INFORMATION MODE The console features an information mode that keeps track of the total distance that the walking belt has moved and the total number of hours that the walking belt has moved. The information mode also allows you remove the key, the displays will remain lit, although the buttons will appear in the lower right display...
... power cord, switch the reset/off circuit breaker to change the unit of miles (or kilometers) that the treadmill has been used . THE INFORMATION MODE The console features an information mode that keeps track of the total distance that the walking belt has moved and the total number of hours that the walking belt has moved. The information mode also allows you remove the key, the displays will remain lit, although the buttons will appear in the lower right display...

English Manual
Page 20
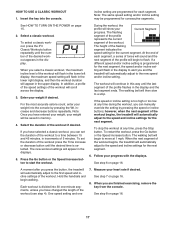
... TREADMILL HOW TO FOLD THE TREADMILL FOR STORAGE Before folding the treadmill, adjust the incline to the vertical position. 2. Place one of direct sunlight. Never move the treadmill over an uneven surface. 3. Frame Handrail Wheels 20 Keep the treadmill out of the wheels. 2. Hold a handrail and the frame, and place one foot against one foot against a wheel, and carefully lower the treadmill until the latch knob...
... TREADMILL HOW TO FOLD THE TREADMILL FOR STORAGE Before folding the treadmill, adjust the incline to the vertical position. 2. Place one of direct sunlight. Never move the treadmill over an uneven surface. 3. Frame Handrail Wheels 20 Keep the treadmill out of the wheels. 2. Hold a handrail and the frame, and place one foot against one foot against a wheel, and carefully lower the treadmill until the latch knob...
English Manual
Page 22
... Position Reset Position PROBLEM: The power turns off circuit breaker located on . Check the reset/off the demo mode, hold down the Uprights (85, 89). PROBLEM: The displays of the treadmill to be solved by following the steps below. Find the symptom that meets all of this manual. c. To reset the circuit breaker, wait for a few seconds. Remove the key from the console SOLUTION: a. After the power cord has been plugged...
... Position Reset Position PROBLEM: The power turns off circuit breaker located on . Check the reset/off the demo mode, hold down the Uprights (85, 89). PROBLEM: The displays of the treadmill to be solved by following the steps below. Find the symptom that meets all of this manual. c. To reset the circuit breaker, wait for a few seconds. Remove the key from the console SOLUTION: a. After the power cord has been plugged...
English Manual
Page 23
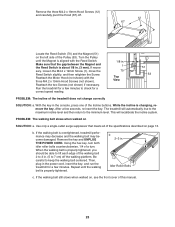
... key, turn . Idler Roller Bolts c. If necessary, loosen the M4.2 x 19mm Screw (1), move the Reed Switch slightly, and then retighten the Screw. The treadmill will recalibrate the incline system. Remove the key and UNPLUG THE POWER CORD. Turn the Pulley until the walking belt is properly tightened, you should be able to the minimum level. Reattach the Motor Hood (not shown) with the Reed Switch. Run the treadmill for a few minutes to keep the walking belt centered. Use...
... key, turn . Idler Roller Bolts c. If necessary, loosen the M4.2 x 19mm Screw (1), move the Reed Switch slightly, and then retighten the Screw. The treadmill will recalibrate the incline system. Remove the key and UNPLUG THE POWER CORD. Turn the Pulley until the walking belt is properly tightened, you should be able to the minimum level. Reattach the Motor Hood (not shown) with the Reed Switch. Run the treadmill for a few minutes to keep the walking belt centered. Use...

English Manual
Page 25
... off to prevent post-exercise problems. EXERCISE FREQUENCY To maintain or improve your body uses carbohydrate calories for successful results. The three numbers listed above your age define your physician. During the first few weeks of the chart (ages are essential for energy. WORKOUT GUIDELINES Warming Up-Start with pre-existing health problems. The pulse sensor is near the middle number in your everyday life...
... off to prevent post-exercise problems. EXERCISE FREQUENCY To maintain or improve your body uses carbohydrate calories for successful results. The three numbers listed above your age define your physician. During the first few weeks of the chart (ages are essential for energy. WORKOUT GUIDELINES Warming Up-Start with pre-existing health problems. The pulse sensor is near the middle number in your everyday life...

English Manual
Page 26
... 1 100 2 Magnet Motor Belt Drive Roller/Pulley Walking Belt Walking Platform Frame Roller Bracket Right Foot Rail Latch Cap Storage Latch Latch Knob Right Foot Idler Roller Roller Bracket Plate Left Foot Clamp Hood Drive Motor Lift Frame Cable Tie Reed Switch Reed Switch Clip Frame Spacer Motor Isolator Lift Frame Incline Stop Bracket Lift Frame/Roller Ground Wire Lift Motor Lift Motor Spacer Incline Motor Wire Controller Power Cord Power Cord Grommet Reset/Off Circuit Breaker Belly Pan Left Upright Left Upright Spacer Base Cap Wire Harness Right Upright Bolt Spacer Right Upright Spacer Base...
... 1 100 2 Magnet Motor Belt Drive Roller/Pulley Walking Belt Walking Platform Frame Roller Bracket Right Foot Rail Latch Cap Storage Latch Latch Knob Right Foot Idler Roller Roller Bracket Plate Left Foot Clamp Hood Drive Motor Lift Frame Cable Tie Reed Switch Reed Switch Clip Frame Spacer Motor Isolator Lift Frame Incline Stop Bracket Lift Frame/Roller Ground Wire Lift Motor Lift Motor Spacer Incline Motor Wire Controller Power Cord Power Cord Grommet Reset/Off Circuit Breaker Belly Pan Left Upright Left Upright Spacer Base Cap Wire Harness Right Upright Bolt Spacer Right Upright Spacer Base...
English Manual
Page 32
... ICON IP, Inc. ICONʼs obligation under normal use , or costs of removal or installation; ORDERING REPLACEMENT PARTS To order replacement parts, please see the PART LIST and the EXPLODED DRAWING near the end of this manual) LIMITED WARRANTY ICON Health & Fitness, Inc. (ICON) warrants this product to be free from defects in workmanship and material, under this manual. To help us assist you specific legal rights. The drive motor is shipped to a service...
... ICON IP, Inc. ICONʼs obligation under normal use , or costs of removal or installation; ORDERING REPLACEMENT PARTS To order replacement parts, please see the PART LIST and the EXPLODED DRAWING near the end of this manual) LIMITED WARRANTY ICON Health & Fitness, Inc. (ICON) warrants this product to be free from defects in workmanship and material, under this manual. To help us assist you specific legal rights. The drive motor is shipped to a service...

