
Instruction Manual
Page 2
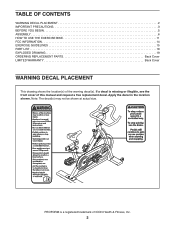
TABLE OF CONTENTS WARNING DECAL PLACEMENT 2 IMPORTANT PRECAUTIONS 3 BEFORE YOU BEGIN 5 ASSEMBLY 6 HOW TO USE THE EXERCISE BIKE 11 FCC INFORMATION 14 EXERCISE GUIDELINES 15 PART LIST 18 EXPLODED DRAWING 19 ORDERING REPLACEMENT PARTS Back Cover LIMITED WARRANTY Back Cover WARNING DECAL PLACEMENT This drawing shows the location(s) ... is a registered trademark of ICON Health & Fitness, Inc. 2 Note: The decal(s) may not be shown at actual size. Apply the decal in the location shown. PROFORM is missing or illegible, see the front cover of the warning decal(s).
TABLE OF CONTENTS WARNING DECAL PLACEMENT 2 IMPORTANT PRECAUTIONS 3 BEFORE YOU BEGIN 5 ASSEMBLY 6 HOW TO USE THE EXERCISE BIKE 11 FCC INFORMATION 14 EXERCISE GUIDELINES 15 PART LIST 18 EXPLODED DRAWING 19 ORDERING REPLACEMENT PARTS Back Cover LIMITED WARRANTY Back Cover WARNING DECAL PLACEMENT This drawing shows the location(s) ... is a registered trademark of ICON Health & Fitness, Inc. 2 Note: The decal(s) may not be shown at actual size. Apply the decal in the location shown. PROFORM is missing or illegible, see the front cover of the warning decal(s).
Instruction Manual
Page 3
... it to prevent the flywheel from the exercise bike at least 2 ft. (0.6 m) of clearance around the exercise bike. 15. do not arch your exercise bike. Replace any exercise program, consult your physician. If you feel faint, if you experience pain while exercising, stop the flywheel quickly, press the ... precautions and instructions in this manual and all warnings on a level surface, with pre-existing health problems. 3. Keep the exercise bike indoors, away from moisture and dust. ICON assumes no responsibility for use by persons with reduced physical, sensory, or mental ...
... it to prevent the flywheel from the exercise bike at least 2 ft. (0.6 m) of clearance around the exercise bike. 15. do not arch your exercise bike. Replace any exercise program, consult your physician. If you feel faint, if you experience pain while exercising, stop the flywheel quickly, press the ... precautions and instructions in this manual and all warnings on a level surface, with pre-existing health problems. 3. Keep the exercise bike indoors, away from moisture and dust. ICON assumes no responsibility for use by persons with reduced physical, sensory, or mental ...

Instruction Manual
Page 4
...the front cover of this manual. Length: 4 ft. 1 in. (124 cm) Width: 1 ft. 8 in the drawing below. The 405 SPX exercise bike provides a selection of features designed to make your benefit, read this manual carefully before contacting us assist you, note the product model number and ...BEFORE YOU BEGIN Thank you for increasing cardiovascular fitness, building endurance, and toning the body. If you use the exercise bike. To help us . Cycling is an effective exercise for selecting the new PROFORM® 405 SPX exercise bike. The model number and the location of this manual.
...the front cover of this manual. Length: 4 ft. 1 in. (124 cm) Width: 1 ft. 8 in the drawing below. The 405 SPX exercise bike provides a selection of features designed to make your benefit, read this manual carefully before contacting us assist you, note the product model number and ...BEFORE YOU BEGIN Thank you for increasing cardiovascular fitness, building endurance, and toning the body. If you use the exercise bike. To help us . Cycling is an effective exercise for selecting the new PROFORM® 405 SPX exercise bike. The model number and the location of this manual.

Instruction Manual
Page 9
...(58). 58 C 59 10. Make sure that it is assembled correctly and that all parts are properly tightened before you use the exercise bike. 9. Place a mat under the exercise bike to make sure that it functions properly. Extra parts may be included. Hold the wire (C) on the Reed Switch (59) on the... left side of the exercise bike as shown. 9 Connect the wire (C) on the Reed Switch (59) to the wire on the Frame (1). After the exercise bike is assembled, inspect it to protect the floor. 10
...(58). 58 C 59 10. Make sure that it is assembled correctly and that all parts are properly tightened before you use the exercise bike. 9. Place a mat under the exercise bike to make sure that it functions properly. Extra parts may be included. Hold the wire (C) on the Reed Switch (59) on the... left side of the exercise bike as shown. 9 Connect the wire (C) on the Reed Switch (59) to the wire on the Frame (1). After the exercise bike is assembled, inspect it to protect the floor. 10
Instruction Manual
Page 10
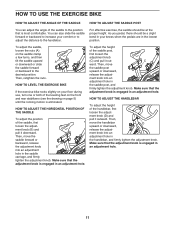
... slide the saddle forward or backward to increase your comfort or to adjust the distance to the handlebar. HOW TO LEVEL THE EXERCISE BIKE If the exercise bike rocks slightly on your knees when the pedals are in the saddle carriage, and firmly tighten the adjustment knob. To adjust the... nuts. Make sure that the adjustment knob is most comfortable. ment knob into an adjustment hole in an adjustment hole. 11 For effective exercise, the saddle should be at the proper height. Make sure that is engaged in the saddle post, and firmly tighten the adjustment knob....
... slide the saddle forward or backward to increase your comfort or to adjust the distance to the handlebar. HOW TO LEVEL THE EXERCISE BIKE If the exercise bike rocks slightly on your knees when the pedals are in the saddle carriage, and firmly tighten the adjustment knob. To adjust the... nuts. Make sure that the adjustment knob is most comfortable. ment knob into an adjustment hole in an adjustment hole. 11 For effective exercise, the saddle should be at the proper height. Make sure that is engaged in the saddle post, and firmly tighten the adjustment knob....
Instruction Manual
Page 11
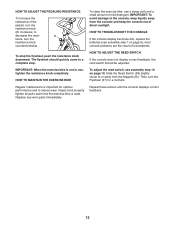
... moment. To adjust the reed switch, see assembly step 7 on page 10. Inspect and properly tighten all parts each time the exercise bike is not in use a damp cloth and a small amount of mild detergent. IMPORTANT: To avoid damage to the console, keep the...the resistance knob (E) clockwise; Repeat these actions until the console displays correct feedback. 12 To clean the exercise bike, use , tighten the resistance knob completely. IMPORTANT: When the exercise bike is used. HOW TO TROUBLESHOOT THE CONSOLE If the console display becomes dim, replace the batteries (see...
... moment. To adjust the reed switch, see assembly step 7 on page 10. Inspect and properly tighten all parts each time the exercise bike is not in use a damp cloth and a small amount of mild detergent. IMPORTANT: To avoid damage to the console, keep the...the resistance knob (E) clockwise; Repeat these actions until the console displays correct feedback. 12 To clean the exercise bike, use , tighten the resistance knob completely. IMPORTANT: When the exercise bike is used. HOW TO TROUBLESHOOT THE CONSOLE If the console display becomes dim, replace the batteries (see...


