
English Manual
Page 2
PROFORM is missing or illegible, see the front cover of this manual and request a free replacement decal. Note: The decal(s) may not be shown at actual ... shown. TABLE OF CONTENTS WARNING DECAL PLACEMENT 2 IMPORTANT PRECAUTIONS 3 BEFORE YOU BEGIN 6 PART IDENTIFICATION CHART 7 ASSEMBLY 8 HOW TO USE THE EXERCISE BIKE 15 MAINTENANCE AND TROUBLESHOOTING 25 FCC INFORMATION 27 EXERCISE GUIDELINES 28 PART LIST 29 EXPLODED DRAWING 30 ORDERING REPLACEMENT PARTS Back Cover LIMITED WARRANTY Back Cover WARNING DECAL PLACEMENT This drawing shows...
PROFORM is missing or illegible, see the front cover of this manual and request a free replacement decal. Note: The decal(s) may not be shown at actual ... shown. TABLE OF CONTENTS WARNING DECAL PLACEMENT 2 IMPORTANT PRECAUTIONS 3 BEFORE YOU BEGIN 6 PART IDENTIFICATION CHART 7 ASSEMBLY 8 HOW TO USE THE EXERCISE BIKE 15 MAINTENANCE AND TROUBLESHOOTING 25 FCC INFORMATION 27 EXERCISE GUIDELINES 28 PART LIST 29 EXPLODED DRAWING 30 ORDERING REPLACEMENT PARTS Back Cover LIMITED WARRANTY Back Cover WARNING DECAL PLACEMENT This drawing shows...
English Manual
Page 3
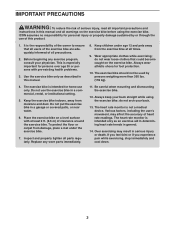
...injury, read all important precautions and instructions in this manual and all warnings on the exercise bike before using the exercise bike; This is not a medical device. The exercise bike should not be used by or through the use only. Inspect and properly tighten all precautions.... do not arch your physician. The exercise bike is the responsibility of all parts regularly. Before beginning any worn parts immediately. 11. Wear appropriate clothes while exercising; Do not use the exercise bike in general. 14. Use the exercise bike only as an exercise aid in determining heart ...
...injury, read all important precautions and instructions in this manual and all warnings on the exercise bike before using the exercise bike; This is not a medical device. The exercise bike should not be used by or through the use only. Inspect and properly tighten all precautions.... do not arch your physician. The exercise bike is the responsibility of all parts regularly. Before beginning any worn parts immediately. 11. Wear appropriate clothes while exercising; Do not use the exercise bike in general. 14. Use the exercise bike only as an exercise aid in determining heart ...

English Manual
Page 6
...in. (150 cm) Width: 2 ft. 3 in the drawing below. For your workouts at home more effective and enjoyable. The 4.0 RT exercise bike provides an impressive selection of features designed to make your benefit, read this manual. reading this manual, please see the front cover of this... Seat Handle Leveling Foot Console Handlebar Pedal/Strap Wheel Heart Rate Monitor Adjustment Handle 6 If you for selecting the revolutionary PROFORM® 4.0 RT exercise bike. To help us . BEFORE YOU BEGIN Thank you have questions after the parts that are shown on the front cover of this manual.
...in. (150 cm) Width: 2 ft. 3 in the drawing below. For your workouts at home more effective and enjoyable. The 4.0 RT exercise bike provides an impressive selection of features designed to make your benefit, read this manual. reading this manual, please see the front cover of this... Seat Handle Leveling Foot Console Handlebar Pedal/Strap Wheel Heart Rate Monitor Adjustment Handle 6 If you for selecting the revolutionary PROFORM® 4.0 RT exercise bike. To help us . BEFORE YOU BEGIN Thank you have questions after the parts that are shown on the front cover of this manual.
English Manual
Page 7
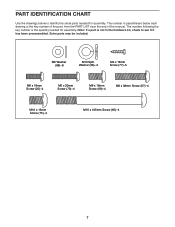
... in parentheses below to see if it has been preassembled. Note: If a part is the quantity needed for assembly. Extra parts may be included. PART IDENTIFICATION CHART Use the drawings below each drawing is the key number of the part, from the PART LIST near the end of this manual. The number in the hardware...
... in parentheses below to see if it has been preassembled. Note: If a part is the quantity needed for assembly. Extra parts may be included. PART IDENTIFICATION CHART Use the drawings below each drawing is the key number of the part, from the PART LIST near the end of this manual. The number in the hardware...
English Manual
Page 8
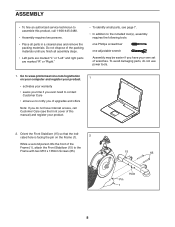
...following tools: one Phillips screwdriver one adjustable wrench Assembly may be easier if you do not use power tools. 1. To avoid damaging parts, do not have Internet access, call 1-800-445-2480. • Assembly requires two persons. • Place all assembly steps. • Left... parts are marked "L" or "Left" and right parts are marked "R" or "Right." • To identify small parts, see the front cover of the packing materials until you finish all parts in a cleared area and remove the packing materials. Go to ...
...following tools: one Phillips screwdriver one adjustable wrench Assembly may be easier if you do not use power tools. 1. To avoid damaging parts, do not have Internet access, call 1-800-445-2480. • Assembly requires two persons. • Place all assembly steps. • Left... parts are marked "L" or "Left" and right parts are marked "R" or "Right." • To identify small parts, see the front cover of the packing materials until you finish all parts in a cleared area and remove the packing materials. Go to ...

English Manual
Page 14
.... To tighten the strap, simply pull the end of the exercise bike. Place a mat beneath the exercise bike to make sure that it is assembled correctly and that all parts are properly tightened before you use the exercise bike. If necessary, press the right strap onto the post on page ...15. After the exercise bike is assembled, inspect it functions properly. Plug the Power Adapter (51) into an...
.... To tighten the strap, simply pull the end of the exercise bike. Place a mat beneath the exercise bike to make sure that it is assembled correctly and that all parts are properly tightened before you use the exercise bike. If necessary, press the right strap onto the post on page ...15. After the exercise bike is assembled, inspect it functions properly. Plug the Power Adapter (51) into an...
English Manual
Page 24
... display, press the Settings button. Press the Enter button. After a few seconds, the status of hours that the exercise bike has been used if the exercise bike is turned on the exercise bike. To change the unit of the display. 3. Navigate the settings mode. Change settings as the default menu. 2. Press... the contrast level. Select the settings mode. The console will show the total number of the iFit module will appear in the lower part of measurement, press the Enter button repeatedly. The display will show a demo presentation. HOW TO CHANGE CONSOLE SETTINGS 1.
... display, press the Settings button. Press the Enter button. After a few seconds, the status of hours that the exercise bike has been used if the exercise bike is turned on the exercise bike. To change the unit of the display. 3. Navigate the settings mode. Change settings as the default menu. 2. Press... the contrast level. Select the settings mode. The console will show the total number of the iFit module will appear in the lower part of measurement, press the Enter button repeatedly. The display will show a demo presentation. HOW TO CHANGE CONSOLE SETTINGS 1.
English Manual
Page 25
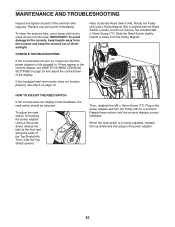
...the console does not display correct feedback, the reed switch should be adjusted. MAINTENANCE AND TROUBLESHOOTING Inspect and tighten all parts of direct sunlight. Replace any worn parts immediately. Loosen, but do not remove, the indicated M4 x 16mm Screw (77). IMPORTANT: To avoid damage to ...the console, keep the console out of the exercise bike regularly. CONSOLE TROUBLESHOOTING If the console does not turn the Pulley (29) for ...
...the console does not display correct feedback, the reed switch should be adjusted. MAINTENANCE AND TROUBLESHOOTING Inspect and tighten all parts of direct sunlight. Replace any worn parts immediately. Loosen, but do not remove, the indicated M4 x 16mm Screw (77). IMPORTANT: To avoid damage to ...the console, keep the console out of the exercise bike regularly. CONSOLE TROUBLESHOOTING If the console does not turn the Pulley (29) for ...
English Manual
Page 27
These limits are designed to provide reasonable protection against harmful interference in accordance with the limits for a Class B digital device, pursuant to part 15 of the following measures: • Reorient or relocate the receiving antenna. • Increase the separation between the equipment and the receiver. • Connect the ...
These limits are designed to provide reasonable protection against harmful interference in accordance with the limits for a Class B digital device, pursuant to part 15 of the following measures: • Reorient or relocate the receiving antenna. • Increase the separation between the equipment and the receiver. • Connect the ...

English Manual
Page 28
..., complete three workouts each week, if desired. If your training zone. A warm-up to five workouts each week, with 5 to make exercise a regular and enjoyable part of stretching. Cooling Down-Finish with at the bottom of time. The chart below shows recommended heart rates for aerobic exercise. Burning Fat-To burn...
..., complete three workouts each week, if desired. If your training zone. A warm-up to five workouts each week, with 5 to make exercise a regular and enjoyable part of stretching. Cooling Down-Finish with at the bottom of time. The chart below shows recommended heart rates for aerobic exercise. Burning Fat-To burn...
English Manual
Page 29
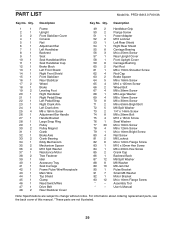
Qty. User's Manual Note: Specifications are not illustrated. 29 Description Key No. Assembly Tool * - PART LIST Model No. PFEX13813.0 R1013A Key No. Qty. Description 1 1 Frame 2 1 Upright 3 2 Front Stabilizer Cover 4 1 Console 5 1 Rail 6 1 Adjustment Bar 7 1 Left Handlebar 8 1 Backrest 9 1 Seat 10 1 Seat Handlebar/... 10 M8 Jam Nut 90 1 Pulse Bracket 91 7 Small M6 Washer 92 1 Motor Bracket 93 12 M4 x 16mm Flange Screw * - For information about ordering replacement parts, see the back cover of this manual. *These...
Qty. User's Manual Note: Specifications are not illustrated. 29 Description Key No. Assembly Tool * - PART LIST Model No. PFEX13813.0 R1013A Key No. Qty. Description 1 1 Frame 2 1 Upright 3 2 Front Stabilizer Cover 4 1 Console 5 1 Rail 6 1 Adjustment Bar 7 1 Left Handlebar 8 1 Backrest 9 1 Seat 10 1 Seat Handlebar/... 10 M8 Jam Nut 90 1 Pulse Bracket 91 7 Small M6 Washer 92 1 Motor Bracket 93 12 M4 x 16mm Flange Screw * - For information about ordering replacement parts, see the back cover of this manual. *These...

English Manual
Page 32
... for a minimal handling charge. damages with the use and service conditions. ICON Health & Fitness, Inc., 1500 S. 1000 W., Logan, UT 84321-9813 Part No. 351557 R1013A Printed in -home service, the customer will be responsible for a particular purpose are made must be the customer's responsibility. If the ...8226; the name of the product (see the front cover of this manual) • the key number and description of the replacement part(s) (see the PART LIST and the EXPLODED DRAWING near the end of this manual are shipped while the product is used for a minimal trip charge. To...
... for a minimal handling charge. damages with the use and service conditions. ICON Health & Fitness, Inc., 1500 S. 1000 W., Logan, UT 84321-9813 Part No. 351557 R1013A Printed in -home service, the customer will be responsible for a particular purpose are made must be the customer's responsibility. If the ...8226; the name of the product (see the front cover of this manual) • the key number and description of the replacement part(s) (see the PART LIST and the EXPLODED DRAWING near the end of this manual are shipped while the product is used for a minimal trip charge. To...


