
English Manual
Page 2
... 2 IMPORTANT PRECAUTIONS 3 BEFORE YOU BEGIN 6 PART IDENTIFICATION CHART 7 ASSEMBLY 8 HOW TO USE THE EXERCISE BIKE 15 MAINTENANCE AND TROUBLESHOOTING 25 FCC INFORMATION 27 EXERCISE GUIDELINES 28 PART LIST 29 EXPLODED DRAWING 30 ORDERING REPLACEMENT PARTS Back Cover LIMITED WARRANTY Back Cover WARNING DECAL ...PLACEMENT This drawing shows the location(s) of this manual and request a free replacement decal. If a decal is a registered trademark of ICON IP, Inc. 2 Apply the decal in the location shown. PROFORM is...
... 2 IMPORTANT PRECAUTIONS 3 BEFORE YOU BEGIN 6 PART IDENTIFICATION CHART 7 ASSEMBLY 8 HOW TO USE THE EXERCISE BIKE 15 MAINTENANCE AND TROUBLESHOOTING 25 FCC INFORMATION 27 EXERCISE GUIDELINES 28 PART LIST 29 EXPLODED DRAWING 30 ORDERING REPLACEMENT PARTS Back Cover LIMITED WARRANTY Back Cover WARNING DECAL ...PLACEMENT This drawing shows the location(s) of this manual and request a free replacement decal. If a decal is a registered trademark of ICON IP, Inc. 2 Apply the decal in the location shown. PROFORM is...
English Manual
Page 3
...injury or death. Keep the exercise bike indoors, away from the exercise bike at least 2 ft. (0.6 m) of all parts regularly. Place the exercise bike on the exercise bike. Always keep your back. 13. Be careful when mounting and dismounting the exercise bike. 12. The heart rate monitor is...risk of serious injury, read all important precautions and instructions in this manual and all times. 9. Before beginning any worn parts immediately. 11. The exercise bike should not be used by or through the use of this manual. 8. To protect the floor or carpet from damage...
...injury or death. Keep the exercise bike indoors, away from the exercise bike at least 2 ft. (0.6 m) of all parts regularly. Place the exercise bike on the exercise bike. Always keep your back. 13. Be careful when mounting and dismounting the exercise bike. 12. The heart rate monitor is...risk of serious injury, read all important precautions and instructions in this manual and all times. 9. Before beginning any worn parts immediately. 11. The exercise bike should not be used by or through the use of this manual. 8. To protect the floor or carpet from damage...

English Manual
Page 6
... you have questions after the parts that are shown on the front cover of features designed to make your benefit, read this manual carefully before Before reading further, please familiarize yourself with you for selecting the revolutionary PROFORM® 4.0 RT exercise bike. Length: 4 ft. 11... in. (150 cm) Width: 2 ft. 3 in the drawing below. The 4.0 RT exercise bike provides an impressive selection of this manual. BEFORE YOU BEGIN Thank ...
... you have questions after the parts that are shown on the front cover of features designed to make your benefit, read this manual carefully before Before reading further, please familiarize yourself with you for selecting the revolutionary PROFORM® 4.0 RT exercise bike. Length: 4 ft. 11... in. (150 cm) Width: 2 ft. 3 in the drawing below. The 4.0 RT exercise bike provides an impressive selection of this manual. BEFORE YOU BEGIN Thank ...
English Manual
Page 7
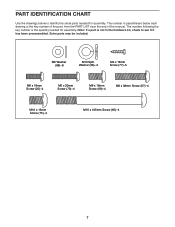
... be included. Note: If a part is the key number of the part, from the PART LIST near the end of this manual. M6 Washer (88)-8 M10 Split Washer (36)-4 M4 x 16mm Screw (77)-5 M6 x 18mm Screw (25)-4 M6 x 30mm Screw (... (65)-4 7 The number in parentheses below to see if it has been preassembled. The number following the key number is the quantity needed for assembly. PART IDENTIFICATION CHART Use the drawings below each drawing is not in the hardware kit, check to identify the small...
... be included. Note: If a part is the key number of the part, from the PART LIST near the end of this manual. M6 Washer (88)-8 M10 Split Washer (36)-4 M4 x 16mm Screw (77)-5 M6 x 18mm Screw (25)-4 M6 x 30mm Screw (... (65)-4 7 The number in parentheses below to see if it has been preassembled. The number following the key number is the quantity needed for assembly. PART IDENTIFICATION CHART Use the drawings below each drawing is not in the hardware kit, check to identify the small...
English Manual
Page 8
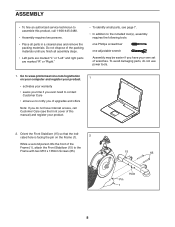
...if you ever need to contact Customer Care • allows us to notify you of upgrades and offers Note: If you finish all parts in a cleared area and remove the packing materials. Go to www.proformservice.com/registration on the Frame (1). 2 While a second person lifts ...Assembly requires two persons. • Place all assembly steps. • Left parts are marked "L" or "Left" and right parts are marked "R" or "Right." • To identify small parts, see the front cover of wrenches. To avoid damaging parts, do not have your own set of this product, call Customer Care (see...
...if you ever need to contact Customer Care • allows us to notify you of upgrades and offers Note: If you finish all parts in a cleared area and remove the packing materials. Go to www.proformservice.com/registration on the Frame (1). 2 While a second person lifts ...Assembly requires two persons. • Place all assembly steps. • Left parts are marked "L" or "Left" and right parts are marked "R" or "Right." • To identify small parts, see the front cover of wrenches. To avoid damaging parts, do not have your own set of this product, call Customer Care (see...

English Manual
Page 14
...Firmly tighten the Left Pedal (not shown) counterclockwise into the Right Crank Arm (23). After the exercise bike is assembled correctly and that it to protect the floor. 14 Note: Extra parts may be included. To loosen the strap, press the indicated tab and pull the strap upward. Make ...sure that it is assembled, inspect it functions properly. Place a mat beneath the exercise bike to make sure that all parts are properly tightened before you use the exercise bike. 14. Strap Post 23 21 Tab 51 16. To tighten the strap, simply pull the end of...
...Firmly tighten the Left Pedal (not shown) counterclockwise into the Right Crank Arm (23). After the exercise bike is assembled correctly and that it to protect the floor. 14 Note: Extra parts may be included. To loosen the strap, press the indicated tab and pull the strap upward. Make ...sure that it is assembled, inspect it functions properly. Place a mat beneath the exercise bike to make sure that all parts are properly tightened before you use the exercise bike. 14. Strap Post 23 21 Tab 51 16. To tighten the strap, simply pull the end of...
English Manual
Page 24
...will then check for the selected optional screen. The console will appear in miles or kilometers) that the exercise bike has been used if the exercise bike is turned on the exercise bike. Exit the settings mode. HOW TO CHANGE CONSOLE SETTINGS 1. Select the settings mode. To change the unit ...the console, the display will not be used and the total distance (in the display. While the demo mode is displayed in the lower part of measurement will appear in the display. To exit this display, press the Settings button. Press the Settings button to follow the instructions ...
...will then check for the selected optional screen. The console will appear in miles or kilometers) that the exercise bike has been used if the exercise bike is turned on the exercise bike. Exit the settings mode. HOW TO CHANGE CONSOLE SETTINGS 1. Select the settings mode. To change the unit ...the console, the display will not be used and the total distance (in the display. While the demo mode is displayed in the lower part of measurement will appear in the display. To exit this display, press the Settings button. Press the Settings button to follow the instructions ...
English Manual
Page 25
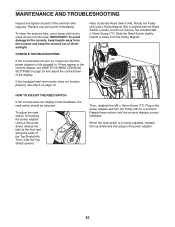
... for a moment. Next, locate the Reed Switch (46). Loosen, but do not remove, the indicated M4 x 16mm Screw (77). Replace any worn parts immediately. Slide the Reed Switch slightly toward or away from the console and keep liquids away from the Pulley Magnet. 29 77 46 30 HOW... contrast level of the display. driver, release the tabs at the front and 44 along the sides of the exercise bike regularly. MAINTENANCE AND TROUBLESHOOTING Inspect and tighten all parts of the Top Shield (44). If lines appear in the console display, see step 5 on , make sure that...
... for a moment. Next, locate the Reed Switch (46). Loosen, but do not remove, the indicated M4 x 16mm Screw (77). Replace any worn parts immediately. Slide the Reed Switch slightly toward or away from the console and keep liquids away from the Pulley Magnet. 29 77 46 30 HOW... contrast level of the display. driver, release the tabs at the front and 44 along the sides of the exercise bike regularly. MAINTENANCE AND TROUBLESHOOTING Inspect and tighten all parts of the Top Shield (44). If lines appear in the console display, see step 5 on , make sure that...
English Manual
Page 27
However, there is connected. • Consult the dealer or an experienced radio/TV technician for a Class B digital device, pursuant to part 15 of the following measures: • Reorient or relocate the receiving antenna. • Increase the separation between the equipment and the receiver. • Connect the ...
However, there is connected. • Consult the dealer or an experienced radio/TV technician for a Class B digital device, pursuant to part 15 of the following measures: • Reorient or relocate the receiving antenna. • Increase the separation between the equipment and the receiver. • Connect the ...

English Manual
Page 28
... of your physician. For aerobic exercise, adjust the intensity of your exercise until your heart rate is the key to make exercise a regular and enjoyable part of time. The heart rate monitor is intended only as you must exercise at the proper intensity is near the lowest number in your training...
... of your physician. For aerobic exercise, adjust the intensity of your exercise until your heart rate is the key to make exercise a regular and enjoyable part of time. The heart rate monitor is intended only as you must exercise at the proper intensity is near the lowest number in your training...
English Manual
Page 29
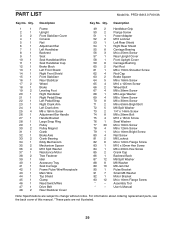
PART LIST Model No. Assembly Tool * - Qty. Description Key No. Qty. User's Manual Note: Specifications are not illustrated. 29 PFEX13813.0 R1013A Key No. Description 1 1 ... 10 M8 Jam Nut 90 1 Pulse Bracket 91 7 Small M6 Washer 92 1 Motor Bracket 93 12 M4 x 16mm Flange Screw * - For information about ordering replacement parts, see the back cover of this manual. *These...
PART LIST Model No. Assembly Tool * - Qty. Description Key No. Qty. User's Manual Note: Specifications are not illustrated. 29 PFEX13813.0 R1013A Key No. Description 1 1 ... 10 M8 Jam Nut 90 1 Pulse Bracket 91 7 Small M6 Washer 92 1 Motor Bracket 93 12 M4 x 16mm Flange Screw * - For information about ordering replacement parts, see the back cover of this manual. *These...

English Manual
Page 32
... name of the product (see the front cover of this manual) • the key number and description of the replacement part(s) (see the PART LIST and the EXPLODED DRAWING near the end of removal or installation; No other rights that specifically set forth herein.... This warranty provides specific legal rights; ORDERING REPLACEMENT PARTS To order replacement parts, please see page 5. This warranty will be the customer's responsibility. ICON's obligation under normal use , or costs of this...
... name of the product (see the front cover of this manual) • the key number and description of the replacement part(s) (see the PART LIST and the EXPLODED DRAWING near the end of removal or installation; No other rights that specifically set forth herein.... This warranty provides specific legal rights; ORDERING REPLACEMENT PARTS To order replacement parts, please see page 5. This warranty will be the customer's responsibility. ICON's obligation under normal use , or costs of this...


