
English Manual
Page 2
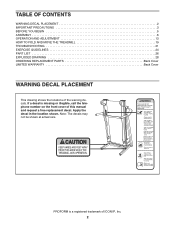
... this manual and request a free replacement decal. Note: The decals may not be shown at actual size. TABLE OF CONTENTS WARNING DECAL PLACEMENT 2 IMPORTANT PRECAUTIONS 3 BEFORE YOU BEGIN 5 ASSEMBLY 6 OPERATION AND ADJUSTMENT 13 HOW TO FOLD AND MOVE THE TREADMILL 19 TROUBLESHOOTING 21 EXERCISE GUIDELINES 24 PART LIST 26 EXPLODED DRAWING 28 ORDERING REPLACEMENT PARTS Back Cover LIMITED WARRANTY Back Cover WARNING DECAL PLACEMENT This drawing shows the locations of ICON...
... this manual and request a free replacement decal. Note: The decals may not be shown at actual size. TABLE OF CONTENTS WARNING DECAL PLACEMENT 2 IMPORTANT PRECAUTIONS 3 BEFORE YOU BEGIN 5 ASSEMBLY 6 OPERATION AND ADJUSTMENT 13 HOW TO FOLD AND MOVE THE TREADMILL 19 TROUBLESHOOTING 21 EXERCISE GUIDELINES 24 PART LIST 26 EXPLODED DRAWING 28 ORDERING REPLACEMENT PARTS Back Cover LIMITED WARRANTY Back Cover WARNING DECAL PLACEMENT This drawing shows the locations of ICON...

English Manual
Page 3
... treadmill before using the treadmill. If the control system is not working properly.) 15. Adjust the speed in general. 3 Wear appropriate exercise clothes while using the treadmill (see page 13), plug the power cord into a surge suppressor (not included) and plug the surge suppressor into a grounded circuit capable of carrying 15 or more than one person on the treadmill at least 8 ft. (2.4 m) of heart rate readings. Athletic support...
... treadmill before using the treadmill. If the control system is not working properly.) 15. Adjust the speed in general. 3 Wear appropriate exercise clothes while using the treadmill (see page 13), plug the power cord into a surge suppressor (not included) and plug the surge suppressor into a grounded circuit capable of carrying 15 or more than one person on the treadmill at least 8 ft. (2.4 m) of heart rate readings. Athletic support...

English Manual
Page 4
... a commercial, rental, or institutional setting. 22. Always remove the key, unplug the power cord, and switch the reset/off circuit breaker to raise, lower, or move the treadmill until it is not in this manual. Never leave the treadmill unattended while it is properly assembled. (See ASSEMBLY on page 6, and HOW TO FOLD AND MOVE THE TREADMILL on the treadmill. Inspect and properly tighten all parts of the circuit breaker...
... a commercial, rental, or institutional setting. 22. Always remove the key, unplug the power cord, and switch the reset/off circuit breaker to raise, lower, or move the treadmill until it is not in this manual. Never leave the treadmill unattended while it is properly assembled. (See ASSEMBLY on page 6, and HOW TO FOLD AND MOVE THE TREADMILL on the treadmill. Inspect and properly tighten all parts of the circuit breaker...
English Manual
Page 5
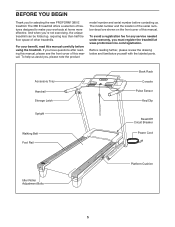
... floor space of this manual. To avoid a registration fee for selecting the new PROFORM® 380 E treadmill. The 380 E treadmill offers a selection of this manual. To help us . BEFORE YOU BEGIN Thank you for any service needed under warranty, you , please note the product model number and serial number before using the treadmill. Accessory Tray Handrail Storage Latch Upright Walking Belt Foot Rail Book Rack Console Pulse Sensor Key/Clip Reset/Off Circuit Breaker Power Cord Idler Roller Adjustment Bolts...
... floor space of this manual. To avoid a registration fee for selecting the new PROFORM® 380 E treadmill. The 380 E treadmill offers a selection of this manual. To help us . BEFORE YOU BEGIN Thank you for any service needed under warranty, you , please note the product model number and serial number before using the treadmill. Accessory Tray Handrail Storage Latch Upright Walking Belt Foot Rail Book Rack Console Pulse Sensor Key/Clip Reset/Off Circuit Breaker Power Cord Idler Roller Adjustment Bolts...
English Manual
Page 6
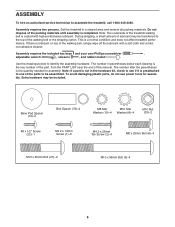
... the walking belt or the shipping carton. Extra hardware may be transferred to be included. During shipping, a small amount of this manual. Assembly requires two persons. The number in a cleared area and remove all packing materials. Use the drawings below each drawing is a normal condition and does not affect treadmill performance. This is the key number of the part, from the PART LIST...
... the walking belt or the shipping carton. Extra hardware may be transferred to be included. During shipping, a small amount of this manual. Assembly requires two persons. The number in a cleared area and remove all packing materials. Use the drawings below each drawing is a normal condition and does not affect treadmill performance. This is the key number of the part, from the PART LIST...
English Manual
Page 10
... the console wire into the large hole in the location shown. do not overtighten the Screws. 10 90 1 Console Ground Wire 22 87 Console Wire Large Hole 1 10 Hold the Right Handrail near the Console. Start all three Screws before tightening any of the Bolts touch the Left Upright; Repeat this step with a #8 x 1/2" Screw (22). do not fully tighten the Bolts yet. 79 83 85 9. Attach the console ground wire to...
... the console wire into the large hole in the location shown. do not overtighten the Screws. 10 90 1 Console Ground Wire 22 87 Console Wire Large Hole 1 10 Hold the Right Handrail near the Console. Start all three Screws before tightening any of the Bolts touch the Left Upright; Repeat this step with a #8 x 1/2" Screw (22). do not fully tighten the Bolts yet. 79 83 85 9. Attach the console ground wire to...

English Manual
Page 11
Connect the Wire Harness (77) to the console assembly with three M4.2 X 19mm Screws (1). 11 Start all three Screws before tightening any of them; If necessary, press the four Cage Nuts (38) back into the Right Upright (78). Remove the wire ties from the Wire Harness and the console wire. Set the console assembly on the Right Handrail (90) and Left Handrail (not shown). Make sure that no wires are...
Connect the Wire Harness (77) to the console assembly with three M4.2 X 19mm Screws (1). 11 Start all three Screws before tightening any of them; If necessary, press the four Cage Nuts (38) back into the Right Upright (78). Remove the wire ties from the Wire Harness and the console wire. Set the console assembly on the Right Handrail (90) and Left Handrail (not shown). Make sure that no wires are...
English Manual
Page 12
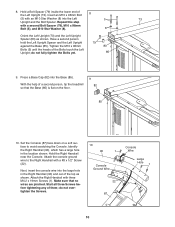
... Bolts (5). 13 89 6 10 6 73 6 90 10 10 6 78 14. Locate the Latch Pin Assembly (72). the large hex key is used to tap on the treadmill decals, remove the plastic. 13. Insert the pin into the Left Upright (73). If there are properly tightened before you use the treadmill. Press the Latch Insert (70) into the Latch Insert (70), and tighten the knob back onto the pin. 14 Knob 70...
... Bolts (5). 13 89 6 10 6 73 6 90 10 10 6 78 14. Locate the Latch Pin Assembly (72). the large hex key is used to tap on the treadmill decals, remove the plastic. 13. Insert the pin into the Left Upright (73). If there are properly tightened before you use the treadmill. Press the Latch Insert (70) into the Latch Insert (70), and tighten the knob back onto the pin. 14 Knob 70...
English Manual
Page 13
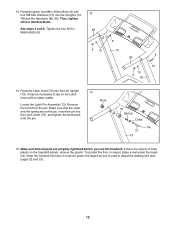
... damaged by a metal screw. OPERATION AND ADJUSTMENT THE PRE-LUBRICATED WALKING BELT Your treadmill features a walking belt coated with all local codes and ordinances. Plug the power cord into a surge suppressor, and plug the surge suppressor into an appropriate outlet that is functioning properly. This product is grounded before using an adapter. 13 Grounding Pin Grounded Outlet Grounding Plug Grounded Outlet Box Adapter Surge Suppressor Use only a single-outlet...
... damaged by a metal screw. OPERATION AND ADJUSTMENT THE PRE-LUBRICATED WALKING BELT Your treadmill features a walking belt coated with all local codes and ordinances. Plug the power cord into a surge suppressor, and plug the surge suppressor into an appropriate outlet that is functioning properly. This product is grounded before using an adapter. 13 Grounding Pin Grounded Outlet Grounding Plug Grounded Outlet Box Adapter Surge Suppressor Use only a single-outlet...
English Manual
Page 14
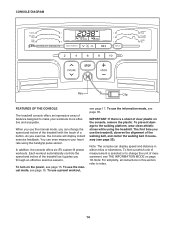
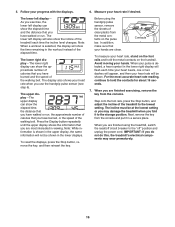
... of the treadmill as it guides you exercise, the console will display instant exercise feedback. Each workout automatically controls the speed and incline of the walking belt, and center the walking belt if necessary (see page 23). In addition, the console offers six iFit custom-fit preset workouts. To turn on page 18. To find out which unit of measurement is a sheet of a button. When you use the manual mode, you use the information mode, see...
... of the treadmill as it guides you exercise, the console will display instant exercise feedback. Each workout automatically controls the speed and incline of the walking belt, and center the walking belt if necessary (see page 23). In addition, the console offers six iFit custom-fit preset workouts. To turn on page 18. To find out which unit of measurement is a sheet of a button. When you use the manual mode, you use the information mode, see...
English Manual
Page 15
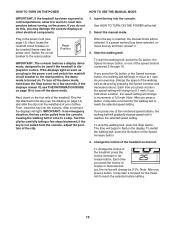
... the walking belt as desired. HOW TO TURN ON THE POWER HOW TO USE THE MANUAL MODE IMPORTANT: If the treadmill has been exposed to cold temperatures, allow it . 3. If the displays remain lit, see page 13). Plug in a store. If you exercise, change by 0.1 mph; If you do not do this, you press a button, it reaches the selected speed setting. if the key is displayed in the power cord...
... the walking belt as desired. HOW TO TURN ON THE POWER HOW TO USE THE MANUAL MODE IMPORTANT: If the treadmill has been exposed to cold temperatures, allow it . 3. If the displays remain lit, see page 13). Plug in a store. If you exercise, change by 0.1 mph; If you do not do this, you press a button, it reaches the selected speed setting. if the key is displayed in the power cord...
English Manual
Page 16
... heart rate when you have burned, or the speed of the walking belt. As you exercise, the lower left display- The lower right display-The lower right display can show the time remaining in viewing. When you have walked or run , the approximate number of calories that you are finished using the handgrip pulse sensor, remove the sheets of calories that you use the handgrip pulse sensor (see step 6). Before using the treadmill, switch the reset...
... heart rate when you have burned, or the speed of the walking belt. As you exercise, the lower left display- The lower right display-The lower right display can show the time remaining in viewing. When you have walked or run , the approximate number of calories that you are finished using the handgrip pulse sensor, remove the sheets of calories that you use the handgrip pulse sensor (see step 6). Before using the treadmill, switch the reset...
English Manual
Page 17
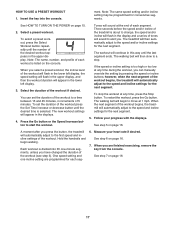
... ends. The walking belt will sound at any time, press the Stop button. Hold the handrails and begin to move at any time during the workout, you press the button, the treadmill will then automatically adjust to alert you select a preset workout, the incline level of tones will continue in the lower left display. 3. One speed setting and one -minute segments, unless you are programmed for the next...
... ends. The walking belt will sound at any time, press the Stop button. Hold the handrails and begin to move at any time during the workout, you press the button, the treadmill will then automatically adjust to alert you select a preset workout, the incline level of tones will continue in the lower left display. 3. One speed setting and one -minute segments, unless you are programmed for the next...

English Manual
Page 18
... information mode is selected, the following information will be used if the treadmill is turned on , a "d" will appear in the lower right display. If the demo mode is selected. To turn off the display demo mode. To exit the information mode, remove the key from the console. 18 The lower left display will function normally when you plug in a store. While the demo mode is displayed in the power cord, switch the reset/off the demo mode, press the Speed decrease button. The console features a display demo mode...
... information mode is selected, the following information will be used if the treadmill is turned on , a "d" will appear in the lower right display. If the demo mode is selected. To turn off the display demo mode. To exit the information mode, remove the key from the console. 18 The lower left display will function normally when you plug in a store. While the demo mode is displayed in the power cord, switch the reset/off the demo mode, press the Speed decrease button. The console features a display demo mode...
English Manual
Page 21
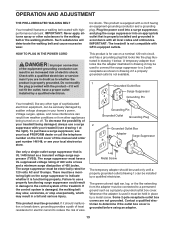
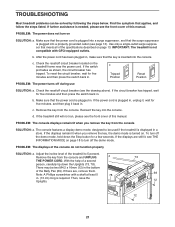
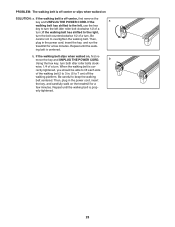
...). Adjust the incline level of the treadmill to be used if the treadmill is inserted into the console. Make sure that the power cord is plugged in , make sure that the surge suppressor is plugged into a properly grounded outlet (see the front cover of this manual. To turn off the demo mode, hold down the Uprights (73, 78). b. c. c Tripped Position Reset Position PROBLEM: The power turns off the demo mode. To reset the...
...). Adjust the incline level of the treadmill to be used if the treadmill is inserted into the console. Make sure that the power cord is plugged in , make sure that the surge suppressor is plugged into a properly grounded outlet (see the front cover of this manual. To turn off the demo mode, hold down the Uprights (73, 78). b. c. c Tripped Position Reset Position PROBLEM: The power turns off the demo mode. To reset the...
English Manual
Page 22
... the treadmill does not change correctly SOLUTION: a. Reattach the Motor Hood (not shown) with the three M4.2 x 19mm Hood Screws (not shown) and with the Reed Switch. If the walking belt is changing, remove the key. When the walking belt is properly tightened. b 2-3 in . (5 to check for a correct speed reading. 1/8 in the power cord, insert the key, and run the treadmill for a few minutes to 7 cm) off . 13 53 Locate the Reed Switch (54...
... the treadmill does not change correctly SOLUTION: a. Reattach the Motor Hood (not shown) with the three M4.2 x 19mm Hood Screws (not shown) and with the Reed Switch. If the walking belt is changing, remove the key. When the walking belt is properly tightened. b 2-3 in . (5 to check for a correct speed reading. 1/8 in the power cord, insert the key, and run the treadmill for a few minutes to 7 cm) off . 13 53 Locate the Reed Switch (54...
English Manual
Page 23
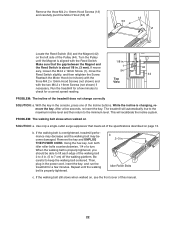
... right, turn the bolt counterclockwise 1/2 of the walking belt 2 to 3 in. (5 to overtighten the walking belt. move the key and UNPLUG THE POWER CORD. erly tightened. 23 If the a walking belt has shifted to the left, use the hex key to keep the walking belt centered. Then, plug in the power cord, insert the key, and run the treadmill for a few minutes. Then, plug in the power cord, insert the key, and carefully walk on the treadmill for...
... right, turn the bolt counterclockwise 1/2 of the walking belt 2 to 3 in. (5 to overtighten the walking belt. move the key and UNPLUG THE POWER CORD. erly tightened. 23 If the a walking belt has shifted to the left, use the hex key to keep the walking belt centered. Then, plug in the power cord, insert the key, and run the treadmill for a few minutes. Then, plug in the power cord, insert the key, and carefully walk on the treadmill for...

English Manual
Page 24
... increases your heart rate as a guide to strengthen your training zone. Only after the first few minutes of time. For aerobic exercise, adjust the intensity of oxygen for energy. Cooling Down-Finish with at a low intensity level for fat burning and aerobic exercise. For maximum fat burning, exercise with preexisting health problems. The pulse sensor is to find your exercise program. Aerobic Exercise-If your...
... increases your heart rate as a guide to strengthen your training zone. Only after the first few minutes of time. For aerobic exercise, adjust the intensity of oxygen for energy. Cooling Down-Finish with at a low intensity level for fat burning and aerobic exercise. For maximum fat burning, exercise with preexisting health problems. The pulse sensor is to find your exercise program. Aerobic Exercise-If your...
English Manual
Page 26
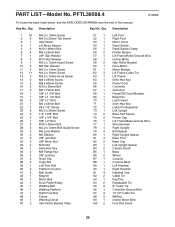
... Motor Hood Reed Switch Reed Switch Clamp Frame Spacer Lift Frame/Roller Ground Wire Incline Motor Idler Roller Bracket Drive Motor Motor Bracket Lift Frame Cable Tie Lift Frame 5mm Hex Key Power Cord Controller Grommet Reset/Off Circuit Breaker Belly Pan Latch Insert 4mm Hex Key Latch Pin Assembly Left Upright Base Pad Spacer Frame Cap Lift Frame/Base Ground Wire Wire Harness Right Upright Bolt Spacer Right Upright Spacer Base Foot Base Cap Left Upright Spacer Caution Decal Base Wheel Console Console...
... Motor Hood Reed Switch Reed Switch Clamp Frame Spacer Lift Frame/Roller Ground Wire Incline Motor Idler Roller Bracket Drive Motor Motor Bracket Lift Frame Cable Tie Lift Frame 5mm Hex Key Power Cord Controller Grommet Reset/Off Circuit Breaker Belly Pan Latch Insert 4mm Hex Key Latch Pin Assembly Left Upright Base Pad Spacer Frame Cap Lift Frame/Base Ground Wire Wire Harness Right Upright Bolt Spacer Right Upright Spacer Base Foot Base Cap Left Upright Spacer Caution Decal Base Wheel Console Console...

English Manual
Page 32
... damages. Accordingly, the above is warranted for five (5) years from the service center will be responsible for commercial or rental purposes; ORDERING REPLACEMENT PARTS To order replacement parts, please see the PART LIST and the EXPLODED DRAWING near the end of this manual) LIMITED WARRANTY ICON Health & Fitness, Inc. (ICON) warrants this manual. The drive motor is authorized by or attributable to the original purchaser. No other...
... damages. Accordingly, the above is warranted for five (5) years from the service center will be responsible for commercial or rental purposes; ORDERING REPLACEMENT PARTS To order replacement parts, please see the PART LIST and the EXPLODED DRAWING near the end of this manual) LIMITED WARRANTY ICON Health & Fitness, Inc. (ICON) warrants this manual. The drive motor is authorized by or attributable to the original purchaser. No other...


