

User Manual
Page 1
... are missing or damaged parts, we will guarantee complete satisfaction through direct assistance from our factory. Model No. PFTL31330 Serial No. Save this equipment. MST CAUTION Read all precautions and instructions in this manual before using this manual for future reference. Visit our website at www.proform.com new products, prizes, fitness tips, and much more! Serial Number Decal USER'S MANUAL QUESTIONS? TO AVOID...
... are missing or damaged parts, we will guarantee complete satisfaction through direct assistance from our factory. Model No. PFTL31330 Serial No. Save this equipment. MST CAUTION Read all precautions and instructions in this manual before using this manual for future reference. Visit our website at www.proform.com new products, prizes, fitness tips, and much more! Serial Number Decal USER'S MANUAL QUESTIONS? TO AVOID...

User Manual
Page 2
TABLE OF CONTENTS IMPORTANT PRECAUTIONS 2 BEFORE YOU BEGIN 5 ASSEMBLY 6 OPERATION AND ADJUSTMENT 10 HOW TO FOLD AND MOVE THE TREADMILL 13 TROUBLESHOOTING 15 CONDITIONING GUIDELINES 17 ORDERING REPLACEMENT PARTS Back Cover LIMITED WARRANTY Back Cover Note: An EXPLODED DRAWING and a PART LIST are attached in the center of ICON Health & Fitness, Inc. 2 PROFORM is a registered trademark of this manual.
TABLE OF CONTENTS IMPORTANT PRECAUTIONS 2 BEFORE YOU BEGIN 5 ASSEMBLY 6 OPERATION AND ADJUSTMENT 10 HOW TO FOLD AND MOVE THE TREADMILL 13 TROUBLESHOOTING 15 CONDITIONING GUIDELINES 17 ORDERING REPLACEMENT PARTS Back Cover LIMITED WARRANTY Back Cover Note: An EXPLODED DRAWING and a PART LIST are attached in the center of ICON Health & Fitness, Inc. 2 PROFORM is a registered trademark of this manual.

User Manual
Page 3
... risk of heart rate readings. Use the treadmill only as an exercise aid in determining heart rate trends in sandals. 16. Place the treadmill on page 5 if the treadmill is turned off. To protect the floor or carpet from the treadmill at a time. 9. Do not put the treadmill in speed. 17. Failure to use an extension cord. 11. Never move the walking belt while the power is not working properly...
... risk of heart rate readings. Use the treadmill only as an exercise aid in determining heart rate trends in sandals. 16. Place the treadmill on page 5 if the treadmill is turned off. To protect the floor or carpet from the treadmill at a time. 9. Do not put the treadmill in speed. 17. Failure to use an extension cord. 11. Never move the walking belt while the power is not working properly...

User Manual
Page 4
... health problems. Read all parts of this manual). When folding or moving the treadmill, make sure that the storage latch is intended for personal injury or property damage sustained by or through the use only. Never remove the motor hood unless instructed to order a free replacement decal (see the front cover of this product. Do not use , before cleaning the treadmill, and before using. ICON assumes no responsibility for in the location...
... health problems. Read all parts of this manual). When folding or moving the treadmill, make sure that the storage latch is intended for personal injury or property damage sustained by or through the use only. Never remove the motor hood unless instructed to order a free replacement decal (see the front cover of this product. Do not use , before cleaning the treadmill, and before using. ICON assumes no responsibility for in the location...

User Manual
Page 5
... us assist you 're not exercising, the unique 325i treadmill can be folded up, requiring less than half the floor space of the treadmill is not included) Key/Clip Storage Latch Handrail Bookrack Console Hand Weights Walking Belt Foot Rail BACK Rear Roller Adjustment Bolts Reset/Off Circuit Breaker Power Cord RIGHT SIDE Cushioned Walking Platform for selecting the revolutionary PROFORM® 325i treadmill. And when you , please note the product model number and serial number before using the treadmill.
... us assist you 're not exercising, the unique 325i treadmill can be folded up, requiring less than half the floor space of the treadmill is not included) Key/Clip Storage Latch Handrail Bookrack Console Hand Weights Walking Belt Foot Rail BACK Rear Roller Adjustment Bolts Reset/Off Circuit Breaker Power Cord RIGHT SIDE Cushioned Walking Platform for selecting the revolutionary PROFORM® 325i treadmill. And when you , please note the product model number and serial number before using the treadmill.

User Manual
Page 6
... the lubricant with high-performance lubricant. Make sure that the treadmill is completed. With the help identifying the assembly hardware, refer to the bottom of the walking belt or the shipping carton. Open part bag A. Attach four Base Pads (57) to the PART IDENTIFICATION CHART below. Do not open the part bags until instructed to the top of the Base (69) with a Wheel Bolt (64...
... the lubricant with high-performance lubricant. Make sure that the treadmill is completed. With the help identifying the assembly hardware, refer to the bottom of the walking belt or the shipping carton. Open part bag A. Attach four Base Pads (57) to the PART IDENTIFICATION CHART below. Do not open the part bags until instructed to the top of the Base (69) with a Wheel Bolt (64...

User Manual
Page 7
... inset drawing. Hand tighten two 3" Bolts (61) with two 1" Bolts (63), two 1/4" Star Washers (76), two 2" Bolts (114), and two 1/4" Washers (38) as described in the Storage Latch is not a wire harness on the left side. 2. Make sure that the large hole in step 3. Feed the Wire Harness (42) up into the Base and the Right Upright; Attach the Right Handrail...
... inset drawing. Hand tighten two 3" Bolts (61) with two 1" Bolts (63), two 1/4" Star Washers (76), two 2" Bolts (114), and two 1/4" Washers (38) as described in the Storage Latch is not a wire harness on the left side. 2. Make sure that the large hole in step 3. Feed the Wire Harness (42) up into the Base and the Right Upright; Attach the Right Handrail...

User Manual
Page 8
... ground wire to prevent the Wire Harness from slipping. Securely tighten the plastic ties on the bottom of the plastic ties. Tighten the two Crossbar Screws (39). 6 47 42 Ties 43 2 72 42 3-wire 5-wire 7 Ties Opening 47 42 44 72 39 40 49 2 8 IF THE CONNECTORS ARE NOT INSERTED PROPERLY, THE CONSOLE MAY BE DAMAGED WHEN THE POWER IS TURNED ON...
... ground wire to prevent the Wire Harness from slipping. Securely tighten the plastic ties on the bottom of the plastic ties. Tighten the two Crossbar Screws (39). 6 47 42 Ties 43 2 72 42 3-wire 5-wire 7 Ties Opening 47 42 44 72 39 40 49 2 8 IF THE CONNECTORS ARE NOT INSERTED PROPERLY, THE CONSOLE MAY BE DAMAGED WHEN THE POWER IS TURNED ON...

User Manual
Page 9
...) as shown with the lightest weights in a secure place. Firmly tighten the 1" Bolts (63) and the 2" 8 Bolts (114). Firmly tighten the 3" Bolts (61). 8. Raise the Handrails to the floor. The large allen wrench is centered between the Handrails. Make sure that all parts are properly tightened before you use the treadmill. Attach the Weight Rack (107) to adjust the walking belt (see page 16). See step 3.
...) as shown with the lightest weights in a secure place. Firmly tighten the 1" Bolts (63) and the 2" 8 Bolts (114). Firmly tighten the 3" Bolts (61). 8. Raise the Handrails to the floor. The large allen wrench is centered between the Handrails. Make sure that all parts are properly tightened before you use the treadmill. Attach the Weight Rack (107) to adjust the walking belt (see page 16). See step 3.

User Manual
Page 10
... treadmill being turned on or off. If it will deteriorate the walking belt and cause excessive wear. Whenever the adapter is damaged, the walking belt may change speed or stop unexpectedly, which may be grounded. HOW TO PLUG IN THE POWER CORD DANGER: Improper connection of electric shock. The surge suppressor must be held in doubt as a transient voltage surge suppressor (TVSS). If the control...
... treadmill being turned on or off. If it will deteriorate the walking belt and cause excessive wear. Whenever the adapter is damaged, the walking belt may change speed or stop unexpectedly, which may be grounded. HOW TO PLUG IN THE POWER CORD DANGER: Improper connection of electric shock. The surge suppressor must be held in doubt as a transient voltage surge suppressor (TVSS). If the control...

User Manual
Page 11
CONSOLE DIAGRAM Displays Note: If there is a thin sheet of the walking belt as desired by pressing the Speed buttons. STEP-BY-STEP CONSOLE OPERATION Before operating the console, make sure that the power cord is inserted, the displays will light. 2 Press the Start button or the Speed increase button to operate the console. 1 Insert the key fully into the console. As you exercise, change the speed of plastic on the console, remove it. Avoid spilling liquids on the...
CONSOLE DIAGRAM Displays Note: If there is a thin sheet of the walking belt as desired by pressing the Speed buttons. STEP-BY-STEP CONSOLE OPERATION Before operating the console, make sure that the power cord is inserted, the displays will light. 2 Press the Start button or the Speed increase button to operate the console. 1 Insert the key fully into the console. As you exercise, change the speed of plastic on the console, remove it. Avoid spilling liquids on the...

User Manual
Page 12
... walking speeds. HOW TO USE THE HAND WEIGHTS To exercise your pulse will be restricted and your upper body as you use the pulse sensor (see FAT BURNING on page 17). The hand weights can display speed and distance in the weight rack. To stop the walking belt, press the Stop button. When the Stop button is selected, remove the key and then reinsert it if necessary (see page 16). 3 Change the incline of the walking belt Note: The console...
... walking speeds. HOW TO USE THE HAND WEIGHTS To exercise your pulse will be restricted and your upper body as you use the pulse sensor (see FAT BURNING on page 17). The hand weights can display speed and distance in the weight rack. To stop the walking belt, press the Stop button. When the Stop button is selected, remove the key and then reinsert it if necessary (see page 16). 3 Change the incline of the walking belt Note: The console...
User Manual
Page 13
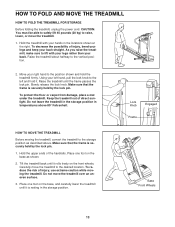
... position shown and hold it is securely held by the lock pin. HOW TO FOLD AND MOVE THE TREADMILL HOW TO FOLD THE TREADMILL FOR STORAGE Before folding the treadmill, unplug the power cord. To decrease the possibility of the handrails. Raise the treadmill about halfway to raise, lower, or move the treadmill. 1. Move your back. Raise the treadmill until it rolls freely on the front wheels...
... position shown and hold it is securely held by the lock pin. HOW TO FOLD AND MOVE THE TREADMILL HOW TO FOLD THE TREADMILL FOR STORAGE Before folding the treadmill, unplug the power cord. To decrease the possibility of the handrails. Raise the treadmill about halfway to raise, lower, or move the treadmill. 1. Move your back. Raise the treadmill until it rolls freely on the front wheels...
User Manual
Page 14
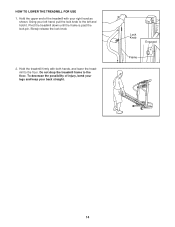
Slowly release the lock knob. 2. Hold the treadmill firmly with your back straight. Do not drop the treadmill frame to the left hand, pull the lock knob to the floor. Pivot the treadmill down until the frame is past the lock pin. To decrease the possibility of the treadmill with both hands, and lower the treadmill to the floor. Lock Knob Engaged Frame 14 HOW TO LOWER THE TREADMILL FOR USE 1. Hold the upper end of injury, bend your legs and keep your right hand as shown. Using your left and hold it.
Slowly release the lock knob. 2. Hold the treadmill firmly with your back straight. Do not drop the treadmill frame to the left hand, pull the lock knob to the floor. Pivot the treadmill down until the frame is past the lock pin. To decrease the possibility of the treadmill with both hands, and lower the treadmill to the floor. Lock Knob Engaged Frame 14 HOW TO LOWER THE TREADMILL FOR USE 1. Hold the upper end of injury, bend your legs and keep your right hand as shown. Using your left and hold it.

User Manual
Page 15
... power cord is not compatible with the Reed Switch. If necessary, loosen the Screw (26) and move the Reed Switch slightly. 26 18 Retighten the Screw. TROUBLESHOOTING Most treadmill problems can be solved by following the steps below. Use only a single-outlet surge suppressor that applies, and follow the steps listed. Important: The treadmill is plugged in, unplug it, wait for five minutes and then press the switch back in . Remove...
... power cord is not compatible with the Reed Switch. If necessary, loosen the Screw (26) and move the Reed Switch slightly. 26 18 Retighten the Screw. TROUBLESHOOTING Most treadmill problems can be solved by following the steps below. Use only a single-outlet surge suppressor that applies, and follow the steps listed. Important: The treadmill is plugged in, unplug it, wait for five minutes and then press the switch back in . Remove...

User Manual
Page 16
..., first remove the key and UNPLUG THE POWER CORD. ing belt 2 to overtighten the walking belt. Be careful to keep the walking belt centered. PROBLEM: The walking belt slows when walked on , call our Customer Service Department toll-free. Plug in the power cord, insert the key, and run the treadmill for a few minutes. Plug in the power cord, insert the key, and carefully walk on SOLUTION: a. b. Using the allen wrench, turn both rear roller bolts clockwise, 1/4 of the specifications described...
..., first remove the key and UNPLUG THE POWER CORD. ing belt 2 to overtighten the walking belt. Be careful to keep the walking belt centered. PROBLEM: The walking belt slows when walked on , call our Customer Service Department toll-free. Plug in the power cord, insert the key, and run the treadmill for a few minutes. Plug in the power cord, insert the key, and carefully walk on SOLUTION: a. b. Using the allen wrench, turn both rear roller bolts clockwise, 1/4 of the specifications described...

User Manual
Page 17
... fat, adjust the speed and incline of your training zone. The lower two numbers are rounded off to make exercise a regular and enjoyable part of the treadmill until your goal is to use the pulse sensor. During the first few months, you , first find the three numbers above your heart rate as a guide. After a few minutes of exercise, your body Training Zone Exercise-After warming up to five workouts each workout with...
... fat, adjust the speed and incline of your training zone. The lower two numbers are rounded off to make exercise a regular and enjoyable part of the treadmill until your goal is to use the pulse sensor. During the first few months, you , first find the three numbers above your heart rate as a guide. After a few minutes of exercise, your body Training Zone Exercise-After warming up to five workouts each workout with...

User Manual
Page 18
... leg, lean forward and move your toes as far as you reach down toward your hips toward your extended leg. Hold for each leg. Repeat 3 times for 15 counts, then relax. Hold for each leg. Repeat 3 times. Stretches: Hamstrings, back of the achilles ten- Stretches: Hamstrings, lower back and groin. 3. Repeat 3 times. SUGGESTED STRETCHES The correct form...
... leg, lean forward and move your toes as far as you reach down toward your hips toward your extended leg. Hold for each leg. Repeat 3 times for 15 counts, then relax. Hold for each leg. Repeat 3 times. Stretches: Hamstrings, back of the achilles ten- Stretches: Hamstrings, lower back and groin. 3. Repeat 3 times. SUGGESTED STRETCHES The correct form...

User Manual
Page 20
... Screw 2 27 3/4" Screw 46 1 Bookrack 89 2 Cable Tie Clamp 3 1 Motor Belt 47 1 Console Base 90 1 Ground Wire 4 1 Motor Tension Bolt 48 4 5/16" Star Washer 91 1 Right Rear 5 5 Flat Washer 49 4 1/2" Silver Screw Endcap Pad 6 1 Motor Star Washer 50 1 Key/Clip 92 2 Rear Roller 7 1 Flywheel 51 1 Incline Motor Adjustable Bolt 8 1 Motor 52 1 Incline Bracket 93 1 Right Rear Endcap 9* 1 Motor Assembly 53 1 Incline Motor 94 1 Allen Wrench 10 1 Reed Switch Bolt (Lower) 95 1 Left Rear Endcap 11 1 Latch Warning Decal 54 2 Clevis Pin 96 1 Walking Belt 12...
... Screw 2 27 3/4" Screw 46 1 Bookrack 89 2 Cable Tie Clamp 3 1 Motor Belt 47 1 Console Base 90 1 Ground Wire 4 1 Motor Tension Bolt 48 4 5/16" Star Washer 91 1 Right Rear 5 5 Flat Washer 49 4 1/2" Silver Screw Endcap Pad 6 1 Motor Star Washer 50 1 Key/Clip 92 2 Rear Roller 7 1 Flywheel 51 1 Incline Motor Adjustable Bolt 8 1 Motor 52 1 Incline Bracket 93 1 Right Rear Endcap 9* 1 Motor Assembly 53 1 Incline Motor 94 1 Allen Wrench 10 1 Reed Switch Bolt (Lower) 95 1 Left Rear Endcap 11 1 Latch Warning Decal 54 2 Clevis Pin 96 1 Walking Belt 12...

User Manual
Page 22
... used as store display models. Accordingly, the above limitation may not apply to give the following information: • The MODEL NUMBER OF THE PRODUCT (PFTL31330) • The NAME OF THE PRODUCT (PROFORM® 325i treadmill) • The SERIAL NUMBER OF THE PRODUCT (see the front cover of this manual) • The KEY NUMBER AND DESCRIPTION OF THE PART(S) (see the EXPLODED DRAWING and PART LIST attached in USA © 2003 ICON Health & Fitness...
... used as store display models. Accordingly, the above limitation may not apply to give the following information: • The MODEL NUMBER OF THE PRODUCT (PFTL31330) • The NAME OF THE PRODUCT (PROFORM® 325i treadmill) • The SERIAL NUMBER OF THE PRODUCT (see the front cover of this manual) • The KEY NUMBER AND DESCRIPTION OF THE PART(S) (see the EXPLODED DRAWING and PART LIST attached in USA © 2003 ICON Health & Fitness...


