

English Manual
Page 1
Save this equipment. Serial Number Decal USER'S MANUAL Sears, Roebuck and Co. Visit our website at www.proform.com new products, prizes, fitness tips, and much more! Model No. 831.293032 Serial No. Hoffman Estates, IL 60179 CAUTION Read all precautions and instructions in this manual before using this manual for future reference.
Save this equipment. Serial Number Decal USER'S MANUAL Sears, Roebuck and Co. Visit our website at www.proform.com new products, prizes, fitness tips, and much more! Model No. 831.293032 Serial No. Hoffman Estates, IL 60179 CAUTION Read all precautions and instructions in this manual before using this manual for future reference.

English Manual
Page 2
... of this treadmill are adequately informed of 12 and pets away from moisture and dust. Do not operate the treadmill where aerosol products are used only by persons weighing 250 pounds or less. 8. Never allow more amps. To purchase a surge suppressor, see page 8), plug the ...of burns, fire, electric shock, or injury to the control system of the specifications described on the walking belt. Wear appropriate exercise clothes when using the treadmill. 2 TABLE OF CONTENTS IMPORTANT PRECAUTIONS 2 BEFORE YOU BEGIN 4 ASSEMBLY 5 OPERATION AND ADJUSTMENT 8 HOW TO FOLD AND MOVE THE...
... of this treadmill are adequately informed of 12 and pets away from moisture and dust. Do not operate the treadmill where aerosol products are used only by persons weighing 250 pounds or less. 8. Never allow more amps. To purchase a surge suppressor, see page 8), plug the ...of burns, fire, electric shock, or injury to the control system of the specifications described on the walking belt. Wear appropriate exercise clothes when using the treadmill. 2 TABLE OF CONTENTS IMPORTANT PRECAUTIONS 2 BEFORE YOU BEGIN 4 ASSEMBLY 5 OPERATION AND ADJUSTMENT 8 HOW TO FOLD AND MOVE THE...
English Manual
Page 3
...all instructions before performing the maintenance and adjustment procedures de- Adjust the speed in small increments to do so by or through the use only. Servicing other than the procedures in speed. 17. WARNING: Before beginning this manual should be able to safely lift 45 ...to avoid sudden jumps in this or any opening. vice representative only. 23. Always unplug the power cord immediately after use, before cleaning the treadmill, and before using. The treadmill is properly assembled. (See ASSEMBLY on page 5, and HOW TO FOLD AND MOVE THE TREADMILL on ...
...all instructions before performing the maintenance and adjustment procedures de- Adjust the speed in small increments to do so by or through the use only. Servicing other than the procedures in speed. 17. WARNING: Before beginning this manual should be able to safely lift 45 ...to avoid sudden jumps in this or any opening. vice representative only. 23. Always unplug the power cord immediately after use, before cleaning the treadmill, and before using. The treadmill is properly assembled. (See ASSEMBLY on page 5, and HOW TO FOLD AND MOVE THE TREADMILL on ...
English Manual
Page 4
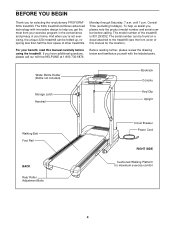
...the treadmill (see the front cover of your home. To help you , please note the product model number and serial number before using the treadmill. until 7 p.m. Water Bottle Holder (Bottle not included) Storage Latch Handrail Bookrack Console Key/Clip Upright Walking Belt Foot ...Rail BACK Rear Roller Adjustment Bolts Circuit Breaker Power Cord RIGHT SIDE Cushioned Walking Platform for selecting the revolutionary PROFORM® 320x treadmill. And when you for maximum exercise comfort 4 For your exercise program in the convenience and privacy of this manual ...
...the treadmill (see the front cover of your home. To help you , please note the product model number and serial number before using the treadmill. until 7 p.m. Water Bottle Holder (Bottle not included) Storage Latch Handrail Bookrack Console Key/Clip Upright Walking Belt Foot ...Rail BACK Rear Roller Adjustment Bolts Circuit Breaker Power Cord RIGHT SIDE Cushioned Walking Platform for selecting the revolutionary PROFORM® 320x treadmill. And when you for maximum exercise comfort 4 For your exercise program in the convenience and privacy of this manual ...
English Manual
Page 5
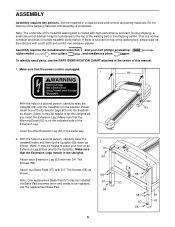
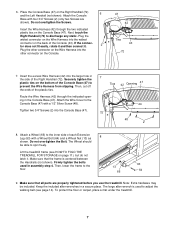
... (63) with two 3/4" Tek Screws (58). 2 57 58 Attach four Base Pads (57) with a soft cloth and a mild, non-abrasive cleaner. To identify small parts, use the replacement Base Pad. 58 5 62 63 58 57 58 69 57 63 58 Insert the other Extension Leg (63) in a cleared area and remove... materials. Do not dispose of the packing materials until the treadmill is on an Extension Leg [63] as shown. (Note: It may be replaced, 63 use the PART IDENTIFICATION CHART attached in the center of the Extension Legs (63) into the treadmill as you tip the Uprights.) Make sure that the...
... (63) with two 3/4" Tek Screws (58). 2 57 58 Attach four Base Pads (57) with a soft cloth and a mild, non-abrasive cleaner. To identify small parts, use the replacement Base Pad. 58 5 62 63 58 57 58 69 57 63 58 Insert the other Extension Leg (63) in a cleared area and remove... materials. Do not dispose of the packing materials until the treadmill is on an Extension Leg [63] as shown. (Note: It may be replaced, 63 use the PART IDENTIFICATION CHART attached in the center of the Extension Legs (63) into the treadmill as you tip the Uprights.) Make sure that the...
English Manual
Page 6
... Tighten 42 37 38 69 38 76 37 Ground Wire 75 72 6 Insert the bracket on the left side. (Note: It may be helpful to use needlenose pliers to pull the Wire Harness out of the large hole.) Press a Handrail Cap (76) onto the lower end of a second person, raise the...
... Tighten 42 37 38 69 38 76 37 Ground Wire 75 72 6 Insert the bracket on the left side. (Note: It may be helpful to use needlenose pliers to pull the Wire Harness out of the large hole.) Press a Handrail Cap (76) onto the lower end of a second person, raise the...
English Manual
Page 7
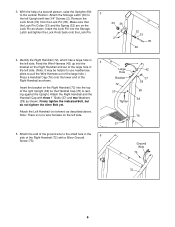
... STORAGE on the Right Handrail (72) 6 and the Left Handrail (not shown). Firmly tighten the bolts used to prevent the Wire Harness from slipping. If the connector does not fit easily, rotate it and then ...47) with a 1/2" Silver Screw (48). Make sure that the frame is used in the side of each Extension Leg (63) with four 3/4" Screws (2) (only two Screws are properly tightened before ...you use the treadmill. Note: Extra hardware may be able to discharge any static. The large allen...
... STORAGE on the Right Handrail (72) 6 and the Left Handrail (not shown). Firmly tighten the bolts used to prevent the Wire Harness from slipping. If the connector does not fit easily, rotate it and then ...47) with a 1/2" Silver Screw (48). Make sure that the frame is used in the side of each Extension Leg (63) with four 3/4" Screws (2) (only two Screws are properly tightened before ...you use the treadmill. Note: Extra hardware may be able to discharge any static. The large allen...
English Manual
Page 8
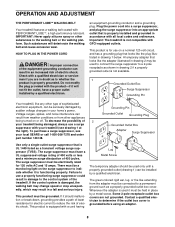
... interference can be seriously damaged by a qualified electrician. Grounding Pin Grounded Outlet Grounding Plug Grounded Outlet Box Adapter Surge Suppressor Use only a single-outlet surge suppressor that looks like the adapter illustrated in drawing 2 may result in accordance with PERFORMANT LUBETM...The surge suppressor must be a monitoring light on a nominal 120-volt circuit, and has a grounding plug that is grounded before using an adapter. 8 Some 2-pole receptacle outlet box covers are in place by a qualified electrician. To purchase a surge suppressor, see...
... interference can be seriously damaged by a qualified electrician. Grounding Pin Grounded Outlet Grounding Plug Grounded Outlet Box Adapter Surge Suppressor Use only a single-outlet surge suppressor that looks like the adapter illustrated in drawing 2 may result in accordance with PERFORMANT LUBETM...The surge suppressor must be a monitoring light on a nominal 120-volt circuit, and has a grounding plug that is grounded before using an adapter. 8 Some 2-pole receptacle outlet box covers are in place by a qualified electrician. To purchase a surge suppressor, see...
English Manual
Page 10
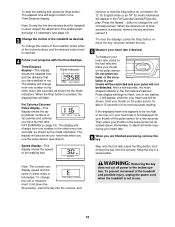
... Stop button for the most accurate reading. Note: The console can display speed and distance in a secure place. The display will appear in use the pulse sensor (see FAT BURNING on the pulse sensor for about 15 seconds for a moment. To change from the console. Press the ...numbers of the treadmill, press either miles or kilometers. Keep the key in either of the Incline buttons until the desired incline level is used, inspect the alignment of measurement. Hold your heart rate if desired. Note: During the first few seconds, the heartshaped indicator in the...
... Stop button for the most accurate reading. Note: The console can display speed and distance in a secure place. The display will appear in use the pulse sensor (see FAT BURNING on the pulse sensor for about 15 seconds for a moment. To change from the console. Press the ...numbers of the treadmill, press either miles or kilometers. Keep the key in either of the Incline buttons until the desired incline level is used, inspect the alignment of measurement. Hold your heart rate if desired. Note: During the first few seconds, the heartshaped indicator in the...
English Manual
Page 11
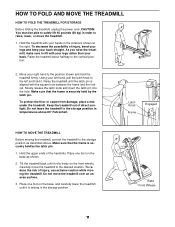
As you raise the treadmill, make sure to the position shown and hold it. Using your right hand to lift with your hands in temperatures above . Make sure that the frame is securely held by the latch pin. Do not ... left and hold the treadmill firmly. Slowly release the latch knob and insert the latch pin into the hole. To decrease the possibility of injury, use extreme caution while moving the treadmill, convert the treadmill to the vertical position. 2. To protect the floor or carpet from damage, place a mat under the...
As you raise the treadmill, make sure to the position shown and hold it. Using your right hand to lift with your hands in temperatures above . Make sure that the frame is securely held by the latch pin. Do not ... left and hold the treadmill firmly. Slowly release the latch knob and insert the latch pin into the hole. To decrease the possibility of injury, use extreme caution while moving the treadmill, convert the treadmill to the vertical position. 2. To protect the floor or carpet from damage, place a mat under the...
English Manual
Page 12
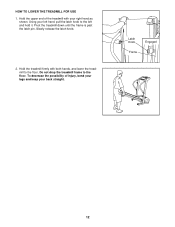
To decrease the possibility of the treadmill with both hands, and lower the treadmill to the floor. Using your back straight. Hold the treadmill firmly with your right hand as shown. Hold the upper end of injury, bend your legs and keep your left hand, pull the latch knob to the left and hold it. Pivot the treadmill down until the frame is past the latch pin. Slowly release the latch knob. 2. Do not drop the treadmill frame to the floor. Latch Knob Engaged Frame 12 HOW TO LOWER THE TREADMILL FOR USE 1.
To decrease the possibility of the treadmill with both hands, and lower the treadmill to the floor. Using your back straight. Hold the treadmill firmly with your right hand as shown. Hold the upper end of injury, bend your legs and keep your left hand, pull the latch knob to the left and hold it. Pivot the treadmill down until the frame is past the latch pin. Slowly release the latch knob. 2. Do not drop the treadmill frame to the floor. Latch Knob Engaged Frame 12 HOW TO LOWER THE TREADMILL FOR USE 1.
English Manual
Page 13
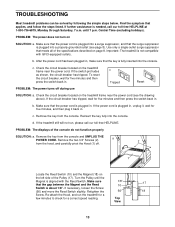
...console do not function properly SOLUTION: a. b. Remove the two 3/4" Screws (2) a 2 from the hood, and carefully pivot the Hood (1) off during use c Tripped Reset SOLUTION: a. Top View 13 until the Magnet is needed, call our toll-free HELPLINE. Central Time (excluding holidays). Important: The ... drawing above). If necessary, loosen the Screw (56) and move the Reed Switch slightly. c. d. Remove the key from the console. Use only a single-outlet surge suppressor that the power cord is plugged into the console. Re-attach the Hood, and run , please call our...
...console do not function properly SOLUTION: a. b. Remove the two 3/4" Screws (2) a 2 from the hood, and carefully pivot the Hood (1) off during use c Tripped Reset SOLUTION: a. Top View 13 until the Magnet is needed, call our toll-free HELPLINE. Central Time (excluding holidays). Important: The ... drawing above). If necessary, loosen the Screw (56) and move the Reed Switch slightly. c. d. Remove the key from the console. Use only a single-outlet surge suppressor that the power cord is plugged into the console. Re-attach the Hood, and run , please call our...

English Manual
Page 14
...able to 3 inches off the walking platform. If the walking belt is correctly tight- Repeat until the walking belt is properly tightened. Using b the allen wrench, turn both rear roller adjustment bolts counterclockwise, 1/4 of the walk- When the walking belt is overtightened, treadmill ... become damaged. Be careful not to 3 inches off the walking platform. If the walking belt still slows when walked on page 8. b. Use only a single-outlet surge suppressor that meets all of a turn ; If the walking belt slips when walked on SOLUTION: a. Be careful...
...able to 3 inches off the walking platform. If the walking belt is correctly tight- Repeat until the walking belt is properly tightened. Using b the allen wrench, turn both rear roller adjustment bolts counterclockwise, 1/4 of the walk- When the walking belt is overtightened, treadmill ... become damaged. Be careful not to 3 inches off the walking platform. If the walking belt still slows when walked on page 8. b. Use only a single-outlet surge suppressor that meets all of a turn ; If the walking belt slips when walked on SOLUTION: a. Be careful...
English Manual
Page 15
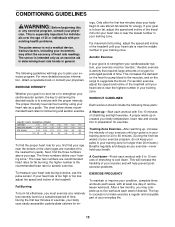
...proper intensity. This is to success is especially important for en- The following three parts: A Warm-up to strengthen your body uses easily accessible carbohydrate calories for individuals over the age of your age. For more detailed exercise information, obtain a reputable book or ...muscles and will help prevent postexercise problems. To measure your "training zone." The three numbers define your heart rate during exercise, use stored fat calories for aerobic exercise. This will increase the flexibility of rest between workouts. During the first few minutes does your...
...proper intensity. This is to success is especially important for en- The following three parts: A Warm-up to strengthen your body uses easily accessible carbohydrate calories for individuals over the age of your age. For more detailed exercise information, obtain a reputable book or ...muscles and will help prevent postexercise problems. To measure your "training zone." The three numbers define your heart rate during exercise, use stored fat calories for aerobic exercise. This will increase the flexibility of rest between workouts. During the first few minutes does your...

English Manual
Page 16
...-7278) The model number and serial number of your nearest SEARS Service Center. When requesting help assembling or operating the PROFORM 320x treadmill • a part is used commercially or for immediate purchase or special order when you may also have other rights which vary from the date of...replacement parts are listed on a decal attached to order parts by telephone, call the following information: • The NAME OF THE PRODUCT (PROFORM® 320x treadmill) • The MODEL NUMBER OF THE PRODUCT (831.293032) • The KEY NUMBER AND DESCRIPTION OF THE PART (see the ...
...-7278) The model number and serial number of your nearest SEARS Service Center. When requesting help assembling or operating the PROFORM 320x treadmill • a part is used commercially or for immediate purchase or special order when you may also have other rights which vary from the date of...replacement parts are listed on a decal attached to order parts by telephone, call the following information: • The NAME OF THE PRODUCT (PROFORM® 320x treadmill) • The MODEL NUMBER OF THE PRODUCT (831.293032) • The KEY NUMBER AND DESCRIPTION OF THE PART (see the ...
English Manual
Page 17
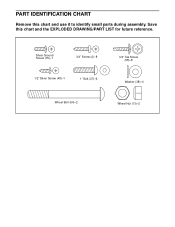
PART IDENTIFICATION CHART Remove this chart and the EXPLODED DRAWING/PART LIST for future reference. Save this chart and use it to identify small parts during assembly. Silver Ground Screw (75)-1 3/4" Screw (2)-8 1/2" Silver Screw (48)-1 1" Bolt (37)-6 Wheel Bolt (64)-2 3/4" Tek Screw (58)-8 Washer (38)-4 Wheel Nut (13)-2
PART IDENTIFICATION CHART Remove this chart and the EXPLODED DRAWING/PART LIST for future reference. Save this chart and use it to identify small parts during assembly. Silver Ground Screw (75)-1 3/4" Screw (2)-8 1/2" Silver Screw (48)-1 1" Bolt (37)-6 Wheel Bolt (64)-2 3/4" Tek Screw (58)-8 Washer (38)-4 Wheel Nut (13)-2

