
English Manual
Page 1
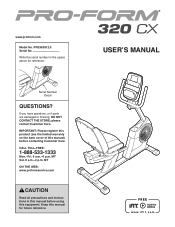
... instructions in the space above for future reference. If you have questions, or if parts are damaged or missing, DO NOT CONTACT THE STORE; PFEX63912.0 Serial No. Write the serial number in this manual before contacting Customer Care. Keep this equipment. USER’'S MANUAL Serial Number Decal QUESTIONS? IMPORTANT: Please register this product (see the limited warranty on the back cover of this manual) before using...
... instructions in the space above for future reference. If you have questions, or if parts are damaged or missing, DO NOT CONTACT THE STORE; PFEX63912.0 Serial No. Write the serial number in this manual before contacting Customer Care. Keep this equipment. USER’'S MANUAL Serial Number Decal QUESTIONS? IMPORTANT: Please register this product (see the limited warranty on the back cover of this manual) before using...
English Manual
Page 2
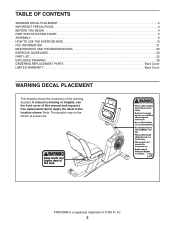
... actual size. TABLE OF CONTENTS WARNING DECAL PLACEMENT 2 IMPORTANT PRECAUTIONS 3 BEFORE YOU BEGIN 4 PART IDENTIFICATION CHART 5 ASSEMBLY 6 HOW TO USE THE EXERCISE BIKE 13 FCC INFORMATION 21 MAINTENANCE AND TROUBLESHOOTING 22 EXERCISE GUIDELINES 23 PART LIST 25 EXPLODED DRAWING 26 ORDERING REPLACEMENT PARTS Back Cover LIMITED WARRANTY Back Cover WARNING DECAL PLACEMENT This drawing shows the location(s) of this manual and request a free replacement decal. If a decal is a registered trademark of ICON IP, Inc. 2 PROFORM...
... actual size. TABLE OF CONTENTS WARNING DECAL PLACEMENT 2 IMPORTANT PRECAUTIONS 3 BEFORE YOU BEGIN 4 PART IDENTIFICATION CHART 5 ASSEMBLY 6 HOW TO USE THE EXERCISE BIKE 13 FCC INFORMATION 21 MAINTENANCE AND TROUBLESHOOTING 22 EXERCISE GUIDELINES 23 PART LIST 25 EXPLODED DRAWING 26 ORDERING REPLACEMENT PARTS Back Cover LIMITED WARRANTY Back Cover WARNING DECAL PLACEMENT This drawing shows the location(s) of this manual and request a free replacement decal. If a decal is a registered trademark of ICON IP, Inc. 2 PROFORM...
English Manual
Page 3
... all users of the exercise bike are adequately informed of all parts regularly. To protect the floor or carpet from moisture and dust. The heart rate monitor is especially important for home use the exercise bike in a commercial, rental, or institutional setting. 5. The heart rate monitor is the responsibility of the owner to ensure that could become caught on your exercise bike before using your back straight while using the exercise bike; IMPORTANT...
... all users of the exercise bike are adequately informed of all parts regularly. To protect the floor or carpet from moisture and dust. The heart rate monitor is especially important for home use the exercise bike in a commercial, rental, or institutional setting. 5. The heart rate monitor is the responsibility of the owner to ensure that could become caught on your exercise bike before using your back straight while using the exercise bike; IMPORTANT...
English Manual
Page 4
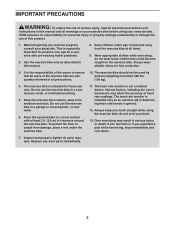
... on the front cover of this manual carefully before contacting us assist you, note the product model number and serial number before you use the exercise bike. The 320 CX exercise bike provides an impressive selection of the serial number decal are labeled in . (135 cm) Width: 2 ft. (61 cm) Handlebar Knob Seat Backrest Handle Leveling Knob Console Handlebar Accessory Tray Pedal/Strap Wheel Heart Rate Monitor Seat Handle 4 The model number and the location of features designed...
... on the front cover of this manual carefully before contacting us assist you, note the product model number and serial number before you use the exercise bike. The 320 CX exercise bike provides an impressive selection of the serial number decal are labeled in . (135 cm) Width: 2 ft. (61 cm) Handlebar Knob Seat Backrest Handle Leveling Knob Console Handlebar Accessory Tray Pedal/Strap Wheel Heart Rate Monitor Seat Handle 4 The model number and the location of features designed...
English Manual
Page 5
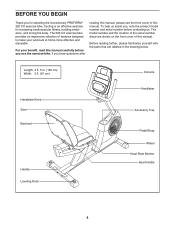
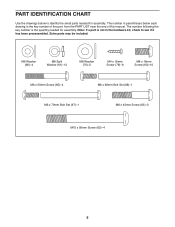
...)–-8 M8 x 16mm Screw (60)–-10 M6 x 50mm Screw (65)–-4 M6 x 60mm Bolt Set (68)–-1 M6 x 70mm Bolt Set (67)–-1 M8 x 45mm Screw (63)–-2 M10 x 95mm Screw (62)–-4 5 PART IDENTIFICATION CHART Use the drawings below each drawing is the key number of the part, from the PART LIST near the end of this manual. The number following the key number is the quantity needed for assembly.
...)–-8 M8 x 16mm Screw (60)–-10 M6 x 50mm Screw (65)–-4 M6 x 60mm Bolt Set (68)–-1 M6 x 70mm Bolt Set (67)–-1 M8 x 45mm Screw (63)–-2 M10 x 95mm Screw (62)–-4 5 PART IDENTIFICATION CHART Use the drawings below each drawing is the key number of the part, from the PART LIST near the end of this manual. The number following the key number is the quantity needed for assembly.
English Manual
Page 6
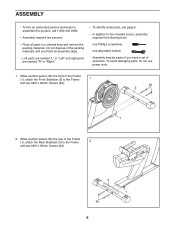
... have a set of wrenches. While another person lifts the rear of the Frame (1), attach the Front Stabilizer (2) to the Frame 1 with two M10 x 95mm Screws (62). 3 1 62 6 ASSEMBLY •• To hire an authorized service technician to assemble this product, call 1-800-445-2480. •• Assembly requires two persons. •• Place all assembly steps. •• Left parts are...
... have a set of wrenches. While another person lifts the rear of the Frame (1), attach the Front Stabilizer (2) to the Frame 1 with two M10 x 95mm Screws (62). 3 1 62 6 ASSEMBLY •• To hire an authorized service technician to assemble this product, call 1-800-445-2480. •• Assembly requires two persons. •• Place all assembly steps. •• Left parts are...

English Manual
Page 8
... Bolt Set (67) and two M8 Washers (70). While another person holds the Console (7) near the Handlebar (6), connect the wires on the Handlebar (6). Tip: Avoid pinching the wires. Insert the Main Wire (89) and the Frame Pulse Wire (30) upward through the lower bracket on the Console to the Upright (4) with four M4 x 16mm Screws (79). 7 7 6 79 30 89 Avoid pinching 4 the wires 8 Attach the...
... Bolt Set (67) and two M8 Washers (70). While another person holds the Console (7) near the Handlebar (6), connect the wires on the Handlebar (6). Tip: Avoid pinching the wires. Insert the Main Wire (89) and the Frame Pulse Wire (30) upward through the lower bracket on the Console to the Upright (4) with four M4 x 16mm Screws (79). 7 7 6 79 30 89 Avoid pinching 4 the wires 8 Attach the...

English Manual
Page 10
... helpful to adjust the seat during this step. Tip: It may be helpful to adjust the seat dur- 13 ing this step. Tip: Avoid pinching the Pulse Wire (29). Identify and orient the Pulse Bar (12) so that the Pulse Grips (41) face upward. While a second person holds the Pulse Bar (12), attach the Pulse Bar to the Seat Carriage (11) with two M8 x 45mm Screws (63) and...
... helpful to adjust the seat during this step. Tip: It may be helpful to adjust the seat dur- 13 ing this step. Tip: Avoid pinching the Pulse Wire (29). Identify and orient the Pulse Bar (12) so that the Pulse Grips (41) face upward. While a second person holds the Pulse Bar (12), attach the Pulse Bar to the Seat Carriage (11) with two M8 x 45mm Screws (63) and...

English Manual
Page 13
... PLUG IN THE POWER ADAPTER HOW TO ADJUST THE PEDAL STRAPS IMPORTANT: If the exercise bike has been exposed to cold temperatures, allow it to warm to the desired angle, and then release the knob into an adjustment hole. To adjust the seat, push downward on the seat handle, slide the seat to the desired position, and then press the ends of the adjustment holes. Then, tighten...
... PLUG IN THE POWER ADAPTER HOW TO ADJUST THE PEDAL STRAPS IMPORTANT: If the exercise bike has been exposed to cold temperatures, allow it to warm to the desired angle, and then release the knob into an adjustment hole. To adjust the seat, push downward on the seat handle, slide the seat to the desired position, and then press the ends of the adjustment holes. Then, tighten...
English Manual
Page 15
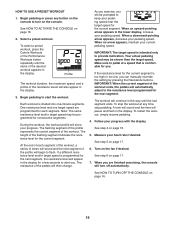
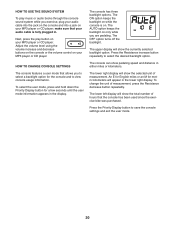
... pounds with the touch of features designed to make your heart rate using the handgrip heart rate monitor. To use the sound system, see page 19. To change the resistance of the pedals with the progressive 8-week weight-loss program. The console also offers a selection of the pedals as it guides you through an effective workout. To use the manual mode, see page 20. While you through an effective...
... pounds with the touch of features designed to make your heart rate using the handgrip heart rate monitor. To use the sound system, see page 19. To change the resistance of the pedals with the progressive 8-week weight-loss program. The console also offers a selection of the pedals as it guides you through an effective workout. To use the manual mode, see page 20. While you through an effective...

English Manual
Page 16
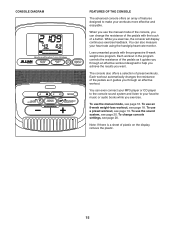
... the distance in miles or kilometers that you have pedaled, your heart rate when you pedal, change the volume level of the console, press the volume increase and decrease buttons. See HOW TO PLUG IN THE POWER ADAPTER on the console, the manual mode will pause. If the pedals do not move for use the handgrip heart rate monitor (see HOW TO CHANGE CONSOLE SETTINGS on the exercise bike may wear prematurely. The upper display—-This display can...
... the distance in miles or kilometers that you have pedaled, your heart rate when you pedal, change the volume level of the console, press the volume increase and decrease buttons. See HOW TO PLUG IN THE POWER ADAPTER on the console, the manual mode will pause. If the pedals do not move for use the handgrip heart rate monitor (see HOW TO CHANGE CONSOLE SETTINGS on the exercise bike may wear prematurely. The upper display—-This display can...

English Manual
Page 17
... use alcohol, abrasives, or chemicals to move for at least 15 seconds. Note: If the pedals do not move your heart rate will turn off the fan. Avoid moving your palms resting against the contacts. To measure your heart rate, hold the contacts for about thirty seconds the fan will be shown in the display. The fan has low and high speed settings...
... use alcohol, abrasives, or chemicals to move for at least 15 seconds. Note: If the pedals do not move your heart rate will turn off the fan. Avoid moving your palms resting against the contacts. To measure your heart rate, hold the contacts for about thirty seconds the fan will be shown in the display. The fan has low and high speed settings...

English Manual
Page 18
... appears in the lower display, increase your pedaling speed. To stop pedaling. Press the Go button and begin to keep your progress. The workout will show your pedaling speed near the target speed for the next segment, the resistance level will be slower than the target speed. Turn on the console. Start the workout. When a downward-pointing arrow appears, decrease your heart rate if desired. Each workout is programmed for the current...
... appears in the lower display, increase your pedaling speed. To stop pedaling. Press the Go button and begin to keep your progress. The workout will show your pedaling speed near the target speed for the next segment, the resistance level will be slower than the target speed. Turn on the console. Start the workout. When a downward-pointing arrow appears, decrease your heart rate if desired. Each workout is programmed for the current...
English Manual
Page 19
... manually override the setting by pressing the Resistance buttons. When no arrow appears, maintain your heart rate if desired. See HOW TO ACTIVATE THE CONSOLE on page 17. 7. The workout will then change. Each workout is too high or too low, you will begin to pedal at any button on the console. The resistance of each segment. HOW TO USE A PRESET WORKOUT 1. During the workout, the workout profile will turn...
... manually override the setting by pressing the Resistance buttons. When no arrow appears, maintain your heart rate if desired. See HOW TO ACTIVATE THE CONSOLE on page 17. 7. The workout will then change. Each workout is too high or too low, you will begin to pedal at any button on the console. The resistance of each segment. HOW TO USE A PRESET WORKOUT 1. During the workout, the workout profile will turn...
English Manual
Page 20
... SOUND SYSTEM To play button on your MP3 player or CD player. The upper display will show pedaling speed and distance in the lower right display. An E for English miles or an M for a few seconds until the user mode information appears in . HOW TO CHANGE CONSOLE SETTINGS The console features a user mode that allows you exercise, plug your audio cable into the jack on the console and into a jack on your MP3...
... SOUND SYSTEM To play button on your MP3 player or CD player. The upper display will show pedaling speed and distance in the lower right display. An E for English miles or an M for a few seconds until the user mode information appears in . HOW TO CHANGE CONSOLE SETTINGS The console features a user mode that allows you exercise, plug your audio cable into the jack on the console and into a jack on your MP3...

English Manual
Page 21
... instructions, may cause harmful interference to radio communications. If this equipment. 21 Changes or modifications not expressly approved by one or more of the FCC Rules. This equipment generates, uses, and can be determined by turning the equipment off and on, try to part... and the receiver. •• Connect the equipment into an outlet on a circuit different from that interference will not occur in a particular installation. These limits are designed to provide reasonable protection against harmful interference in accordance with the limits for a Class B digital device,...
... instructions, may cause harmful interference to radio communications. If this equipment. 21 Changes or modifications not expressly approved by one or more of the FCC Rules. This equipment generates, uses, and can be determined by turning the equipment off and on, try to part... and the receiver. •• Connect the equipment into an outlet on a circuit different from that interference will not occur in a particular installation. These limits are designed to provide reasonable protection against harmful interference in accordance with the limits for a Class B digital device,...
English Manual
Page 22
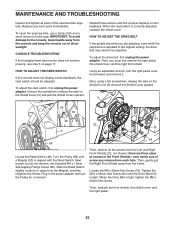
... pedaling, even while the resistance is adjusted to the highest setting, the drive belt may need to be adjusted. IMPORTANT: To avoid damage to or away from the Magnet, and then retighten the Screw. CONSOLE TROUBLESHOOTING If the handgrip heart rate monitor does not function properly, see step 5 on the Shield Cover (5) and pull the Shield Cover upward. 5 80 50 34 46 22 78 5 84 58 Locate the Reed Switch...
... pedaling, even while the resistance is adjusted to the highest setting, the drive belt may need to be adjusted. IMPORTANT: To avoid damage to or away from the Magnet, and then retighten the Screw. CONSOLE TROUBLESHOOTING If the handgrip heart rate monitor does not function properly, see step 5 on the Shield Cover (5) and pull the Shield Cover upward. 5 80 50 34 46 22 78 5 84 58 Locate the Reed Switch...

English Manual
Page 23
... amounts of time. The chart below shows recommended heart rates for successful results. The three numbers listed above your age define your everyday life. 23 Remember, the key to success is the heart rate for exercise. You can use stored fat calories for a...goal is near the lowest number in preparation for aerobic exercise. Aerobic Exercise—-If your cardiovascular system, exercising at a low intensity level for energy. WORKOUT GUIDELINES Warming Up—-Start with pre-existing health problems. The heart rate monitor is especially important for energy....
... amounts of time. The chart below shows recommended heart rates for successful results. The three numbers listed above your age define your everyday life. 23 Remember, the key to success is the heart rate for exercise. You can use stored fat calories for a...goal is near the lowest number in preparation for aerobic exercise. Aerobic Exercise—-If your cardiovascular system, exercising at a low intensity level for energy. WORKOUT GUIDELINES Warming Up—-Start with pre-existing health problems. The heart rate monitor is especially important for energy....
English Manual
Page 25
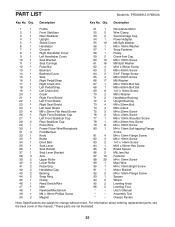
... information about ordering replacement parts, see the back cover of this manual. *These parts are subject to change without notice. Description Key No. Qty. Assembly Tool * –- Description 1 1 Frame 2 1 Front Stabilizer 3 1 Rear Stabilizer 4 1 Upright 5 1 Shield Cover 6 1 Handlebar 7 1 Console 8 1 Right Handlebar Cover 9 1 Left Handlebar Cover 10 1 Seat Bracket 11 1 Seat Carriage 12 1 Pulse Bar 13 1 Backrest 14 1 Backrest Cover 15 1 Seat 16 1 Right Pedal/Strap 17 1 Right Crank Arm 18 1 Left Pedal/Strap 19 1 Left Crank...
... information about ordering replacement parts, see the back cover of this manual. *These parts are subject to change without notice. Description Key No. Qty. Assembly Tool * –- Description 1 1 Frame 2 1 Front Stabilizer 3 1 Rear Stabilizer 4 1 Upright 5 1 Shield Cover 6 1 Handlebar 7 1 Console 8 1 Right Handlebar Cover 9 1 Left Handlebar Cover 10 1 Seat Bracket 11 1 Seat Carriage 12 1 Pulse Bar 13 1 Backrest 14 1 Backrest Cover 15 1 Seat 16 1 Right Pedal/Strap 17 1 Right Crank Arm 18 1 Left Pedal/Strap 19 1 Left Crank...
English Manual
Page 28
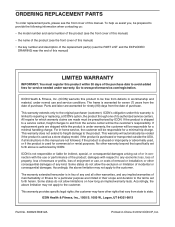
... consequential damages. ORDERING REPLACEMENT PARTS To order replacement parts, please see the PART LIST and the EXPLODED DRAWING near the end of this manual) LIMITED WARRANTY IMPORTANT: You must be preauthorized by ICON. ICON’'s obligation under warranty, the customer will be prepared to the customer. For in-home service, the customer will be voided if the product is used as a store display model, if the product...
... consequential damages. ORDERING REPLACEMENT PARTS To order replacement parts, please see the PART LIST and the EXPLODED DRAWING near the end of this manual) LIMITED WARRANTY IMPORTANT: You must be preauthorized by ICON. ICON’'s obligation under warranty, the customer will be prepared to the customer. For in-home service, the customer will be voided if the product is used as a store display model, if the product...


