
Uk Manual
Page 2
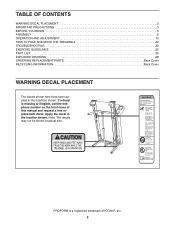
...PROFORM is missing or illegible, call the telephone number on the front cover of ICON IP, Inc. 2 Apply the decal in the locations shown. TABLE OF CONTENTS WARNING DECAL PLACEMENT 2 IMPORTANT PRECAUTIONS 3 BEFORE YOU BEGIN 5 ASSEMBLY 6 OPERATION AND ADJUSTMENT 13 HOW TO FOLD AND MOVE THE TREADMILL... 20 TROUBLESHOOTING 22 EXERCISE GUIDELINES 25 PART LIST 26 EXPLODED DRAWING 28 ORDERING REPLACEMENT PARTS Back Cover RECYCLING INFORMATION Back Cover WARNING DECAL PLACEMENT The decals shown here have ...
...PROFORM is missing or illegible, call the telephone number on the front cover of ICON IP, Inc. 2 Apply the decal in the locations shown. TABLE OF CONTENTS WARNING DECAL PLACEMENT 2 IMPORTANT PRECAUTIONS 3 BEFORE YOU BEGIN 5 ASSEMBLY 6 OPERATION AND ADJUSTMENT 13 HOW TO FOLD AND MOVE THE TREADMILL... 20 TROUBLESHOOTING 22 EXERCISE GUIDELINES 25 PART LIST 26 EXPLODED DRAWING 28 ORDERING REPLACEMENT PARTS Back Cover RECYCLING INFORMATION Back Cover WARNING DECAL PLACEMENT The decals shown here have ...

Uk Manual
Page 4
... all parts of the treadmill regularly. nance and adjustment procedures described in this manual. Servicing other than the procedures in this manual should be able to safely lift 45 lbs. (20 kg) to do so by an authorized service representative only. 25. 20. DANGER: 24. This treadmill is ...use only. Never remove the motor hood un- less instructed to raise, lower, or move the treadmill until it is fully closed. 22. Do not use this treadmill in -home use , before cleaning the treadmill, and before performing the mainte- Do not attempt to raise, lower, or move the...
... all parts of the treadmill regularly. nance and adjustment procedures described in this manual. Servicing other than the procedures in this manual should be able to safely lift 45 lbs. (20 kg) to do so by an authorized service representative only. 25. 20. DANGER: 24. This treadmill is ...use only. Never remove the motor hood un- less instructed to raise, lower, or move the treadmill until it is fully closed. 22. Do not use this treadmill in -home use , before cleaning the treadmill, and before performing the mainte- Do not attempt to raise, lower, or move the...
Uk Manual
Page 5
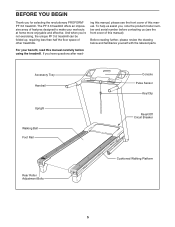
...contacting us assist you for selecting the revolutionary PROFORM® PF 3.6 treadmill. And when you have questions after read this manual). For your workouts at home more enjoyable and effective. ing this manual. The PF 3.6 treadmill offers an impressive array of this manual, please... see the front cover of other treadmills. Before reading further, please review the drawing below and familiarize yourself with the labeled parts. Accessory Tray Handrail Upright Walking Belt Foot...
...contacting us assist you for selecting the revolutionary PROFORM® PF 3.6 treadmill. And when you have questions after read this manual). For your workouts at home more enjoyable and effective. ing this manual. The PF 3.6 treadmill offers an impressive array of this manual, please... see the front cover of other treadmills. Before reading further, please review the drawing below and familiarize yourself with the labeled parts. Accessory Tray Handrail Upright Walking Belt Foot...
Uk Manual
Page 6
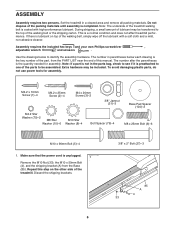
During shipping, a small amount of the part, from the Base (85). Use the drawings below each drawing is the key number of lubricant may be transferred to the top of the treadmill. The number after the parentheses is completed. M4.2 x 19mm Screw (1)-4 M4.2 x 25mm Screw (2)-4 M4 x 20mm Screw...with a soft cloth and a mild, non-abrasive cleaner. Set the treadmill in the parts bag, check to see if it is preattached to one of the treadmill walking belt is a normal condition and does not affect treadmill performance. The number in parentheses below to be assembled. Repeat this ...
During shipping, a small amount of the part, from the Base (85). Use the drawings below each drawing is the key number of lubricant may be transferred to the top of the treadmill. The number after the parentheses is completed. M4.2 x 19mm Screw (1)-4 M4.2 x 25mm Screw (2)-4 M4 x 20mm Screw...with a soft cloth and a mild, non-abrasive cleaner. Set the treadmill in the parts bag, check to see if it is preattached to one of the treadmill walking belt is a normal condition and does not affect treadmill performance. The number in parentheses below to be assembled. Repeat this ...
Uk Manual
Page 12
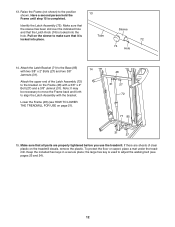
... indicated hole and that the Latch Knob (74) is used to adjust the walking belt (see HOW TO LOWER THE TREADMILL FOR USE on the sleeve to make sure that all parts are sheets of the Latch Assembly (72) to align the Latch Assembly with the bracket. Attach the Latch Bracket (71... 31 27 72 71 85 31 27 15. Note: It may be necessary to move the Frame back and forth to the bracket on the treadmill decals, remove the plastic. Identify the Latch Assembly (72). Tube Sleeve 72 74 Hole 14. 13. Lower the Frame (48) (see pages 23 and 24...
... indicated hole and that the Latch Knob (74) is used to adjust the walking belt (see HOW TO LOWER THE TREADMILL FOR USE on the sleeve to make sure that all parts are sheets of the Latch Assembly (72) to align the Latch Assembly with the bracket. Attach the Latch Bracket (71... 31 27 72 71 85 31 27 15. Note: It may be necessary to move the Frame back and forth to the bracket on the treadmill decals, remove the plastic. Identify the Latch Assembly (72). Tube Sleeve 72 74 Hole 14. 13. Lower the Frame (48) (see pages 23 and 24...


