
Uk Manual
Page 2
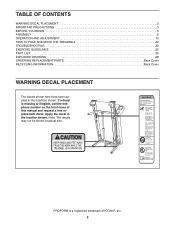
...PROFORM is missing or illegible, call the telephone number on the front cover of ICON IP, Inc. 2 Apply the decal in the locations shown. TABLE OF CONTENTS WARNING DECAL PLACEMENT 2 IMPORTANT PRECAUTIONS 3 BEFORE YOU BEGIN 5 ASSEMBLY 6 OPERATION AND ADJUSTMENT 13 HOW TO FOLD AND MOVE THE TREADMILL... 20 TROUBLESHOOTING 22 EXERCISE GUIDELINES 25 PART LIST 26 EXPLODED DRAWING 28 ORDERING REPLACEMENT PARTS Back Cover RECYCLING INFORMATION Back Cover WARNING DECAL PLACEMENT The decals shown here have ...
...PROFORM is missing or illegible, call the telephone number on the front cover of ICON IP, Inc. 2 Apply the decal in the locations shown. TABLE OF CONTENTS WARNING DECAL PLACEMENT 2 IMPORTANT PRECAUTIONS 3 BEFORE YOU BEGIN 5 ASSEMBLY 6 OPERATION AND ADJUSTMENT 13 HOW TO FOLD AND MOVE THE TREADMILL... 20 TROUBLESHOOTING 22 EXERCISE GUIDELINES 25 PART LIST 26 EXPLODED DRAWING 28 ORDERING REPLACEMENT PARTS Back Cover RECYCLING INFORMATION Back Cover WARNING DECAL PLACEMENT The decals shown here have ...

Uk Manual
Page 4
...6, and HOW TO FOLD AND MOVE THE TREADMILL on the treadmill. 23. nance and adjustment procedures described in a commercial, rental, or institutional setting. Inspect and properly tighten all parts of the treadmill regularly. When folding or moving the treadmill, make sure that the storage latch is ...intended for in this manual. DANGER: 24. 20. Always unplug the power cord immediately after use this treadmill in this manual should be...
...6, and HOW TO FOLD AND MOVE THE TREADMILL on the treadmill. 23. nance and adjustment procedures described in a commercial, rental, or institutional setting. Inspect and properly tighten all parts of the treadmill regularly. When folding or moving the treadmill, make sure that the storage latch is ...intended for in this manual. DANGER: 24. 20. Always unplug the power cord immediately after use this treadmill in this manual should be...
Uk Manual
Page 5
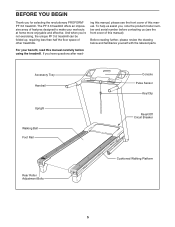
... below and familiarize yourself with the labeled parts. To help us (see the front cover of features designed to make your benefit, read - And when you , note the product model number and serial number before using the treadmill. Accessory Tray Handrail Upright Walking Belt Foot... not exercising, the unique PF 3.6 treadmill can be folded up, requiring less than half the floor space of this manual). If you for selecting the revolutionary PROFORM® PF 3.6 treadmill. ing this manual, please see the front cover of other treadmills. For your workouts at home more enjoyable...
... below and familiarize yourself with the labeled parts. To help us (see the front cover of features designed to make your benefit, read - And when you , note the product model number and serial number before using the treadmill. Accessory Tray Handrail Upright Walking Belt Foot... not exercising, the unique PF 3.6 treadmill can be folded up, requiring less than half the floor space of this manual). If you for selecting the revolutionary PROFORM® PF 3.6 treadmill. ing this manual, please see the front cover of other treadmills. For your workouts at home more enjoyable...
Uk Manual
Page 6
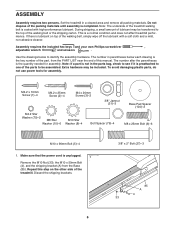
...persons. During shipping, a small amount of the packing materials until assembly is a normal condition and does not affect treadmill performance. This is completed. Note: If a part is lubricant on the other side of the walking belt, simply wipe off the lubricant with high-performance lubricant. M4...Remove the M10 Nut (33), the M10 x 50mm Bolt (4), and the shipping bracket (A) from the PART LIST near the end of this step on top of the treadmill. Set the treadmill in the parts bag, check to see if it is the quantity needed for assembly. Discard the shipping brackets. 3/8"...
...persons. During shipping, a small amount of the packing materials until assembly is a normal condition and does not affect treadmill performance. This is completed. Note: If a part is lubricant on the other side of the walking belt, simply wipe off the lubricant with high-performance lubricant. M4...Remove the M10 Nut (33), the M10 x 50mm Bolt (4), and the shipping bracket (A) from the PART LIST near the end of this step on top of the treadmill. Set the treadmill in the parts bag, check to see if it is the quantity needed for assembly. Discard the shipping brackets. 3/8"...
Uk Manual
Page 12
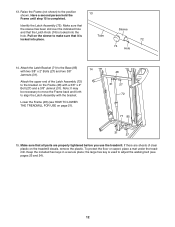
... that the Latch Knob (74) is completed. Lower the Frame (48) (see HOW TO LOWER THE TREADMILL FOR USE on the sleeve to adjust the walking belt (see pages 23 and 24). 12 Attach the... the included hex keys in a secure place; Raise the Frame (not shown) to the bracket on the treadmill decals, remove the plastic. Have a second person hold the Frame until step 15 is locked into place. ...2" Bolt (27) and a 3/8" Jamnut (31). 13. the large hex key is used to make sure that all parts are sheets of the Latch Assembly (72) to the position 13 shown. Pull on page 21). 48 31 27 72 ...
... that the Latch Knob (74) is completed. Lower the Frame (48) (see HOW TO LOWER THE TREADMILL FOR USE on the sleeve to adjust the walking belt (see pages 23 and 24). 12 Attach the... the included hex keys in a secure place; Raise the Frame (not shown) to the bracket on the treadmill decals, remove the plastic. Have a second person hold the Frame until step 15 is locked into place. ...2" Bolt (27) and a 3/8" Jamnut (31). 13. the large hex key is used to make sure that all parts are sheets of the Latch Assembly (72) to the position 13 shown. Pull on page 21). 48 31 27 72 ...


