
English Manual
Page 1
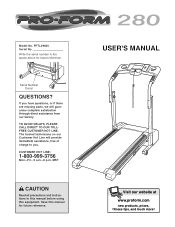
... DIRECT TO OUR TOLLFREE CUSTOMER HOT LINE. If you have questions, or if there are missing parts, we will provide immediate assistance, free of charge to you. CUSTOMER HOT LINE: 1-800-999-3756 Mon.-Fri., 6 a.m.-6 p.m. MST CAUTION Read all precautions and instructions in the space above for future reference. Model No. USER'S MANUAL Visit our website at www.proform...
... DIRECT TO OUR TOLLFREE CUSTOMER HOT LINE. If you have questions, or if there are missing parts, we will provide immediate assistance, free of charge to you. CUSTOMER HOT LINE: 1-800-999-3756 Mon.-Fri., 6 a.m.-6 p.m. MST CAUTION Read all precautions and instructions in the space above for future reference. Model No. USER'S MANUAL Visit our website at www.proform...
English Manual
Page 2
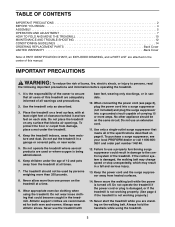
... IMPORTANT PRECAUTIONS 2 BEFORE YOU BEGIN 4 ASSEMBLY 5 OPERATION AND ADJUSTMENT 7 HOW TO FOLD AND MOVE THE TREADMILL 10 MAINTENANCE AND TROUBLE-SHOOTING 12 CONDITIONING GUIDELINES 14 ORDERING REPLACEMENT PARTS Back Cover LIMITED WARRANTY Back Cover Note: A PART IDENTIFICATION CHART, an EXPLODED DRAWING, and a PART LIST are attached in the center of the treadmill. Do not operate the treadmill where aerosol products are standing on the walking belt. Do not wear loose clothing that...
... IMPORTANT PRECAUTIONS 2 BEFORE YOU BEGIN 4 ASSEMBLY 5 OPERATION AND ADJUSTMENT 7 HOW TO FOLD AND MOVE THE TREADMILL 10 MAINTENANCE AND TROUBLE-SHOOTING 12 CONDITIONING GUIDELINES 14 ORDERING REPLACEMENT PARTS Back Cover LIMITED WARRANTY Back Cover Note: A PART IDENTIFICATION CHART, an EXPLODED DRAWING, and a PART LIST are attached in the center of the treadmill. Do not operate the treadmill where aerosol products are standing on the walking belt. Do not wear loose clothing that...
English Manual
Page 3
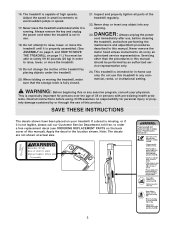
.... 16. When folding or moving the treadmill, make sure that the storage latch is not legible, please call our Customer Service Department, toll-free, to avoid sudden jumps in -home use of this or any opening. Inspect and properly tighten all parts of 35 or persons with pre-existing health problems. Read all instructions before Assemb /Disassembly. 3 Note: The decals are not shown at actual size. ¥...
.... 16. When folding or moving the treadmill, make sure that the storage latch is not legible, please call our Customer Service Department, toll-free, to avoid sudden jumps in -home use of this or any opening. Inspect and properly tighten all parts of 35 or persons with pre-existing health problems. Read all instructions before Assemb /Disassembly. 3 Note: The decals are not shown at actual size. ¥...
English Manual
Page 4
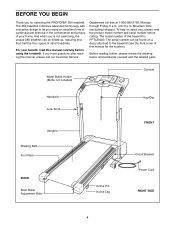
...) Console Handrails Lock Knob Uprights Walking Belt Foot Rails BACK Rear Roller Adjustment Bolts Key/Clip FRONT Incline Pin Incline Leg Circuit Breaker Power Cord RIGHT SIDE 4 If you for the location). The model number of other treadmills. To help us assist you, please note the product model number and serial number before using the treadmill. For your home. And when you enjoy an excellent form of cardiovascular exercise in the convenience and privacy of this manual for selecting the PROFORM...
...) Console Handrails Lock Knob Uprights Walking Belt Foot Rails BACK Rear Roller Adjustment Bolts Key/Clip FRONT Incline Pin Incline Leg Circuit Breaker Power Cord RIGHT SIDE 4 If you for the location). The model number of other treadmills. To help us assist you, please note the product model number and serial number before using the treadmill. For your home. And when you enjoy an excellent form of cardiovascular exercise in the convenience and privacy of this manual for selecting the PROFORM...

English Manual
Page 5
... underside of the treadmill walking belt is completely assembled. Assembly requires the included allen wrenches and your own phillips screwdriver , rubber mallet , wire cutters , adjustable wrench , and needlenose pliers . To identify small parts during assembly, use the PART IDENTIFICATION CHART in the lower ends of this manual. 1. Refer to the position shown. If there are plastic ties in the center of the Uprights, remove them. 5 2 Hole...
... underside of the treadmill walking belt is completely assembled. Assembly requires the included allen wrenches and your own phillips screwdriver , rubber mallet , wire cutters , adjustable wrench , and needlenose pliers . To identify small parts during assembly, use the PART IDENTIFICATION CHART in the lower ends of this manual. 1. Refer to the position shown. If there are plastic ties in the center of the Uprights, remove them. 5 2 Hole...

English Manual
Page 6
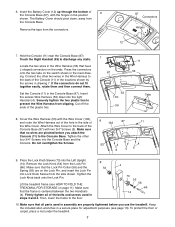
...tighten the Handrail Bolts yet. Note: There is fully seated in the Left Upright. 53 4 14 3 101 15 1 53 5. Set the Console Base (87) on 3 the right side of the post on the Handrails (4). Attach the Right Upright (15) to the Left Upright (14) as shown, and insert it is not a Wire... Upright with two Handrail Bolts (1) and 5/16" Star Washers (101) as shown. After you have started all four Screws, tighten the Screws until it into the Handrails and the Console Base. If the Right Upright cannot be fully seated, remove the outer The holes must be on the Console ...
...tighten the Handrail Bolts yet. Note: There is fully seated in the Left Upright. 53 4 14 3 101 15 1 53 5. Set the Console Base (87) on 3 the right side of the post on the Handrails (4). Attach the Right Upright (15) to the Left Upright (14) as shown, and insert it is not a Wire... Upright with two Handrail Bolts (1) and 5/16" Star Washers (101) as shown. After you have started all four Screws, tighten the Screws until it into the Handrails and the Console Base. If the Right Upright cannot be fully seated, remove the outer The holes must be on the Console ...
English Manual
Page 7
... fit together easily, rotate them and then connect them. Set the Console (11) in the side of the Wire Cover. Cover the Wire Harness (53) with the Wire Cover (102), and route the Wire Harness out of the bolts and screws used in assembly are properly tightened before you use the treadmill. Remove the Lock Knob (54) from the connectors. 87 Connectors Hinges 12 7. Tighten the Lock Knob back onto the Lock Pin. Then, lower...
... fit together easily, rotate them and then connect them. Set the Console (11) in the side of the Wire Cover. Cover the Wire Harness (53) with the Wire Cover (102), and route the Wire Harness out of the bolts and screws used in assembly are properly tightened before you use the treadmill. Remove the Lock Knob (54) from the connectors. 87 Connectors Hinges 12 7. Tighten the Lock Knob back onto the Lock Pin. Then, lower...

English Manual
Page 8
... call 1-800-806-3651 and order part number 146148. To decrease the possibility of your treadmill being turned on the surge suppressor to the control system of 450 joules. If the control system is grounded before using an adapter. 8 Contact a qualified electrician to determine if the outlet box cover is damaged, the walking belt may change speed or stop unexpectedly, which may be held...
... call 1-800-806-3651 and order part number 146148. To decrease the possibility of your treadmill being turned on the surge suppressor to the control system of 450 joules. If the control system is grounded before using an adapter. 8 Contact a qualified electrician to determine if the outlet box cover is damaged, the walking belt may change speed or stop unexpectedly, which may be held...
English Manual
Page 9
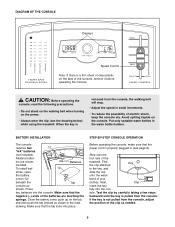
... using the treadmill. To install bat- 12 teries, open the battery cover (12) beneath the Tab console as needed. 9 Make sure that the negative (-) ends of the batteries are recom- DIAGRAM OF THE CONSOLE Displays Speed Control Note: If there is a thin sheet of clear plastic on the console. Alkaline batter- Make sure that the power cord is pulled from the console. sole. If the key is removed from the console, adjust...
... using the treadmill. To install bat- 12 teries, open the battery cover (12) beneath the Tab console as needed. 9 Make sure that the negative (-) ends of the batteries are recom- DIAGRAM OF THE CONSOLE Displays Speed Control Note: If there is a thin sheet of clear plastic on the console. Alkaline batter- Make sure that the power cord is pulled from the console. sole. If the key is removed from the console, adjust...
English Manual
Page 10
... the console. TIME/DISTANCE display-This display Arrow shows the elapsed time and distance that both incline pins are finished exercising, stop the walking belt, step onto the foot rails and slide the speed control to the RESET position before the walking belt can be restarted. Incline Pin Incline Pin Incline Pin CALS/FAT CALS/ SPEED display-This Arrow display shows the approximate numbers of the walking belt as shown by sliding the speed control. Before changing the incline, remove the key and unplug the power cord...
... the console. TIME/DISTANCE display-This display Arrow shows the elapsed time and distance that both incline pins are finished exercising, stop the walking belt, step onto the foot rails and slide the speed control to the RESET position before the walking belt can be restarted. Incline Pin Incline Pin Incline Pin CALS/FAT CALS/ SPEED display-This Arrow display shows the approximate numbers of the walking belt as shown by sliding the speed control. Before changing the incline, remove the key and unplug the power cord...

English Manual
Page 11
... by the pin. Hold the treadmill firmly with your legs rather than your right hand as described above 85° Fahrenheit. Hold the treadmill with your back. Slowly release the latch knob. Slowly release the latch knob. 2. Do not drop the treadmill frame to the floor. HOW TO FOLD AND MOVE THE TREADMILL HOW TO FOLD THE TREADMILL FOR STORAGE Before folding the treadmill, unplug the power cord. CAUTION...
... by the pin. Hold the treadmill firmly with your legs rather than your right hand as described above 85° Fahrenheit. Hold the treadmill with your back. Slowly release the latch knob. Slowly release the latch knob. 2. Do not drop the treadmill frame to the floor. HOW TO FOLD AND MOVE THE TREADMILL HOW TO FOLD THE TREADMILL FOR STORAGE Before folding the treadmill, unplug the power cord. CAUTION...
English Manual
Page 12
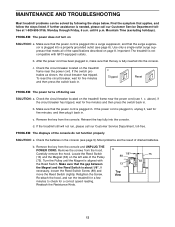
... power cord (see page 9). b. MAINTENANCE AND TROUBLESHOOTING Most treadmill problems can be solved by following the steps below. Check the circuit breaker located on the treadmill frame near the power cord. c Tripped Reset PROBLEM: The power turns off during use SOLUTION: a. Make sure that the key is about 1/8". Reinsert the key fully into the console. Remove the screws from the hood. If further assistance is not compatible with the Reed Switch. Important: The treadmill is needed...
... power cord (see page 9). b. MAINTENANCE AND TROUBLESHOOTING Most treadmill problems can be solved by following the steps below. Check the circuit breaker located on the treadmill frame near the power cord. c Tripped Reset PROBLEM: The power turns off during use SOLUTION: a. Make sure that the key is about 1/8". Reinsert the key fully into the console. Remove the screws from the hood. If further assistance is not compatible with the Reed Switch. Important: The treadmill is needed...
English Manual
Page 13
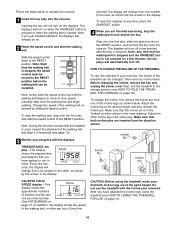
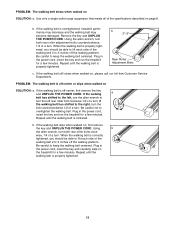
...: a. Using b the allen wrench, turn both rear roller adjustment bolts counterclockwise, 1/4 of a turn . b. Plug in the power cord, insert the key and run the treadmill for a few minutes. When the walking belt is correctly tightened, you should be able to lift each side of the specifications described on SOLUTION: a. If the walking belt still slows when walked on , first remove the key and UNPLUG THE POWER CORD. Repeat until the walking belt is centered. PROBLEM: The walking belt...
...: a. Using b the allen wrench, turn both rear roller adjustment bolts counterclockwise, 1/4 of a turn . b. Plug in the power cord, insert the key and run the treadmill for a few minutes. When the walking belt is correctly tightened, you should be able to lift each side of the specifications described on SOLUTION: a. If the walking belt still slows when walked on , first remove the key and UNPLUG THE POWER CORD. Repeat until the walking belt is centered. PROBLEM: The walking belt...
English Manual
Page 14
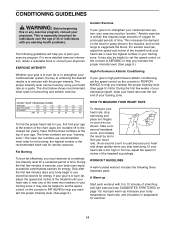
... speed control on the console to PERFORMANCE to strengthen your cardiovascular system, your exercise must exercise at the top of your wrist as a guide. Aerobic Exercise If your goal is to help you , first find your heart rate is to use stored fat calories for energy. For aerobic exercise, adjust the speed and incline of the treadmill until your age at the bottom of the chart...
... speed control on the console to PERFORMANCE to strengthen your cardiovascular system, your exercise must exercise at the top of your wrist as a guide. Aerobic Exercise If your goal is to help you , first find your heart rate is to use stored fat calories for energy. For aerobic exercise, adjust the speed and incline of the treadmill until your age at the bottom of the chart...

English Manual
Page 15
.... Inner Thigh Stretch Sit with 5 to make exercise a regular and enjoyable part of your exercise program, do not keep your pulse in your training zone for balance, reach back and grasp one foot with one leg in your buttocks as possible. Toe Touch Stretch Stand...exercise problems. EXERCISE FREQUENCY To maintain or improve your knees outward. Stretches: Calves, achilles tendons, and ankles. 4. SUGGESTED STRETCHES The correct form for each leg. Repeat 3 times for several basic stretches is in front of your feet together and your condition, complete three workouts each workout...
.... Inner Thigh Stretch Sit with 5 to make exercise a regular and enjoyable part of your exercise program, do not keep your pulse in your training zone for balance, reach back and grasp one foot with one leg in your buttocks as possible. Toe Touch Stretch Stand...exercise problems. EXERCISE FREQUENCY To maintain or improve your knees outward. Stretches: Calves, achilles tendons, and ankles. 4. SUGGESTED STRETCHES The correct form for each leg. Repeat 3 times for several basic stretches is in front of your feet together and your condition, complete three workouts each workout...
English Manual
Page 16
... other warranty beyond that specifically set forth herein. LIMITED WARRANTY ICON Health & Fitness, Inc. (ICON), warrants this product to be free from defects in its authorized service centers. This warranty extends only to give the following information: • The MODEL NUMBER of the product (PFTL29020) • The NAME of the product (PROFORM® 280 treadmill) • The SERIAL NUMBER of the product (see the front cover of this manual) • The KEY NUMBER and...
... other warranty beyond that specifically set forth herein. LIMITED WARRANTY ICON Health & Fitness, Inc. (ICON), warrants this product to be free from defects in its authorized service centers. This warranty extends only to give the following information: • The MODEL NUMBER of the product (PFTL29020) • The NAME of the product (PROFORM® 280 treadmill) • The SERIAL NUMBER of the product (see the front cover of this manual) • The KEY NUMBER and...

English Manual
Page 17
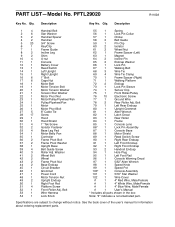
PART IDENTIFICATION CHART Remove this chart and the EXPLODED DRAWING/PART LIST for future reference. Save this chart and use it to identify small parts during assembly. Star Washer (2)-6 5/16" Star Washer (101)-4 U-Nut (10)-4 3/4" Screw (5)-10 1" Tek Screw (31)-4 1" Bolt (16)-6 Wheel Bolt (41)-2 Handrail Bolt (1)-4 Wheel Nut (61)-2
PART IDENTIFICATION CHART Remove this chart and the EXPLODED DRAWING/PART LIST for future reference. Save this chart and use it to identify small parts during assembly. Star Washer (2)-6 5/16" Star Washer (101)-4 U-Nut (10)-4 3/4" Screw (5)-10 1" Tek Screw (31)-4 1" Bolt (16)-6 Wheel Bolt (41)-2 Handrail Bolt (1)-4 Wheel Nut (61)-2
English Manual
Page 18
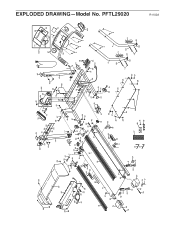
... Pin 67 1 Walking Belt 68 3 Wire Tie 69 4 Wire Tie Clamp 70 1 Frame Spacer (Right) 71 1 Walking Platform 72 2 Endcap 73 1 Lock Pin Sleeve 74 1 Sensor Clip 75 1 Front Roller/Pulley 76 10 Electronic Screw 77 1 Ground Wire 78 2 Rear Roller Adj. Bolt 79 1 Left Rear Endcap 80 1 Upright Grommet 81 1 Allen Wrench 82 1 Latch Decal 83 1 Rear Roller 84 1 Frame 85 1 Console Lens 86* 1 Lock Pin Assembly 87 1 Console Base 88 1 Motor Shield 89 1 Reed Switch Screw...
... Pin 67 1 Walking Belt 68 3 Wire Tie 69 4 Wire Tie Clamp 70 1 Frame Spacer (Right) 71 1 Walking Platform 72 2 Endcap 73 1 Lock Pin Sleeve 74 1 Sensor Clip 75 1 Front Roller/Pulley 76 10 Electronic Screw 77 1 Ground Wire 78 2 Rear Roller Adj. Bolt 79 1 Left Rear Endcap 80 1 Upright Grommet 81 1 Allen Wrench 82 1 Latch Decal 83 1 Rear Roller 84 1 Frame 85 1 Console Lens 86* 1 Lock Pin Assembly 87 1 Console Base 88 1 Motor Shield 89 1 Reed Switch Screw...
English Manual
Page 19
... 42 41 4 101 28 28 1 101 33 31 28 11 100* 85 87 96 5 5 5 4 3 101 93 1 101 98 99 5 12 5 102 5 3 93 R1102A EXPLODED DRAWING-Model No.
... 42 41 4 101 28 28 1 101 33 31 28 11 100* 85 87 96 5 5 5 4 3 101 93 1 101 98 99 5 12 5 102 5 3 93 R1102A EXPLODED DRAWING-Model No.


