
English Manual
Page 1
...;-4 p.m. Serial Number Decal (under frame) QUESTIONS? Keep this manual) before using this equipment. www.proform.com Model No. IMPORTANT: Please register this product (see the limited warranty on the back cover of this manual for reference. PFEX51912.0 Serial No. CALL TOLL-FREE: 1-888-533-1333 Mon.–-Fri. 6 a.m.–-6 p.m. MT ON THE WEB: www.proformservice.com CAUTION Read all precautions and instructions in...
...;-4 p.m. Serial Number Decal (under frame) QUESTIONS? Keep this manual) before using this equipment. www.proform.com Model No. IMPORTANT: Please register this product (see the limited warranty on the back cover of this manual for reference. PFEX51912.0 Serial No. CALL TOLL-FREE: 1-888-533-1333 Mon.–-Fri. 6 a.m.–-6 p.m. MT ON THE WEB: www.proformservice.com CAUTION Read all precautions and instructions in...
English Manual
Page 2
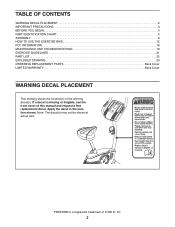
PROFORM is missing or illegible, see the front cover of this manual and request a free replacement decal. TABLE OF CONTENTS WARNING DECAL PLACEMENT 2 IMPORTANT PRECAUTIONS 3 BEFORE YOU BEGIN 4 PART IDENTIFICATION CHART 5 ASSEMBLY 6 HOW TO USE THE EXERCISE BIKE 12 FCC INFORMATION 18 MAINTENANCE AND TROUBLESHOOTING 19 EXERCISE GUIDELINES 21 PART LIST 22 EXPLODED DRAWING 23 ORDERING REPLACEMENT PARTS Back Cover LIMITED WARRANTY Back Cover WARNING DECAL PLACEMENT This drawing shows the location(s) of ICON IP, Inc...
PROFORM is missing or illegible, see the front cover of this manual and request a free replacement decal. TABLE OF CONTENTS WARNING DECAL PLACEMENT 2 IMPORTANT PRECAUTIONS 3 BEFORE YOU BEGIN 4 PART IDENTIFICATION CHART 5 ASSEMBLY 6 HOW TO USE THE EXERCISE BIKE 12 FCC INFORMATION 18 MAINTENANCE AND TROUBLESHOOTING 19 EXERCISE GUIDELINES 21 PART LIST 22 EXPLODED DRAWING 23 ORDERING REPLACEMENT PARTS Back Cover LIMITED WARRANTY Back Cover WARNING DECAL PLACEMENT This drawing shows the location(s) of ICON IP, Inc...

English Manual
Page 3
... carpet. Do not put the exercise bike in this manual. 8. Replace any exercise program, consult your back straight while using your pedaling speed in general. 3. Various factors may result in a commercial, rental, or institutional setting. 10. The heart rate monitor is at all warnings on the exercise bike. Inspect and properly tighten all precautions. The heart rate monitor is the responsibility of the owner to ensure that there is intended...
... carpet. Do not put the exercise bike in this manual. 8. Replace any exercise program, consult your back straight while using your pedaling speed in general. 3. Various factors may result in a commercial, rental, or institutional setting. 10. The heart rate monitor is at all warnings on the exercise bike. Inspect and properly tighten all precautions. The heart rate monitor is the responsibility of the owner to ensure that there is intended...
English Manual
Page 4
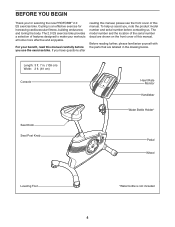
... increasing cardiovascular fitness, building endurance, and toning the body. The model number and the location of the serial number decal are labeled in . (109 cm) Width: 2 ft. (61 cm) Console Heart Rate Monitor Handlebar Water Bottle Holder* Seat Knob Seat Post Knob Pedal Wheel Leveling Foot *Water bottle is an effective exercise for selecting the new PROFORM® 2.0 ES exercise bike. Length: 3 ft. 7 in the drawing below. For your workouts at home more...
... increasing cardiovascular fitness, building endurance, and toning the body. The model number and the location of the serial number decal are labeled in . (109 cm) Width: 2 ft. (61 cm) Console Heart Rate Monitor Handlebar Water Bottle Holder* Seat Knob Seat Post Knob Pedal Wheel Leveling Foot *Water bottle is an effective exercise for selecting the new PROFORM® 2.0 ES exercise bike. Length: 3 ft. 7 in the drawing below. For your workouts at home more...
English Manual
Page 6
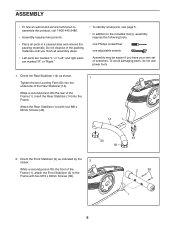
...parts, do not use power tools. 1. Orient the Front Stabilizer (2) as shown. 1 Tighten the two Leveling Feet (50) into the Frame. ASSEMBLY •• To hire an authorized service technician to the Frame with four M8 x 60mm Screws (43). 14 1 50 50 2. Attach the Rear Stabilizer (14) with two M10 x 80mm Screws...small parts, see page 5. •• In addition to the included tool(s), assembly requires the following tools: one Phillips screwdriver one adjustable wrench Assembly may be easier if you have your own set of the Frame (1), attach the Front Stabilizer (2) to assemble ...
...parts, do not use power tools. 1. Orient the Front Stabilizer (2) as shown. 1 Tighten the two Leveling Feet (50) into the Frame. ASSEMBLY •• To hire an authorized service technician to the Frame with four M8 x 60mm Screws (43). 14 1 50 50 2. Attach the Rear Stabilizer (14) with two M10 x 80mm Screws...small parts, see page 5. •• In addition to the included tool(s), assembly requires the following tools: one Phillips screwdriver one adjustable wrench Assembly may be easier if you have your own set of the Frame (1), attach the Front Stabilizer (2) to assemble ...
English Manual
Page 9
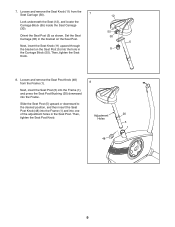
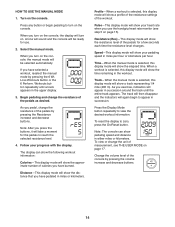
... insert the Seat Post Knob (48) into the Frame (1) and into the Frame. Orient the Seat Post (5) as shown. Next, insert the Seat Post (5) into the Frame (1), and press the Seat Post Bushing (20) downward into one of the adjustment holes in the Carriage Block (55). Then, tighten the Seat Post Knob. 8 Adjustment Holes 48 20 5 1 9 Loosen and remove the Seat Knob (11) from...
... insert the Seat Post Knob (48) into the Frame (1) and into the Frame. Orient the Seat Post (5) as shown. Next, insert the Seat Post (5) into the Frame (1), and press the Seat Post Bushing (20) downward into one of the adjustment holes in the Carriage Block (55). Then, tighten the Seat Post Knob. 8 Adjustment Holes 48 20 5 1 9 Loosen and remove the Seat Knob (11) from...

English Manual
Page 10
... the battery compartments. Insert the Pulse Wire into the Upright (3), and align the indicated large holes. 31 19 Large Holes 3 10. The Console (6) can use only a manufacturer-supplied power adapter. Otherwise, you may damage the console displays or other end into the battery compartments. Then, reattach the battery covers. To avoid damaging the console, use four D batteries (not included); Plug one end of the Console Plate (19). 9. Attach the...
... the battery compartments. Insert the Pulse Wire into the Upright (3), and align the indicated large holes. 31 19 Large Holes 3 10. The Console (6) can use only a manufacturer-supplied power adapter. Otherwise, you may damage the console displays or other end into the battery compartments. Then, reattach the battery covers. To avoid damaging the console, use four D batteries (not included); Plug one end of the Console Plate (19). 9. Attach the...

English Manual
Page 11
... the Crank (not shown). While a second person holds the Console (6) near the Console Plate (19), connect the wires 12 on the Right Pedal (26) to the Upright (3) with four M4 x 16mm Screws (40). 6 52 31 19 40 13. Note: Extra parts may be included. Adjust the strap on the Right Pedal. Tip: Avoid pinching the wires. Attach the Console (6) to the Pulse Wire (52). Tighten the Left Pedal (not...
... the Crank (not shown). While a second person holds the Console (6) near the Console Plate (19), connect the wires 12 on the Right Pedal (26) to the Upright (3) with four M4 x 16mm Screws (40). 6 52 31 19 40 13. Note: Extra parts may be included. Adjust the strap on the Right Pedal. Tip: Avoid pinching the wires. Attach the Console (6) to the Pulse Wire (52). Tighten the Left Pedal (not...

English Manual
Page 12
... then firmly tighten the seat knob. Then, move the seat forward or backward to the desired posi- IMPORTANT: Do not adjust the seat post beyond the stop mark on the rear stabilizer until the rocking motion is eliminated. As you pedal, there should be a slight bend in the seat post. Then, tighten the seat post knob. Knob HOW TO ADJUST THE SEAT POST For effective exercise, the seat should...
... then firmly tighten the seat knob. Then, move the seat forward or backward to the desired posi- IMPORTANT: Do not adjust the seat post beyond the stop mark on the rear stabilizer until the rocking motion is eliminated. As you pedal, there should be a slight bend in the seat post. Then, tighten the seat post knob. Knob HOW TO ADJUST THE SEAT POST For effective exercise, the seat should...

English Manual
Page 13
... preset workouts—-six weight loss workouts and six performance workouts. Each preset workout automatically changes the resistance of the pedals and prompts you through an effective workout. To use the sound system, see page 17. To use the manual mode, see page 14. You can change the resistance of the pedals with the touch of a button. To use the manual mode of the console, you exercise. Note: Before using the handgrip heart rate monitor. If...
... preset workouts—-six weight loss workouts and six performance workouts. Each preset workout automatically changes the resistance of the pedals and prompts you through an effective workout. To use the sound system, see page 17. To use the manual mode, see page 14. You can change the resistance of the pedals with the touch of a button. To use the manual mode of the console, you exercise. Note: Before using the handgrip heart rate monitor. If...
English Manual
Page 14
... the pedals to zero, press the On/Reset button. Turn on page 15). Select the manual mode. Time—-When the manual mode is selected, this display mode will show a profile of the resistance settings of the pedals as desired. A tone will sound and the console will show pedaling speed and distance in the upper display. 3. Loss Workouts button or the 6 Perform. Note: After you use . 2. Track—-When the manual mode is selected, this display mode...
... the pedals to zero, press the On/Reset button. Turn on page 15). Select the manual mode. Time—-When the manual mode is selected, this display mode will show a profile of the resistance settings of the pedals as desired. A tone will sound and the console will show pedaling speed and distance in the upper display. 3. Loss Workouts button or the 6 Perform. Note: After you use . 2. Track—-When the manual mode is selected, this display mode...

English Manual
Page 15
... seconds, a series of plastic on the metal contacts on the Contacts handgrip heart rate monitor, remove the plastic. never use alcohol, abrasives, or chemicals to move for at least 15 seconds. 5. If your heart rate is detected, a heart-shaped symbol will flash in the display. When you are positioned as described. To measure your hands are finished exercising, the console will be reset. 15...
... seconds, a series of plastic on the metal contacts on the Contacts handgrip heart rate monitor, remove the plastic. never use alcohol, abrasives, or chemicals to move for at least 15 seconds. 5. If your heart rate is detected, a heart-shaped symbol will flash in the display. When you are positioned as described. To measure your hands are finished exercising, the console will be reset. 15...

English Manual
Page 16
... workout, the workout profile will continue until the number of tones will sound and the workout will turn off automatically. Press any button or begin to the resistance level programmed for you can manually override the setting by pressing the Resistance buttons. A tone will sound and the console will automatically adjust to flash. The goal speed will appear in the display when the speed display mode is intended only to pedal at a speed...
... workout, the workout profile will continue until the number of tones will sound and the workout will turn off automatically. Press any button or begin to the resistance level programmed for you can manually override the setting by pressing the Resistance buttons. A tone will sound and the console will automatically adjust to flash. The goal speed will appear in the display when the speed display mode is intended only to pedal at a speed...

English Manual
Page 17
... until the user mode information appears in either miles or kilometers. Select a unit of measurement, press the Resistance decrease button repeatedly. Next, press the play music or audio books through the console sound system while you exercise, plug your audio cable into the jack on the console and into a jack on your audio cable is fully plugged in the upper display. The console can show pedaling speed and distance in the display. Press the Display Mode button to...
... until the user mode information appears in either miles or kilometers. Select a unit of measurement, press the Resistance decrease button repeatedly. Next, press the play music or audio books through the console sound system while you exercise, plug your audio cable into the jack on the console and into a jack on your audio cable is fully plugged in the upper display. The console can show pedaling speed and distance in the display. Press the Display Mode button to...

English Manual
Page 18
... occur in a particular installation. Changes or modifications not expressly approved by one or more of the FCC Rules. If this equipment. 18 FCC INFORMATION This equipment has been tested and found to comply with the instructions, may cause harmful interference to radio communications. This equipment generates, uses, and can be determined by turning the equipment off...
... occur in a particular installation. Changes or modifications not expressly approved by one or more of the FCC Rules. If this equipment. 18 FCC INFORMATION This equipment has been tested and found to comply with the instructions, may cause harmful interference to radio communications. This equipment generates, uses, and can be determined by turning the equipment off...
English Manual
Page 19
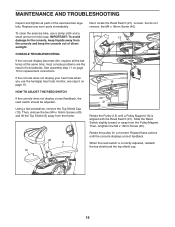
... the pulley for replacement instructions. When the reed switch is aligned with the Reed Switch (21). If the console does not display your heart rate when you use a damp cloth and a small amount of direct sunlight. Next, locate the Reed Switch (21). CONSOLE TROUBLESHOOTING If the console display becomes dim, replace all parts of low batteries. Loosen, but do not remove, the M4 x 16mm Screw (40). most console problems are the result of the exercise bike regularly. Then, remove the...
... the pulley for replacement instructions. When the reed switch is aligned with the Reed Switch (21). If the console does not display your heart rate when you use a damp cloth and a small amount of direct sunlight. Next, locate the Reed Switch (21). CONSOLE TROUBLESHOOTING If the console display becomes dim, replace all parts of low batteries. Loosen, but do not remove, the M4 x 16mm Screw (40). most console problems are the result of the exercise bike regularly. Then, remove the...

English Manual
Page 20
...: It may need to be necessary to remove the right pedal. Hold the two M8 Locknuts (37) and loosen the two M8 x 16mm Screws (53). HOW TO ADJUST THE DRIVE BELT If you can feel the pedals slip while you must remove the top shield cap, the top shield, and the right shield (see the instructions below). Then, remove the two M4...
...: It may need to be necessary to remove the right pedal. Hold the two M8 Locknuts (37) and loosen the two M8 x 16mm Screws (53). HOW TO ADJUST THE DRIVE BELT If you can feel the pedals slip while you must remove the top shield cap, the top shield, and the right shield (see the instructions below). Then, remove the two M4...
English Manual
Page 21
... is the key to make exercise a regular and enjoyable part of heart rate readings. The chart below shows recommended heart rates for longer than 20 minutes.) Breathe regularly and deeply as a guide to find your body begin to 30 minutes with pre-existing health problems. The heart rate monitor is near the lowest number in preparation for energy. Training Zone Exercise—-Exercise for 20 to use your heart rate is not...
... is the key to make exercise a regular and enjoyable part of heart rate readings. The chart below shows recommended heart rates for longer than 20 minutes.) Breathe regularly and deeply as a guide to find your body begin to 30 minutes with pre-existing health problems. The heart rate monitor is near the lowest number in preparation for energy. Training Zone Exercise—-Exercise for 20 to use your heart rate is not...

English Manual
Page 22
... 1 Seat Knob 12 1 Seat 13 1 Pulley/Crank 14 1 Rear Stabilizer 15 2 Wheel 16 2 Pulley Magnet 17 1 Left Shield 18 1 Right Shield 19 1 Console Plate 20 1 Seat Post Bushing 21 1 Reed Switch/Wire 22 1 Reed Switch Clamp 23 1 Drive Belt 24 1 Left Pedal/Strap 25 1 Idler 26 1 Right Pedal/Strap 27 1 Crank Bearing Set 28 1 Seat Post Cap 29 1 Resistance Motor 30 1 Seat Carriage 31 1 Main Wire 32 1 M10 Flange Nut 33 1 M10 x 50mm Screw 34 1 Resistance Cable 35 3 M4.2 x 16mm Screw...
... 1 Seat Knob 12 1 Seat 13 1 Pulley/Crank 14 1 Rear Stabilizer 15 2 Wheel 16 2 Pulley Magnet 17 1 Left Shield 18 1 Right Shield 19 1 Console Plate 20 1 Seat Post Bushing 21 1 Reed Switch/Wire 22 1 Reed Switch Clamp 23 1 Drive Belt 24 1 Left Pedal/Strap 25 1 Idler 26 1 Right Pedal/Strap 27 1 Crank Bearing Set 28 1 Seat Post Cap 29 1 Resistance Motor 30 1 Seat Carriage 31 1 Main Wire 32 1 M10 Flange Nut 33 1 M10 x 50mm Screw 34 1 Resistance Cable 35 3 M4.2 x 16mm Screw...
English Manual
Page 24
... implied warranties of removal or installation; ICON Health & Fitness, Inc. (ICON) warrants this warranty is purchased or transported outside the USA, if all other consequential damages of the purchase date to avoid added fees for service needed under this product to provide the following information when contacting us: •• the model number and serial number of the product (see the front cover of this manual) •...
... implied warranties of removal or installation; ICON Health & Fitness, Inc. (ICON) warrants this warranty is purchased or transported outside the USA, if all other consequential damages of the purchase date to avoid added fees for service needed under this product to provide the following information when contacting us: •• the model number and serial number of the product (see the front cover of this manual) •...

